
This repo contains a tensorflow project for the Behavioral Cloning Project, as you can see in the following video we succesfully complete the task of copy the behaviour of a human driver on a track.
Click link:
or see the video.mp4
So we create a pilotnet module with the following module structure:
pilotnet/
├── configs
│   ├── data-augmentation.yml
│   ├── run.yml
│   └── train.yml
├── data_augmentation.py
├── data_pipelines.py
├── estimator.py
├── __init__.py
├── model.py
├── run.py
├── scripts
│   ├── data-augmentation.sh
│   ├── get-training-data.sh
│   └── train.sh
├── test
│   └── test_fire_dicto.py
├── train.py
└── utils.py

3 directories, 15 files
Let us navigate through that module, the first folder inside the pilotnet module is the configs files for each of the steps in the machine learning workflow:
- Data-augmentations.yml: Contains the parameters for the data augmentation pipeline. I use imgaug library for helping to create various folder with various degrees (ranging from simple to very agressive) to data augmentation.
- run.yml: Contains the parameters for the module run.py that contains the logic for car that is being driven by a Relational Convulational Network.
- train.yml: Since I had to do a lot of manual hyper-parameter search I created this train configs for easyness of searching of hyperparameters.
For this project we use the Tensorflow Estimator API, the reason over Keras was because I wanted to have a reason to experiment with the distribuited training techniques provided by Tensorflow.
Most of the modules can be accessed by python3 -m pilotnet.module, they also provide a -h help guide. Modules:
- data_augmentation.py module thet contains the data augmentations pipeline per image.
- data_pipelines.py module that contains the tf.data objects created by input and serving inputs.
- estimator.py module that contains the estimator used by the tf training and eval loop for the model defined at model.py.
- model.py Implementation of the relational convolutional net.
- run.py the module that initates the loop for the web server application.
- train.py The module for training the estimator object defined at estimator.py.
- utils.py collection of utility function for the module.
Finally there is a script folder that contains three bash executable files that:
-
data-augmentation.sh: A wrapper over the python module data_augmentation.py that creates 9 data_idx folders that have augmented images. (there are 9 different folders with various degrees of augmnetation).
-
get-training-data.sh: Downloads, and unzip the raw data and creates a data folder with the unaugmented data images.
-
train.sh: A bash file for training, you can modify to select which data folder to read (in this project we use data_3 the folder with medium augmentation).
Finally at the root of the project we provide the following tree folder:
├── data
│   ├── data
│   │   ├── driving_log.csv
│   │   └── IMG [24108 entries exceeds filelimit, not opening dir]
│   ├── data_0
│   │   ├── driving_log.csv
│   │   └── IMG [24108 entries exceeds filelimit, not opening dir]
│   ├── data_1
│   │   ├── driving_log.csv
│   │   └── IMG [24108 entries exceeds filelimit, not opening dir]
│   ├── data_2
│   │   ├── driving_log.csv
│   │   └── IMG [24108 entries exceeds filelimit, not opening dir]
│   ├── data_3
│   │   ├── driving_log.csv
│   │   └── IMG [24108 entries exceeds filelimit, not opening dir]
│   ├── data_4
│   │   ├── driving_log.csv
│   │   └── IMG [24108 entries exceeds filelimit, not opening dir]
│   ├── data_5
│   │   ├── driving_log.csv
│   │   └── IMG [24108 entries exceeds filelimit, not opening dir]
│   ├── data_6
│   │   ├── driving_log.csv
│   │   └── IMG [24108 entries exceeds filelimit, not opening dir]
│   ├── data_7
│   │   ├── driving_log.csv
│   │   └── IMG [24108 entries exceeds filelimit, not opening dir]
│   ├── data_8
│   │   ├── driving_log.csv
│   │   └── IMG [24108 entries exceeds filelimit, not opening dir]
│   ├── data_9
│   │   ├── driving_log.csv
│   │   └── IMG [24108 entries exceeds filelimit, not opening dir]
│   └── dataset.zip
├── docker-compose.yml
├── Dockerfile
├── drive.py -> pilotnet/run.py
├── enviroment.yml
├── LICENSE
├── model.h5
├── model.py -> pilotnet/model.py
├── models
│   └── pilotnet_rel [20 entries exceeds filelimit, not opening dir]
├── notebooks
│   └── Data_Exploration.ipynb
├── pilotnet
│   ├── configs
│   │   ├── data-augmentation.yml
│   │   ├── run.yml
│   │   └── train.yml
│   ├── data_augmentation.py
│   ├── data_pipelines.py
│   ├── estimator.py
│   ├── __init__.py
│   ├── model.py
│   ├── run.py
│   ├── scripts
│   │   ├── data-augmentation.sh
│   │   ├── get-training-data.sh
│   │   └── train.sh
│   ├── test
│   │   └── test_fire_dicto.py
│   ├── train.py
│   └── utils.py
├── README.md
└── requirements.txt
The root folder contains a docker-compose.yml that (if you have nvidia-docker) should give you a docker container (please see the services in docker-container) that has all the requirements you need, to build the services:
$ docker-compose buildShould create all the docker images necesary to run the project.
Let us then jump to the ml-workflow
To get the raw data and unzip:
$ bash pilotnet/scripts/get-training-data.shThe raw data contains images like this:
raw data:

To do the augmentation you can do:
$ docker-compose up augment-imagesYou will get data augmented folder such as:
Augmentation from slighty to heavy
Image 1:

Image 2:

Image 3:

Image 4:

Image 5:

Image 6:

Image 7:

Image 8:

Image 9:

Having this kind of data-augmentation provides us a good-way to generalize.
Technical notes: We use parallelism to make data-augmentation fast. We use dask for it.
Having the all the data on the data folder, we decide to experiment with different model arquitectures. At the end, I decided to implement a relational convolutional network based on the work of DeepMind. Paper
The implementation can be found in model.py
    net = images

    net = tf.layers.conv2d(net, 24, [5, 5], strides = 2, **conv_args)
    net = tf.layers.batch_normalization(net, training=training)
    net = tf.nn.relu(net)
    net = tf.layers.dropout(net, rate = params.dropout, training=training)

    net = tf.layers.conv2d(net, 36, [5, 5], strides = 2, **conv_args)
    net = tf.layers.batch_normalization(net, training=training)
    net = tf.nn.relu(net)
    net = tf.layers.dropout(net, rate = params.dropout, training=training)

    net = tf.layers.conv2d(net, 48, [5, 5], strides = 2, **conv_args)
    net = tf.layers.batch_normalization(net, training=training)
    net = tf.nn.relu(net)
    net = tf.layers.dropout(net, rate = params.dropout, training=training)

    net = tf.layers.conv2d(net, 64, [3, 3], **conv_args)
    net = tf.layers.batch_normalization(net, training=training)
    net = tf.nn.relu(net)
    net = tf.layers.dropout(net, rate = params.dropout, training=training)

    net = tf.layers.conv2d(net, 64, [3, 3], **conv_args)
    net = tf.layers.batch_normalization(net, training=training)
    net = tf.nn.relu(net)
    net = tf.layers.dropout(net, rate = params.dropout, training=training)

    net = add_coordinates(net)

    n_objects = np.prod(net.shape[1:-1])
    n_channels = net.shape[-1]

    net = tf.reshape(net, [-1, n_channels])

    net = tf.layers.dense(net, 200, **conv_args)
    net = tf.layers.batch_normalization(net, training=training)
    net = tf.nn.relu(net)
    net = tf.layers.dropout(net, rate = params.dropout, training=training)

    # aggregate relations
    n_channels = net.shape[1]
    net = tf.reshape(net, [-1, n_objects, n_channels])
    net = tf.reduce_max(net, axis = 1)

    # calculate global attribute
net = tf.layers.dense(net, params.nbins)To train the model we decide to use a Power Sign Optimizer found in the Neural Optimizer Search with RL with an amortized learning rate with initial value: 0.000001
We treat this problem as a classification problem in which we break the steering interval into 51 bins, and we use then the cross entropy loss.
Since is a classification problem, we make calculations on the Top1/Top5 accuracy:

The losses can be seen:

We export the model (we include a trained model in models) and we finally can do inference with this model
to train:
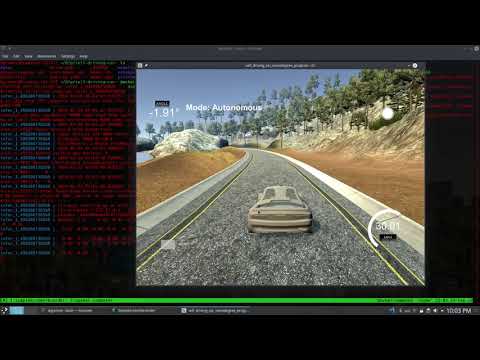
docker-compose up trainFinally with a model trained you can do inference on the simulator. To do that, you just need to run:
$ docker-compose up inferEnjoy your autonomous model provided by Davidnet (David Cardozo)
Thanks to @cgarciae (Cristian Garcia) for being my mentor!