


Customer churn, when a customer ends their relationship with a business, is one of the most basic factors in determining the revenue of a business. You need to know which of your customers are loyal and which are at risk of churning, and you need to know the factors that affect these decisions from a customer perspective.
Customer churn is likely more costly in telecommunication sector than in other industries based on customers’ attitudes toward the sector, but companies aware of this fact can use data analytics in an effort to specifically bring down churn rates by identifying and relieving customer pain points, as well as understanding customer behavior on a deeper level.
The project was developed in 4 steps:
- Create a project and AutoAI instance
- Set up your AutoAI environment and generate pipelines
- Save AutoAI model
- Deploy and test the model
AutoAI is a capability that automates machine learning tasks to ease the tasks of data scientists. It automatically prepares your data for modeling, chooses the best algorithm for your problem, and creates pipelines for the trained models, and it can be run in public clouds and in private clouds, including IBM Cloud Pak® for Data.
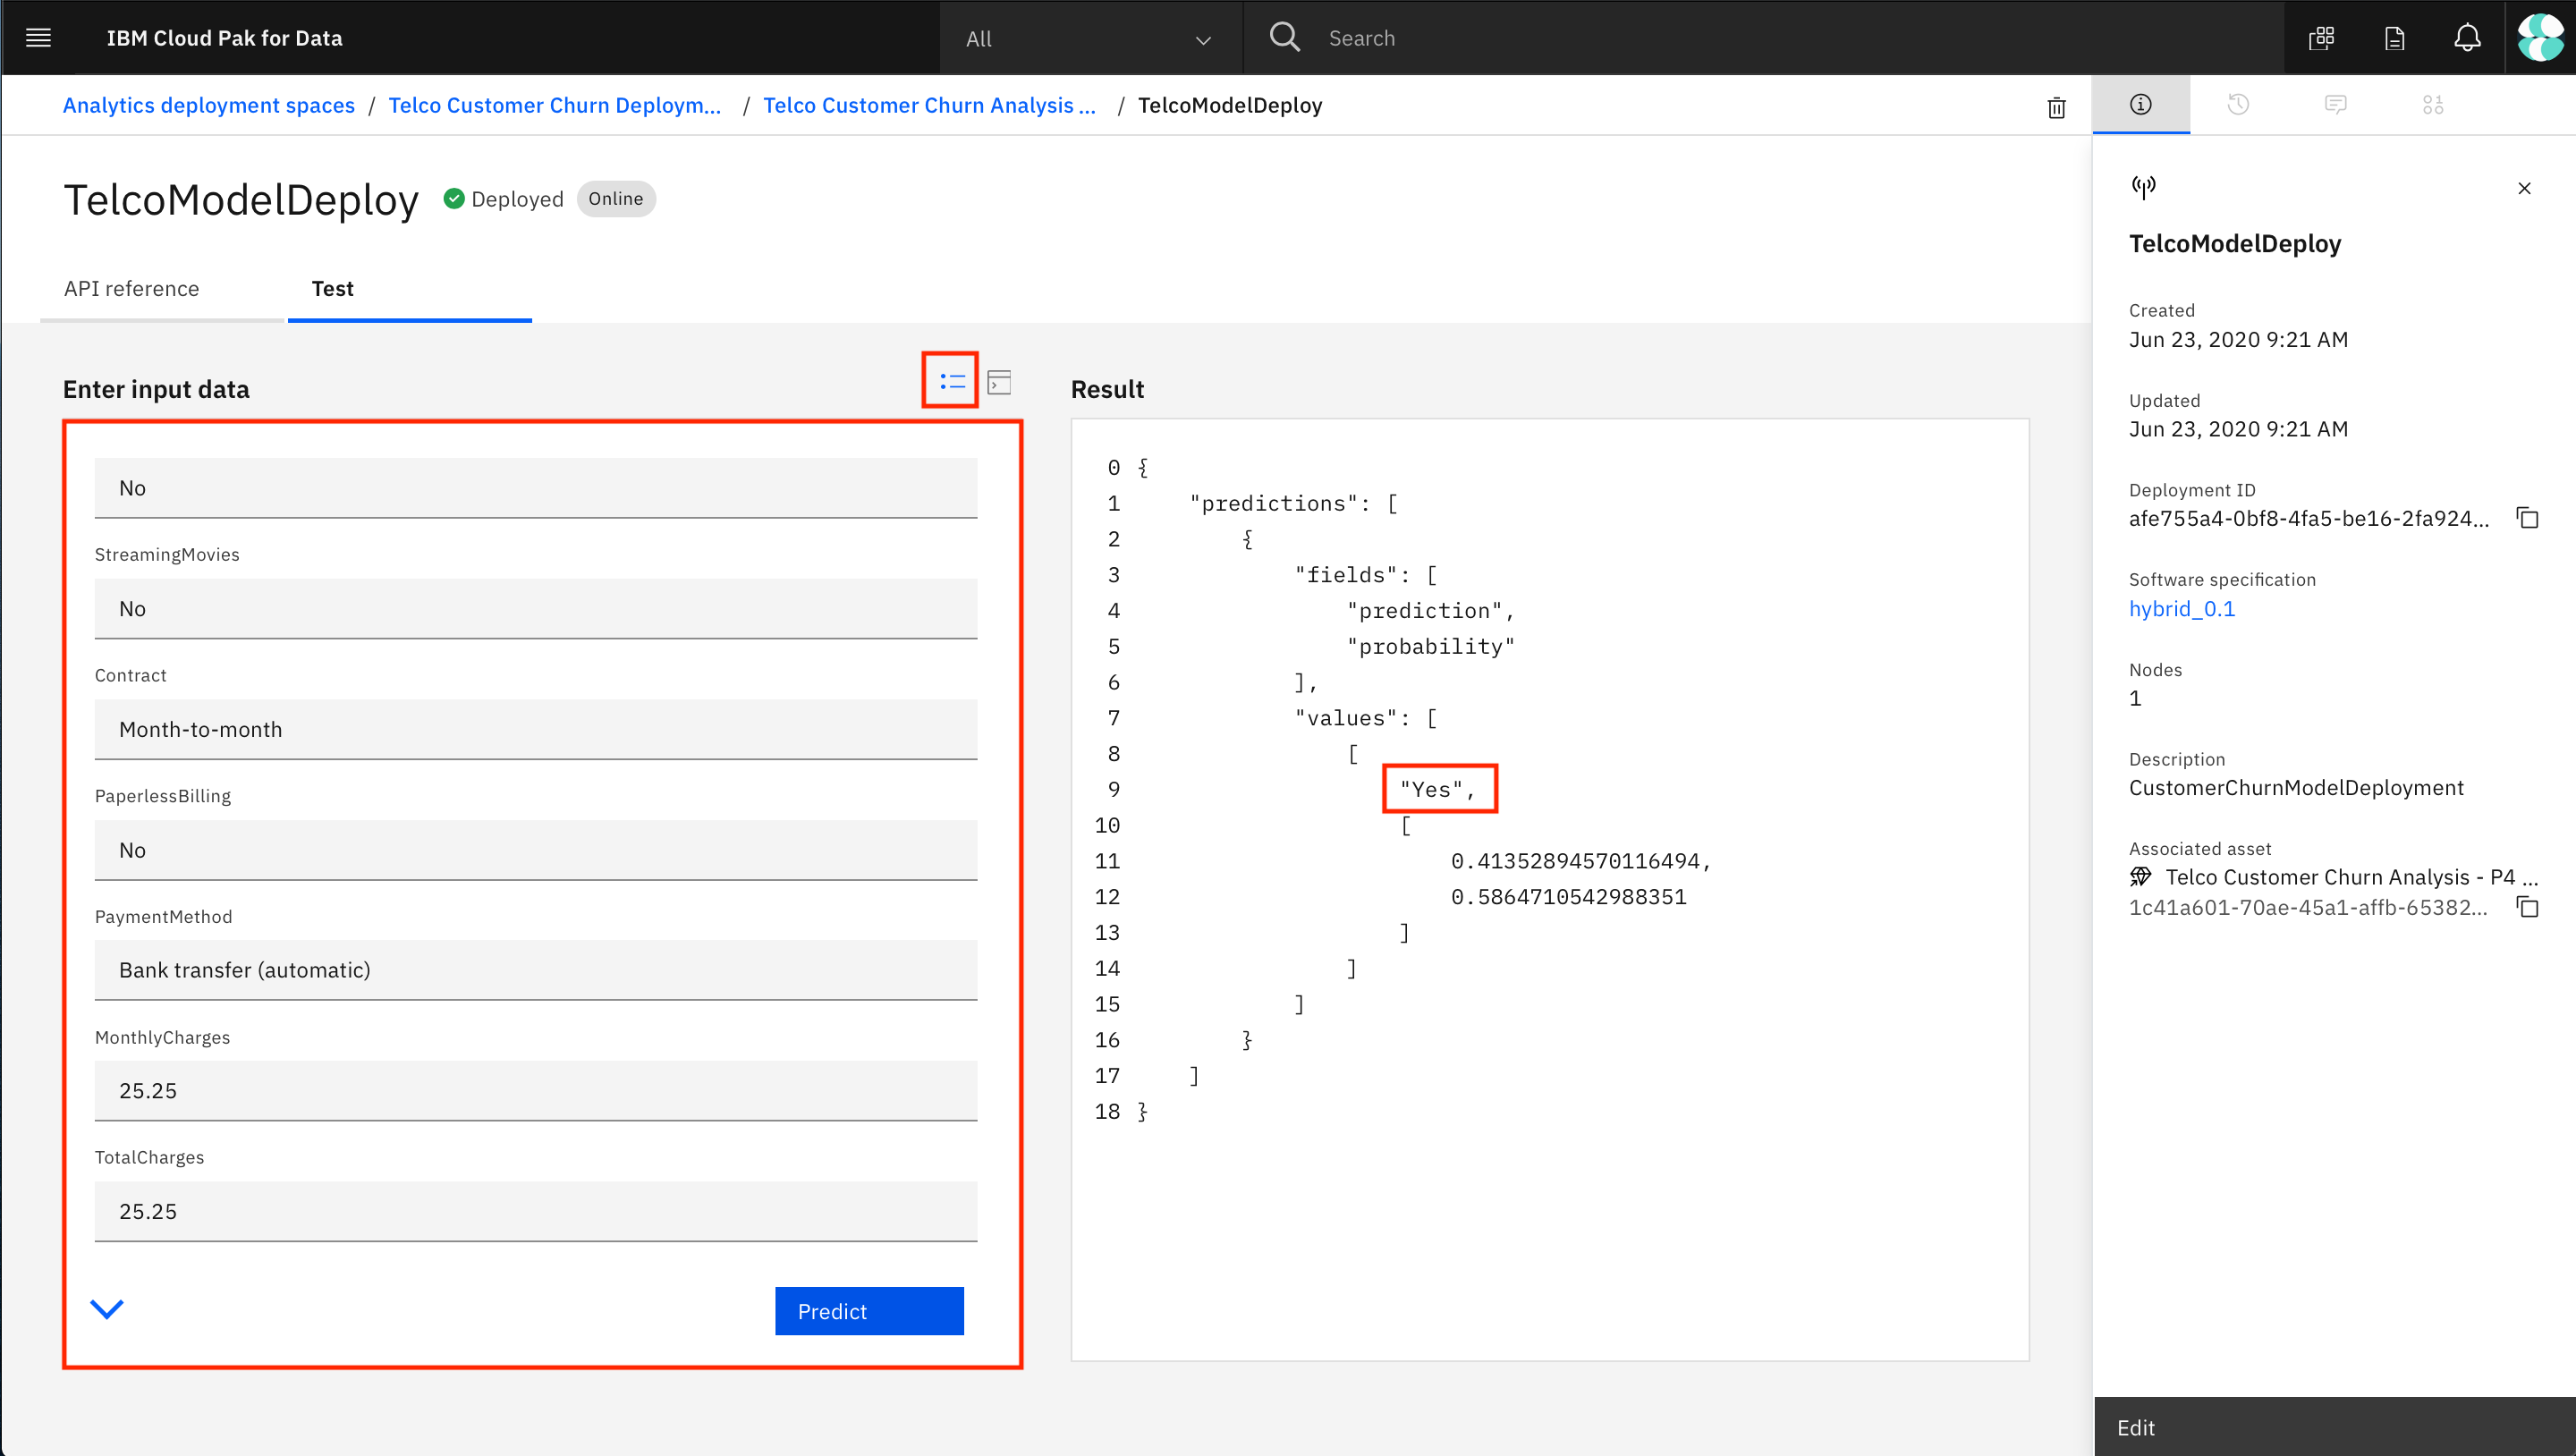
You can test the model by giving values directly in graphical interface.
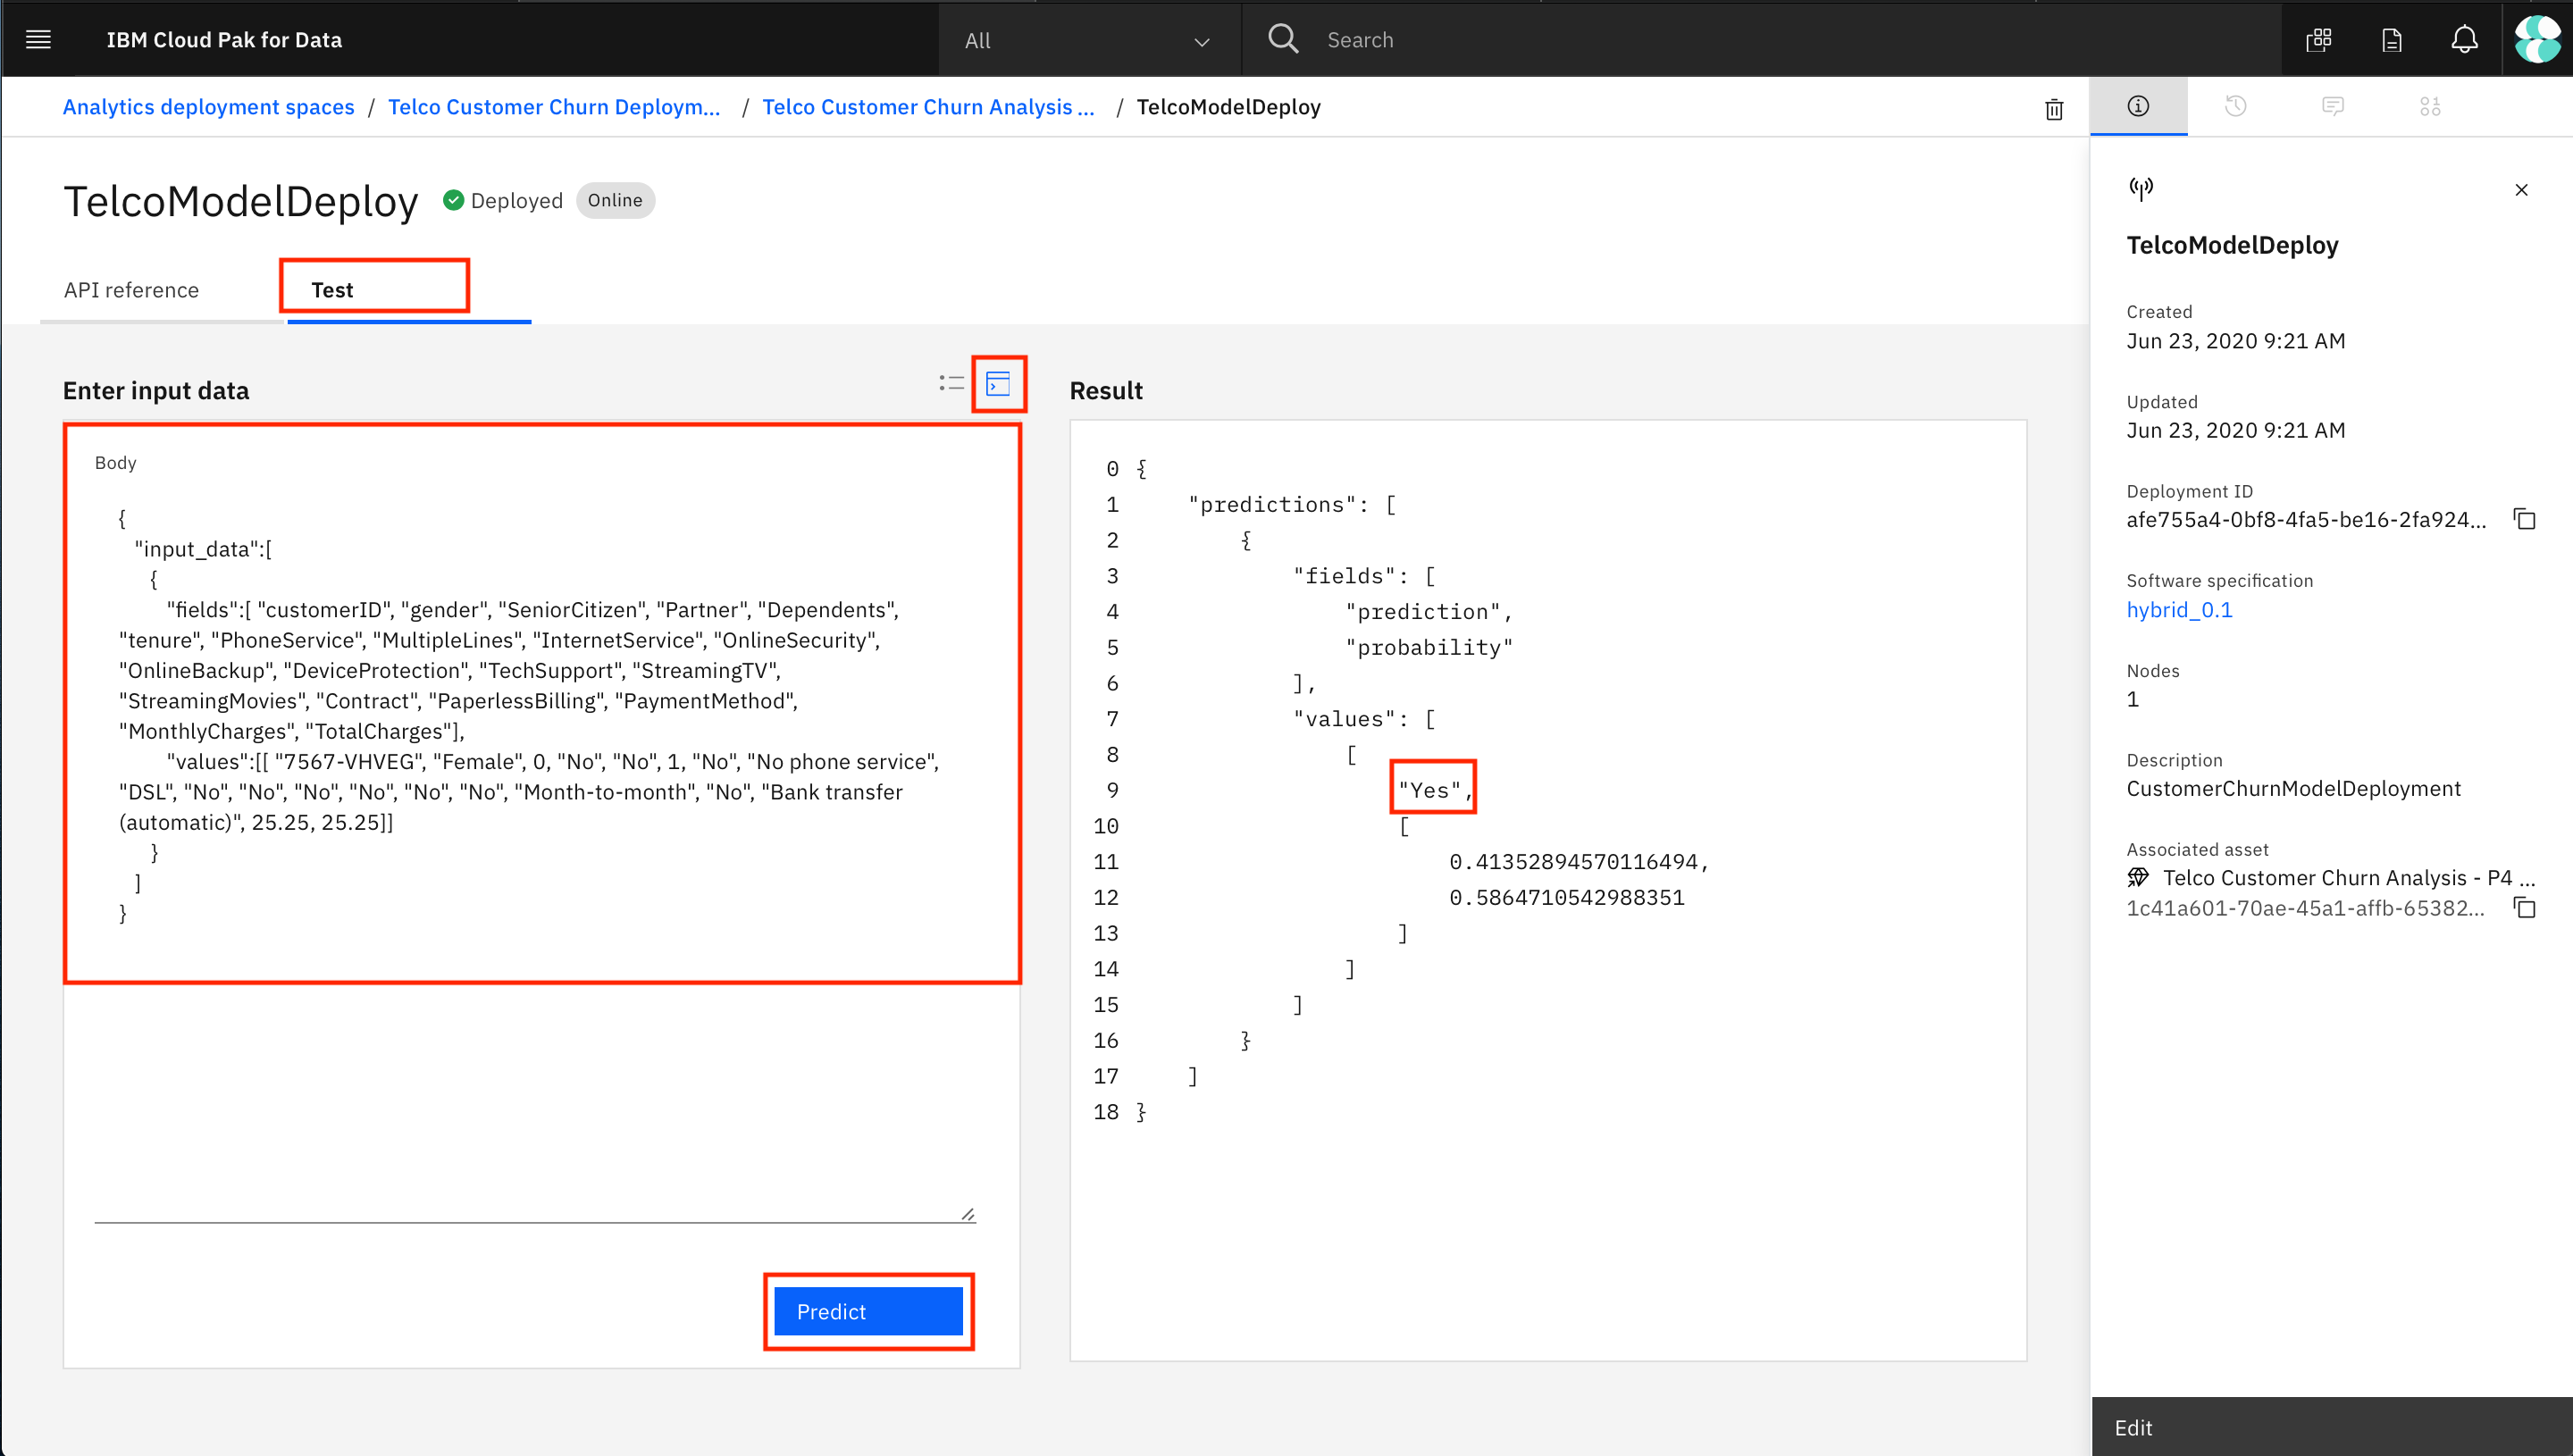
Or you can also provide values in JSON format
Here is the Table Of Contents for this project.
To create this project, follow the following instructions:
-
Create all the required services in IBM Cloud:
a. Create a Watson studio instance b. Create a Cloud object storage instance c. Create Machine Learning instance
-
Create an IBM cloud pak for data project.
-
Download the Telco-Customer-Churn.csv dataset.
-
Upload the dataset to the analytics project by clicking on Browse and selecting the downloaded file.
-
Set up your AutoAI environment and generate pipelines a. To start the AutoAI experience, click Add to Project + from the top and select AutoAI experiment. b. Name your AutoAI experiment asset and leave the default compute configuration option listed in the drop-down menu, then click Create. c. To configure the experiment, we must give it the dataset to use. Click on the Select from project option. d. In the dialog, select the Telco-Customer-Churn.csv dataset that was uploaded in the previous step, then click Select asset.
-
Prediction: a. Once the dataset is read in, we need to indicate what we want the model to predict. Under the Select prediction column, find and click on the Churn row. b. AutoAI will set up defaults values for the experiment based on the dataset. This includes the type of model to build, the metrics to optimize against, the test/train split, etc. You could view/change these values under Experiment settings. For now, we will accept the defaults and click the Run experiment button. c. The experiment can take several minutes to run. Upon completion, you will see a message that the pipelines have been created.
-
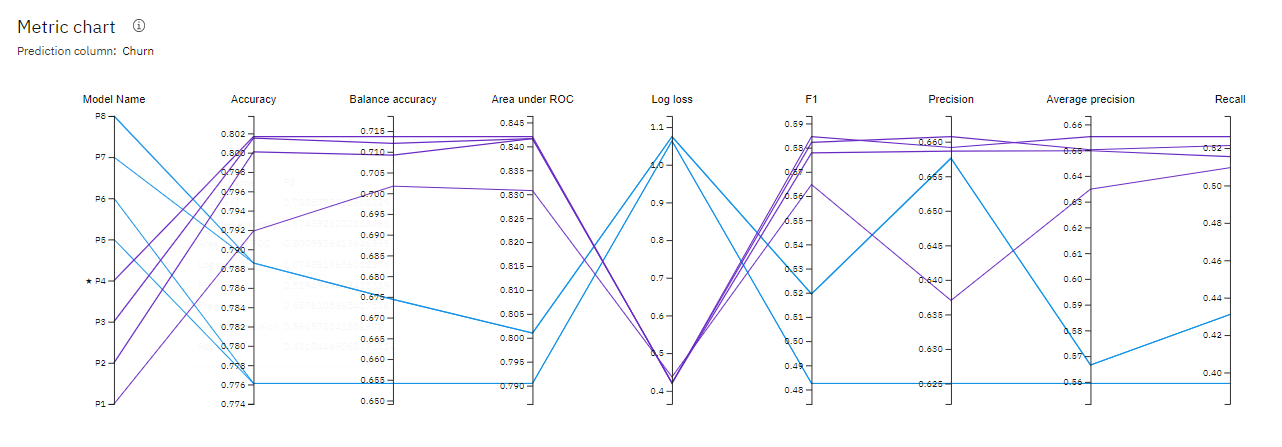
Save AutoAI model a. Scroll down to see the Pipeline leaderboard. The top-performing pipeline is in the first rank. b. The next step is to select the model that gives the best result by looking at the metrics. In this case, Pipeline 4 gave the best result with the metric “Accuracy (optimized)”. You can view the detailed results by clicking the corresponding pipeline from the leaderboard. c. The model evaluation page will show metrics for the experiment, feature transformations performed (if any), which features contribute to the model, and more details of the pipeline.
-
Deploy the model a. To deploy this model, click on Save as, then Model to save. b. A window opens that asks for the model name, description (optional), etc. You can accept the defaults or give your model a meaningful name/description and then click Save. c. You receive a notification to indicate that your model is saved to your project. Go back to your project main page by clicking on the project name on the navigator on the top left. d. Under the Models section of the Assets page, click the name of your saved model. e. To make the model available to be deployed, we need to make it available in the deployment space. Click on Promote to deployment space. f. To promote an asset, the project must first be associated with a deployment space. Click Associate Deployment Space
-
Check your deployement. a. If you came in through the Menu > Analyze > Analytics deployments path, click on your deployment space. b. Under the Assets tab, click on the AutoAI model you just promoted. c. Click Create deployment in the top-right corner. d. On the Create a deployment screen, choose Online for the deployment type, give the deployment a name and an optional description, then click Create. e. The deployment will show as “In progress” and switch to “Deployed” when done
-
Testing the deployed model a. Click on the deployment. The deployment API reference tab shows how to use the model using Curl, Java, JavaScript, Python, and Scala. Click on the corresponding tabs to get the code snippet in the language you want to use. b. To get to the built-in test tool, click the Test tab, then click on the Provide input data as JSON icon and paste the following data under Body:
json
   {
   "input_data":[
      {
         "fields":[ "customerID", "gender", "SeniorCitizen", "Partner", "Dependents", "tenure", "PhoneService", "MultipleLines", "InternetService", "OnlineSecurity", "OnlineBackup", "DeviceProtection", "TechSupport", "StreamingTV", "StreamingMovies", "Contract", "PaperlessBilling", "PaymentMethod", "MonthlyCharges", "TotalCharges"],
         "values":[[ "7567-VHVEG", "Female", 0, "No", "No", 1, "No", "No phone service", "DSL", "No", "No", "No", "No", "No", "No", "Month-to-month", "No", "Bank transfer (automatic)", 25.25, 25.25]]
      }
   ]
}
c. Click the Predict button and the model will be called with the input data. The results will display in the Result window. Scroll down to the bottom of the result to see the prediction (“Yes” or a “No” for Churn). Test deployment with JSON
d. Alternatively, you can click the Provide input using form icon and input the various fields, then click Predict. Input to the fields
This model can be used in Telecom sector to analyse and predict the number of users that are going to churn or switch their telecom providers. Churn is quite common in telecom industry and models like these can help the telecoms to take necessary actions before they face huge consequences.
We can select the model that gives the best result by looking at the metrics. In our case, Pipeline 4 gave the best result with the metric “Accuracy (optimized)”. You can view the detailed results by clicking the corresponding pipeline from the leaderboard.
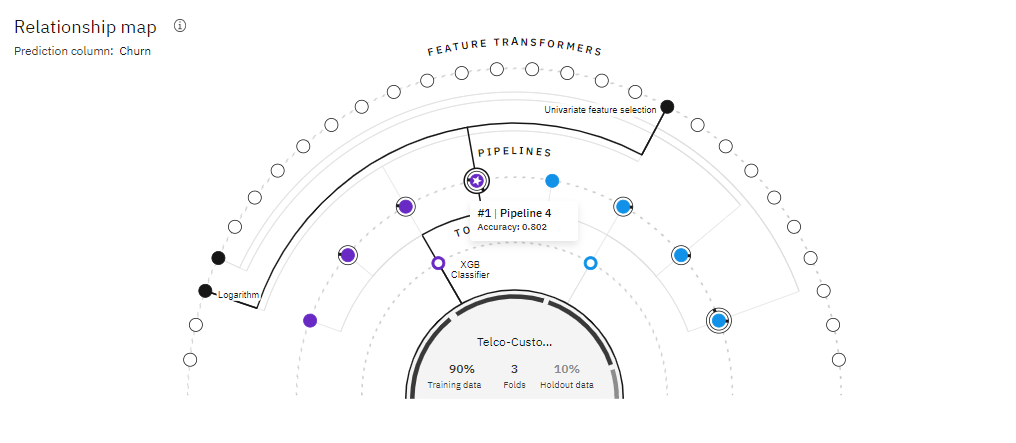
If we want to know more details about a pipeline, we can go to the model evaluation page. The model evaluation page will show metrics for the experiment, feature transformations performed (if any), which features contribute to the model, and more details of the pipeline.
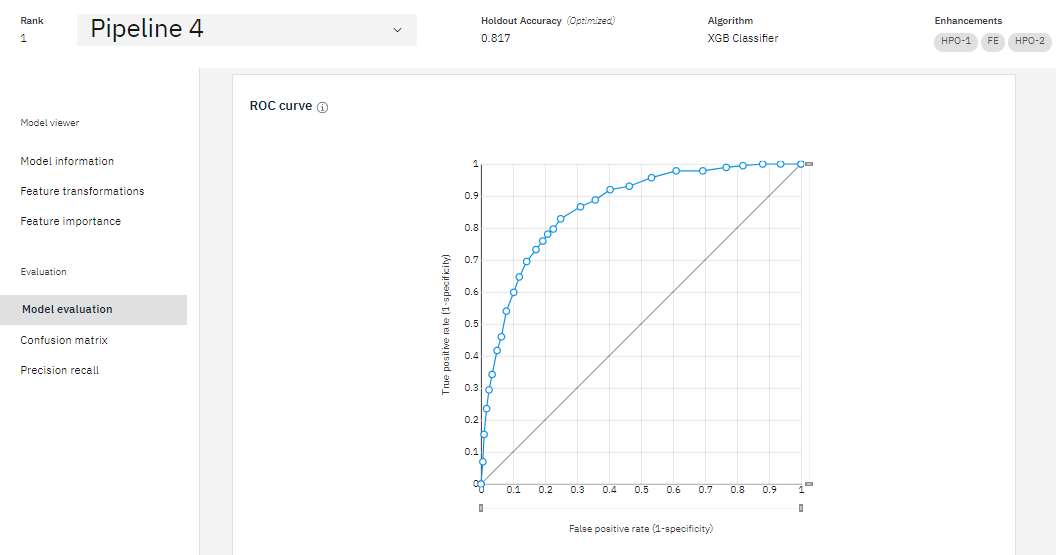
We can compare each pipleline based on their Model name, accuracy, Loss, precision, recall, etc to find out the ideal pipeline.
Please check Contribute.md to know how you can contribute to this project.
Idea: You can develop a web application for taking user input for the AutoAI model.
If you want to sponsor the project, please donate your money to any relief funds for COVID-19 like WHO Relief fund or the organizations in your own country like PM cares fund
If you find an issue in the project, open a new issue or a raise a pull request in this repository.
You can also mail to dantusaikamal@gmail.com incase of any issues.
Check out the LICENSE file in the repo.