I made this script to easily update custom roms on the Asus Rog Phone 2.
Normally to update a custom rom fully you need to flash the stock rom twice and then flash the custom rom.
With this script you technically only flash once since it flashed all of the images to both slots in one go, therefore updating is faster since we dont need to flash the same image twice.
For example the system image of stock rom will be overwritten by the system image of custom rom so there is no point in wasting time flashing stock system image.
You will need to download some extra files depending on what you want here is the full list.
You will need to use Payload Dumper to extract the images.
You will need to use TWRP for custom recovery
Here is Havoc Os custom rom
Here is Omni rom
Here is stock rom
Here is Custom Kernel
Here are Magisk Files
You will need to use Payload Dumper to extract the images
edit the config options in the script to suite your own folder locations
magisk_name=""
kernel_name=""
twrpQ_boot=""
twrpP_boot=""
twrp_installer=""
scripts_folder=""
asus_images_folder=""
havoc_images_folder=""
omni_images_folder=""
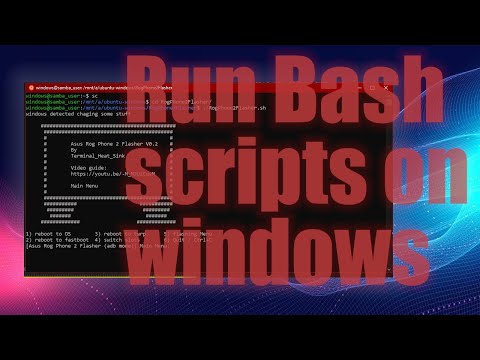
if you are using windows you will also need to edit
scripts_folder=""
asus_images_folder=""
havoc_images_folder=""
omni_images_folder=""
after if [ ! -z $windowscheck ] this is just because my windows environment uses a different path structure therefore you can run the script on linux and windows without changing anything since when the script detects a windows environment it will switch to the latter.
You will also need to change the following if using windows
windows_adb=""
windows_fastboot=""
This is because we will be running the adb.exe and fastboot.exe from ubuntu so set these to wherever you have adb and fastboot on your windows installations. It is possible to use adb and fastboot linux binaries however there is a missmatch of version numbers which takes time to resolve therefore my solution of simply runnning windows binaries is easier for the average user.
When running the script (./RogPhone2Flasher.sh) you will be presented with a menu
     #############################################
      ###########################################
      #                                         #
      #        Asus Rog Phone 2 Flasher V0.9    #
      #        By                               #
      #        Terminal_Heat_Sink               #
      #                                         #
      #        Video guide:                     #
      #        https://youtu.be/-M_MJUzCuvM     #
      #                                         #
      #        Main Menu                        #
      #                                         #
      ###########################################
      ###########                     ###########
       #########                       #########
        #######                         #######
     #############                   #############

1) reboot to OS	       5) flashing Menu
2) reboot to fastboot      6) Backup Menu
3) reboot to twrp          7) Multi rom
4) switch slots	       8) Quit / Ctrl+C
[Asus Rog Phone 2 Flasher (adb mode)] Main Menu:
This feature allows us to switch roms without loosing data ( provided a seperate data exists for each rom ).
This is acheived by flashing say stock android 10 images to slot a and custom rom images to slot b, along with a disabled vbmeta image on both slots.
Then when switching roms a twrp data backup is made for the current rom, data is deleted slot is switched and data for the other rom is restored, thereby the illusion of dual booting is complete.
-
select which rom you want to dual currently only stock and havoc work. So in multirom menu choose "
2) Stock android 10 / Havoc" -
Flash the images to the correct slot choose "
2) flash stock and havoc roms" -
After the flash is successfull we will boot into stock rom first by choosing "
4) switch to stock rom for the first time" this will flash twrp to both slots and will give you an option to restore stock data if you have it. You can then flash magisk or just reboot. -
To change to the other rom choose "
5) switch to havoc rom" this will wipe data change slot and then restore havoc data. -
To go back to stock rom again simply choose "
3) switch to stock rom"
You may or may not need to format internal storage, I was using havoc already so I didnt need to format internal storage to keep switching from havoc to stock
For a demonstration see the following video guide

- refactored code fully
- support for multirom through backing up and restoring from twrp
- supported dual boots
- - stock android 10 and havoc
- - stock android 10 and omni ( some issues with booting? )
- added support for windows through linux subsystem for windows ( use ubuntu 18.04 lts ( 20.04 has issues with sleep command not working) )
- added seperate menu for flashing as it was getting hard to breathe
initial release