Unlock the Power of Machine Learning in Production for All Skillsets in a Hybrid & Multi-Cloud World
Within a bank’s loan department, a customer’s application undergoes a lot of scrutiny before a decision of approval or rejection is made. The evaluation process can take a while, which opens the possibility of the bank losing a potential customer. To reduce the decision-making time and to increase the accuracy of the decisions being made, we can now use machine learning solutions. This allows customer representative to make predictions about a loan application quickly.
Now a days businesses also use chatbots to increase productivity and provide a better customer experience. This demo aims to automate the banking experience for customers regarding loan applications using Watson Studio machine learning, Cloud function, and then extend the Watson Assistant chatbot’s capabilities by connecting it to WhatsApp using Twilio. We will be using Twilio’s sandbox to show how this integration works.
- Login/Sign Up for IBM Cloud: https://ibm.biz/BdfU36
- Prerequisites
- Architecture Diagram
- Create The Machine Learning Model
- Set Up IBM Cloud Functions
- Integrate the Machine Learning Model with Watson Assistant
Sign-up/Login to IBM Cloud There are 3 steps to create your account on IBM Cloud:
- Put your email and password.
- You get a verification link with the registered email to verify your account.
- Fill the personal information fields.


-
Login to your IBM Cloud account.
-
Within your IBM Cloud account, click on the top search bar to search for cloud services and offerings. Type in “Watson Studio” and then click on Watson Studio under “Catalog Results”.
-
This takes you to the Watson Studio service page. Select a region, “Lite” plan (Free) and give your service a unique name. Click on “Create” and this creates a Watson Studio instance for you.
-
Once the service instance is ready, you will be redirected to the Watson Studio page. Click on the “Get Started” button to launch Watson Studio in a new tab. This might take few minutes to set up the service.
-
Under the heading “work with data” you will find a link that says, “Create a project”. Click on “Create a project”. Next, click on “Create an empty project”.

-
On the new project page, give your project a name. You will also need to associate an IBM Cloud Object Storage instance to store the data set.
-
Under “Select Storage Service”, click on the “Add” button. This takes you to the IBM Cloud Object Store service page. Leave the service on the “Lite” tier and then click the “Create” button at the bottom of the page. You are prompted to name the service and choose the resource group. Once you give a name, click “Create”.
-
Once the instance is created, you’re taken back to the project page. Click on “refresh” and you should see your newly created Cloud Object Storage instance under Storage.
-
Click the “Create” button at the bottom right of the page to create your project.
-
Click on the “Add to project” button on the top right corner. From the pop-up window select “Data”.
-
In the column, on the right, click on “browse”. Navigate to the folder where you downloaded the data set to and select “german_credit.csv”
-
Watson Studio takes a couple of seconds to load the data, and then you should see the import has completed. To make sure it has worked properly, you can click on “Assets” on the top of the page, and you should see your insurance file under “Data Assets”.

-
Once you have added the data set, click on the “Add to project” button on the top right corner. This time select “AutoAI experiment”.
-
On the New AutoAI Experiment page, give a name to your project.
-
Next, you need to add a Watson Machine Learning instance. On the right side of the screen, click on “Associate a Machine Learning service instance”.
-
On the Associate service page, click on the “New Service” button on the right side of the screen. From the pop-up screen, select “Machine Learning”.
-
Select the appropriate region. It is recommended to build your machine learning service instance in the same region that you created your Watson Studio service. Select the “Lite” (free) plan. Give your instance a unique name. Click on “Create”.
-
Once you create your machine learning service, on the next page, check the box with your machine learning service instance. Next, click on “associate service” on the right corner.
-
Once the service is successfully associated, you will be redirected to new AutoAI experiment page. Click on “Reload” on the right side of the screen. You should see your newly created machine learning instance. Click on “Create” on the bottom right part of your screen to create your first AutoAI experiment!

-
After you create your experiment, you are taken to a page to add a data source to your project. Click on “Select from project” and then add the new_german_data.csv file. Click on Select asset to confirm your data source.
-
Next, you see that AutoAI processes your data, and you see a What do you want to predict section. Select the expenses as the Prediction column.
-
Next, let's explore the AutoAI settings to see what you can customize when running your experiment. Click on Experiment settings.First, you see the data source tab, which lets you omit certain columns from your experiment. You choose to leave all columns. You can also select the training data split. It defaults to 85% training data. The data source tab also shows which metric you optimize for. For the Binary Classification, and for other types of experiments, such as regression, it is RMSE (Root Mean Squared Error), AutoAI defaults to Accuracy. Either way, you can change the metric from this tab depending on your use case.
-
Click on the Prediction tab from within the Experiment settings. There you can select from Binary Classification, Regression, and Multiclass Classification.
-
Lastly, you can see the Runtime tab from the Experiment settings this shows you other experiment details you may want to change depending on your use case.
-
Once you are happy with your settings, ensure you are predicting for the expense’s column, and click on the run Run Experiment button on the bottom-right corner of the screen.

-
Next, your AutoAI experiment runs on its own. You see a progress map on the right side of the screen which shows which stage of the experiment is running. This may be Hyper Parameter Optimization, feature engineering, or some other stage.
-
You have different pipelines that are created, and you see the rankings of each model. Each model is ranked based on the metric that you selected. In the specific case that is the accuracy. Given that you want that number to be as high as possible, you can see that in the experiment, the model with the highest accuracy is at the top of the leaderboard.
-
Once the experiment is done, you see Experiment completed under the Progress map on the right-hand side of the screen.
-
Now the AutoAI has successfully generated eight different models.
-
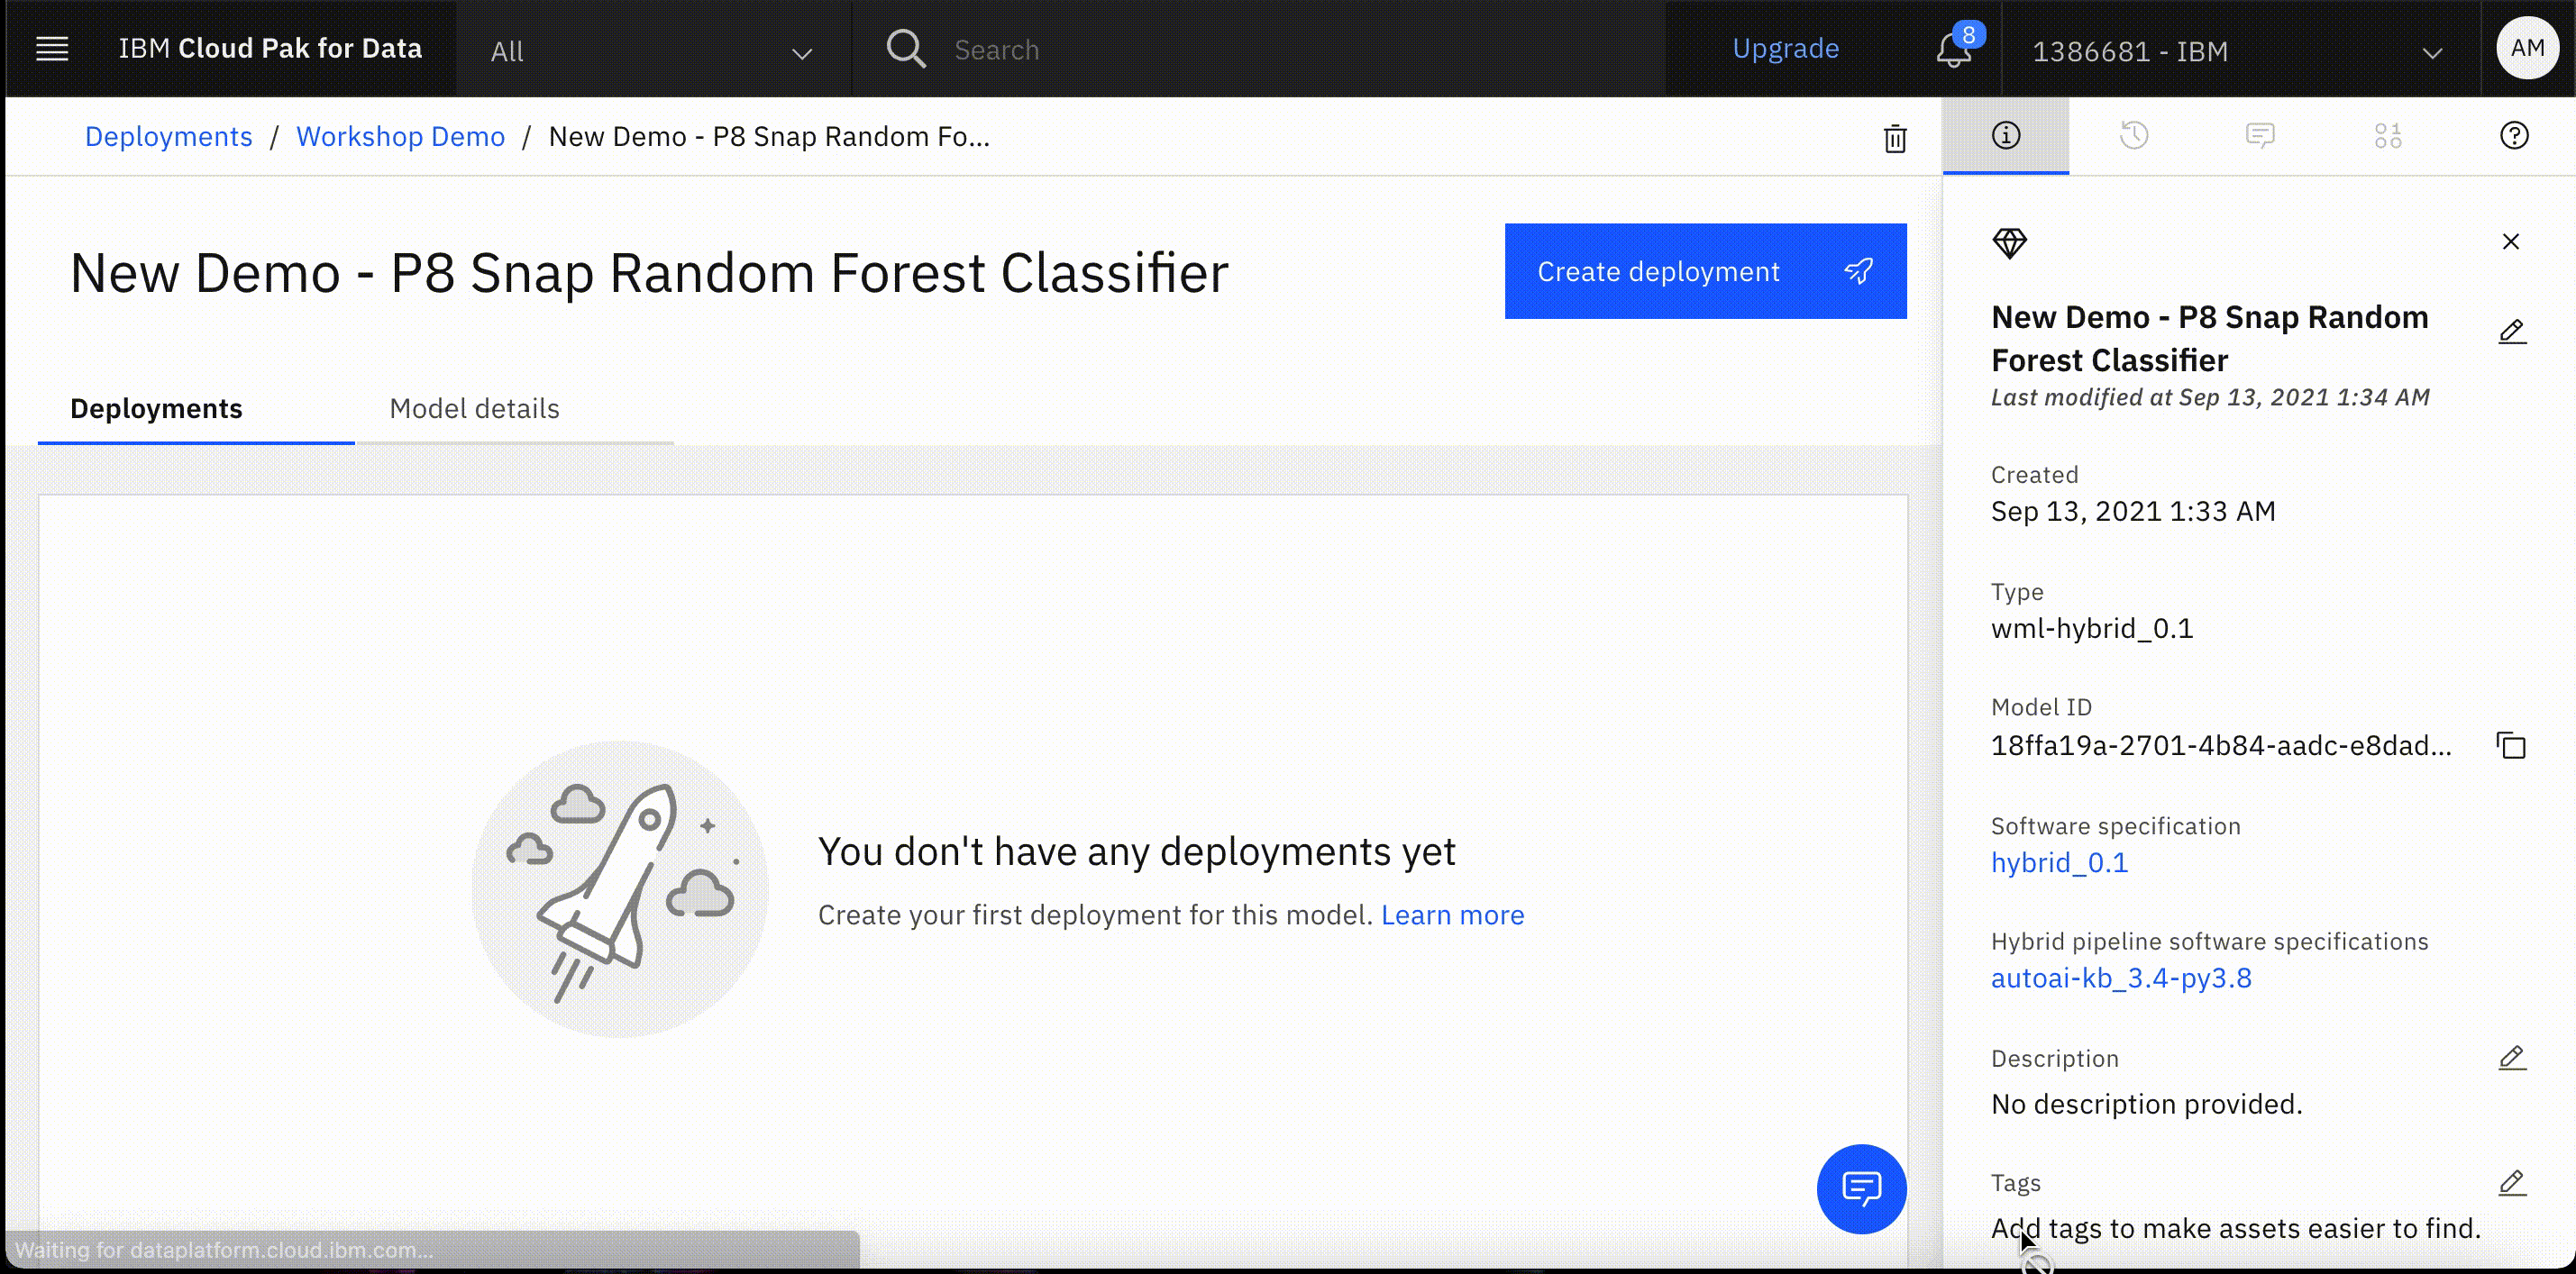
In our case, you see the accuracy value is 0.785, from Pipeline 8. Click on “Pipeline 8”.
-
On the left-hand side, you can see different “Model Evaluation Measures”. For this particular model, you can view the ROC curve.
-
On the left-hand side, you can also see “Model Evaluation”, and “Feature Summary”.
-
On the left-hand side, click on “Feature Summary”. You can see here that the most important predictor of the loan eligibilty is the duration of the new feature created by AutoAI. This is by far the most important feature, followed by age and so on.

-
Once you are ready to deploy one of the models, click on “Save As” at the top-right corner of the model you want to deploy. Save it as a “Model” and name your model as you want. Click on “Create”.
-
Once the model is successfully saved, click on the “View in project” in the green notification on the right side of the screen. Alternatively, you can also find your model saved in the “Assets” tab under “Models”.
-
Next, you are taken to a screen that has the overview of the model you just saved. Click on “Promote to deployment space” on the top right corner of your screen. Alternatively, if you’re doing it from the Assets tab, then under the “Models” section, click on the 3 dots on the right side of your screen and click “promote”.
-
On the Promote to space page, you need a target space to promote your model. Click on “New space +” on the right side of your screen.
-
Next, on the Create a deployment space screen, give your space a name, make sure the right cloud object storage is selected, and select your machine learning service instance. For this experiment, selecting the machine learning service is mandatory as we need to build a prediction model. Then click on “Create”.
-
Once the space is ready, click on “Close” in the pop-up and you will be redirected to the promote to space page. You see your newly created space under the “Target space”. Once you’re happy with your selections, click on “Promote”.
-
Once the model is successfully promoted, you will see a green notification box, click on “deployment space” in the notification. Alternatively, you can also find your deployment spaces when you click on the hamburger sign on the top left most side on your screen.
-
You will be redirected to the deployments page, where you will find your promoted model. Hover over the row, to see a rocket shaped icon, click on the icon to deploy you model.
-
In the dialog box, select “Online” as your deployment type, give your deployment a name and click “Create”.
-
Click on the “Deployments” tab to see the status of your deployment.
-
Once the deployment is completed, click on the name your deployment.
-
On this page you find the API references, endpoint and code snippets to help you integrate your model with your applications. Copy the endpoint of your model and save it as we will need it later.

- To test your model, click on the “Test” tab. You can select a row from the data set and enter the data in the fields. Enter the values from the dataset, and then click on the “ Add to Predict” button at the bottom and then on "Predict".
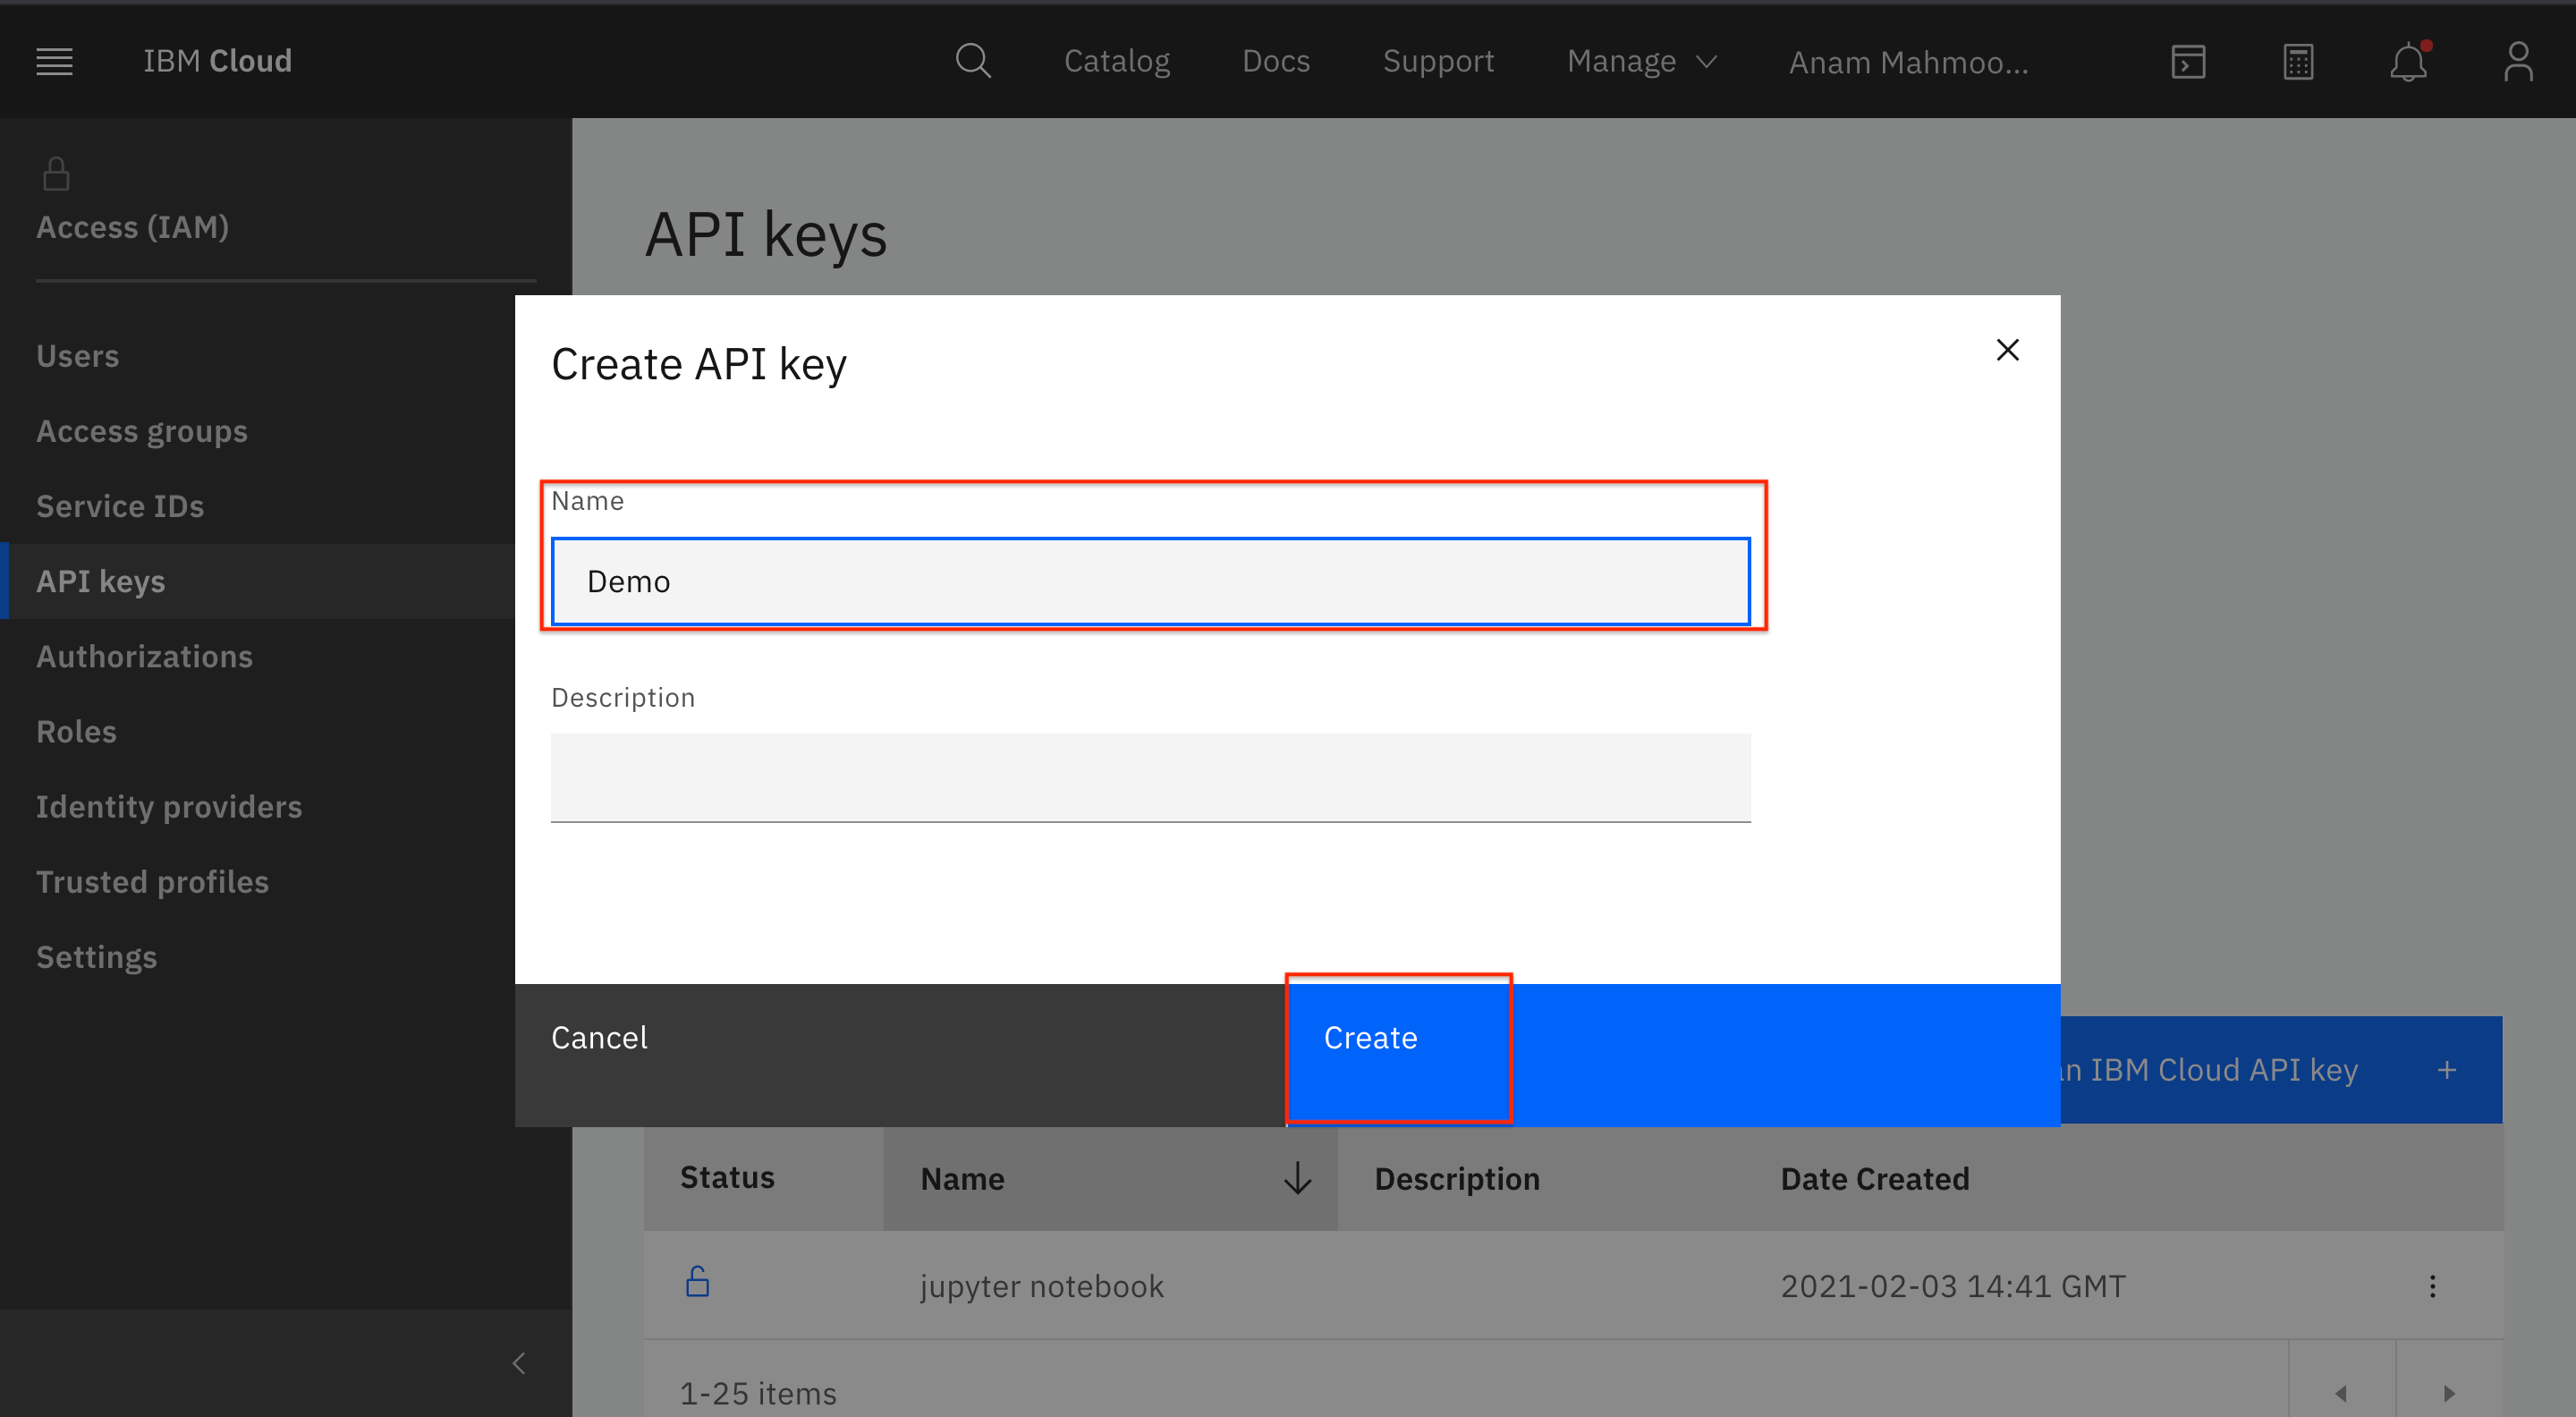
- Click on manage next to your account name and in the drop down list choose “Access (IAM)”.

-
Click on API keys on the right side.
-
Click on "Create" and give a name to the Api Key. Copy and save the API Key as you will not be able to see it again. You can also download the API KEY.
-
Within your IBM Cloud account, click on the top search bar to search for cloud services and offerings. Type in “Functions” and then click on Functions under “Catalog Results”.
-
Click on get started.
-
Click on Current namespace and create a namespace.

-
Under "Action" tab click on "Create" and then "Action"
-
Give the action a name, choose the “Default package, and a runtime of your choice, in our case we are using "Python 3.7".

- Once the action is created you will need to add an API KEY under the "Parameters" tab that we created in Step 2 and click on "Save".

- Under the "Code" tab, paste the below code.
# main() will be run when you invoke this action
#
# @param Cloud Functions actions accept a single parameter, which must be a JSON object.
#
# @return The output of this action, which must be a JSON object.
#

import sys
import json
import requests

def main(dic):
    # NOTE: you must manually set API_KEY below using information retrieved from your IBM Cloud account.
    API_KEY = dic["api_key"]
    token_response = requests.post('https://iam.cloud.ibm.com/identity/token', data={"apikey": API_KEY, "grant_type": 'urn:ibm:params:oauth:grant-type:apikey'})
    mltoken = token_response.json()["access_token"]

    header = {'Content-Type': 'application/json', 'Authorization': 'Bearer ' + mltoken}

    # NOTE: manually define and pass the array(s) of values to be scored in the next line
    payload_scoring = {
	"input_data": [
		{
			"fields": [
				"LoanDuration",
				"LoanPurpose",
				"LoanAmount",
				"ExistingSavings",
				"EmploymentDuration",
				"InstallmentPercent",
				"OthersOnLoan",
				"CurrentResidenceDuration",
				"OwnsProperty",
				"Age",
				"InstallmentPlans",
				"Housing",
				"ExistingCreditsCount",
				"Job"
			],
			"values": [
				[
					dic["LoanDuration"],
					dic["LoanPurpose"],
					dic["LoanAmount"],
					dic["ExistingSavings"],
					dic["EmploymentDuration"],
					dic["InstallmentPercent"],
					dic["OthersOnLoan"],
					dic["CurrentResidenceDuration"],
					dic["OwnsProperty"],
					dic["Age"],
					dic["InstallmentPlans"],
					dic["Housing"],
					dic["ExistingCreditsCount"],
					dic["Job"]

				]
			]
		}
	]
}
    response_scoring = requests.post('Add your machine learning deployment URL', json=payload_scoring, headers={'Authorization': 'Bearer ' + mltoken})
    print("Scoring response")
    print(response_scoring.json())
    result = response_scoring.text
    result_json = json.loads(result)

    result_keys = result_json['predictions'][0]['fields']
    result_vals = result_json['predictions'][0]['values']

    result_dict = dict(zip(result_keys, result_vals[0]))

    no_percent = result_dict["probability"][0] * 100
    print("no_percent: ", no_percent)
    yes_percent = result_dict["probability"][1] * 100
    print("yes_percent: ", yes_percent)

    predict = result_dict["prediction"]


    final = ('Your application is presenting a ' + predict + ' application with a risk probability of: %.0f%%'% yes_percent)
    print("final: ", final)
    return { 'message': final }
- In the below line, replace the link with your machine learning deployment link that you copied from Step 1.2.12, the final code should look like this:
response_scoring = requests.post('https://us-south.ml.cloud.ibm.com/ml/v4/deployments/e7a8d7c5-5f14-49ab-b236-bd3326dcbabb/predictions?version=2021-08-05', json=payload_scoring, headers={'Authorization': 'Bearer ' + mltoken})
-
Lastly under the "Endpoints" tab, check the "Enable as web action" and copy the public URL.
-
In the code above, for testing you can replace the values in json section with any value from the dataset and invoke the function to get an output.

-
Within your IBM Cloud account, click on the top search bar to search for cloud services and offerings. Type in “Watson Assistant” and then click on Watson Assistant under “Catalog Results”.
-
This takes you to the Watson Studio service page. Select a region (make sure all your services are in the same region), “Lite” plan (Free) and give your service a unique name. Click on “Create” and this creates a Watson Assistant instance for you.

-
Once the service instance is ready, you will be redirected to the Watson Assistant page. Click on the “Launch Assistant” button to launch Watson Assistant in a new tab. This might take few minutes to set up the service.
-
Click on "Assistants" and then "Create" assistant.

5.Give your assistant a name and click "Create" assistant.
6.Once your Assistant is created, click on "add an action or dialog skill".

- Click on "Upload Skill".

Your machine learning model is now connected to your Watson Assistant. You can click on "preview" and test it out!


Chatbots are everywhere these days, and most businesses aim to use them to increase productivity and provide a better customer experience. In this tutorial, we will demonstrate how to extend a Watson Assistant chatbot's capabilities by connecting it to WhatsApp using Twilio. We will be using Twilio's sandbox to show how this integration works.
In this step, we will be focusing on the integrating Watson Assistant with WhatsApp.
- Under Integrations on the right side, choose WhatsApp with Twilio.

- Choose WhatsApp with Twilio and then click Create.

- Now here we will need to set the Account SID and Auth token that we can get from Twilio. Go to your Twilio account (if you don't an account, you can create one here) and copy your Account SID and Auth token that are in the home dashboard. (Click on Show to reveal the token).

- Go back to your Watson Assistant and fill Account SID and Auth token with the values that you got from Twilio.

Click Sync Account and wait for it till it shows Synced. Once it's synced you will see a webhook URL generated in the WhatsApp Webhook field. Copy this URL and go back to Twilio.
- Now we need to set up and configure our Twilio sandbox to integrate it with Watson Assistant. In your Twilio Account, click on the icon that represents all products and services (it's below the home icon) on the left side go to Programmable Messaging from the expanded menu and select Try WhatsApp under the Try it out section.

We will be using this testing sandbox for our integration. Send the given code/message to the number provided by Twilio from your WhatsApp.

Once it's done, you should see Message Received on Twilio like this image.

This means that now your phone number is connected to this Twilio-WhatsApp sandbox.
- Click Next. The second step is to set a template in case you're working with a One-Way Message case like appointment reminders, order notification and verification codes. So, in these cases, only the service is talking to the user. We are not interested in this step for this tutorial so you can click Next to move to the 3rd step which is Two-Way Messaging where both the user and the service can send messages which results in a conversation. The service triggers a 24-hour conversation window in which the conversation can take place. Send a reply to the message that you received on WhatsApp and click Next: Configure Your Sandbox.

- Paste the webhook URL that you have from Watson Assistant into the When a message comes in field. You should see your number in the sandbox participants and others can enter this sandbox by sending the code mentioned to the sandbox WhatsApp number (In the below image the code is join design-thumb). Once you're done click save.

- All is set. Now the Assistant is integrated with WhatsApp through Twilio. From your device, send a WhatsApp message to the WhatsApp sandbox number and you will receive the assistant's response.

In this tutorial, you were able to successfully integrate your Watson Assistant with WhatsApp through Twilio. Since this is a tutorial, we were using WhatsApp-Twilio sandbox to show you how this integration work. If you want to use WhatsApp-Twilio with the Assistant for a real use case, then you will need to have a premium Twilio Account, a Facebook Business Manager ID and apply for permission. You can find more information about this here.