If you like this Repo, Please click the ⭐
Step-by-step guide to building a custom machine for OSINT activities. The Basic Package includes a robust LINUX system strengthening process, Tor browser setup, firewall installation, rotating proxy configuration, and advanced attack prevention measures.
Do you want to read the article in full?? Please visit our Article
Welcome to our repository dedicated to enhancing the security of your journalistic investigations and open-source intelligence (OSINT) sources. In a scenario where powerful adversaries are constantly undermining our investigations, the implementation of appropriate security measures becomes crucial. Many investigators overlook the dangers associated with the use of vulnerable machines (computers/notebooks), exposing themselves to significant risks.
When investigating opponents with extensive resources, vast knowledge, and unlimited time, the vulnerability of your machine is an imminent threat. Invasion can result in devastating losses, from the destruction or alteration of your research to obtaining confidential data from sources, putting lives at risk. Additionally, your work and reputation can be destroyed in an instant.
In this repository, you will also find a basic security approach for your team. We then delve into digital security with a comprehensive guide that includes enhanced protection measures. We avoid the use of vulnerable machines by implementing advanced system strengthening techniques, configuring firewalls, installing rotating proxies, and system hardening to prevent major attacks.
Protect the integrity of your research and the security of your sources at no cost. Don't risk it with standard solutions; choose the unparalleled security we offer. Maintain the confidentiality of your investigations with our step-by-step guide and expertise in digital security.
If you like this Repo, Please click the ⭐
Help me build our non-profit investigative journalism association by accessing the link below and (buy me a coffee).
Link : https://www.buymeacoffee.com/amazonialeaks
OPTIONAL READING (BUT RECOMMENDED):
The 8 items below are not part of the tutorial but are fundamental concepts that need to be understood before proceeding to the tutorial content.
- 1. INTRODUCTION - (About building a Robust (OSINT) Framework for Investigations Against Powerful Adversaries
- 2. Protecting People - (crucial risk aspects for the investigators)
- 3. Technical Environment Issues
- 4. Host Operating System
- 5. Important Considerations About the Operating System
- 6. Initial System Setup
- 7. Creating a Bootable USB Drive (Using Ventoy)
- 8. Reflection About Disks
From now on, you will find the tutorial content. Good luck!
- Initial Preparation After Debian Installation
- Tor Browser Installation and Configuration
- Virtual Machine Installation
- Installation of Additional Applications
- Morphing Installation/Procedure (Linux Hardening)
- Firewall Installation and Configuration
- Tor Service and Rotating Proxy Configuration
- Password Manager
- NOTE ON TECHNICAL ISSUES
- Sources
To follow along with this tutorial, we assume that you have already installed Debian on your computer (the machine you will use for your investigations or the machine/HD where you will test this tutorial).
It is crucial to note that if you are not familiar with installing Debian on your own, you may not be ready to proceed with this tutorial. I'm not saying you won't be able to do it, especially because, after the installation, the subsequent steps involve simply copying from my tutorial and pasting into your terminal, making the process easier. In my understanding, the installation is the most complex part, as you can't just copy and paste like in the other steps of this article.
THE GOOD NEWS IS, IF YOU CAN INSTALL DEBIAN, THE REST IS SIMPLE - JUST COPY AND PASTE INTO YOUR TERMINAL...
Open a terminal and execute the following command:
su
Install the sudo and adduser packages:
apt update
Note: It’s possible the terminal may generate an error and not update; if this happens, follow the next 2 steps below.
sudo nano /etc/apt/sources.list
Erase whatever is there and paste the code below:
deb http://deb.debian.org/debian bookworm main non-free-firmware
deb-src http://deb.debian.org/debian bookworm main non-free-firmware

deb http://deb.debian.org/debian-security/ bookworm-security main non-free-firmware
deb-src http://deb.debian.org/debian-security/ bookworm-security main non-free-firmware

deb http://deb.debian.org/debian bookworm-updates main non-free-firmware
deb-src http://deb.debian.org/debian bookworm-updates main non-free-firmwar
Press ctrl + O to save Press Enter Press ctrl + X to exit
Note: If the update error doesn’t occur, ignore the above procedure and continue to the command below:
apt full-upgrade

apt install --no-install-recommends sudo adduser
Create a group called ‘console’:
/usr/sbin/addgroup --system console
Add your Linux username to the ‘console’ group. Be sure to replace ‘user’ with your actual username (or your sock puppet’s):
/usr/sbin/adduser user console
Add the user ‘user’ to the ‘sudo’ group. Depending on your level of experience, follow the appropriate instructions:
/usr/sbin/adduser user sudo
Restart the system:
/sbin/reboot
Open the terminal and type:
sudo apt update
After the update, enter the following command:
Download the APT Signing Key: (necessary wget install)
wget https://www.kicksecure.com/keys/derivative.asc
Users can check the Signing Key for better security.
Add the APT Signing Key:
sudo cp ~/derivative.asc /usr/share/keyrings/derivative.asc
Add the derivative repository:
echo "deb [signed-by=/usr/share/keyrings/derivative.asc] https://deb.kicksecure.com bookworm main contrib non-free" | sudo tee /etc/apt/sources.list.d/derivative.list
Update your package lists:
sudo apt-get update

sudo apt-get install tb-updater

Choose YES
Once the terminal completes, it may be necessary to go to “Applications -> Internet and click Tor Browser (AnonDist)”

Choose YES

Choose YES
Now just wait……
It will do all the work for you (Stay alert, it will display some windows with warnings ‘READ ALL,’ you will understand, and when it re-verifies the signature, it will print something like: ‘Good Signature.’ If it doesn’t show this, abort the installation.

Ok, Good signature.. Choose YES
Once the installation is complete, open the Tor browser
- Open the Tor Browser: Launch the Tor Browser on your device.
- Access settings: In the upper right corner, click on the icon to open the menu and select “Settings” or “Preferences.”
- Select “Connection”: Within the settings, you will see the available configuration options.
- Bridge Configuration: Go to the “Select a Built-In Bridge…” button and click on it.
- Choose obfs4: Within the bridge options, choose “obfs4.”
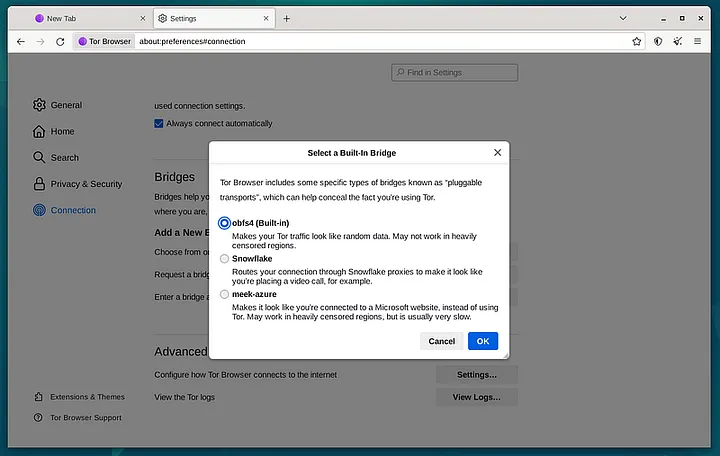
It should look like this screen.
Click OK and Restart: After entering the bridge information, save the settings and restart the Tor Browser.
To restart Tor, go to the ‘broom’ icon in the upper right corner.
Test the Connection: After restarting, check if the configuration is working correctly.
Open the Tor Browser and confirm that you are using the obfs4 bridges to access the Onion network.
Note: You can configure a SOCKS4 proxy by clicking on "Advanced" in the "Configure how Tor Browser connects to the internet" settings, and entering 127.0.0.1:9050. For more information, see the Tor Project website.
Open a terminal
Update the package lists:
sudo apt update
Install the Debian fasttrack signing key:
sudo apt install --no-install-recommends fasttrack-archive-keyring
Add the Debian fasttrack repository:
echo 'deb https://fasttrack.debian.net/debian/ bookworm-fasttrack main contrib non-free' | sudo tee /etc/apt/sources.list.d/fasttrack.list
Add Debian the backports repository:
echo 'deb https://deb.debian.org/debian bookworm-backports main contrib non-free' | sudo tee /etc/apt/sources.list.d/backports.list
Update the package lists again:
sudo apt update
Install VirtualBox and Linux kernel headers:
sudo apt install --no-install-recommends virtualbox-qt linux-headers-$(dpkg - print-architecture)
Add your current user to group vboxusers:
sudo adduser $(whoami) vboxusers
Done.
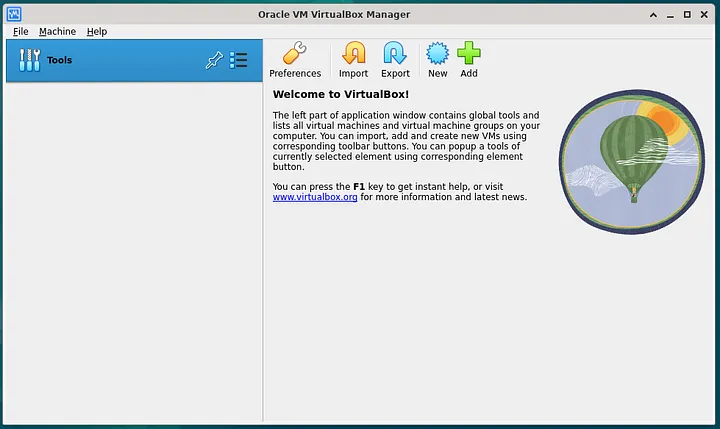
The procedure of installing the VirtualBox host software is complete.
To open VirtualBox, go to Applications -> System and click on VirtualBox.
Opening Synaptic:
You can find Synaptic in the applications menu or start it by typing ‘synaptic’ in the terminal.
Run Synaptic with administrator privileges using the command:
sudo synaptic
Exploring the Interface:
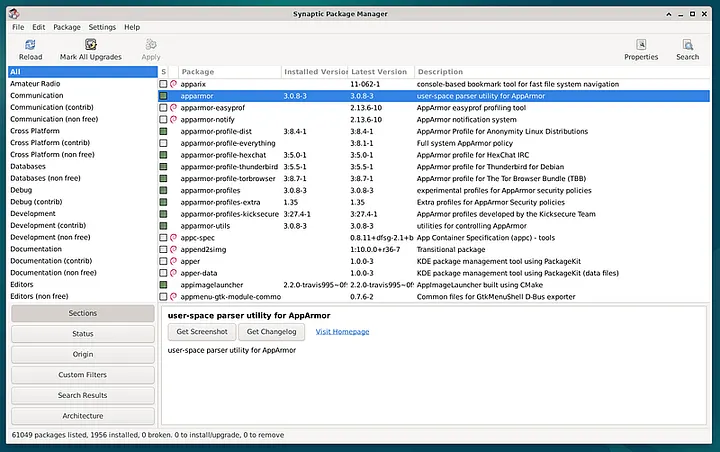
The Synaptic interface is attractive and intuitive. Just click on ‘Search’ and enter the name of the software.
Synaptic will open with an interface divided into three panels: Categories on the left, Package list in the middle, and Package details on the right. The Synaptic interface is attractive and intuitive. Just click on ‘Search’ and enter the name of the software.
Use the search bar to find specific packages.
Installing Packages:
Browse the list of packages until you find the desired software. Mark the package for installation by right-clicking or checking the box to the left of the name. Click ‘Apply’ to start the installation process. Install the following applications: Zulucrypt, Bleachbit, Kleopatra and OnionShare, KeePassXC.
Now install ClamAV using the following command:
sudo apt install clamav-freshclam
To enable ClamAV, type the following command:
sudo systemctl enable clamav-freshclam
It is necessary to install the “curl” package.
To do so, follow steps below:
Update the package list:
sudo apt update
Update the system:
sudo apt full-upgrade
Install the “curl” package. The use of the — no-install-recommends parameter with the apt command is, in most cases, optional.
sudo apt install --no-install-recommends curl
Done.
The installation procedure for “curl” has been completed.
Download the Kicksecure signature key and add it to the system with the following commands:
sudo torsocks curl --output /usr/share/keyrings/derivative.asc --url http://www.w5j6stm77zs6652pgsij4awcjeel3eco7kvipheu6mtr623eyyehj4yd.onion/keys/derivative.asc
Done.
Add the Repository
Add the Kicksecure APT Repository.
Choose Option A; there are three options as listed below, and we will choose Option A as it is the most secure.
A: Onion Repository
B: Clearnet Repository via Tor
C: Clearnet Repository
Option A: Add the Kicksecure Onion Repository.
To add the Kicksecure Repository via Onion, install the “apt-transport-tor” package from the Debian repository.
sudo apt install apt-transport-tor
Next, add the Kicksecure APT Repository to the default Kicksecure, using the stable Debian (at the time of writing, it was “bookworm”):
echo "deb [signed-by=/usr/share/keyrings/derivative.asc] tor+http://deb.w5j6stm77zs6652pgsij4awcjeel3eco7kvipheu6mtr623eyyehj4yd.onion bookworm main contrib non-free" | sudo tee /etc/apt/sources.list.d/derivative.list
Done.
Choose a Kicksecure package.
CLI Version: Exclusive command-line interface (CLI) version. This version does not modify the graphical environment of the system. It provides kernel enhancement, increased entropy, and other security features."
GUI Version: Similar to the CLI version, but installs the Xfce graphical environment and default applications. Useful if Debian was installed without a graphical environment, and you want the Kicksecure graphical environment (Xfce). This is the one we will choose!!"
For host operating systems: kicksecure-xfce-host
Install a Kicksecure package, such as “kicksecure-xfce-host.”
To do this, follow steps below:
Update the package list:
sudo apt update
Update the system:
sudo apt full-upgrade
Install the “kicksecure-xfce-host” package.
The use of the --no-install-recommends parameter with the apt command is, in most cases, optional.
sudo apt install --no-install-recommends kicksecure-xfce-host
Wait for it to complete.
Done.
Move the original file “/etc/apt/sources.list” to a temporary location (or delete it) as it will be replaced by “/etc/apt/sources.list.d/debian.list” from Kicksecure:
sudo mv /etc/apt/sources.list ~/
Configure the onionized Debian repositories. Open the file “/etc/apt/sources.list” with the text editor “nano” and replace the existing content with the following:
sudo nano /etc/apt/sources.list.d/debian.list
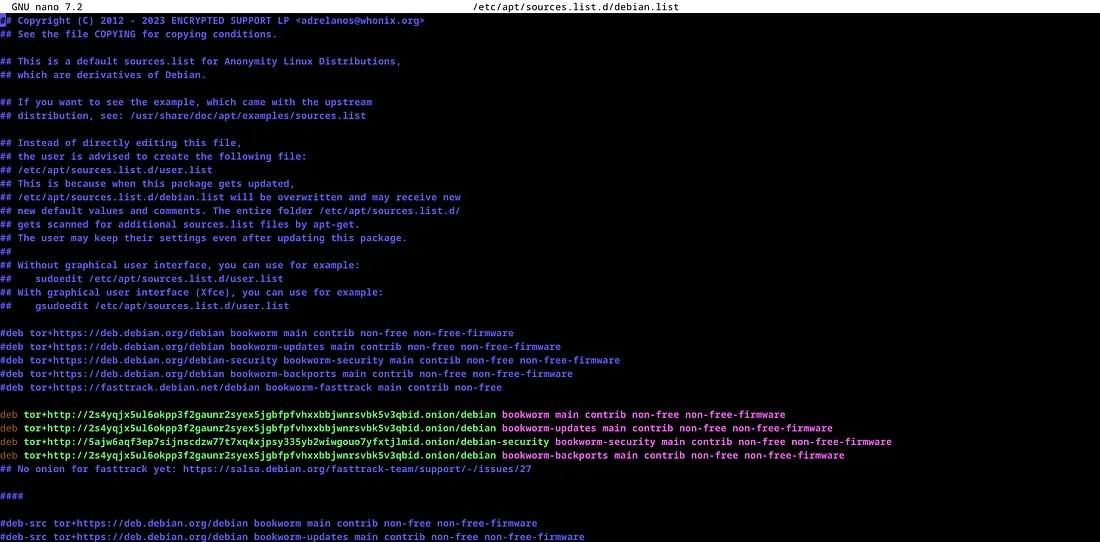
An file like this will appear; take note of the green lines. If yours doesn’t have green lines, simply go to the beginning of the line and remove the # (also known as uncommenting the line).
If you don’t find it in your file, just copy the lines below, paste them into the file, and save.
deb tor+https://fasttrack.debian.net/debian bookworm-fasttrack main contrib non-free

deb tor+http://2s4yqjx5ul6okpp3f2gaunr2syex5jgbfpfvhxxbbjwnrsvbk5v3qbid.onion/debian bookworm main contrib non-free
deb tor+http://2s4yqjx5ul6okpp3f2gaunr2syex5jgbfpfvhxxbbjwnrsvbk5v3qbid.onion/debian bookworm-updates main contrib non-free
deb tor+http://5ajw6aqf3ep7sijnscdzw77t7xq4xjpsy335yb2wiwgouo7yfxtjlmid.onion/debian-security bookworm-security main contrib non-free
deb tor+http://2s4yqjx5ul6okpp3f2gaunr2syex5jgbfpfvhxxbbjwnrsvbk5v3qbid.onion/debian bookworm-backports main contrib non-free
Press ctrl+O to save.
Press Enter.
Press ctrl+X to exit.
Confirm that the onionized repositories are functional.
sudo apt update && sudo apt full-upgrade
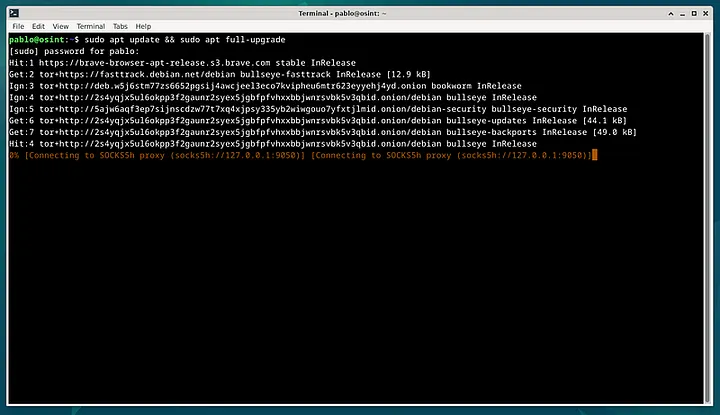
If it appears like this screen, it means the onionization has worked.
To install GUFW, open the terminal and type the following command.
sudo apt install gufw
This command will install the firewall. Once the installation is complete, go to the “Applications” menu, point to “Settings,” and in the submenu, click on “Firewall Configuration.”
It will open the following window:

Click on “Status” to activate the profile.
Mark both as “Deny” to block all incoming and outgoing traffic.
Click on “Rules.”
In the bottom-left corner, when pointing the mouse, click on the “+” sign that will appear as “Add a rule…”
Click on “Simple.”
Select “Outgoing” and choose the “Allow” option.
In “Direction,” select “Out” (do not change the other options).
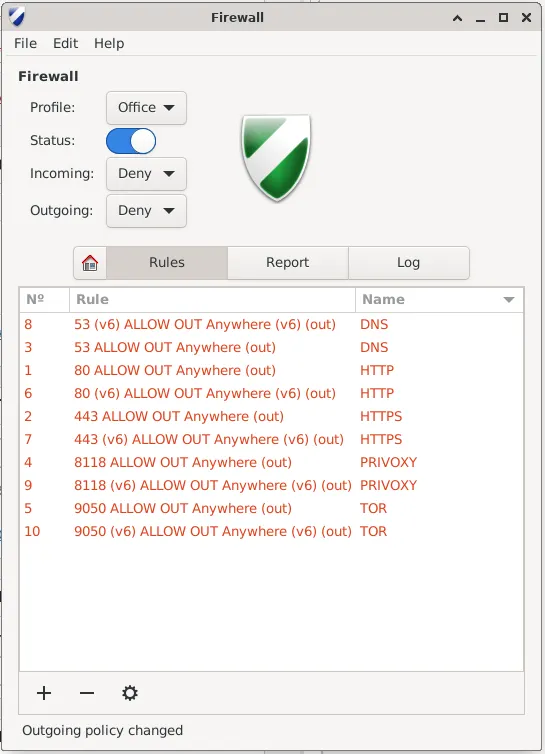
- “Name”: DNS, “Port”: 53 —Click on “+ Add”.
- “Name”: HTTP, “Port”: 80 — Click on “+ Add”.
- “Name”: HTTPS, “Port”: 443 — Click on “+ Add”.
- “Name”: PRIVOXY, “Port”: 8118 — Click on “+ Add”.
- “Name”: TOR, “Port”: 9050 — Click on “+ Add”.
Done,
Your firewall is configured with the defined rules, it should look like the image below:
Click on the X to close GUFW.
sudo systemctl enable ufw
During the boot screen, you will notice a change; you should see something similar to the image below:

Note that now GRUB displays text related to Kicksecure and no longer to Debian. Also, observe that there is an option “LIVE mode USER (For daily activities.)” Soon we will see how to use this option. For now, keep the option “Kicksecure GNU/Linux” selected.
Wait for the system to start, log in with your user.
Installation of Tor and Privoxy:
Install Tor and Privoxy with the following commands:
Note: Since you installed the Kicksecure Package, the Tor Service was automatically installed by default. However, to confirm, simply enter the following command in the terminal:
sudo tor --version
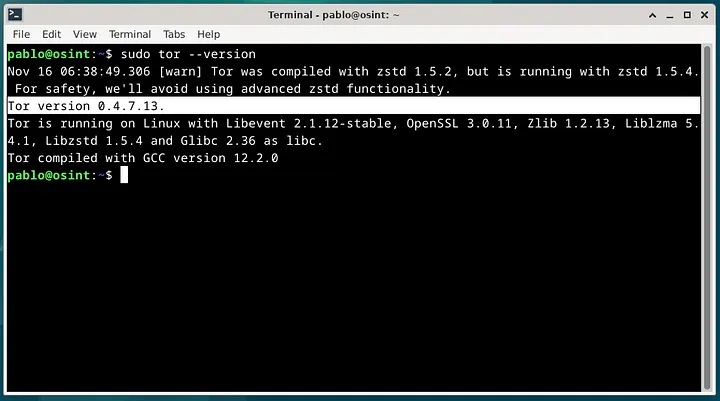
An interface similar to this should appear, displaying the Tor Service version and additional information.
If it doesn’t appear, you will have to install it with the command below:
sudo apt install tor
Now install Privoxy with the command below:
sudo apt install privoxy
Tor and Privoxy Configuration:
Enable the Tor service to start automatically with the system:
sudo systemctl enable tor
Enable the Privoxy service to start automatically with the system:
sudo systemctl enable privoxy
Configure Privoxy to forward connections to Tor:
Open the Privoxy configuration file in a text editor, such as Nano:
sudo nano /etc/privoxy/config
Locate the line containing “forward-socks5” and remove the “#” at the beginning of the line to uncomment it.
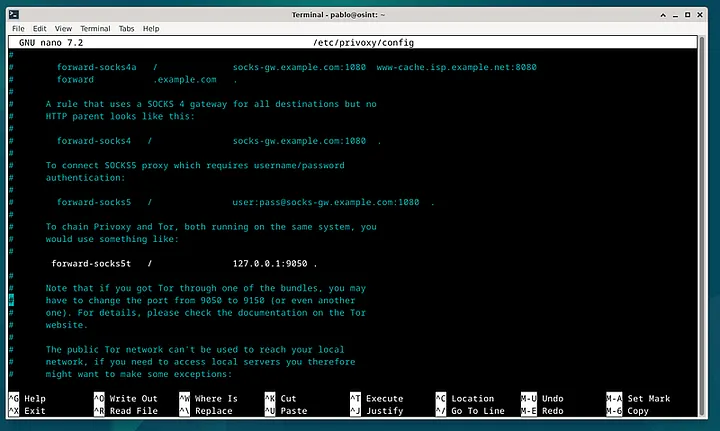
As shown in this image, be persistent, as it may take some time to locate this line.
Save the changes by pressing Ctrl + O to save, confirm with Enter, and press Ctrl + X to Exit.
Start the Tor and Privoxy services:
sudo systemctl start tor && sudo systemctl start privoxy
If necessary, restart the services:
sudo systemctl restart tor

sudo systemctl restart privoxy
DNS Configuration:
Open the DNS configuration file in a text editor, such as Nano:
sudo nano /etc/resolv.conf
Remove all existing lines and add the following lines to configure the DNS servers (use DNS servers of your preference if desired):
nameserver 9.9.9.9
nameserver 149.112.112.112
Save the changes to the file.
Protect the DNS configuration file against accidental modifications:
sudo chattr +i /etc/resolv.conf
Restart the services:
sudo systemctl restart tor

sudo systemctl restart privoxy
Now let’s configure the proxy on the system. Some people prefer to set it up in the browser, but I prefer to apply it system-wide. For this, I recommend installing the Gnome-Control-Panel, which is an intuitive tool.
Open the terminal and type the following command:
sudo apt update

sudo apt install gnome-control-center
Once it completes the installation, continue in the terminal and type:
gnome-control-center
A screen will appear as below:
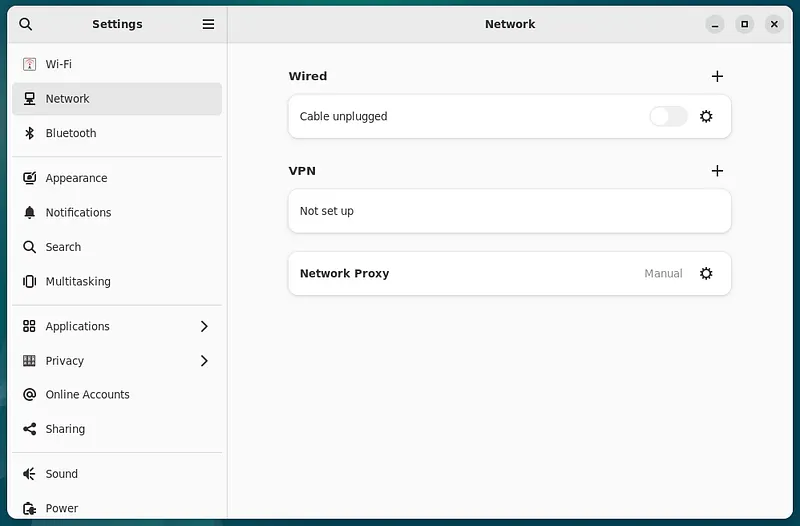
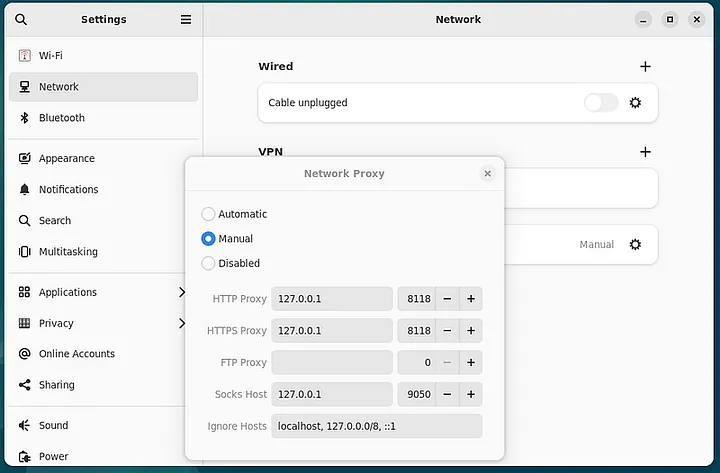
Go to “Network Proxy” and click on the “gear” icon for settings.
-
HTTP Proxy: 127.0.0.1 — Port: 8118
-
HTTPS Proxy: 127.0.0.1 — Port: 8118
-
Socks Host: 127.0.0.1 — Port: 9050
-
gnore Hosts: localhost, 127.0.0.0/8, ::1
Now, as shown in the image above, configure your computer settings. When you finish, close the windows by clicking on the X.
Open Firefox and type: dnsleaktest.com
You should see an IP different from yours, meaning it’s not from your ISP.
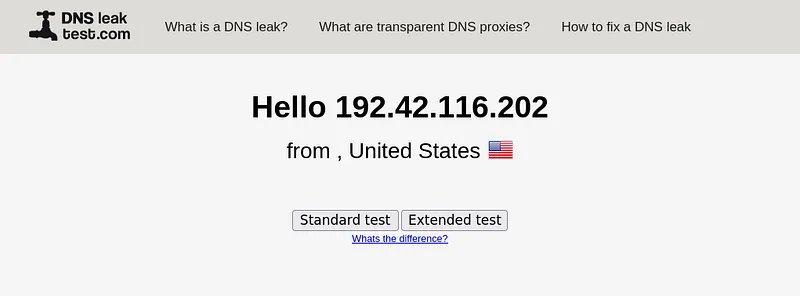
Note: Some people don’t like to use a proxy in countries of the 5 or 14 Eyes, but don’t worry, you are an investigator for good and in the service of justice, so the NSA won’t come after you unless you are threatening U.S. security (laughs). Oh, and remember that Privoxy is rotating, meaning every few minutes, you can refresh this page, and a new IP address will appear.
[User manual link for KeePassXC. Click Here.]
Launch KeePassXC on your computer.
In the main menu, click on “File” and select “New Database.”
Select where you want to save the database and give it a name. Remember to choose a secure location.
Create a strong password for your database. I recommend using a password generated by a password generator like Diceware. Ensure the password is long, unique, and includes special characters. [[User manual link for KeePassXC. Click Here.]
As suggested, it’s a good practice to write the password on paper and store it in a secure location until you memorize it. Make sure this paper is in a private place.
After entering the password, click on “Create Database” to complete the process.
Now that the database is created, begin adding your passwords and important information to KeePassXC.
Click on “Entries” and then “New Entry…”
Simply follow the steps.
Remember, the security of your database heavily depends on the strength of the master password. Ensure to protect it properly.
[User manual link for KeePassXC. Click Here.]
I understand that building a HOST machine resilient to determined adversaries, especially autocratic governments and criminals, can be challenging, as I mentioned at the beginning of the text. This material is advanced, and it’s completely understandable if you couldn’t follow all the steps. I recognize that what may seem easy for some people can be complex for others. So, if you encountered any difficulty at any point in the tutorials and had to interrupt the process, please don’t hesitate to contact me. I am here to assist you in overcoming any technical issues, ensuring that you successfully complete your journey. My email is: mauriciolimaosint@protonmail.com
You can also contribute! Open a new issue. We look forward to receiving your suggestions, ideas, and contributions to make our repository even better. Together, we can build a stronger and more collaborative community. Join us!
Issues: Feel free to open a new issue with details or suggestions about your problems. Issues Section of the repository.
Contributions: This repository is a collaborative effort, and contributions are welcome. If you have additional knowledge or suggestions, feel free to submit a pull request.
-
Fontes:
-
National Security Agency (NSA) — Document on Deprecated Signature Algorithms in Network Security Devices — https://www.nsa.gov/portals/75/documents/what-we-do/cybersecurity/professional-resources/orn-deprecated-signature-algorithms.pdf
-
Wired — Article on Google Hackers’ Capability to Modify Source Code — https://www.wired.com/2010/03/source-code-hacks/
-
Washington Free Beacon — Report on a New Chinese Intelligence Unit Associated with Extensive Cyber Espionage — https://freebeacon.com/national-security/new-chinese-intelligence-unit-linked-to-massive-cyber-spying-program/
-
Wikipedia — Information on Operation Aurora — https://en.wikipedia.org/wiki/operation_aurora
-
Whonix Forum — Discussion on Boot Clock Randomization — https://forums.whonix.org/t/boot-clock-randomization-bootclockrandomization/2200/3
-
GitHub Repository — Boot Clock Randomization Tool — ttps://github.com/kicksecure/bootclockrandomization
-
Whonix Wiki — Details on Local Clock Leaks and Whonix — https://www.whonix.org/wiki/dev/timesync#local_clock_leaks
-
Kicksecure Wiki — Hardened Kernel for Host and Virtual Machines — https://www.kicksecure.com/wiki/hardened-kernel
-
GitHub Repository — TCP ISN CPU Information Leak Protection (Tirdad) — https://github.com/kicksecure/tirdad
-
University of Cambridge — Research Paper: “Hot or Not: Revealing Hidden Services by Their Clock Skew” — https://www.cl.cam.ac.uk/~sjm217/papers/ccs06hotornot.pdf
-
University of Cambridge — Research Paper: “Embedding Covert Channels into TCP/IP” — http://www.cl.cam.ac.uk/~sjm217/papers/ih05coverttcp.pdf
-
Kicksecure Wiki — Strong Linux User Account Isolation — https://www.kicksecure.com/wiki/dev/strong_linux_user_account_isolation
-
Imperva: Man in the middle (MITM) attack — https://www.imperva.com/learn/application-security/man-in-the-middle-attack-mitm/
-
GitHub Repository — Brute Force Attack Protection (Security-Misc) — https://github.com/kicksecure/security-misc#brute-force-attack-protection
-
Kicksecure Wiki — Entropy, Randomness, /dev/random vs /dev/urandom, Entropy Sources, Entropy Gathering Daemons, RDRAND — https://www.kicksecure.com/wiki/dev/entropy
-
Kicksecure Wiki — Live Mode for Kicksecure™ — https://www.kicksecure.com/wiki/live_mode
-
Whonix Forum — Discussion on Using sudoedit in Whonix Documentation and Software — https://forums.whonix.org/t/use-sudoedit-in-whonix-documentation-and-whonix-software/7599/9
-
Wikipedia — Article on Side-channel Attack — https://en.wikipedia.org/wiki/Side-channel_attack
-
Kernel.org (Archived) — Documentation on Kernel Self-Protection — https://web.archive.org/web/20220320172536/https://www.kernel.org/doc/html/latest/security/self-protection.html
-
Whonix Forum — Guidelines for Posting in the Qubes-Whonix Forum — https://forums.whonix.org/t/what-to-post-in-this-qubes-whonix-forum-and-what-not/2275
-
Kicksecure Wiki — Information about Man-in-the-Middle Attacks — https://www.kicksecure.com/wiki/Warning#Man-in-the-middle_Attacks
-
Whonix Forum — Discussion on Tor Connection Padding — https://forums.whonix.org/t/tor-connection-padding/7477/11
-
Whonix Forum — Disabling TCP SACK, DSACK, FACK — https://forums.whonix.org/t/disabling-tcp-sack-dsack-fack/8109/5
-
Whonix Forum — Issues with SWAP, SWAP FILE, Whonix-Gateway Freezing During apt-get dist-upgrade, Encrypted Swap-File-Creator — https://forums.whonix.org/t/swap-swap-file-whonix-gateway-freezing-during-apt-get-dist-upgrade-encrypted-swap-file-creator/8317
-
Kicksecure Wiki — Operating System Software and Updates — https://www.kicksecure.com/wiki/operating_system_software_and_updates
-
Kicksecure Wiki — System Hardening Checklist — https://www.kicksecure.com/wiki/system_hardening_checklist
-
Kicksecure Wiki — Strong Linux User Account Isolation — https://www.kicksecure.com/wiki/dev/strong_linux_user_account_isolation
Give a ⭐️ if this project helped you!