Firmware for the Dual Looping Delay, a Eurorack-format module from 4ms Company.
The DLD is a two-channel, clock-syncable, high fidelity audio looping delay, with a maximum loop period of 2 minutes 54 seconds per channel at 48kHz, 16-bit (about 6 minutes maximum time), and half the time at 48kHz, 24-bit.
The DLD would make a nice platform for other audio projects, the hardware contains:
- 180MHz 32-bit ARM chip with FPU (STM32F427)
- Two stereo codec chips, very low noise and low jitter (CS4271)
- Four audio inputs and four audio outputs
- 256MBit of SDRAM
- Eight potentiometers
- Six Analogue inputs:
- Four unipolar analogue inputs (0 to 5V)
- Two bipolar analogue inputs (-5V to 5V)
- Five LED buttons (momentary)
- Two three-position switches
- Five trigger/gate digital inputs
- Three digital outputs
- Two LEDs, capable of being dimmed with PWM
- Separate analogue power supplies for each codec and the ADC
- EFficient 3.3V DC-DC converter accepts a wide range of input voltages
- Extra header with TX/RX UART connections.
You need to install the GCC ARM toolchain. This project is known to compile with arm-none-eabi-gcc version 4.8.3, and version 4.9.3. It is likely that it will compile with future versions as well.
You also may wish to install and IDE such as Eclipse. There are many resources online for setting up GCC ARM with Eclipse (as well as commerical software). This is totally optional. Instead of an IDE you can use your favorite text editor and a few commands on the command line which are given below.
For Mac OSX, follow these instructions to install brew and then the arm toolchain and st-link (taken from https://github.com/nitsky/homebrew-stm32):
ruby -e "$(curl -fsSL https://raw.githubusercontent.com/Homebrew/install/master/install)"
brew tap nitsky/stm32
brew install arm-none-eabi-gcc
brew install stlink
If you want to use the J-Link or J-Trace to flash your DLD, download and install the latest version of J-Link Software and Documentation Pack. You also may want to download and install Ozone, the GUI debugger. It can be downloaded from the same page. You don't need to install stlink if you are using Ozone, but it doesn't hurt to do so.
That's it! Continue below to Clone the Projects
For linux, check your package manager to see if there is a package for arm-none-eabi-gcc or gcc-arm-embedded or gcc-arm-none-eabi. Or just download it here:
Download GCC ARM toolchain from Launchpad
If you want If you want to use the ST-LINK or Discovery board to flash your DLD, install st-link from texane:
sudo apt-get install git libusb-1.0.0-dev pkg-config autotools-dev
cd (your work directory)
git clone https://github.com/texane/stlink.git
cd stlink
./autogen.sh
./configure
make
export PATH=$PATH:(your work directory)/stlink
The last command makes sure that the binary st-flash is in your PATH so that the Makefile can run it to program your module.
On the other hand, if you want to use the J-Link or J-Trace to flash your DLD, download and install the latest version of J-Link Software and Documentation Pack. You also may want to download and install Ozone, the GUI debugger. It can be downloaded from the same page.
If you don't know what you want to use to program, see the programmer section below!
That's it! Continue below to Clone the Projects
Download GCC ARM toolchain from Launchpad
If you want to use the ST-LINK or Discovery board to program, download and Install ST-UTIL.
If you want to use the J-Link or J-Trace to program, download and install the latest version of J-Link Software and Documentation Pack. You also may want to download and install Ozone, the GUI debugger. It can be downloaded from the same page.
If you don't know what you want to use to program, see the programmer section below!
Please contact me if you run into problems that you can't google your way out of.
Make sure git is installed on your system. (OSX: type "brew install git" into the Terminal)
Create a work directory, and enter it.
Clone this project (DLD), stmlib, and the stm-audio-bootloader projects:
git clone https://github.com/4ms/DLD.git
git clone https://github.com/4ms/stmlib.git
git clone https://github.com/4ms/stm-audio-bootloader.git
Create a symlink for stm-audio-bootloader so that it works with python (required to generate the .wav file for audio bootloading)
ln -s stm-audio-bootloader stm_audio_bootloader
Verify that your directories are as follows:
(work directory)
|
|--DLD/
|--stm-audio-bootloader/
|--stm_audio_bootloader/   <----symlink to stm-audio-bootloader
|--stmlib/
Make your changes to the code in the DLD directory. When ready to compile, make the project like this:
cd DLD
make
This creates an main.elf, main.bin, and main.hex file in the build/ directory. See the Programmer section below for how to get these files onto your DLD.
The bootloader is a separate project, slightly modifed from the stm-audio-bootloader from pichenettes.
The bootloader is already installed on all factory-built DLDs.
Once you can compile your firmware, you will need a way to flash it to your DLD. There are several options:
###Option 1) Audio Bootloader
The DLD has an audio bootloader built-in, so you can just compile your project using make wav and then play the wav file into the audio input of the DLD (see DLD's User Manual for detailed procedure).
This works well, but it very slow (up to 5 minutes per update). If you are going to be making a series of changes, this will be a very slow process!
When ready to build an audio file for the bootloader, make it like this:
make wav
This requires python to run. It creates the file main.wav in the build/ directory. Play the file from a computer or device into the DLD by following the instructions in the User Manual on the 4ms DLD page.
Troubleshooting: If you have trouble getting python to create a wav file, such as this error:
ImportError: No module named stm_audio_bootloader
Then run this command:
export PYTHONPATH=$PYTHONPATH:'.'
You may wish to put the above export command in your .bashrc or .bash_profile file
###Option 2) ST-UTIL or stlink
A faster way to flash firmware is to use ST-UTIL (windows) or stlink (osx or linux) to program the DLD the SWD header. With ST-UTIL or stlink and a programmer, you can update in a few seconds.
ST-UTIL only runs on Windows, and the stlink package from Texane runs on osx or linux.
Texane's stlink contains a gdb debugger that works with SWD programmers such as the STM32 Discovery boards. The STM32F4 Discovery Board is low-cost (around US$25) and works great as a programmer and debugger. Using four wires (that you have to supply), you can connect to the first 4 the DLD's 6-pin SWD header. Read the Discovery board's manual to learn about setting the jumpers to use it as an SWD programmer (rather than an evaluation board).
Another SWD programmer, which is slightly more robust than the Discovery board, is the ST-LINK v2 from ST corporation. This works similarly to the Discovery board. The ST-LINK v2 is encased in a plastic enclosure, while the Discovery board is open and could potentially be damaged if you're not careful. The ST-LINK v2 has a 20-pin JTAG header, so you have to read the pinout to know which four wires to connect to your DLD.
If you have stlink installed (osx and linux only), flash the file onto the DLD by attaching an ST-LINK programmer in SWD mode using a 4-conductor cable and run:
make flash
This writes the main.bin file starting at the 0x08008000 sector.
In Windows, use ST-UTIL to write the main.bin file starting at 0x08008000.
###Option 3) SEGGER's J-Link or J-Trace
Another option is SEGGER's J-link programmer. There is an educational version which is very affordable and a good choice for a programmer if you meet the requirements for education use. There are various professional commercial versions with a number of useful features. The J-link uses SEGGER's propriety software, Ozone, which not only will flash a hex or bin file, but can be used as a powerful debugger if you use it to open the elf file. There also are command-line commands for flashing. J-Link software runs on Mac, Linux, and Windows.
###Connecting the programmer to the DLD (options 2 and 3)
Discovery Board: The Discovery board has a 6-pin SWD header, and you can connect that pin-for-pin to the DLD's 6-pin SWD header. Only the first four pins are used, but it does no harm to connect pins 5 and 6. You can use a 0.1" spaced 4-pin Jumper Wire such as this one from Sparkfun.
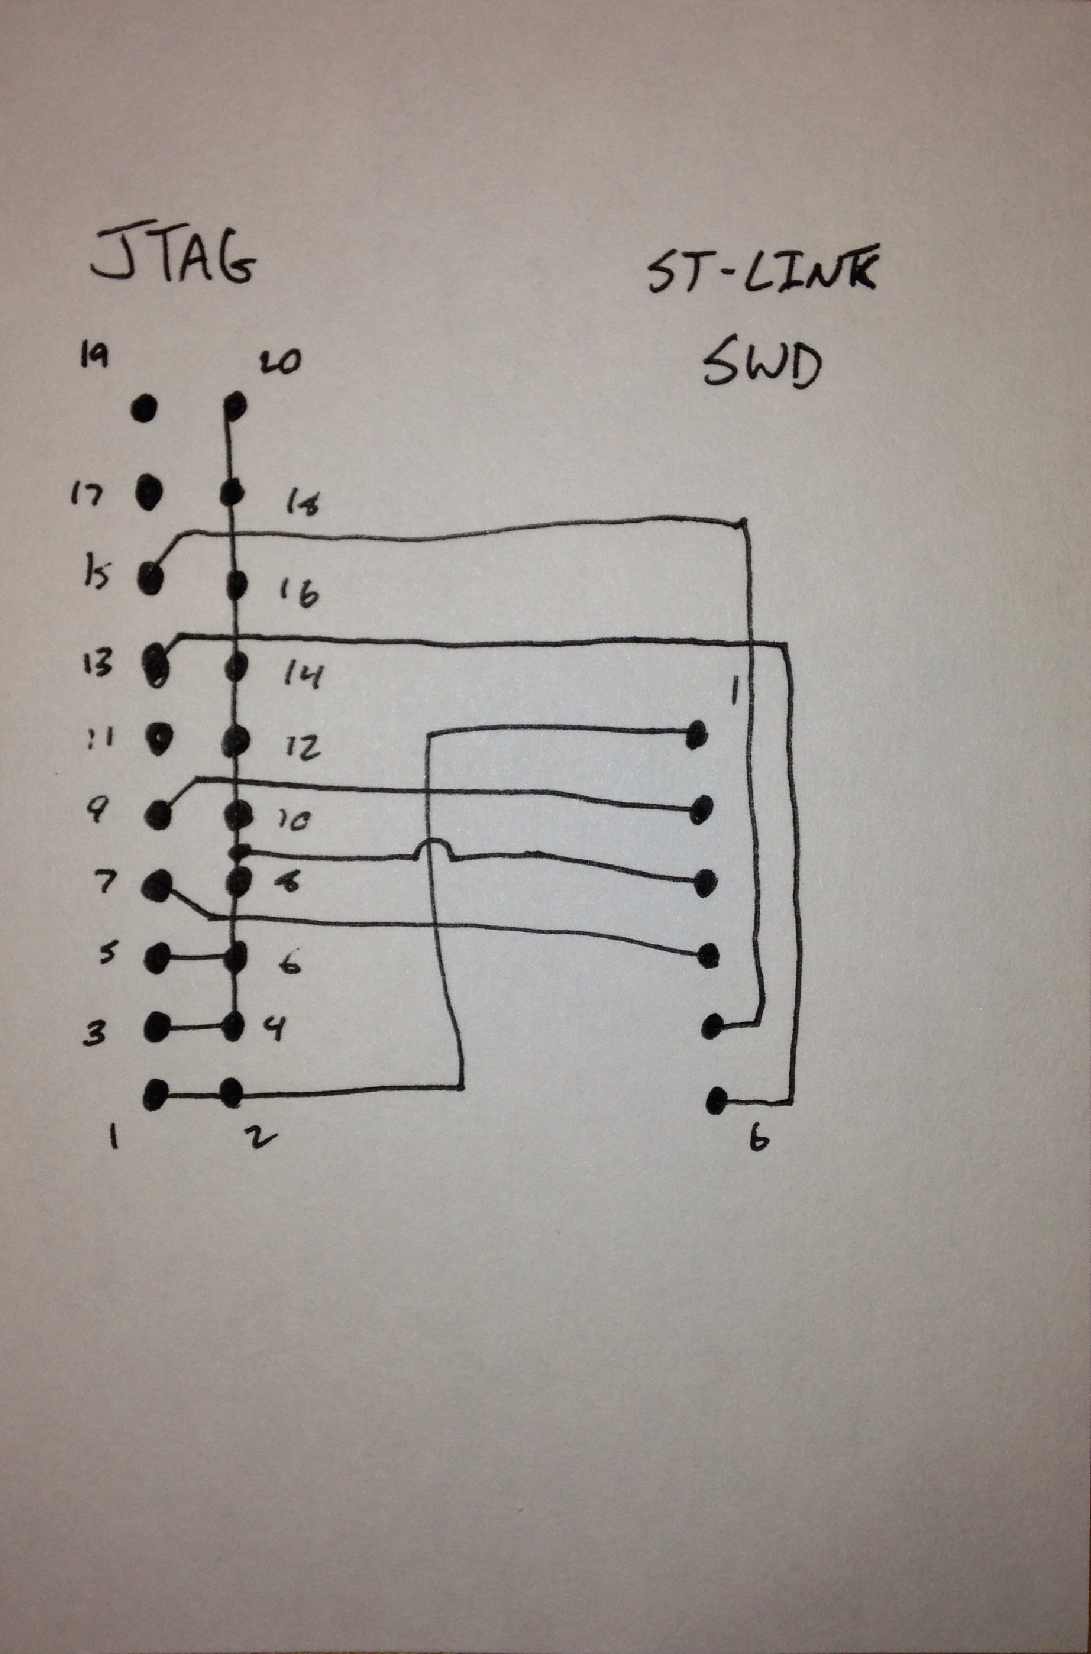
ST-LINK v2 or SEGGER J-Link: Both the ST-LINK and the SEGGER J-link have a 20-pin JTAG connector. You need to connect 4 of these pins to the DLD's 6-pin SWD connector, using 4 wires: here's a pack of 10
Look at these images:
- JTAG: 20-pin pinout
- SWD: 6-pin pinout
Then use your jumper wires to connect:
- SWD pin 1 (VDD) -> JTAG pin 1 (VREF)
- SWD pin 2 (SWCLK) -> JTAG pin 9 (TCK)
- SWD pin 3 (GND) -> JTAG pin 4 (GND)
- SWD pin 4 (SWDIO) -> JTAG pin 7 (TMS)
Here's more info in case you want it explained in another way:
- This image draws this out. (Taken from this post)
- ST's manual
- How to make an adaptor
Note: The DLD only needs pins 1-4 connected, pins 5 and 6 are not used (unless you are using custom code that enables the trace macrocells). On the DLD, pin 1 is marked with the numeral "1". The header itself is labeled "SWD"
The code (software) is licensed by the MIT license.
The hardware is licensed by the CC BY-NC-SA license (Creative Commons, Attribution, NonCommercial, ShareAlike).
See LICENSE file.
I would like to see others build and modify the DLD and DLD-influenced works, in a non-commercial manner. My intent is not to limit the educational use nor to prevent people buying hardware components/PCBs collectively in a group. If you have any questions regarding the license or appropriate use, please do not hesitate to contact me!
Do not include the text "4ms" or "4ms Company" or the graphic 4ms logo on any derivative works. This includes faceplates, enclosures, or front-panels. It's OK (but not required) to include the text "Dual Looping Delay" or "DLD" if you wish.