Tip
Translated by ChatGPT 3.5
中文說明請點選上方連結
PicoBETH (Raspberry Pico Badminton Electronic Tension Head) is an open-source project that allows hobbyist stringers who enjoy stringing but only have mechanical stringing machines (drop-weight, manual crank) to create their own electronic tensioning head. If you have basic programming skills, this project can be easily completed.
Design philosophy: Affordable, Easy , Precision
Drop-weight stringing machine and modification parts

Modified prototype machine

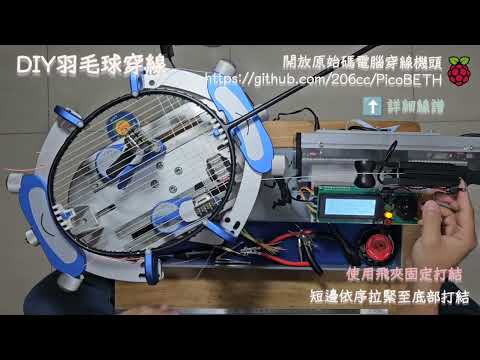
Final machine How to make step by step

Improvements in the final machine:
- Added screw dust cover.
- Upgraded to a 1610 ballscrew for increased tensioning speed.
- More rational hardware layout, allowing individual disassembly without the need for complete disassembly.
- Reduced volume by using a stacking approach, avoiding interference with the storage slot.
- Switched to a custom-designed PCB circuit board.
- Replacing the HX711 module with one produced by SparkFun.
- Addition of a UPS battery box that allows continued stringing even in the absence of an external power source.
Stringing demonstration video
Note
If you don't have a stringing machine, you can refer to this project to make one: Pico-Badminton-Stringer
If your badminton stringing machine structure is not robust, I strongly advise against undertaking this project. A weak fixing platform can deform when under tension, causing the racket frame to become rounded and the tension to decrease. As a result, the machine compensates by reinforcing the tension, leading to a cycle that ultimately results in the badminton racket breaking.
Caution
Extremely important: If your stringing machine is of a simple type, please make sure to reinforce the structure.
A year ago, due to company club activities, I started playing badminton. Although my badminton skills weren't great, I became fascinated with stringing. I purchased a drop-weight stringing machine and initially planned to buy an electronic tensioning head. However, I later thought about using my knowledge to create this project on the Raspberry Pico, incorporating a load sensor, several microswitches, and buttons.
Function demonstration video
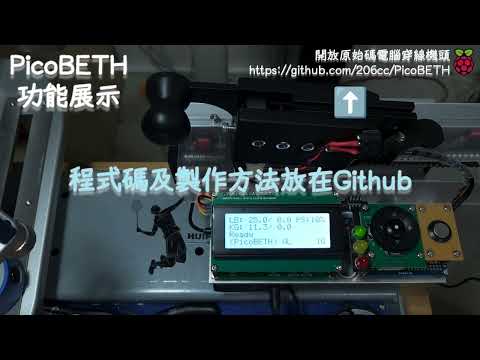
- LB/KG display and setting
- Pre-Stretch function
- Constant-pull system
- Knot function
- Tension adjustment manually during tensioning
- Tension calibration
- Stringing timer
- Tension timer
- Tension counter and boot counter
- Detailed recording of tensioning logs
- Pull speed of the string(Switch on the TB6600 stepper motor driver)
- Real-time UPS Redundancy Feature
- 0.1LB(50G) accurate
- Use left and right keys to set pounds, kilograms, and the tens, units, and decimal places of pre-stretch.
- Use up and down keys to adjust the selected settings.
- Stringing timer function: Start timing by pressing the exit key, stop timing by pressing it again, and reset the timer on the third press.
- The Pre-Stretch function (PS) and Knot function (KT) are switched using the up and down keys. After using the Knot function, it will automatically switch back to the Pre-Stretch function.


- When the set tension is reached, automatically enter the constant-pull mode. Increase tension if it's insufficient, decrease tension if it's too high, until pressing the button on the clamp or exit button to end the tensioning mode.
- Press the center button of the five-way key to enter manual fine-tuning mode. The constant-pull mode will be canceled at this time, and tension can be manually adjusted with the up and down keys. Press the center button of the five-way key again to re-enter constant-pull mode.
- When the specified tension is reached, the countdown timer will appear.


Warning
If the tension fine-tuning amplitude is too high or too low, you can adjust the FT parameter yourself.
- UN: Select pounds or kilograms when setting.
- AT: Default Constant-Pull Switch.
- BB: Active buzzer Switch.
- FT: Amplitude of fine-tuning when reaching the specified tension.
- HX: Calibration of the load sensor for HX711 (see the Final Settings chapter for details).
- I: System information.
- T: Tensioning Count/Log interface


On the settings screen, use the left and right keys to select the tensioning count, then press the center key of the five-way key to enter the tensioning log recording page. On the page, use the left and right keys to browse through the log records.
TIMER: If the timing function is enabled, display the time of tensioning.
LB: Set tension/stop tension.
PS: Set pre-stretch value.
FT: Increase tension fine-tuning count/decrease tension fine-tuning count/fine-tuning parameters.
C/H: CC parameter/HX parameter.

Note
The default display is 1-50 log records. If you need to adjust, please modify the LOG_MAX parameter.
Warning
Do not set the LOG_MAX parameter too large, as loading too many logs during startup will cause insufficient memory and result in failure to boot.

Main materials
- Raspberry Pico H
- CBX/SGX 1610 ballscrew 200MM sliding table
- 57x56 stepper motor (2-phase 4-wire 1.8°)
- TB6600 stepper motor driver
- NJ5 20KG load sensor
- HX711 module (SparkFun)
- 2004 i2c LCD
- Wise 2086 bead clip easy head
- Five-way key module
- Button
- Micro switch
- Active buzzer
- Tri-color LEDs
- 12V 18650 UPS Battery Box
Warning
Unless you have the ability to modify the code yourself, please purchase materials according to the specified models or specifications.

There are many styles of sliding tables, and this project uses the CBX/SGX 1610 ballscrew 200MM sliding table. It is recommended to purchase the CBX version with a bearing fixing seat. Some sliding tables without bearing fixing seat may experience issues under high-speed and high-tension conditions.
Bearing Fixing Seat

TB6600 is a small, economical stepper motor driver used for 42 and 57 type stepper motors. It is very cheap on online stores. It is recommended to buy TB6600 labeled as "upgraded version" or "enhanced version". Some very cheap TB6600s may have noticeable electrical noise, and I am not aware of any unknown issues.
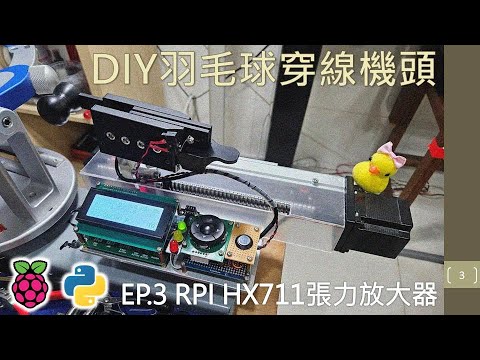
HX711 is a simple and easy-to-use amplifier for weight sensors, commonly used in high-precision electronic scales. In this project, it is used to measure the tension of the strings. I have tested many HX711 circuit boards produced by various manufacturers and found a serious issue: many HX711 circuit boards from different manufacturers tend to drift. Of course, this drifting issue can be fixed. I will produce a dedicated episode on my YouTube channel on how to fix this issue. It is recommended to directly purchase the HX711 Load Cell Amplifier produced by SparkFun, as it has better quality. Before fabricating the stringing machine head, use the drift test program taught in EP. 3 to test the stability of this board. If you encounter any issues, you can leave a comment on the video.
I tested the HX711 circuit board


Warning
Please add safety measures as needed, such as adding pull-up resistors to buttons, fuses to stepper motors, limiting resistors to LEDs, etc., to protect the Raspberry Pi Pico and motors.
Video Series of the Production Process (Continuously Updating)

Use Thonny to save the following code files to the Raspberry Pico. The src folder contains relevant libraries for hx711 and 2004 LCD.
- main.py
- src\hx711.py
- src\lcd_api.py
- src\pico_i2c_lcd.py
Note
Thanks to https://github.com/endail/hx711-pico-mpy for providing the hx711 library for Pico.
Note
Thanks to https://github.com/T-622/RPI-PICO-I2C-LCD for providing the 2004 LCD library for Pico.
Note
Related crafting videos

Note
Related crafting videos

This project demands a higher standard for the HX711, and it is recommended to use the more stable quality provided by SparkFun.

The default setting for SparkFun's HX711 is 10Hz. To enable 80Hz, you'll need to cut the connection wire at the green arrow as indicated below.

The quality of each HX711 unit varies. Before installing the equipment, it's advisable to test the stability using a breadboard. A normally stable board should not drift by more than 1G over the course of a whole day.

Note
The testing script is named TEST_hx711.py.
Warning
Starting from version 1.96, during boot-up, the board will check the RATE. Failure to reach 80Hz or exceeding a drift of 1G will prevent the board from booting up.
Warning
The quality of each HX711 amplifier varies. If there are any issues, it is recommended to switch suppliers.
Note
Related crafting videos
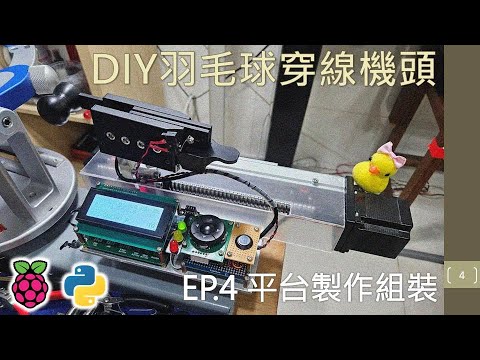
Components can be freely arranged. The diagram below shows the positioning hole diagram for reference. Refer to the tutorial video for usage instructions.

Note
Related crafting videos

Gerber PCB DOWNLOAD

Gerber PCB BTN DOWNLOAD
Note
Related crafting videos

Upon completing assembly and powering on the machine for the first time, please conduct tests on all buttons, front and rear limits, and HX711 sensors as instructed on the screen.
Note
Related crafting videos

FT Parameter: It determines the magnitude of adjustments after reaching the specified tension. A too large value can cause repeated tension adjustments, while a too small value increases the number of fine-tuning iterations required to reach the specified tension.
The recommended FT parameters:
| Ballscrew | TB6600 Normal Mode | TB6600 Fast Mode |
|---|---|---|
| 1605 | 14~15 | 7~8 |
| 1610 | 7~8 | 3~4 |
Warning
Due to differences in hardware brands' precision, the correct FT parameters depend on actual testing.
HX711 tension sensor calibration coefficient. It is necessary to recalibrate it the first time you use it or when replacing the tension sensor or HX711 circuit board.
Calibration method:
- Temporarily disable the Constant-pull function on the settings page.
- Set the HX parameter to 20.00 on the settings page.
- Return to the main menu and set the tension to 20.3 lb with a Pre-Stretch of 10%.
- Attach one end of the external tension gauge to the stringing machine and the other end to the badminton string.
- Start tensioning, and when the LCD displays below 20.0 lb(19.9), note down the reading on the external tension gauge.
- Enter the recorded tension gauge reading on the settings page and re-enable the constant-pull function.
Reference video

Important
Necessary! If you skip this calibration step, the tension displayed on the LCD will not match the actual tension.
A: It is recommended to first watch EP.1 ~ EP.3 of the project compilation on my YouTube channel. You will need to purchase materials such as Raspberry Pico, HX711 load cell amplifier, NJ5 load sensor, TB6600 stepper motor controller, and 57x56 stepper motor. These materials are easy to prepare and not expensive. If the example program runs smoothly, you can prepare the remaining materials. The subsequent production process leans towards mechanical machining. Additionally, you will need tools such as a bench drill, angle grinder, soldering iron, and some basic mechanical machining skills. Follow the tutorial videos step by step to complete the project.
A: In theory, you can switch to DM542C, but the driving method may need to be modified. For example, parameters such as MOTO_FORW_W, MOTO_BACK_W for controlling forward and reverse in the code, and MOTO_SPEED_V1, MOTO_SPEED_V2 for controlling speed may need to be adjusted. It is recommended to first modify the example program in EP.2 to ensure that this driver can drive the motor normally and that there is no abnormal noise from the slide during movement before transplanting it into the main program. Although I haven't tried it myself, there have been successful ports by other branch developers, which you can refer to in the Pico-Badminton-Stringer project.
A: Initially, this project was also made with a sampling frequency of 10Hz, which can be used normally. However, after testing, it was found that a sampling frequency of 80Hz provides more precise, delicate, and faster response control of tension (the time difference between detecting the specified tension and instructing the Raspberry Pico to stop the motor rotation at 10Hz is about 1.3 times that of 80Hz). Therefore, in version 1.96, I added a check for the 80Hz action. If you still want to use 10Hz, please comment out this check and change the tension coefficient CORR_COEF value to 1.3. There may be some parameters or code that need to be adjusted and corrected manually.
A: You can refer to the test program in EP.3. After testing, the normal drift value of HX711 at 80Hz is about 0.5 ~ 1 gram. Therefore, in version 1.96, I added a drift value sampling during startup for 1 second. If it exceeds 1 gram, it cannot be used. If the check passes, generally speaking, the real-time tension displayed in the lower right corner of the LCD within -1 ~ 10 grams during standby is normal linear drift.
A: Of course, you can use HX711 load cell amplifiers from other brands, but the premise is that they can pass the test program in EP.3. In my experience, other brands' normal HX711s will be as stable as SparkFun's. Unfortunately, other brands may have many defective products that drift. If the drift exceeds 50 grams, it is an error value of 0.1 lb, which will cause repeated fine-tuning of the Constant-pull system.
A: This has also been something I've always wanted to do. The Wise 2086 bead clip easy head is the most expensive hardware in the entire project, but it's also because it can be easily installed on the NJ5 load sensor and has excellent clamping functionality. So far, I haven't figured out how to replace it. If you have a good bead clip head design, you can install it yourself. Just make sure to pay attention to the precautions mentioned in EP.9.
A: Theoretically, if high-quality parts are used, the durability should be quite high. As of today (2024/05/22), the number of tensionings on the formal machine I made has exceeded 7500 times without any problems occurring. Even if maintenance is required in the future, all electronic components are quite inexpensive.
A: In theory, it is possible, but some hardware needs to be upgraded, such as changing the load sensor from 20KG to 50KG, larger stepper motors, larger power supplies, stronger platforms and slides, and modifying some code parameters. If interested, you can develop your own branch project.
A: I plan to add English subtitles in the future, but because my usual work is quite busy, I only have some time to work on projects each day. If possible, please give the video a thumbs up and subscribe, as this is a great encouragement for me.
If you have any questions about making, please leave a comment in the YouTube video.
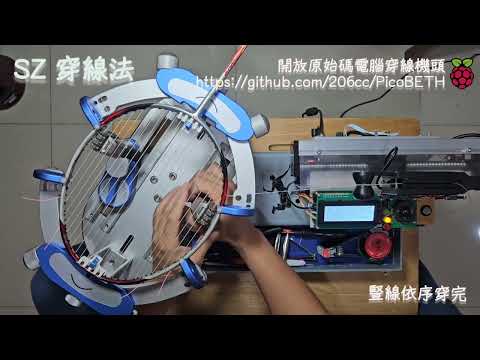
I also have my own stringing pattern, temporarily named the Pico Stringing Pattern. I'm not sure if anyone else is using it, so if there is a similar stringing pattern, please let me know the stringing pattern name.
The stringing pattern demo.

- The short side is approximately 5 racket lengths, and the long side is approximately 8 racket lengths.
- Follow the Yonex stringing pattern for main strings, pulling the two outermost main strings together for tension.
- The cross strings are first the bottom of the short side, tying knots at the bottom, and then strings on the long side, tying knots at the top.
- Increasing the tension of the cross strings will help the racquet maintain its original shape after stringing. Due to variations in stringing machine and individual techniques, you can experiment to find the tension increment that minimizes deformation.

- The measured values were obtained after stringing with a 25lb tension, following a 10% pre-stretch, and allowing it to sit for 48 hours.
- The measurements represent relative tension reference values for each string, NOT the actual tension.
- Calibration method for the tension tester: https://youtu.be/xYqu03XBzFU