Website: https://lilidog.org/
Forum Link: https://www.forum.lilidog.org/
Download link: https://sourceforge.net/projects/lilidog/
Lilidog is a lightweight Linux distro using the Openbox window manager.
Lilidog is based on Debian, with most of the hard parts done, and some cool stuff along the way.
Everything is easily accessible, with numerous options to customize further.
NOTE - For All live sessions, Username is "user" and root password (sudo) is "live".
-
Lilidog-amd64 (Bullseye amd64 full version) - Has most programs already installed for everyday use. This includes Firefox, Thunderbird, Thunar, Geany, Gpicview, Smplayer, Gparted, Synaptic, and Gimp to name a few.
-
Lilidog-Minimal-amd64 - This version contains all of the goodness of Lilidog while allowing you to choose most all of your OWN packages. Currently contains xfce4-terminal, Thunar, and Mousepad to get you started. Design your system with any other programs you might like. sudo apt update && sudo apt install synaptic for a graphical interface to make installing your programs easier.
-
Lilidog-i386 (Bullseye i386 full version) Uses the same base packages as the amd64 version, but for older hardware. You may need to boot with the kernel parameter 'forcepae' if you have difficulties. This version will no longer be available after debian changes from Bullseye to Bookworm.
-
Beardog - A play on words a bit. This is the "bare" minimal version of Lilidog with no ld theme changer. pcmanfm and lxterminal are default. Upon login, you will be presented with an option to install a few of the more common items people like to have on their system, including a login manager, jgmenu with icon control, dunst with sound control, transparency, backports & kernel, and the rest of the installers if you want. If you are wanting to start with a bare system, this may be the one for you!
At various times you may also find a bookworm addition and/or a sid addition. These builds are for testing purposes.
Both sid (unstable) and bookworm (testing) may contain yet unknown errors. Realistically, the stable builds are the
way to go for most people unless you just like to tinker. If you choose one of these builds, be prepared to update
frequently. Some of the installers will also be unavailable until Bookworm becomes stable in the summer of 2023.
If you dual boot, you will want to edit /etc/default/grub as root and uncomment GRUB_DISABLE_OS_PROBER=false
and then 'sudo update-grub' in a terminal to see your other distributions. Join the Lilidog forum to report
any issues and keep lilidog bug free!
See further below for features.
NOTE - The DOWNLOAD button defaults to the Bullseye-amd64 full version! (stable). Click below for the others.
https://sourceforge.net/projects/lilidog/files/Releases/
Probably the easiest way to use Lilidog is to put it on a usb stick.
One easy way is to grab the live-usb-maker app: https://github.com/MX-Linux/lum-qt-appimage/releases/tag/19.11.02
Download the AppImage.tar.gz and open a terminal:
tar -xaf live-usb-maker-qt-19.11.02.x86_64.AppImage.tar.gz
Then:
sudo ./live-usb-maker-qt-19.11.02.x86_64.AppImage
Use "image mode" in the live-usb maker when burning the image.
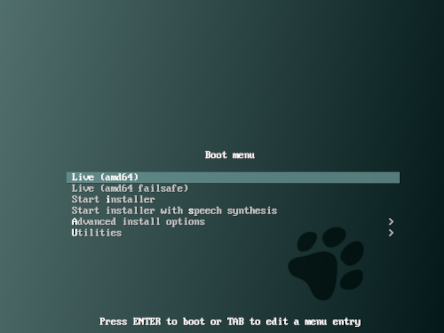
The boot screen for Lilidog gives a choice of using as a Live session, or installing if you like what you see.
Lilidog uses the Debian installer with both text and graphical installs available.
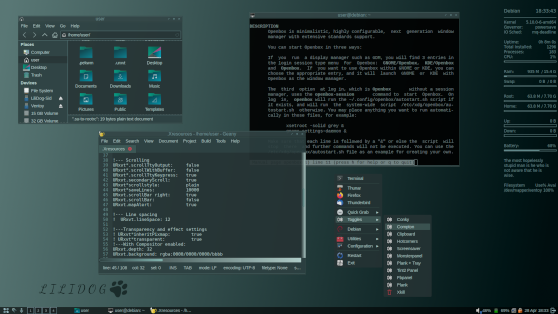
Lilidog opens in the Openbox window manager. Easy enough to install fluxbox or others. They will show up in your login screen
as options.
The username and password for the live environment is "user", and "live" respectively.
Lilidog:
After boot, you have the option to install or try out Lilidog live. Once in a session, there are a few items that can shape your experience. Look in the "paw" icon in the tint2 panel for theming options. Look in the "Toggles" section of the menu for some useful options, and look in the "Install Extras" portion of the menu for extra programs you may want. Look around. There is more to see as well. NOTE - For All live sessions, Username is "user" and root password (sudo) is "live".
-
Based on Debian with contrib and non-free sources enabled by default.
-
Bullseye backport and Debian Fast Track can be added to your sources from the 'Extras' portion of the menu under 'Utilities'.
-
These are 'no recommends' builds. This means only required dependencies are included during install. This leaves out any recommended or suggested packages, allowing for complete control over package installation. No unwanted packages will be installed by default. This can be changed after install if desired.
-
Tint2 is the panel by default, with an option to use FbPanel if desired. Currently available tweaks for tint2 include transparency, time format, autoshrink, autohide, and position (top or bottom). These can be accessed from either the menu, or in the tint2panel itself under the 'T2' icon.
-
Jgmenu is the menu for all versions. Huge amount of customization available. Go to menu -> configuration -> jgmenu.conf for how to change and add items.
-
Wallpapers - Handled by Feh. Place any image you would like to use as a wallpaper in ~/Pictures/wallpapers. Go to Menu -> Configuration -> Wallpaper Chooser to change wallpapers. You can also right-click on any image you choose from the file manager to set as background wallpaper. Other right-click options for images include rotation and copying to ~/Pictures.wallpapers. A random wallpaper toggle is included.
-
Icons - The Breeze icon set comes installed as default. Papirus and Gnome icon sets both have menu install entries as well. Both menu options provide for a variety of different colors to choose from. There is an extra script to provide even more Papirus theme colors if interested. (24 in total for now.)
-
Menu Toggles - Items like Autologin, notification sounds, screen color correction, conky, random BG, and more.
-
Menu Extras - an extra install menu with options for Liquorix kernel, Qemu, Steam, Etcher, Discord, and more.
-
Grub background changer opens a window to choose your own images. Lilidog ships with six to give you an intitial choice before finding your own to add to the collection.
-
There is a shortcut for xfce4-power-manager by right-clicking on the battery icon. To see time format options for 24 hour vs. 12 hour, middle-click over the time for the man page. Hover over the icons to see what they are. The live password is "live" for the screenlock.
-
Xscreensaver and other handy startup apps readily available through the toggles in the menu, or can be activated on login by adding to the autostart configuration file.
-
Dmenu for an alternate menu source. - ALT + F2 pulls the full Dmenu up, while ALT + F3 pulls up a customized Dmenu with only the most commonly used apps. Look under Configuration in the menu to change items.
-
Wbar for icons on the desktop if desired. activate from Toggles in the menu. Fun to configure!
-
Thunar is the default file manager. Custom right-click options are already added as well. These include everything from "Open as Root', to different rotations and sizing of pics, to comparisons of files using Meld. And more.
-
Custom Lilidog Openbox and GTK themes, and matching themes for Geany and Xfce4-terminal. The fonts are Liberation Sans, except for urxvt and Conky, where Dejavu is used. (see "instructions" below.)
-
Xfce4-terminal is default, with URXVT also installed. Use "App Alternatives in the menu or sudo update-alternatives --config x-terminal-emulator in a terminal to switch default terminals.
-
URXVT terminal has font size control (ctl+up/down), transparency, and opens urls in Firefox.
-
Conky Chooser in the toggles section of the menu contains toggles for six different Conkys and the time format shown. All of the Conkys contain relevant info. These include a Clock, Full Info, Fortunes, Shortcuts, Worldclock, and Current Conditions. Please note that "Current Conditions" takes a moment to initialize. Mix, match, change, etc. Everything is located in the conky folder ~/.config/conky including the Conky Chooser script.
-
Picom Composite Manager with transparency enabled. Look in the configuration menu to access ~/.config/picom.conf in order to change transparency, shadows, and more.
-
Gammy screen color and lightness control located in Toggles, and from the keybind "Super + g". This will allow you to change and set the gamma and brightness of your screen for different times of your choice, or simply as a toggle when desired.
-
Newsboat RSS reader with a custom configuration already in place and ready for new RSS feeds.
-
System notifications enabled with Dunst.
-
Swapid script for the frequent dual installer. This grabs your swap uuid and opens the appropriate windows to edit. Run 'swapid' in a terminal after installing another distro to a different partition.
-
ld-hotcorners - Each corner of the screen responds to a command. Turn it on with the button in the lower left corner or under Toggles in the menu. Change the corners in ~/.config/ld-hotcorners. Currently clockwise from top left: __file manager, toggle Picom, exit menu, and terminal.
Theme changes:
The easiest way to change themes is with the 'Quick Theme Changer' located in the menu under Configuration.
This changes The GTK theme, Openbox theme, Geany theme, Lightdm, wallpaper, menu, and terminal theme all on the fly.
Make your own themes:
All of the theme files are located in ~/.config/lilidog-themes. This will allow you to change the settings on the existing themes,
to making your own and adding a button to the theme changer. For a quick overview see the discussion: https://sourceforge.net/p/lilidog/discussion/setup/thread/b3fec6a23b/
or the README located in ~/.config/lilidog-themes.
Other Settings:
- For keyboard language layout see: https://sourceforge.net/p/lilidog/discussion/setup/thread/e9e88533c0/
- Most common items to change will have an entry under 'Configuration' in the menu.
- Settings Manager - Change your gtk theme, fonts, and icons on an individual basis. Other important settings are here as well.
- Openbox Conf - The settings here control the window borders and other settings specific to Openbox.
- Jgmenu - Go to menu -> configuration -> jgmenu.conf for menu items. For theme changes, got to Jgmenu Theme Changer in the menu. ("o" or "g")
- Geany - There are themes to match. These are changed through the Geany program under "view" - "change color scheme"
- Conky net speed (when uncommented) - Use: ls /sys/class/net/ in a terminal to determine which wired/wireless network you have,
and replace "wlp2s0" with yours. - Printer - Setup entry in the menu under utilities.
- Lightdm - Configuration settings in the menu.
Also look under the "Toggles" section in the menu for some instant changes to different items as well.
There is a discussion forum above on Sourceforge as well if you have suggestions or questions. https://sourceforge.net/p/lilidog/discussion/
Open a terminal and:
sudo apt install live-build live-config live-boot gitBe aware that neither live-boot nor live-config are necessary for the build,
but having the information is good (man pages and such), and won't hurt anything.
Now clone Lilidog to your $HOME directory:
git clone https://github.com/sleekmason/Lilidog.gitcd to Lilidog, and then:
sudo lb clean

Sudo lb build
If live build fails for some reason, simply try lb build again until it builds properly,
or if obviously won't build after a few tries, use lb clean and try again.
This will leave you with an iso image you can either burn to dvd or usb (easier).
I recommend grabbing the live-usb-maker app: https://github.com/MX-Linux/lum-qt-appimage/releases/tag/19.11.02
Download the AppImage.tar.gz and open a terminal:
tar -xaf live-usb-maker-qt-19.11.02.x86_64.AppImage.tar.gz
Then:
sudo ./live-usb-maker-qt-19.11.02.x86_64.AppImage
Root is required to write to connected devices.
The boot screen gives a choice of using as a Live session, or installing Lilidog Linux if you like what you see.
If you would like to work on your own distro after building, install to a separate partition ONLY to build from.
The whole system becomes your template. Think clone within a clone.
Follow the examples here for further ideas. A whole new world just opened up if you do:)
https://live-team.pages.debian.net/live-manual/html/live-manual/examples.en.html#tutorial-1
- Please "star" this site! This lets others know there is something worthwhile here.
- Ask questions here, or on Sourceforge.
- Feel free to link this page. This is how others also get to try new things.
Contact info: sleekmason@gmail.com
