This repository contains a single-branch early preview of the Beamable Unreal SDK. It tries to remain as stable as
possible, but with no hard guarantees about it. It also does NOT currently provide any backward compatibility guarantees
across any of it's APIs (Blueprints or C++). The current supported version is Unreal 5.2.
- Beamable Core Plugin
- Beamable Core - Module:
- Contains all Engine Subsystems shared between Editor and Runtime.
- Our Code-Gen Api lives here along with UserSlots.
- Beamable Core Blueprint Nodes - Module
- Intermediate layer that exists only when Uncooked.
- This basically has all the nodes for interacting with Beamable Core
- Beamable Core Editor - Module
- Contains all Editor Subsystems for keeping the state of our editor application.
- Has the Editor UI stuff to render special nodes as well as widgets.
- Beamable Core Runtime - Module
- Contains all Runtime Subsystems for keeping the state of our runtime environment.
- This will not have ALL the systems. This is focused on Auth and Account Management.
- The plan is to release other Plugins, dependent on this one, for adding specific features built on Beamable.
- Beamable Core - Module:
Start by cloning this repo's main branch. At the moment, we are in early development of the SDK (preview) --- so the
simplest way to get new features, fixes and changes to our early adopters is to simply have them be in this single
branch.
We know this does not provide the best of stability guarantees, but at the moment we value ease of development and speed of iteration more than that.
Once this repo is cloned/pulled locally, simply copy/paste the folder Plugins/BeamableCore into your own
project's Plugins folder.
After that, you'll need to add some modules to your Target.cs files.
// Add to YourGameGame.Target.cs
ExtraModuleNames.AddRange(new string[] { "BeamableCore", "BeamableCoreRuntime", "BeamableCoreBlueprintNodes" });

// If you have an Editor Module, add this to YourGameEditor.Target.cs
ExtraModuleNames.AddRange(new string[] { "BeamableCore", "BeamableCoreEditor", "BeamableCoreBlueprintNodes" });

// If you're game has a dedicated server build, add this to YourGameServer.Target.cs
ExtraModuleNames.AddRange(new string[] { "BeamableCore", "BeamableCoreRuntime", });

// If you're game has a client-only build, add this to YourGameClient.Target.cs
ExtraModuleNames.AddRange(new string[] { "BeamableCore", "BeamableCoreRuntime", });
To use beamable, you'll also need to add the modules to your Build.cs files for the targets and modules using
Beamable.
// Add to YourGame.Build.cs
PublicDependencyModuleNames.AddRange(
	new string[] {
		// ... Other Modules ...
		"BeamableCore",
		"BeamableCoreRuntime",
	}
);

// Add to YourGameEditor.Build.cs
 PrivateDependencyModuleNames.AddRange(
	new string[] {
		// ... Other modules ...
		"BeamableCore",
		"BeamableCoreEditor",
		"BeamableCoreBlueprintNodes",
	}
);
Now you can compile and run the Development Editor target for your project from VS, Rider or any UE-supported IDE.
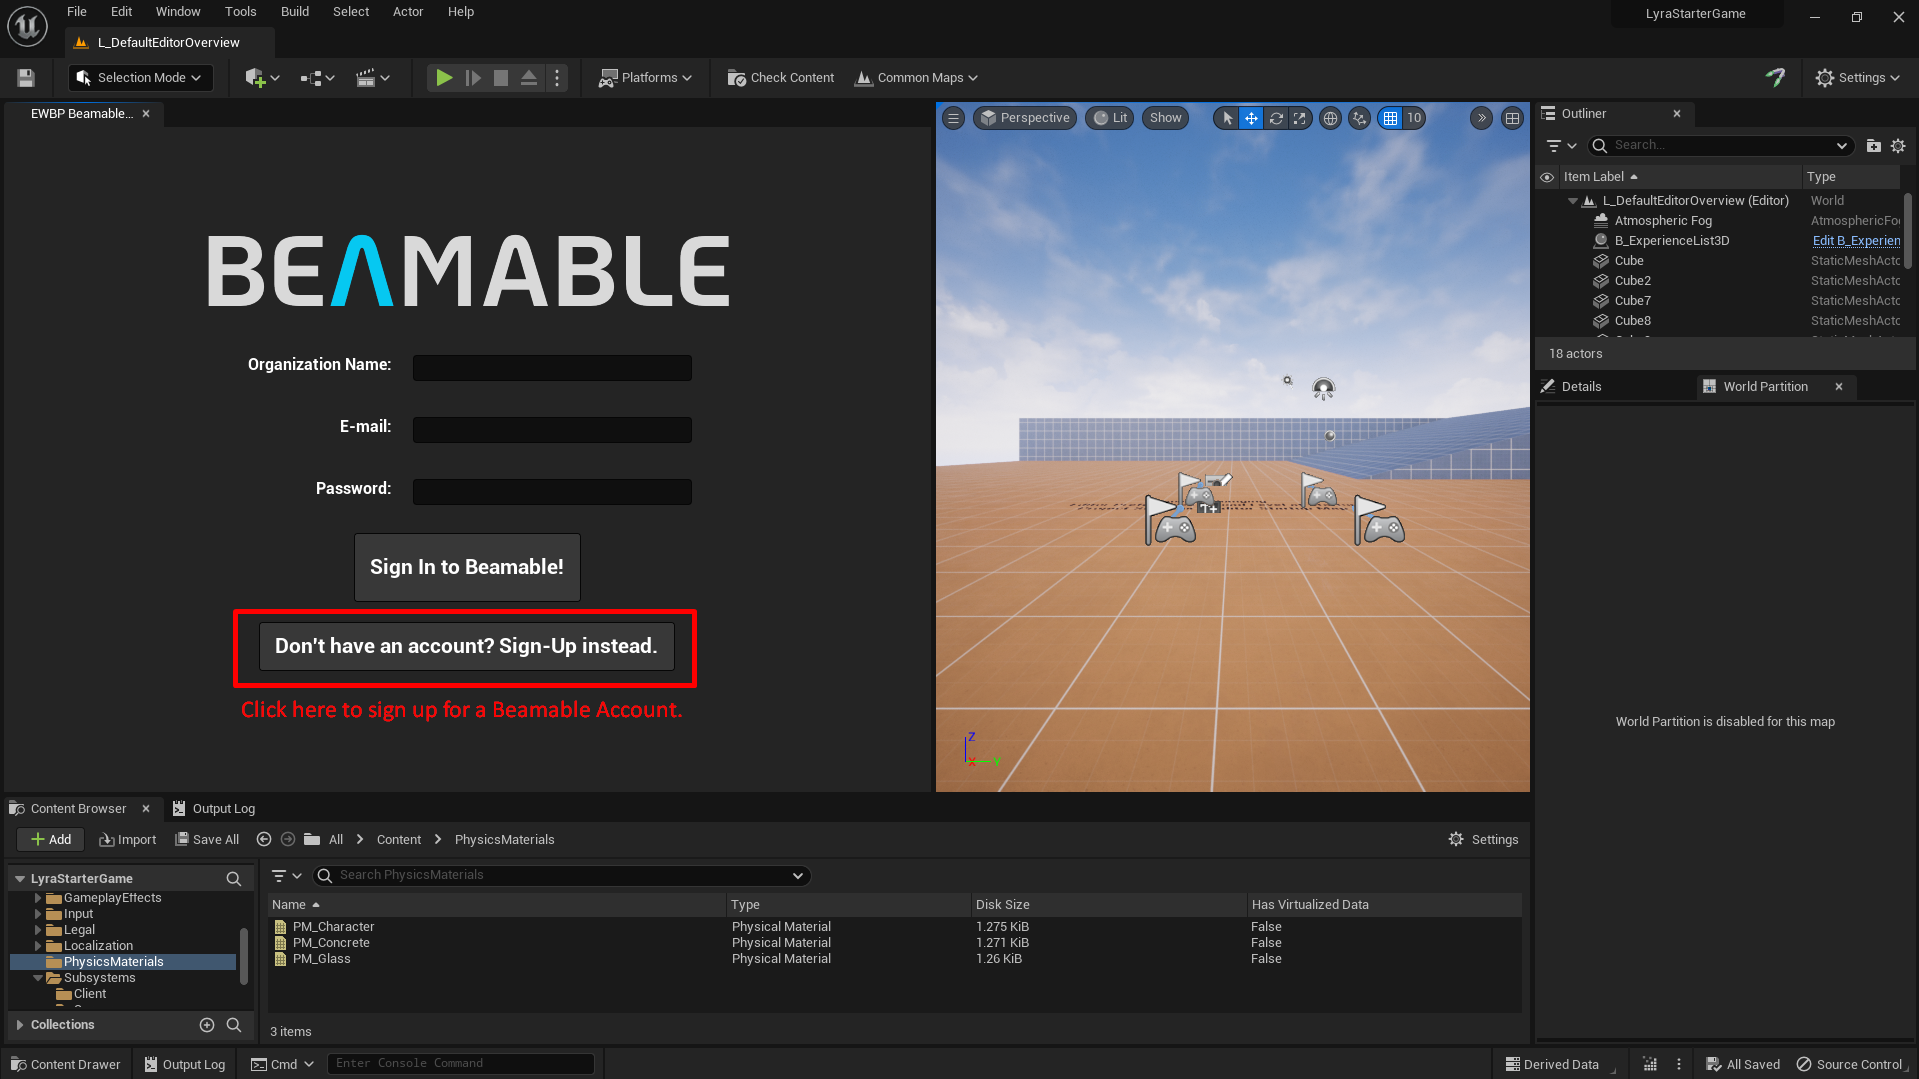
You can see the Beamable Button on the end of the Level Editor Bar. Pressing it will open the Beamable window.

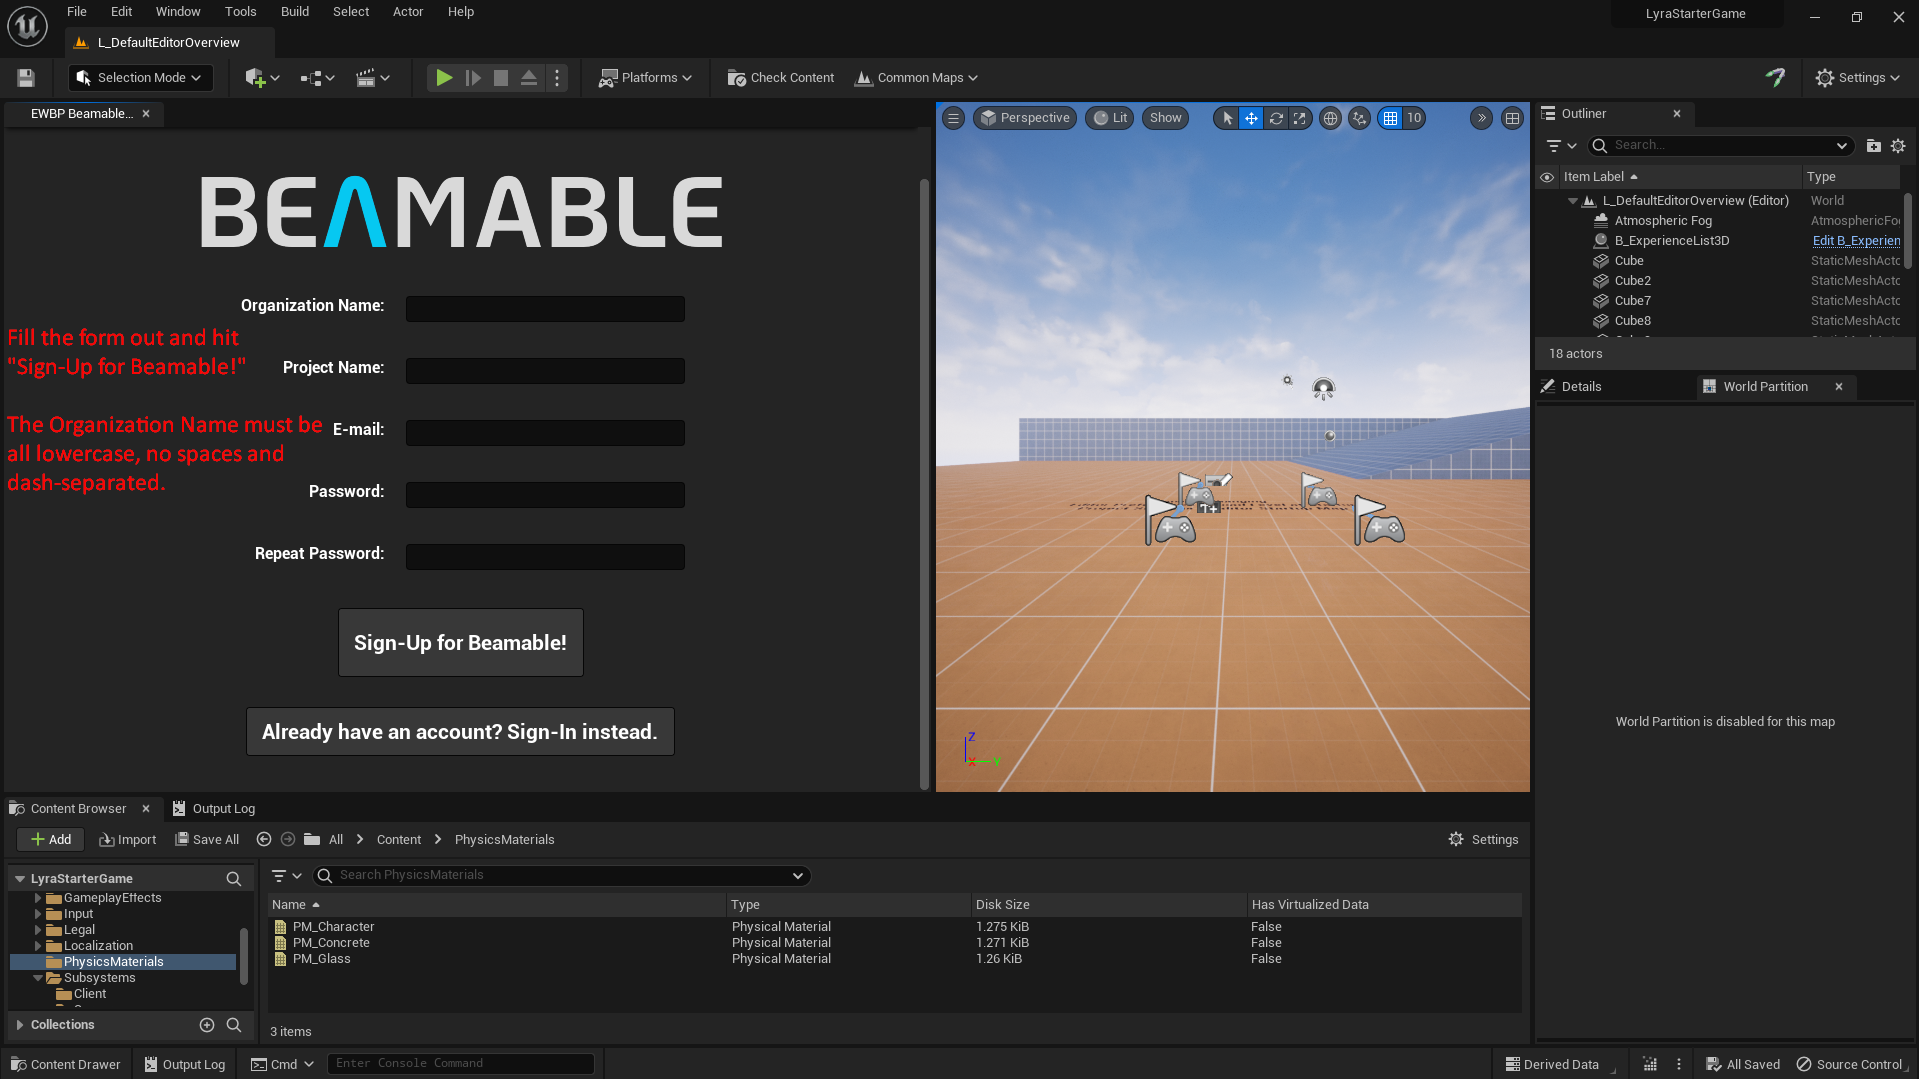
This window is the main access point to Beamable features and settings. It's also how you sign-in/up for Beamable. To get an account, simply follow the sign-up process.
Now that you have an account, you should be seeing the window below. This is the main Beamable Window. It's not pretty at the moment, but gets the job done. It displays the current account information, the Realm dropdown (more on this in a bit) and a list of local content manifests (which you can ignore as it is a WIP).
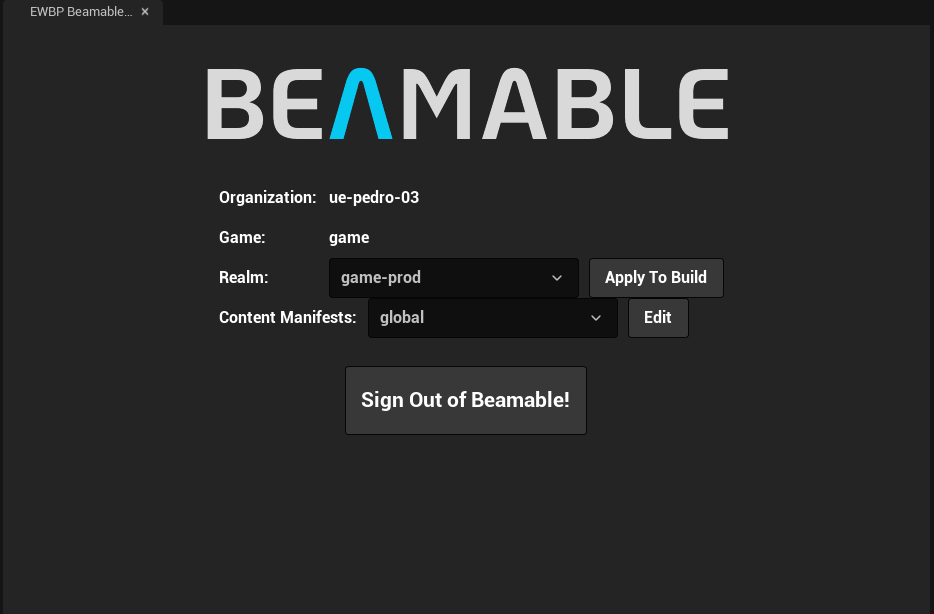
Quick side note on Beamable Realms: you can think of these as your dev/staging/production environments inside Beamable. Each of which have their own isolated data and state.
The Apply to Build button persists the target realm (along with your other Project Settings => Beamable Core) to
your DefaultEngine.ini file. Basically, by default, changes to the realm affect only the local developer (to avoid
configuration mishaps around version control). You need to specifically use the Apply to Build button to map your
local configurations to what will actually be used in builds from this branch of Version Control. This obviously assumes
git is being used as a VCS. For people in non-multi-branch workflows, this seems like an unnecessary step. However,
not having this makes the git experience much worse and we saw it as a common source of accidents in our Unity
SDK --- so we fixed it both here and there in latest releases.
By default, you start pointing at your production realm (that'll change) so use the drop-down to change into your **dev ** realm. Now that you have an account signed in and pointed at your dev realm, you can start using Beamable. There's a Blueprint-only approach I'll explain here, but there's also a Cpp-approach which is very similar in shape ( since you have access to our code-base you can read it --- it's pretty well comented). The next sections of this document also serve as a map of our architecture and modules; what problems they solve and their constraints. So... here's how to use Beamable with blueprints:
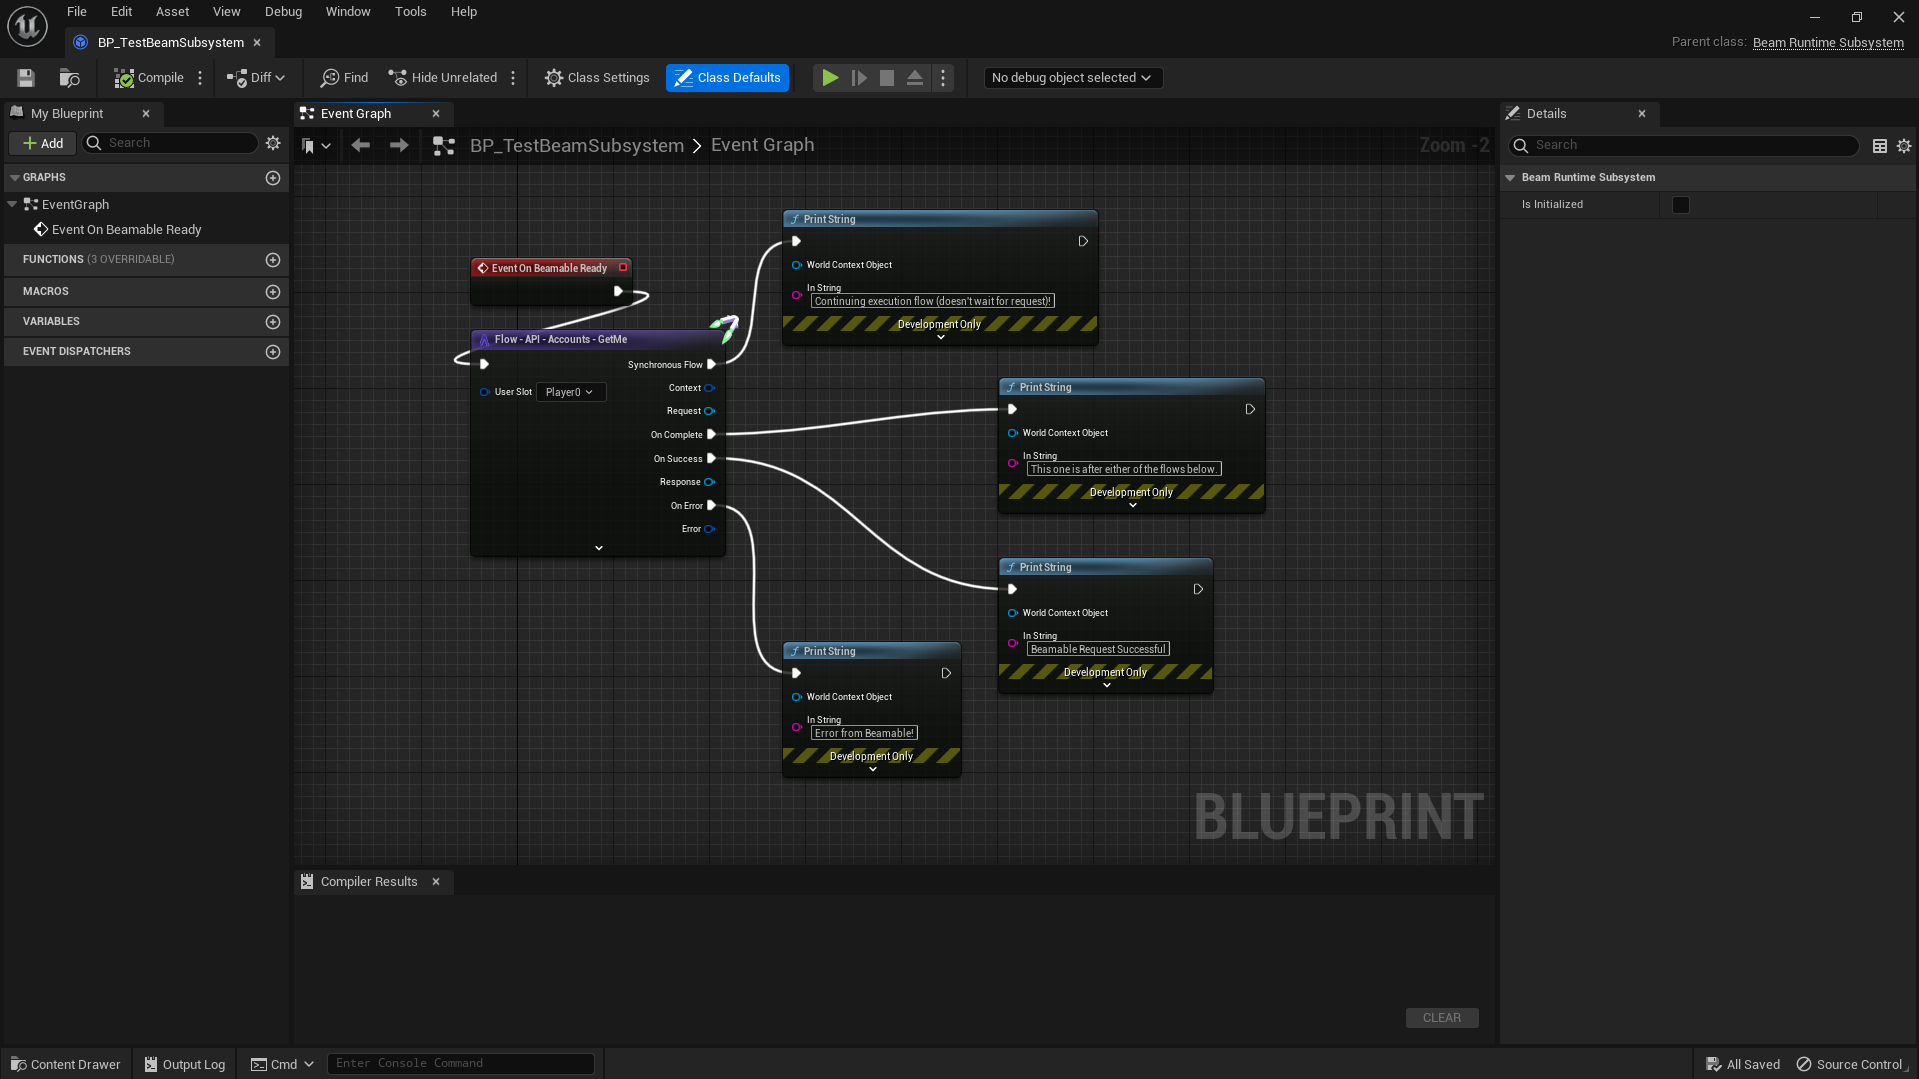
- Create a Blueprint Class inheriting from
UBeamRuntimeSubsystem. - Override it's
OnBeamableReadyfunction. At this point, you're guaranteed to have an authenticated user in theUserSlot Player0and can make authenticated requests as that player. - Open the Node Context Menu by right-clicking and type in
beam flow accounts get meand add theFlow - API - Accounts - GetMenode. - Call it from the
OnBeamableReadyport. - Add a
Printnodes to each execution port of theFlownode. Print different messages in each of them. - Go to
Project Settings => Game => Beam Runtimeand add the created Blueprint class to the list of Runtime Systems. This step is required to get Blueprint Subsystems to work in Builds and in the Editor. In the Editor, it'll work if you've opened the BP at least once, but that's easy to forget so... Always add it here and you'll have a hard guarantee these subsystems will always run. - Run PIE and observe the log. You'll see a bunch of requests being made out to Beamable (that's
the
Frictionless Auth). You should also see your logging statements and an automated log for every response received.
This is what it should look like:
For more information on UBeamRuntime & UBeamRuntimeSubsystems, there's a section further down this document that
explains them. We recommend you read this document at least once for a general understanding of the SDK and how to use
it.
A final note here: our Flow - API functions and nodes are fully code-gen'ed.
Unreal can sometimes get installed configured to use git status as a diff tool to assist in the Unreal Header Tool's
execution. For unclear reasons,
it causes Plugins to not compile correctly if any change whatsoever is made to any file within the plugin. To disable
that, put the following markup in AppData/Roaming/Unreal/UnrealHeaderTool/BuildConfiguration.xml.
<SourceFileWorkingSet>
    <Provider>None</Provider>
    <RepositoryPath></RepositoryPath>
    <GitPath></GitPath>
</SourceFileWorkingSet>This is the module where the lowest level SDK systems live:
- UBeamUserSlots
- UBeamBackend
- UBeamRequestTracker
- UBeam___Api (the code-gen'ed layer)
In our Unreal SDK, we have the concept of UserSlots. At its core, User Slots are exactly what the name implies: a slot that you can store a user inside.
At a more technical level, it is just a fixed ID that you can refer in code and Blueprints when talking about your players or signed-in developers (when in editor).
It provides the ability to have multiple auth'ed players in a single game session as well as out-of-the-box support for running multiple PIE instances and, as such, enables the development of Local Multiplayer Games, Remote Multiplayer Games and any combination of both.
Finally, this system exposes some global callbacks for handling UserSlot Authentication and Clearing as well as helper functions to associate arbitrary data with slots. This is not the recomended way of interacting with this, however.
This subsystem is responsible for building requests, tracking their state and exposing functions for making:
- Non-Authenticated Requests from Blueprints/UObjects
- Authenticated Requests from Blueprints/UObjects
- Non-Authenticated Requests with bindable Lambdas
- Authenticated Requests with bindable Lambdas
At its core, you can think of this as a "Requester" system. This system exposes a callback for handling internet connectivity loss, handling automatic retry with exponential back-off and has a configurable response-cache layer with callsite granularity (we recommend careful use of cache configurations like these as they tend to be very game specific). It also handles making Signed Requests (requests with Admin Privileges) from Dedicated Servers when running inside a dedicated server environment.
This subsystem is responsible for managing request dependencies between one another. It does so by exposing an API that can be used to declare these dependencies and two concepts:
-
Wait Handles:
- Encapsulate several requests that can be awaited on. When all of said requests complete, the given callback will run. Wait Handles can also depend on Operations.
-
Operations Handles:
- Encapsulate a series of requests or a request and change to local state.
- They differ from wait handles in that you don't know exactly how many requests will be made a-priori.
- There's an API exposed that allows you to get an Operation Handle and incrementally add Requests to them (much like you would with a Promise-API).
- You must call
OperationHandle::TriggerOperationSuccess()(or one of it's variants for error/cancellation) in the callback for it's last asynchronous request. Doing so will notify the RequestTracker that the operation is completed and any WaitHandles depending on the operation will run their OnComplete calls. - You can think of these as Blueprint-compatible Promises.
These are the code-gen'ed API. The actual code-gen is implemented in our CLI.
These have direct dependencies on UBeamBackend, UBeamUserSlots and UBeamRequestTracker so that they can build and
send out the requests.
There are 4 types of methods here:
These are functions that do the actual calling to UBeamBackend. There's two versions. The BP_ one doesn't allow the
binding of lambdas on their callbacks and go through a Blueprint-compatible flow. The CPP_ one does allow the binding
of lambda functions on it's callback and goes through a non-Blueprint-compatible flow.
	/**
	 * @brief Private implementation for requests that require authentication that all overloaded BP UFunctions call.
	 */
	void BP_PutRoleImpl(const FBeamRealmHandle& TargetRealm, const FBeamRetryConfig& RetryConfig, const FBeamAuthToken& AuthToken, FBeamConnectivity& ConnectivityStatus, UObjectAccountsPutRoleRequest* RequestData, const FOnObjectAccountsPutRoleSuccess& OnSuccess, const FOnObjectAccountsPutRoleError& OnError, const FOnObjectAccountsPutRoleComplete& OnComplete, int64& OutRequestId) const;
	/**
	 * @brief Overload version for binding lambdas when in C++ land. Prefer the BP version whenever possible, this is here mostly for quick experimentation and capturing purposes.
	 */
	void CPP_PutRoleImpl(const FBeamRealmHandle& TargetRealm, const FBeamRetryConfig& RetryConfig, const FBeamAuthToken& AuthToken, FBeamConnectivity& ConnectivityStatus, UObjectAccountsPutRoleRequest* RequestData,
const FOnObjectAccountsPutRoleFullResponse& Handler) const;These are code gen'ed to be used for lambda-binding flows in Cpp-land. These interact with the UBeamBackend
and UBeamUserSlot and the CPP_Impl functions to correctly make the request.
/**
	 * @brief Makes a request to the Get /basic/accounts/available endpoint of the Accounts Service.
	 *
	 * PREFER THE UFUNCTION OVERLOAD AS OPPOSED TO THIS. THIS MAINLY EXISTS TO ALLOW LAMBDA BINDING THE HANDLER.
	 * (Dynamic delegates do not allow for that so... we autogen this one to make experimenting in CPP a bit faster and for whenever you need to capture variables).
	 *
	 * @param Request The Request UObject. All (de)serialized data the request data creates is tied to the lifecycle of this object.
	 * @param Handler A callback that defines how to handle success, error and completion.
	 */
	void CPP_GetAvailable(UGetAvailableRequest* Request, const FOnGetAvailableFullResponse& Handler) const;

    /**
	 * @brief Makes an authenticated request to the Get /basic/accounts/me endpoint of the Accounts Service.
	 *
	 * PREFER THE UFUNCTION OVERLOAD AS OPPOSED TO THIS. THIS MAINLY EXISTS TO ALLOW LAMBDA BINDING THE HANDLER.
	 * (Dynamic delegates do not allow for that so... we autogen this one to make experimenting in CPP a bit faster).
	 *
	 * @param UserSlot The Authenticated User Slot that is making this request.
	 * @param Request The Request UObject. All (de)serialized data the request data creates is tied to the lifecycle of this object.
	 * @param Handler A callback that defines how to handle success, error and completion.
     * @param CallingContext A UObject managed by the world that's making the request. Used to support multiple PIEs (see UBeamUserSlot::GetNamespacedSlotId).
	 */
void CPP_GetMe(const FUserSlot& UserSlot, UBasicAccountsGetMeRequest* Request, const FOnBasicAccountsGetMeFullResponse& Handler, const UObject* CallingContext = nullptr) const;These are exposed to blueprint and fully-compatible with them. In blueprints, the callbacks are optional and don't
require Event Nodes to be set-up in order to be used. BeamFlowStart is a special Metadata that we look for in our
custom BeamFlow Nodes in order to correctly setup the compiled blueprint.
/**
	 * @brief Makes a request to the Get /basic/accounts/available endpoint of the Accounts Service.
	 *
	 * @param Request The Request UObject. All (de)serialized data the request data creates is tied to the lifecycle of this object.
	 * @param OnSuccess What to do if the requests receives a successful response.
	 * @param OnError What to do if the request receives an error response.
	 * @param OnComplete What to after either OnSuccess or OnError have finished executing.
	 * @param OutRequestContext The Request Context associated with this request -- used to query information about the request or to cancel it while it's in flight.
	 */
	UFUNCTION(BlueprintCallable, BlueprintInternalUseOnly, Category="Beam|Backend|Accounts", meta=(AutoCreateRefTerm="OnSuccess,OnError,OnComplete", BeamFlowStart))
	void GetAvailable(UGetAvailableRequest* Request, const FOnGetAvailableSuccess& OnSuccess, const FOnGetAvailableError& OnError, const FOnGetAvailableComplete& OnComplete, FBeamRequestContext& OutRequestContext);

    /**
	 * @brief Makes an authenticated request to the Get /basic/accounts/me endpoint of the Accounts Service.
	 *
	 * @param UserSlot The authenticated UserSlot with the user making the request.
	 * @param Request The Request UObject. All (de)serialized data the request data creates is tied to the lifecycle of this object.
	 * @param OnSuccess What to do if the requests receives a successful response.
	 * @param OnError What to do if the request receives an error response.
	 * @param OnComplete What to after either OnSuccess or OnError have finished executing.
	 * @param OutRequestContext The Request Context associated with this request -- used to query information about the request or to cancel it while it's in flight.
     * @param CallingContext A UObject managed by the world that's making the request. Used to support multiple PIEs (see UBeamUserSlot::GetNamespacedSlotId).
	 */
	UFUNCTION(BlueprintCallable, BlueprintInternalUseOnly, Category="Beam|Backend|Accounts", meta=(DefaultToSelf="CallingContext", AdvancedDisplay="CallingContext",AutoCreateRefTerm="UserSlot,OnSuccess,OnError,OnComplete", BeamFlowStart))
void GetMe(FUserSlot UserSlot, UBasicAccountsGetMeRequest* Request, const FOnBasicAccountsGetMeSuccess& OnSuccess, const FOnBasicAccountsGetMeError& OnError, const FOnBasicAccountsGetMeComplete& OnComplete, FBeamRequestContext& OutRequestContext, const UObject* CallingContext = nullptr);These are the same as the above, but... you can pass in a retry configuration at the callsite in order to say "I don't want to retry" at all or "I want to retry indefinitely until someone cancels me"...
/**
	 * @brief Makes an authenticated request to the Get /basic/accounts/me endpoint of the Accounts Service.
	 *
	 * @param UserSlot The authenticated UserSlot with the user making the request.
	 * @param RetryConfig The retry config for this specific request.
	 * @param Request The Request UObject. All (de)serialized data the request data creates is tied to the lifecycle of this object.
	 * @param OnSuccess What to do if the requests receives a successful response.
	 * @param OnError What to do if the request receives an error response.
	 * @param OnComplete What to after either OnSuccess or OnError have finished executing.
	 * @param OutRequestContext The Request Context -- used to query information about the request or to cancel it while it's in flight.
	 * @param CallingContext A UObject managed by the UWorld that's making the request. Used to support multiple PIEs (see UBeamUserSlot::GetNamespacedSlotId).
	 */
	UFUNCTION(BlueprintCallable, BlueprintInternalUseOnly, Category="Beam|Backend|Accounts", meta=(DefaultToSelf="CallingContext", AdvancedDisplay="CallingContext", AutoCreateRefTerm="UserSlot,OnSuccess,OnError,OnComplete", BeamFlowStart))
void GetMeWithRetry(FUserSlot UserSlot, const FBeamRetryConfig& RetryConfig, UBasicAccountsGetMeRequest* Request, const FOnBasicAccountsGetMeSuccess& OnSuccess, const FOnBasicAccountsGetMeError& OnError, const FOnBasicAccountsGetMeComplete& OnComplete, FBeamRequestContext& OutRequestContext, const UObject* CallingContext = nullptr);This module is comprised of certain key things:
- UK2BeamNode_BeamFlow
- UK2BeamNode_ApiRequest
- UK2BeamNode_WaitAll
- UK2BeamNode_Operation
- BeamK2
Beam Flow is our Blueprint-Compatible "promise-library". At least, conceptually, it solves the same problem as promises do. With the BeamFlow ApiRequest nodes, this is what that becomes:
There are some rules regarding which output pins you can use where.
These are validated and enforced with the help of utility functions in BeamK2.
These can effectively follow BP function calls forward from a starting node while identifying other BeamFlow nodes in
them so that it is possible to forward the usage of any of the outgoing pins into any part of the flow even if it is
asynchronous (this is not optimized and there are better ways to run this identification process, but this works well
enough for most cases).
To search for these nodes when inside a blueprint, simply type beam flow api or beam flow [api_name] api and you
should be able to find the API nodes.
WE DO NOT RECOMMEND SHIPPING WITH BLUEPRINT SYSTEMS, especially for games with a long expected lifecycle (F2P games, ie) since UE update paths for blueprint is not super smooth and, somehow, is worse than C++'s. Our API being blueprint compatible means that transitioning from BP->CPP is fairly straight-forward so we do recommend using our custom blueprints for exploration and empowering designers and then transitioning systems into C++ as you solidify designs.
These are other BeamFlow nodes that aim to provide request orchestration primitives while working with BeamFlow.
An Operation is a chain of requests that is dynamically built over time.
Users can configure callbacks to Wait on Operations and ApiRequests to finish and then do other things.
WaitAll waits for the RequestContext and Operation Handle's it is tracking to finish and, when they are done, invoke a
callback.
This is managed by the UBeamRequestTracker subsystem.
Operations are also meant as a way to expose single-node long-running functionality for designers and UIs.
Ie.: Imagine a series of requests that'll take time to run and you wish to present a loading bar that seems responsive. You can leverage an Operation to expose each request's result to BP so that the UI can update itself with the newest step it's in.
Here we have our Editor subsystems (the ones that stores and manages our Editor's data). We also have all the
custom GraphNodes and CustomPins for Blueprint visual customization.
The UserSlot pin shows a dropdown with the default values for user slots that are configured in UBeamCoreSettings.
It does so contextually: If in an EditorUtilityBlueprint, it'll display the developer slots. Otherwise, it'll display
the runtime slots. This prevents people from using editor-only slots in blueprints that must work outside of the editor.
The RequestType pin shows a dropdown with the names of each possible request. This is to make it easier for users to
use the BeamBackend RetryConfig API to set up per-request type retry configurations. This can be useful in some cases
where we don't want to retry a specific-request no matter what.
The Beam Core Style is the Slate UI style we use to for our Editor UI. At the moment it is mostly used for loading and making icons available.
The GraphNodeBaseBeam is the Node UI implementation that enables our Beamable branded nodes with the Beamable Icons. More research still needs to happen for us to fully understand how to leverage this stuff better. For now, this is good enough.
In this module, we have our Runtime environment. It is comprised of two main concepts:
the UBeamRuntime GameInstanceSubsystem and implementations of the UBeamRuntimeSubsystem.
UBeamRuntime is responsible for the various Authentication flows the SDK
exposes (FrictionlessAuthentication, AuthenticateWithToken) as well as providing some guarantees and callbacks to
the implementations of UBeamRuntimeSubsystem.
At its core, you can think of this as our SDK's runtime void main().
There are the following key lifecycle points you need to care about:
-
UBeamRuntime::Initialize_DelayedInitruns one tick after all subsystems have been initialized. This solves a bunch of tiny problems and gives us the ability to provide a guaranteed point for allUBeamRuntimeSubsystemimplementations to run theirInitializeWhenUnrealReadyfunctions. At this point, Unreal is ready to go, but Beamable is not. You can check out the implementation as it's fully commented if you wish to understand how this is setup. -
UBeamRuntimeSubsystem::OnBeamableStartedruns after all theInitializeWhenUnrealReadyOperations have finished ( success or error). It has 2 different behaviours based on whether or not it is running in an Dedicated Server build:- Dedicated Server: This gets called after the
UBeamBackendsystem is configured properly to make signed requests. For that configuration to work, load up the target realm secret from the follow hierarchy: 1st, if we received an cmd line argument called--realm-secret <realm_secret>, use it as the secret to sign requests with. 2nd, if there's an environment variable calledBEAMABLE_REALM_SECRET, use that. Lastly, if neither of these are done --- we assert crash (the message explains what needs to be fixed). - Non-Dedicated Server with Frictionless Auth turned On: This gets called if we fail to sign in automatically.
- Non-Dedicated Server with Frictionless Auth turned Off: If you
disable
Project Settings -> Beamable Core -> AutomaticFrictionlessAuthForOwnerPlayer, this callback gets invoked when the SDK is ready to make un-authenticated requests to Beamable. NO AUTHENTICATED REQUESTS CAN BE MADE beforeOnBeamableReadyis called. Typically, this will be used in cases where you don't want to run some code before deciding whether or not to authenticate with Beamable.
- Dedicated Server: This gets called after the
-
UBeamRuntimeSubsystem::OnBeamableReadyruns whenever theOwnerUserSlot(defined inProject Settings -> Beamable Core) is authenticated.- This will get called regardless of the authentication
method:
UBeamUserSlots::TryLoadSavedUserAtSlot,UBeamRuntime::AuthenticateFrictionlessOperationorUBeamRuntime::AuthenticateWithTokenOperation. - At this point, you can make any authenticated requests using the
Player0(or whatever you named your Owner User Slot). - At the moment, this will run only the first time a user gets authenticated into their user slot. This might change in the future when we get to the offline support parts of the SDK.
- This will get called regardless of the authentication
method:
-
UBeamRuntime::FrictionlessAuthenticationOperationis anOperationthat checks to see if the given slot is already authenticated. If it is, the operation completes. Otherwise, it makes anAuthenticaterequest with thegrant_type = guestand then another request to fetch the user's some useful user data. If both succeed, theOperationis successfully completed.- For most games without local-coop, this should probably be left as an automatic process
via
Project Settings -> Beamable Core -> AutomaticFrictionlessAuthForOwnerPlayer(by default it is).
- For most games without local-coop, this should probably be left as an automatic process
via
-
UBeamRuntime::AuthenticateWithTokenOperationis anOperationthat takes anUTokenResponse*(it's the response to ourUBeamAuthApi::Authenticateendpoint).- This is useful in case you want to turn off
FrictionlessAuthenticationand instead manage the Sign-In/Up process for your users manually. - To use this, call Authenticate with the correct parameters (for email, use
grant_type = passwordand pass in the email asusernameand thepassword).
- This is useful in case you want to turn off
Implementations of UBeamRuntimeSubsystem are where the bulk of our functionality lives.
That being said, we won't have a lot of these in our Core Plugin. Instead, we'll expose them as a series of dependent
plugins.
However, you might want to make these yourself and/or depend on the ones we build and ship. To that end, here's how to
go about that:
- Figure out the runtime data the system will manage and how to store it in order to expose a good API.
- Expose an API comprised of Operations and regular UFUNCTIONS to Blueprint.
- Override the OnBeamableReady function to run things when UBeamRuntime becomes ready and prepare your subsystem for use.
- If it is a dedicated server subsystem, override the OnBeamableStarted instead.
These are, quite simply, where most of our work will happen.
You can implement these directly in Blueprint.
If you do, register them at Project Settings > Game > Beam Runtime > Runtime/Client/Server Blueprint Subsystems so
that they are properly initialized when the game starts up.
In order to use Beamable Microservices with Unreal Engine, you'll need to download
and install the Beamable CLI.
No need to run init or new org commands since the Unreal SDK sets up your Unreal project
in a way that is recognizable for the CLI and keeps them in-sync.
You'll also need Docker. This is needed for two things:
- Running Beamable Microservices without opening the service's project (for non-engineers that want to run microservices locally).
- Building and Deploying Beamable Microservices to your realms (dev/staging/prod environments).
After you've installed the CLI, to verify that the integration is working:
- Make sure your CLI is in your system's
PATHenvironment variable (should be done by default if you installed it through thedotnetCLI). - Open the UE Editor for your project with the Beamable SDK.
- Sign into your account (if you're already signed in, you can skip this)
- You should see a log message as the one below:
Initialized CLI with Unreal Project: https://api.beamable.com YOUR_CID YOUR_PID
The Unreal SDK detects that the CLI is installed automatically when the editor runs for the first time after installing the CLI. The integration between Unreal and our CLI is very tight. The CLI is aware of when it's inside an unreal project just as the Unreal SDK is aware that the CLI is installed.
This integration is because the CLI is the preferred way to interact with beamable for build/deployment automation via Github Actions, Jenkins and/or other common CI/CD pipeline tools. As such, we try to keep the CLI aware of the data in the Unreal project and in-sync with your project's current configuration.
In other words, whatever realm you select through the Unreal Editor --- that's the realm the CLI will be talking to.
This synchronization happens automatically whenever the editor boots up and the CLI is installed. So, while using the
CLI for local development, you don't have to worry about keeping them in-sync.
The state the CLI recognizes is kept in the .beamable folder and you can learn more about it here.
For more information on the CLI and it's capabilities, you can look at its commands and guides.
Beamable Standalone Microservices (SAMS) are how we build Microservices in Unreal with
Beamable. In order to set up UE with SAMS, you must have followed the steps to have the CLI installed and correctly
configured with your Beamable account. You can test it by running beam config from your project's root folder. Then:
- From the root of your project, run
beam project new <project name> --solution-name Microservices --skip-common, with<project name>being the name of the microservice (you can have more than one per UE project).- You can pass in another
<solution name>if you'd like. It's the name of the solution containing all your SAMS.
- You can pass in another
- You will be prompted to link your project to a Unity project. Say no (
n). - Then, you will be promted to link your project to a Unreal project. Say yes (
y) and then select your project folder.- This creates a linking file in your
.beamablefolder. It's a plain JSON file with paths and information we use to keep the projects in-sync.
- This creates a linking file in your
- Open your UE Project's Solution and add a module to your game with the following name and
configuration:

- Ensure your game's
Editor.Target.cshas"YourGame", "YourGameBlueprintNodes", "BeamableCore", "BeamableCoreEditor", "BeamableCoreBlueprintNodes", "Json", "JsonUtilities"asExtraModuleNames - Add
BeamableCore,BeamableCoreRuntime,JsonandJsonUtilitiesto your Project's default module'sBuild.csfile.- Add
BeamableCore,BeamableBlueprintNodes,BlueprintGraphand "YourGame" (default module) to your Project's<ProjectName>BlueprintNodesmodule'sBuild.csfile (this is the module you've just created).
- Add
- Navigate to your project folder. You should see a folder named
<solution name>there containing a solution file. Open that solution with VS or Rider. - Compile the microservice. Every time you compile this solution, the CLI will be invoked automatically for you and code
will be generated into the Unreal Module named
<ProjectName>BlueprintNodesyou just created.- You can use this module to add your own nodes if you'd like. The code-generation is guaranteed to not overwrite
anything except itself with each run as all it's files exist under the
AutoGenfolder. - The header files of the generation DO NOT change unless you modify your
ClientCallable(and/or otherCallable) function signatures. This implies that changing the body of the function requires no recompile in UE, but changing its method's interfaces do.
- You can use this module to add your own nodes if you'd like. The code-generation is guaranteed to not overwrite
anything except itself with each run as all it's files exist under the
- Make sure Docker for Windows/Mac is running, recompile your editor and launch it.
After your editor spins up, open the Beamable Window (sign-in if you have to) and enter the Microservice window by clicking the microservice button. You should see a "run" option next to your newly created microservice's name. Clicking the run option will invoke the CLI to start up your microservice in your local Docker.