Assuming that npm and Grunt are both installed:
- Download or clone the repository
git clone https://github.com/ygoex/appointments-app.git
- Go to project directory
cd appointments-app/
- Install npm packages
npm install
- Create a server to run the app
grunt server
- In your browser go to
http://localhost:9000/
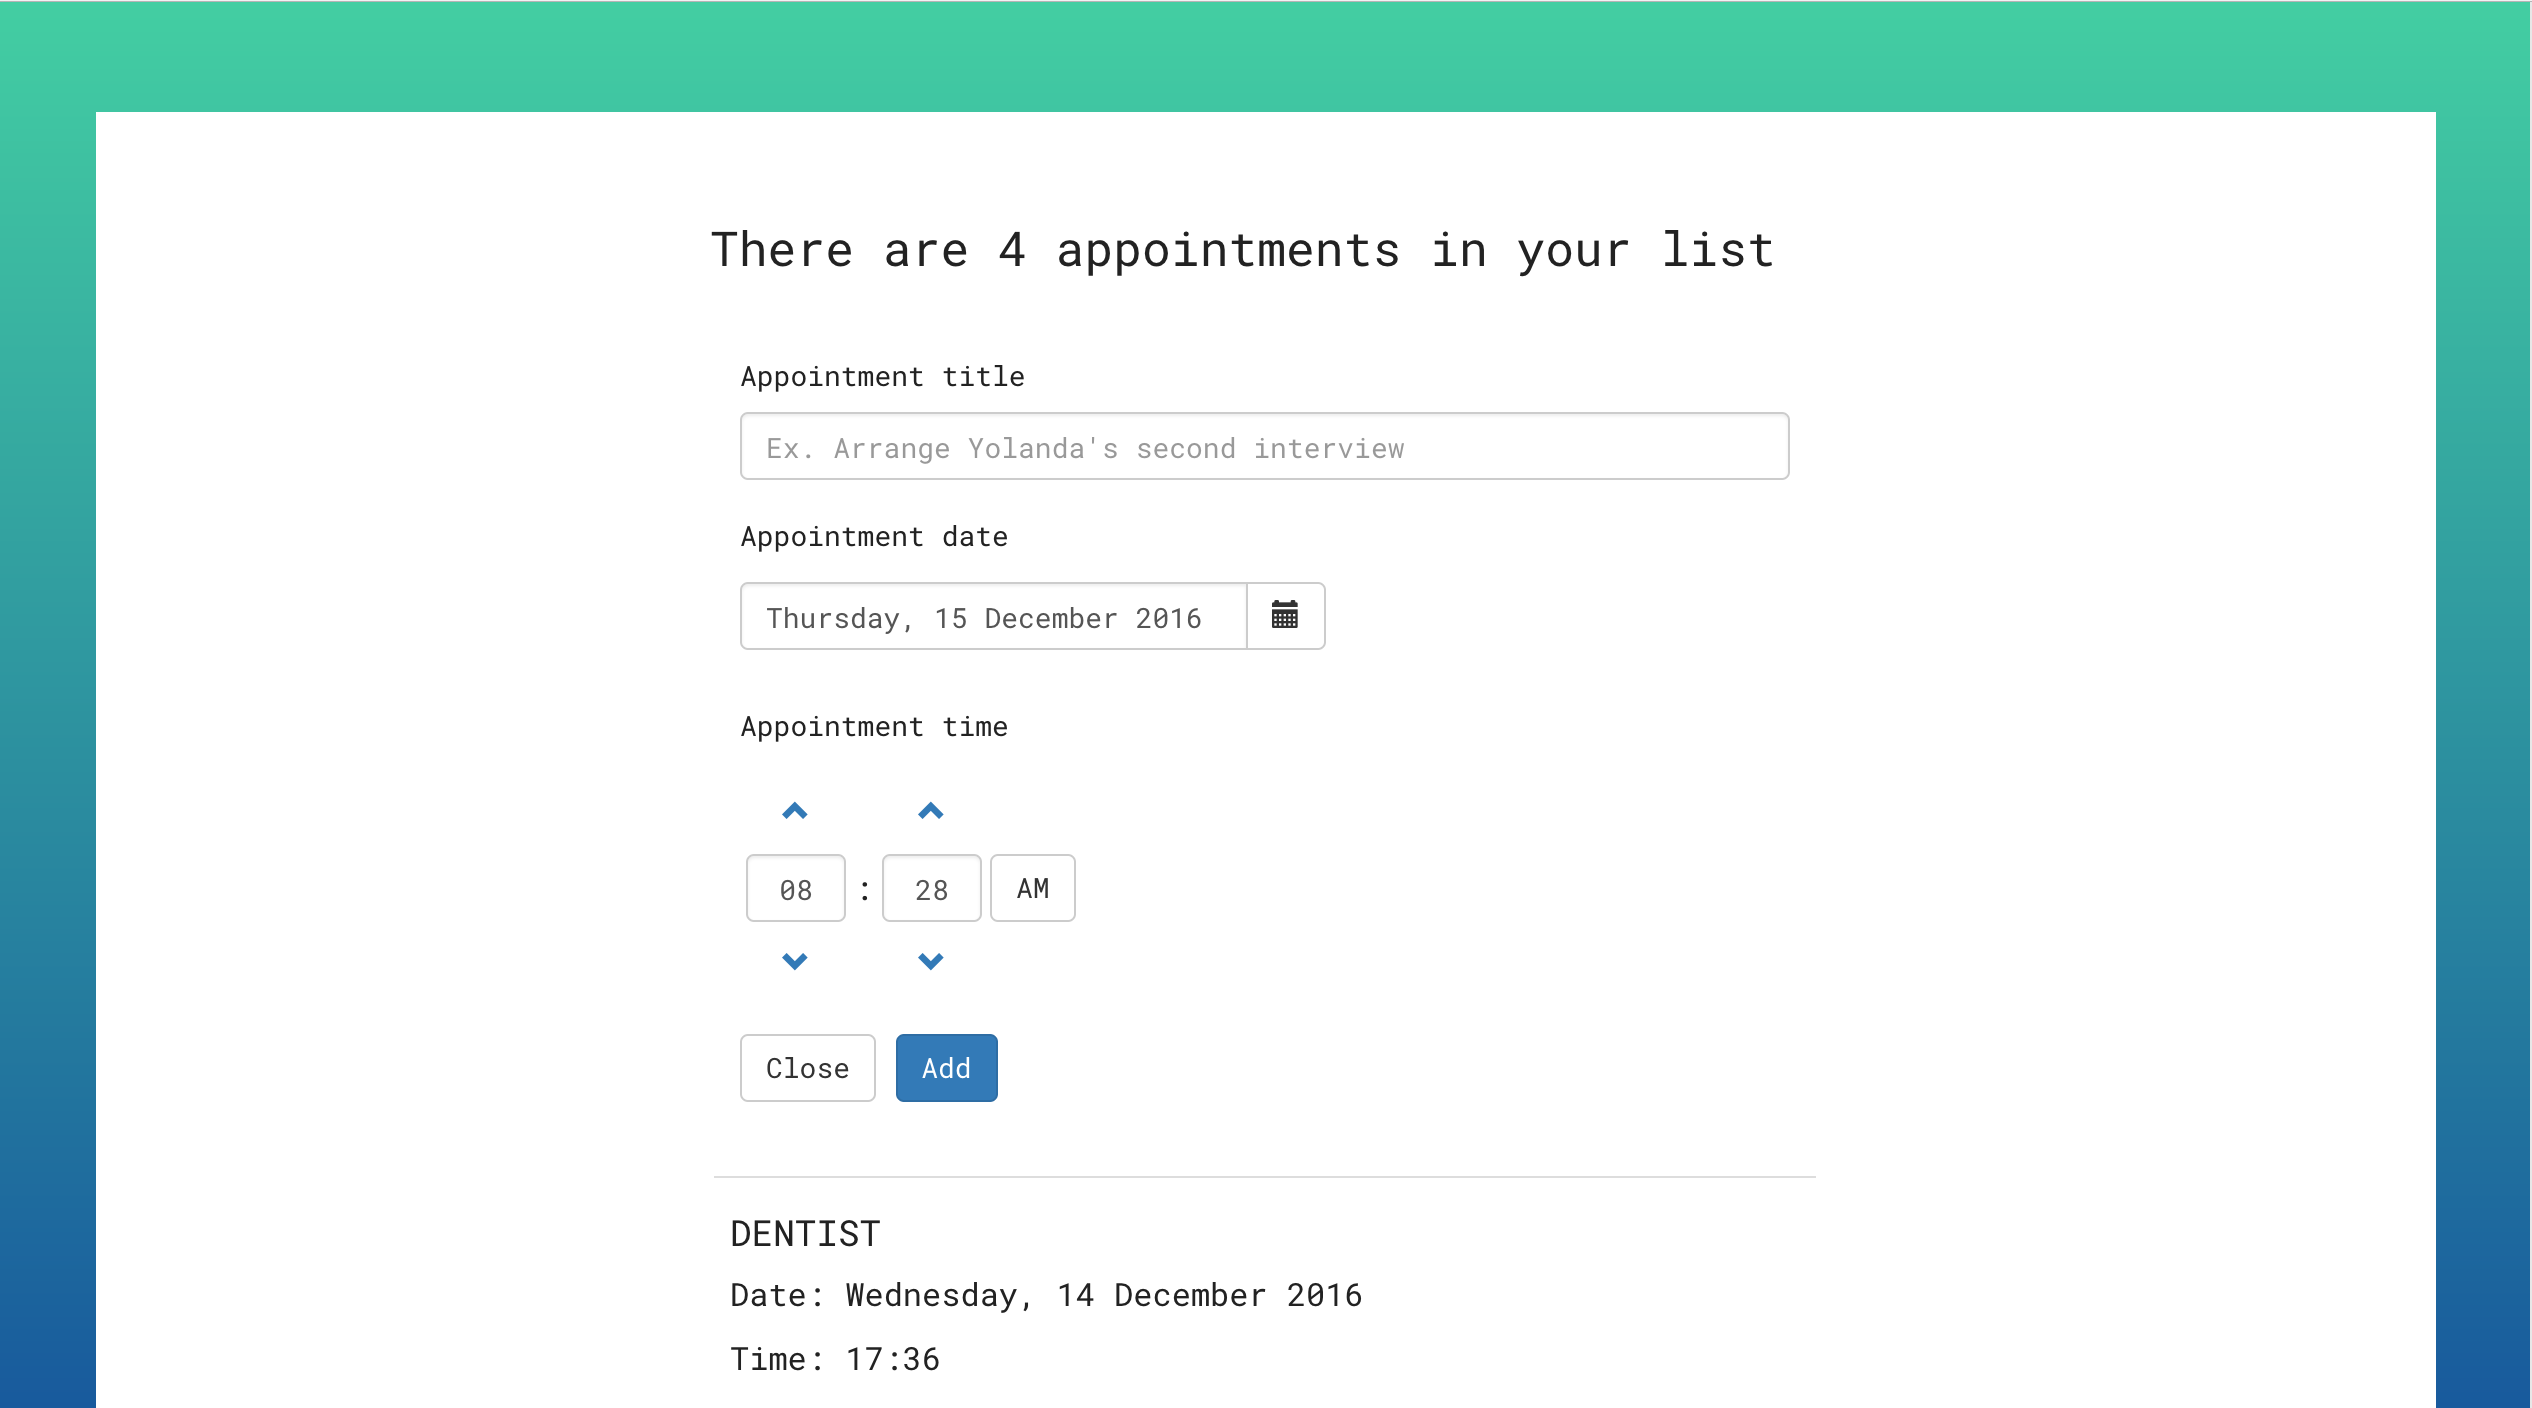
If the installation is successful, the app will look like this screen shot
- Bootstrap v3.3.7: Installed via
bower(client-side code package manager). - AngularJS v1.5.8: Included via CDN
- angular-ui-bootstrap v2.3.1: Included via CDN (Bootstrap components for AngularJS: datepicker, timepicker,etc)
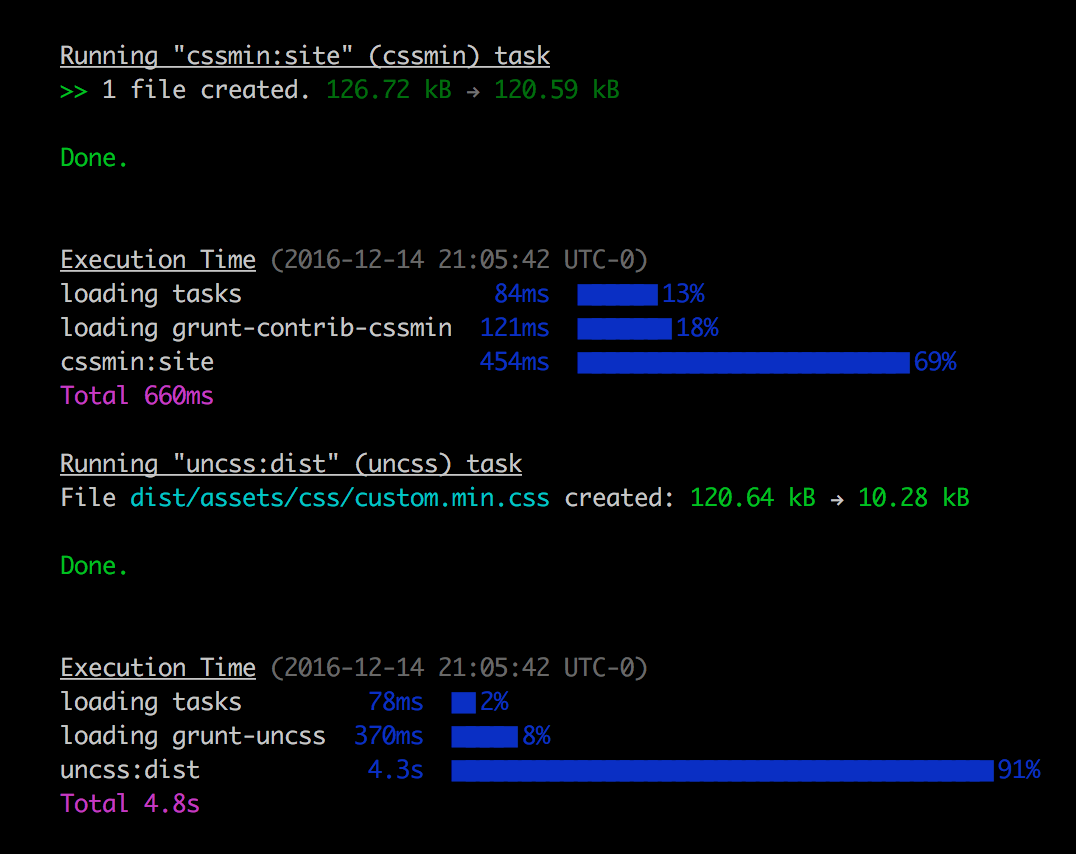
Bootstrap v3.3.7 is installed via bower and not via CDN because this way, using the Grunt plugin UnCSS, we can reduce the size of the file by removing the classes not needed in our project. As the following image shows, the css file is reduced from 120.64 kB to 10.28 kB.
Apart from the dependencies previously described, the main app relies on three files located under app directory: index.html, custom.js and _general.scss
app/
├── bower-components/
│   ├── bootstrap-sass/
│       └── continues...
└── assets/
|   ├── fonts/
|   |   └── continues...
|   ├── img/
|   ├── js/
|   |   ├── app.js
|   |   └── custom.js
|   └── stylesheets/
|       └── scss
|           ├── custom
|           |   ├── _base.scss
|           |   ├── _components.scss
|           |   ├── _elements.scss
|           |   ├── _helperClasses.scss
|           |   ├── _mixins.scss
|           |   ├── _variables.scss
|           |   ├── components/
|           |   ├── elements/
|           |   ├── palettes/
|           |   |   └── continues...
|           |   ├── sections/
|           |       └── _general.scss
|           └── custom.scss
└── index.html
###js/
Inside js/ directory, there are two files:
- app.js
This file is generated after executing the grunt task ngAnnotate (see description here).
- custom.js
This file is divided in three blocks to separate concerns:
In a larger project these blocks would be placed in different files to make everything more reusable and easier to maintain, but for simplicity's sake I have included all of them in a single file.
-
myFactory (model): is a method that allow us to share and inject data in different controllers. Normally, a factory is used to make Ajax calls to server RESTful services using [Angular $http service] (https://docs.angularjs.org/api/ng/service/$http).
In this app, myFactory is not calling a REST API. The data provided as example has been included in an array of objects and stored in the private variable
appointments. This variable is made public through the objectgetAll. -
myController (controller): contains settings and functions to interact with the app.
The first thing the controller does is to call the factory method getAll and store the data a variable
$scope.apps = myFactory.getAll();. Right after that, we count the number of appointments in the array to show it to the user in the view. The idea is to create visual and information hierarchy by going from the generics to the specific (first we show the total of appointments and then we show a list with each appointment and details).The following settings and functions will help users to add more appointments. The way to add more appointments is through a form with three fields: title, date and time. This form is initially collapsed
$scope.editStatus = false;, but will expand when users click on the buttonNew appointment. The button has been styled with blue colour to make contrast against the background, and placed under the main header, so it can be easily spotted by users. When users click onNew appointmentthe functionopenForm()is triggered from our html. This function sets today's date and then opens the form by changing$scope.editStatusfrom false to true.$scope.openForm = function() { $scope.today(); $scope.toggle(); };Datepicker and timepicker Angular components are pre-populated with today's date and time, but they can be set after interacting with the icons provided: calendar in datepicker and arrows in timepicker.
If the user decides to cancel the new appointment, the function
closeForm()is triggered. The form is collapsed, and then the Title field is emptied:$scope.closeForm = function() { $scope.toggle(); $scope.newTitle = ''; };However, if the user decides to add the new appointment to the list, the function
add()is triggered. The first thing this function does is checking if the field title has been filled because I have make this field required. If that is true, the title and the new date are included (push) to the array with the appointments. After that the form is closed and the new appointment is displayed ordered by date.$scope.add = function() { if ($scope.newTitle) { $scope.apps.push({ title: $scope.newTitle, date: $scope.newDate.toISOString() }); //close the form after adding $scope.closeForm(); } };Appointments are ordered using the Angular filter orderBy.
-
myDirective (view)
Angular's filter orderBy is included in the component named
component.htmlthat contains the appointments view. This module is wrapped with script tagstype="text/ng-template"and placed at the end of the html file.<script type="text/ng-template" id="component.html"> <table class='table'> <tr ng-repeat="app in apps | orderBy:'date'"> <td> <h4>{{app.title | uppercase}}</h4> <p>Date: {{app.date | date:'EEEE, dd MMMM yyyy'}}</p> <p>Time: {{app.date | date:'HH:mm'}}</p> </td> </tr> </table> </script>myDirective is responsible for the definition of component.html. The description of each setting is described inline with the code.
###Automation and optimisation In order to automate the process and optimize the project some Grunt plugins are used.
####Running the Build
Writing grunt in the console launches the default Grunt tasks. An optimised copy of the app/ folder is created in the dist/ directory. The definition of the grunt build can be found in grunt/aliases.yaml. In the same folder, the rest of the files are the configuration for each task used in the project. For most small projects a single Gruntfile.js is perfect. But as a project grows, the Gruntfile.js can quickly become unmanageable; this is where load-grunt-config plugin comes in handy.
Other Grunt plugins used in this project are the following:
####Concurrent Use grunt-concurrent to organize which tasks need to run first, and which ones later.
####Clean
Use grunt-contrib-clean to delete the previous build directory.
####Copy Use grunt-contrib-copy to copy our images, fonts, etc. into the new build directory.
####Ng-annotate Use grunt-ng-annotate to rebuild angularjs dependency injection annotations. This plugin needs to run before uglify for protecting dependency injection against minification.
####Sass
Use grunt-sass to compile the main Sass file stylesheets/scss/custom.scss to CSS using node-sass.
####Uglify Use grunt-contrib-uglify to minify the new JavaScript file app.js (generated by ng-annotate pluging, necessary for AngularJS projects), cutting out comments and shortening variables. A new version with extension .min.js will be created.
####Cssmin Use grunt-contrib-cssmin to remove comments and release a new version with extension .min.css. This plugin needs to run before UnCSS to remove all comments; otherwise, UnCSS will throw the error 'Unknown word'.
####UnCSS Use grunt-uncss for removing unused CSS (Bootstrap) from the minified stylesheet version of the project.
####Htmlmin
Use grunt-contrib-htmlmin to compress our HTML page and remove comments from the dist/ version.
Add local storage: done here http://codepen.io/ygoex/pen/GrgvdL- Update Readme with the new changes (new hash Grunt plugin...)