Turn the Raspberry Pi into a portable lightweight VJ plateform.
Please note that this is in an early stage (alpha), so it lacks functionnality and might require patience to get it working. But I'll be happy to reply to your issues and help you in the best I can.
I've been running this app on a Raspberry Pi B bought in 2013. I would not try to run it on a Raspberry Pi A as it requires some RAM, but you could try to run it on a B+ or Pi2. But for the Pi2, I'm pretty sure the video player will need to be compiled again.
Any input, test or remark from you will help improve this application.
- Have a fresh Raspbian system running on your SD card.
- You have to set your RAM split to at least 128MB. You can use
sudo raspi-configfor that. (Iv'e set it up to 256MB) - Install latest Node.js (I'm using v0.12.0) http://node-arm.herokuapp.com/
- Clone this repository in the /home/pi folder.
- Go into raspivj/ folder and do
npm install. This should install the necessary node modules.
I think that's all you'll need. Please tell me if there is something I'm missing. If you'd like to modify the video player (multiPlayer), you will need openFrameworks (I've used v0.8.4).
This is a rough manual. Since I've written this app mainly for my own use, there is things that are obvious for me and that correspond to the way I work live with videos. So don't hesitate to ask if there is someting unclear.
This is where your work goes. Please note that at this stage of development, it's not very flexible. So to be certain that it will work as expected, be sure to follow all these guidelines.
- All your videos should be in the
videos/folder. And only videos should be in that folder. - You will need to make thumbnails of your videos yourself and have them in the subfolder called
thumbs/, inside thevideo/folder.
So yes, you read right, there is something else other that video files in that video/ folder. But it's only that thumbs/ folder.
Be sure to name your thumbnails the same way you name your video files. It's important that all your videos have thumbnails.
The app is quite stupid right now. It assumes that each video has a thumbnail and that the first thubmnail in the thumbs/ folder corresponds to the first video in the video/ folder. - Your videos need to be h264 encoded in a mov container with some sound (even if it's silence) for best results.
Follow this short guide to convert your videos using FFmpeg - The resolution of your videos should not be higher than 1024px, although you might try a 720p. Don't try to go higher than that as it will certainly crash the player. For fast transitions and loading, keep it as low as possible.
The app is started like this:
node raspivj/raspivj.js
There is a raspivj.crontab file that you can use to start up the app everytime the Pi is booting. It' more convenient to use it that way, as you will only need a browser to start playing.
crontab raspivj/raspivj.crontab
To access the interface, you should know the IP of the Raspberry Pi. Then point a browser to this address:
http://ip-of-your-raspberry:3000
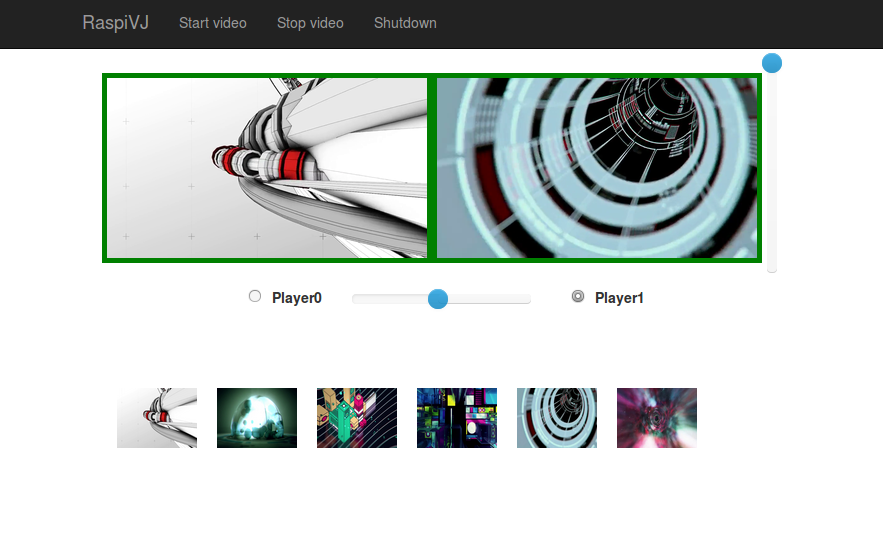
The interface has a series of 'system' command on top. Then there is 2 large frames, called Player0 & Player1. They can be seen as 2 video channels and represent the videos actually playing. You can have up to two videos playing at the same time. Under all this, there is a serie of small thumbnails, representing the videos available in your video/ folder.
Once the interface (web page) is fully loaded in your browser, you can start looping videos:
- Press the "Start video" button to launch the video player on the screen attached to the Raspberry Pi.
- Press "Stop video" to stop the video player.
- Press "Shutdown" to turn off the Pi.
- Select "Player0" (or "Player1") by clicking the corresponding radio button. Now, clicking any thumbnail will load the corresponding video in that "channel" 0 (or 1, depending on your selection).
- The horizontal slider allows to change the mix between the two channels (0 & 1). So when put at 50%, you can see both videos playing.
- The vertical slider controls the "fade to black".
- All sliders are know to be buggy and fuzzy. Will change/remove this in the future.
- Clicking directly in the frame of Player0 or Playe1 will stop or start the video loaded in that channel. When the frame has a green border, video is playing. When the border is grey, video is not playing. When a video doesn't play, it's not shown.
Julien Deswaef @xuv
- Make an external config file for setting up the video folder
- Rework the web interface (add icons,…)
- Add shaders
All videos in the video/ folder were downloaded from http://www.beeple-crap.com/resources.php
"These files are available under a sort of "open source" concept. They are intended for educational use but really can be used for whatever the fuck you want. You don't need to credit me for whatever commercial or non-commercial use you make of them, but if you could shout me a holla with any project that do come from them, I'd love to see it :)"