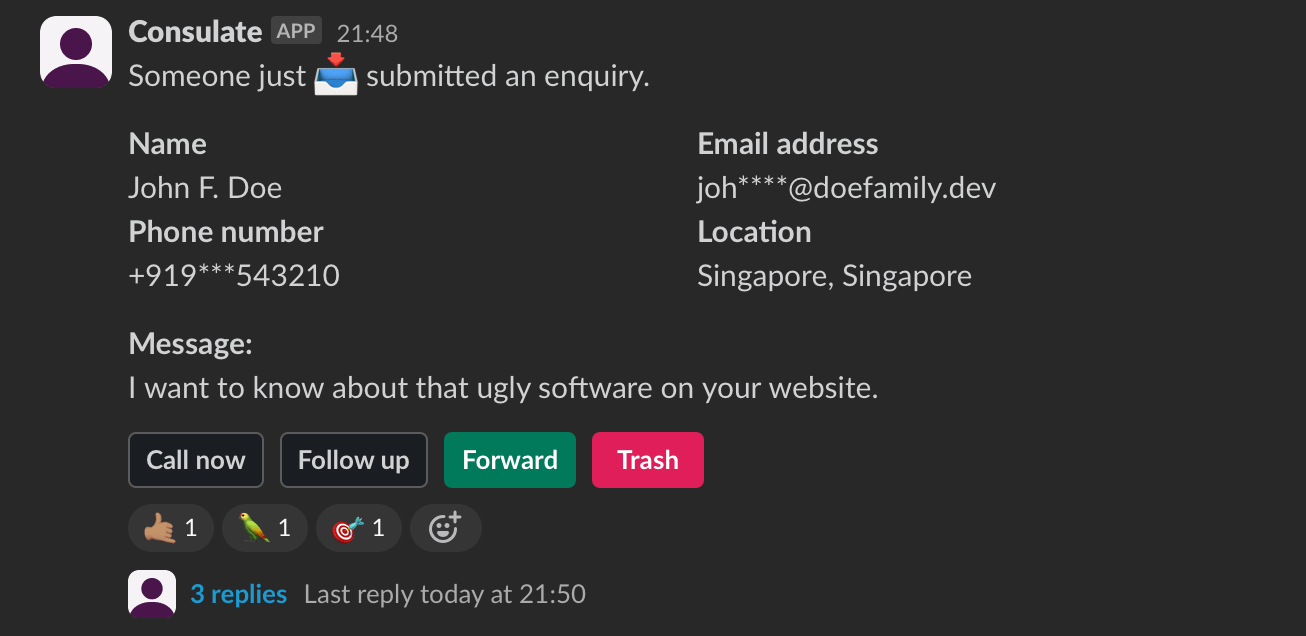
Headless enquiry management system in Go built on Slack and Exotel for inbound marketing teams. Record collected enquiries, place and record outbound calls, store follow-ups etc.
![]()


Grab a binary from the latest release for your platform from this page.
In the same folder as binary, create a config.yml file from the sample in the repository using below command:
wget -O config.yml https://raw.githubusercontent.com/vaibhavpandeyvpz/consulate/main/config.dist.ymlThen go to api.slack.com, create a new app using provided manifest (see slack.dist.yml) and install it on a Slack workspace. Once done, make note of the signing secret as well as bot access token shown in Slack.
Update your Slack and Exotel credentials in config.yml file and start the app server using below command:
./consulate -config=config.ymlSince Slack needs to communicate with your app for certain functionality, it's recommended to run this on a server and install an SSL certificate.
Make sure you have Docker installed on your workstation. For the IDE, I highly recommend using GoLand i.e., my go-to choice for Go development.
Download or clone the project using Git and then run following commands in project folder:
# create .env file in project
cp .env.dist .env

# update NGROK_AUTHTOKEN in .env

# create app config file
cp config.dist.yml config.yml

# update values in config.yml

# create ngrok config file
cp ngrok.dist.yml ngrok.yml

# update ngrok domain in ngrok.yml

# create Slack app manifest
cp slack.dist.yml slack.yml

# update ngrok domain in slack.yml

# start all services
docker compose up -dFor deployment, using pre-built binary from Releases section is the easiest way to go.
You could also use Docker for deployment. There's a bundled Dockerfile that builds and exposes the server on port 8080 (can be configured using PORT environment variable).
To build the Docker container locally, use below command:
docker build -t consulate .
# or
docker build -t ghcr.io/vaibhavpandeyvpz/consulate .
Container once pushed, can be pulled and run directly as below:
docker run -it --rm \
  -p "8080:8080" \
  -v ./config.yml:/consulate_config.yml \
  ghcr.io/vaibhavpandeyvpz/consulate:latest \
  consulate --config=/consulate_config.yml
You can also use below Nginx vhost config to expose the server to internet easily:
server {
    listen 80;
    listen [::]:80;

    server_name example.com;

    location ~ ^/consulate/ {
        rewrite ^/consulate/(.*) /$1 break;
        proxy_http_version 1.1;
        proxy_set_header Upgrade $http_upgrade;
        proxy_set_header Connection "Upgrade";
        proxy_set_header Host $host;
        proxy_set_header X-Real-IP $remote_addr;
        proxy_set_header X-Forwarded-For $proxy_add_x_forwarded_for;
        proxy_set_header X-Forwarded-Proto $scheme;
        proxy_pass http://127.0.0.1:8080;
    }
}
If not running via Docker, you can use below Supervisor configuration to run the server in daemon mode:
[program:consulate]
autorestart=true
command=/home/ubuntu/consulate --config=/home/ubuntu/consulate_config.yml
autostart=true
autorestart=true
stopasgroup=true
killasgroup=true
redirect_stderr=true
stdout_logfile=/home/ubuntu/consulate.log
stopwaitsecs=3600