
Mijung Kim , Wesley De Neve
Members: PyeongEun Kim, JuHyung Lee, MiJeong Lee
- Basic Knowledge in Machine Learning
- Application of machine learning for image classification.
- Application of machine learning for STT (Speech-To-Text).
- The concept of virtual environment, and thereby how to use docker, or any other virtual environment tools.
- Usage of Github as sharing tool for codes.
Just to grasp an idea what machine learning and image classification are, follow the link below:
https://developer.nvidia.com/dli/onlinelabs
The link will take you to NVIDIA DLI online labs. Read through the first two labs:
- Applications of Deep Learning with Caffe, Theano, and Torch
- Image classification with DIGITS.
In order to take those labs, you need to sign up for QWIKLABS. The signing-up process is very short and simple, so no worries.
The codes that you will see on the labs above are complicated and not informative. Make sure you do not try to UNDERSTAND, but REALIZE what you will do.
Docker will be the main tool you will be using throughout this program. It is a container that enables easier creation, deplyoment and running applications.
The tem container defines a software packaged into standardized units for development, shipment and deployment. Simply speaking, it's a program you will need for coding.
Installation
Follow the link below for general instruction of docker:
https://docs.docker.com/get-started/
Make sure you download the Community Edition (CE), which is free. Ofcourse, make sure the installer matches your OS.
Initiation
Make sure you open Docker application.
Open Terminal, and on your bash write command:
$ docker login
If your computer runs a Windows 10 Pro, or has Windows Server 2016, follow the same procedures as for Linux and Mac.
Else, it's a completely different story - you need to download a docker toolbox for windows from the following links:
ttps://docs.docker.com/toolbox/toolbox_install_windows/#step-2-install-docker-toolbox/
Run the file to install toolbox, and then you will see three items popped up on your desktop:
- Docker Quickstart Terminal
- Oracle VM VirtualBox
- Kitematic (Alpha)
Ignore Oracle VM VirtualBox! You won't be using this program (at least during this internship program)
Run Kitematic (Alpha). You will see a page full of boxes that represent docker images. All you need is the very first item on the top left corner: 'hello-world-gnix'
Click 'CREATE' button. It's a blue rectangular button with blue edges that every item has.
Now you have the appropriate container. Close Kitematic (Alpha), and open Docker Quickstart Terminal. a command window will pop up. Wait for the program to do some initializing - when it's done, a pixel-whale will show up. After then you are ready!
*Acutally, running docker on windows is quite complicated and uncompatible with whatever you are going to do on docker. Thus, it is recommended to scroll down a bit and read the section: "Installing Ubuntu".
To learn about the image classification, follow this link below for introductory explanation of image classification : http://cs231n.github.io/classification/
During the internship, modules numpy in python is used that it is important to know how numpy works. It is recommended to have numpy tutorial with the link below to learn numpy and to get familiar with the modules.
http://cs231n.github.io/python-numpy-tutorial/
Machine learning is the basis of the internship program. To have a thorough understanding of the machine learning, follow this link below :
http://www.deeplearningbook.org/contents/ml.html
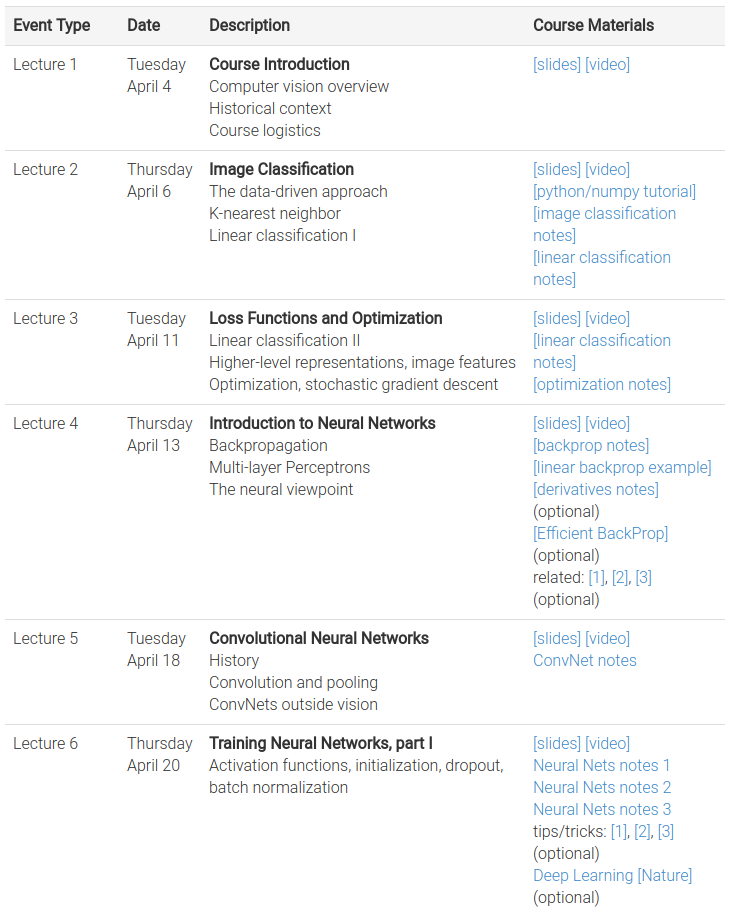
For backgroud knowldege of deep learning, lectures 2-6 of Convolutional Neural Networks for Visual Recognition from Standford University can be followed.
http://cs231n.stanford.edu/syllabus.html
After the lectures, it is recommended to attemp to solve he assignment 1.
Click the link and sign in https://github.com. (If you do not have account sign up! username is important because your username will be the address of your github.)
Click start a project to start making your own repository. Then follow the steps:
- write any repository name.
- Check Public
- Check "Initializing this repository with README".
- You have to choose a license. License normally would be "MIT" (detailed explanation included in the link
- Click 'create'. Now you're ready to roll!
There is a display issue that it does not display the GUI on docker. So it is recommended to install UBUNTU to run GUI on Docker.
-
To download Ubuntu 16.04.3 LTS, follow this link
https://www.ubuntu.com/download/desktop -
Download the iso image for ubuntu wherever you can easily navigate.
-
Make the USB bootable with rufus. To download rufus, follow this link
https://rufus.akeo.ie/When you open the software, keep the default options. Somewhere in the bottom of the interface, you would see an option to insert the iso file you downloaded minutes ago. Insert the image, then run the software so that bootable USB is created.
-
To install Ubuntu, follow this link below
https://tutorials.ubuntu.com/tutorial/tutorial-install-ubuntu-desktop?_ga=2.156978296.258151108.151625099 0-1540692620.1516250990#3
GUI, standing for Graphical User Interface, is basically a program with user-friendly interface in which users can use the program with clicking buttons instead of typing in difficult commands.
Go to the link for tutorials:
http://www.tkdocs.com/tutorial/
The link above guides you from a to z on how to make simple GUIs.
The Tkinter tutorial goes on with Python3.4 or above, but we are using python 2.7.
While going through the tutorial, some commands won't work:
import tkinter
from tkinter import ttk
Instead, you should go by:
import Tkinter
import ttk
Mac does not support direct display export to ubuntu environment, thus something called X11 forwarding using Xqaurtz is needed.
If you does not have Xqaurtz installed on your Macbook please go to the link below.
-
initiate xquartz. Then, go to preference -> security and then check both part.
-
Restart the xquartz.
3. follow the command below. This will redirect your display to ubuntu environment.
$ ip=$(ifconfig en0 | grep inet | awk '$1=="inet" {print $2}') && echo "My IP is: $ip"

$ xhost + ${ip}

$ docker run --rm -it -e DISPLAY=${ip}:0 -v /tmp/.X11-unix:/tmp/.X11-unix mijungkim/2018_winter_internship
everytime you change your internet setting (Wi-Fi), you should write those commands again.
Detailed instructions would be mentioned in the link above. However, you might need some short tips that might help you understand the instructions better.
* The use of 'try' and 'except' commands will prevent many errors.
* Always start with **Tk()**, that creates the main window.
* Whatever label, frame or widgets you make, do not forget to **'grid'** them so that they will be visible.
* At the very end, put **.mainloop()** that runs everything you coded.
After going through tutorials from the section right above, now it's time for real stuff.
Make a GUI based on this github project below:
https://github.com/mozilla/DeepSpeech
Here is an example of GUI made to run the Speech-to-text feature:


Training models for DeepSpeech is done under linux conditions. If you want to safely embed the trained model into python-based GUI script, you need to modify the DeepSpeech model into python language.