This repository includes software and configurations as a result of our efforts to provide datascientists a highly customizable, powerful and a secure platform on OpenShift Container Platform 3.11. Before going deeper into it, first things first, we've greatly inspired from two repos maintained by @GrahamDumpleton, JupyterHub Quickstart and Jupyter Notebooks, then we created our own images and customizations.
The notebook extends the console-based approach to interactive computing in a qualitatively new direction, providing a web-based application suitable for capturing the whole computation process: developing, documenting, and executing code, as well as communicating the results. The Jupyter notebook combines two components:
- A web application: a browser-based tool for interactive authoring of documents which combine explanatory text, mathematics, computations and their rich media output.
- Notebook documents: a representation of all content visible in the web application, including inputs and outputs of the computations, explanatory text, mathematics, images, and rich media representations of objects.
JupyterHub is the best way to serve Jupyter Notebook for multiple users. It can be used in a classes of students, a corporate data science group or scientific research group. It is a multi-user Hub that spawns, manages, and proxies multiple instances of the single-user Jupyter notebook server.
The components used in this project other than Kubernetes / OpenShift are JupyterHub v1.1.0, JupyterLab v1.2.7, Notebook v6.0.3, KubeSpawner and LDAP Authenticator.
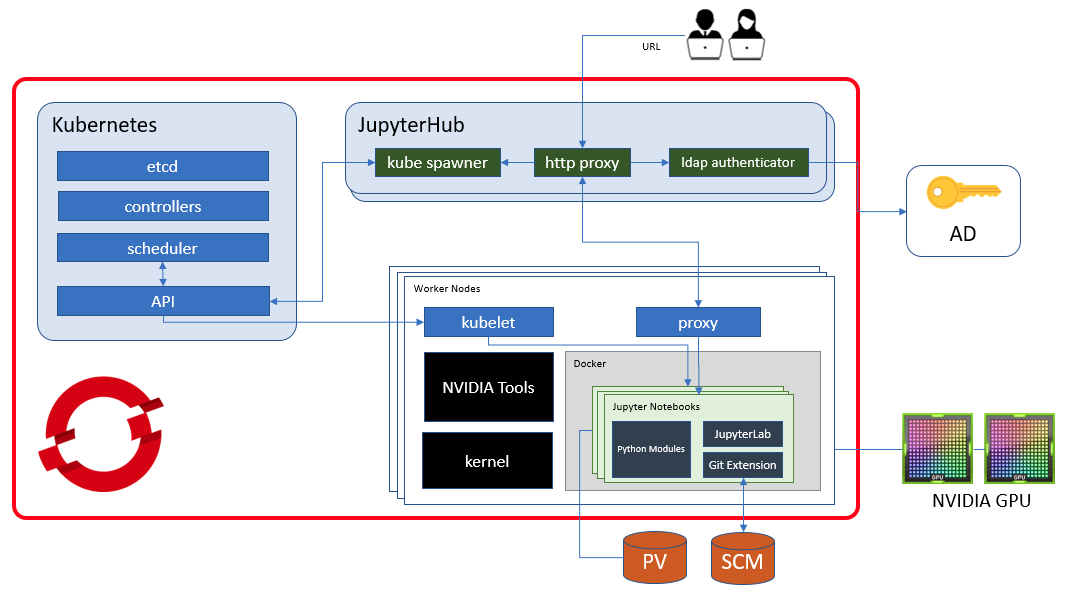
The first step in deploying JupyterHub is to prepare a notebook image and the image for JupyterHub. The contents of the images and Dockerfiles exist in images folder. What we need to do is to build them and push to a private registry or Docker Hub. These images are CentOS based and we prefer to use specific tags so please check for the most recent tags of related base images from Docker Hub.
cd ./images/jupyterhub
docker build -t <registry>/<user>/jupyterhub:<tag> .
docker push <registry>/<user>/jupyterhub:<tag>

cd ../jupyternb-cpu
docker build -t <registry>/<user>/jupyternb-cpu:<tag> .
docker push <registry>/<user>/jupyternb-cpu:<tag>
JupyterHub image is pretty straightforward, these is nothing fancy about it, it will install regular python modules related with JupyterHub. But notebook image is a little bit more customized and complicated. Apart from python modules; Oracle client binaries, tensorflow and JupyterLab (with git extension) are also installed. As a result of this, we have a pretty big image, so you are warned :)
If you are unsure of how to build these images, feel free to use the ones that exist in the template.
The pre-requisities of deploying a JupyterHub environment is as follows:
- A functional OpenShift 3.11 environment. If an OpenShift cluster at your disposal does not exist, you can have a look at Minishift.
- A linux machine to run your
occommands which can access to your OpenShift cluster. - Web server certificate files named
jupyter-ssl.crtandjupyter-ssl.key. - Internet access from your linux machine.
- Last but not least, a quiet place without any distractions.
Start with cloning the repository, creating the namespace, importing the template and creating a new application from the template. There are more parameters in template config, so don't miss to check out and adapt according to your environment.
git clone https://github.com/vOrcunus/jupyter-openshift.git
oc new-project datascience --display-name="MY JUPYTER PROJECT"
oc -n datascience apply -f ./config/template-jupyterhub.yaml
oc -n datascience new-app --template jupyterhub --param APPLICATION_NAME=jupyter
oc status
A postgresql and a jupyterhub pod should have been created. I've defined the replica count of jupyterhub as zero because we need to do some extra configs in order to prevent it from getting erros. These configurations are;
- Give
anyuidpermission to jupyter service account. This is required for running cull-idle service on jupyterhub otherwise it errors out. - Create a configMap that includes most of our jupyterhub customizations.
- Create a secret that keeps the password of the user to query AD.
- Copy your certificate files, inject them to jupyterhub pod via secrets.
oc adm policy add-scc-to-user anyuid system:serviceaccount:datascience:jupyter
oc -n datascience apply -f ./config/configmap-jupyterhub.yaml
oc -n datascience create secret generic ad-password --from-literal AD_PASSWORD=super-hidden-password
oc -n datascience create secret tls jupyter-ssl --cert jupyter-ssl.crt --key jupyter-ssl.key
oc -n datascience set volume dc/jupyter --add -t secret -m /opt/app-root/share/jupyterhub/ssl --name certs --secret-name jupyter-ssl
Now we are ready to spin up our jupyterhub pod. We can have the route and access to the UI after the pod starts and passes the readiness probe.
oc -n datascience scale dc/jupyter --replicas=1
oc -n datascience get route jupyter -o jsonpath="{.spec.host}"
To remove all the resources that has been created so far, run;
oc -n datascience delete all,configmap,pvc,serviceaccount,rolebinding -l app=jupyter
To update jupyterhub configuration and restart the pod, run;
oc -n datascience edit cm/jupyter-cfg
oc delete pod -l deploymentconfig=jupyter
There are more configuration details in the configmap that need to be mentioned.
For authentication purposes, I used Active Directory service and configured official ldapauthenticator according to my environment. This configuration also enables us to authorize users in accordance with their membership information in AD.
 c.LDAPAuthenticator_class = 'ldapauthenticator.LDAPAuthenticator'
 c.LDAPAuthenticator.server_address = 'dc.orcunus.io'
 c.LDAPAuthenticator.server_port = 389
 c.LDAPAuthenticator.use_ssl = False
 c.LDAPAuthenticator.user_search_base = 'OU=Users,DC=orcunuso,DC=io'
 c.LDAPAuthenticator.user_attribute = 'sAMAccountName'
 c.LDAPAuthenticator.use_lookup_dn_username = False
 c.LDAPAuthenticator.allowed_groups = ['CN=DataScientists,OU=Groups,DC=orcunuso,DC=io']
 c.LDAPAuthenticator.lookup_dn = True
 c.LDAPAuthenticator.lookup_dn_search_filter = '({login_attr}={login})'
 c.LDAPAuthenticator.lookup_dn_user_dn_attribute = 'CN'
 c.LDAPAuthenticator.lookup_dn_search_user = 'CN=svcpg,OU=Generic Users,DC=orcunuso,DC=io'
 c.LDAPAuthenticator.lookup_dn_search_password = os.environ['AD_PASSWORD']
 c.LDAPAuthenticator.escape_userdn = False
 c.LDAPAuthenticator.valid_username_regex = r'^[a-z0-9A-Z]*$'
The company might have different user profiles that requires different cpu and memory resources for their pods. There is a very easy way of fulfilling this necessity, KubeSpawner.profile_listoption. But what is missing is that how can we control which user can request which profile, so I tried to find a solution by creating a user-profile mapping file where the jupyterhub administrator manually defines the profiles. This is how it works;
- A plaintext file is added to the configmap that we already mounted (check configmap for details)
- A callable is defined in our configuration script
- That callable is assigned as
KubeSpawner.pre_spawn_hook
If the user is not defined in that mapping list, he/she will not be able to run the server and receive an exception on the user interface. This incident will also be logged in the stdout of jupyterhub pod.
Please note that, the options form will override any image defined by the NOTEBOOK_IMAGE template parameter.
When a notebook instance is created and a user creates their own notebooks or install custom python modules, if the instance is stopped they will lose any work they have done. To prevent users from losing their data and modules, you can configure jupyterhub to request persistent volume and mount it into the notebook pods.
c.Spawner.notebook_dir = '/opt/app-root/src/PV'
c.KubeSpawner.pvc_name_template = '%s-pvc-{username}' % application_name
c.KubeSpawner.storage_class = 'my-storage-class'
c.KubeSpawner.storage_pvc_ensure = True
c.KubeSpawner.storage_access_modes = ['ReadWriteOnce']
c.KubeSpawner.storage_capacity = '20Gi'
c.KubeSpawner.volumes = [{'name': '%s-volume-{username}' % application_name, 'persistentVolumeClaim': {'claimName': '%s-pvc-{username}' % application_name}}]
c.KubeSpawner.volume_mounts = [{'mountPath': '/opt/app-root/src/PV', 'name': '%s-volume-{username}' % application_name}]
Apart from that configuration, you can also alter PYTHONPATH environment variable to include /opt/app-root/src/PV/site-packages, inform your users to install new modules into this directory and therefore they will still be capable of using these modules without the need to reinstall even after pod restarts.
In order to prevent pod2pod communication, you can configure a network policy that denies every ingress traffic to the notebook pods and only accepts from JupyterHub pod.
oc -n datascience create -f ./config/netpol-datascience.yaml
When a notebook server is created, it will keep running forever and consume valuable resources in your cluster. As the time goes by, more users will probably use this platform and more idle resources will consume memory. This problem is addressed by community and a jupyterhub service can be called periodically to cull idle servers. This service configuration takes place under JupyterHub.services parameter. This will stop notebooks which don't have any user or kernel activity for 12 hours.
c.JupyterHub.services = [{'name': 'cull-idle', 'admin': True, 'command': 'python3 /opt/app-root/bin/cull-idle-servers.py --timeout=43200'.split()}]
In my configuration, I've added profiles for advanced datascientists that allocates great amounts of memory hence I would like to define more restrictive timeouts and reclaim those valuable resources sooner than 12 hours. The problem is, jupyterhub service that culls servers will not help because it's a global configuration, it will effect all profiles. The answer is defining kernel shutdown with different timeout configurations within the notebooks.
tcKernelTimeout = int(os.environ.get('JUPYTERNB_KERNEL_TIMEOUT', '0'))
c.NotebookApp.shutdown_no_activity_timeout = 3601
c.MappingKernelManager.cull_idle_timeout = tcKernelTimeout
c.MappingKernelManager.cull_busy = False
c.MappingKernelManager.cull_connected = True
c.MappingKernelManager.cull_interval = 301
This configuration takes place in jupyter_notebook_config.py. For more information, refer to the jupyter notebook documentation.
JupyterLab is a next-generation web-based user interface for Project Jupyter offering all the familiar building blocks of the classic Jupyter Notebook (notebook, terminal, text editor, file browser, rich outputs, etc.) in a flexible and powerful user interface, and it's already enabled in this project. To improve collaborative work between datascientists, git extension is installed and enabled with JupyterLab.