Get up and running quickly to allow Okta users to SSO into AWS.
This guide will walk you through the basics of setting up Okta as an IDP for your AWS account. We will use CloudFormation templates to set up the AWS resources. If you are interested in what's going on behind the scenes in AWS and Okta, take a look at the "How it Works" section below.
If you do not already have an Okta account, you can get a free-forever developer account at developer.okta.com.
Note: Okta developer accounts are free forever and essentially the same as Okta production environments.
If you get a developer account, these instructions will be easier to follow if you switch to the "classic" Okta UI. In the upper-right hand corner of your screen you will see Developer Console. Mouse over that and click on Classic UI.
All of our work will be in AWS IAM, so you will not incur any additional charges.
Log in to Okta.
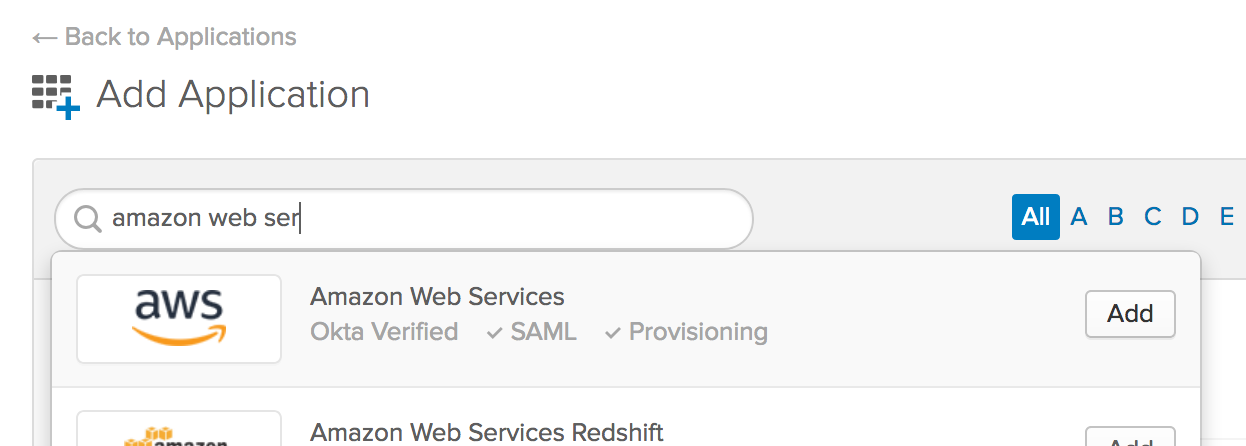
In the Shortcuts menu on the right-hand side, click on Add Applications.
In the search box, type amazon web services, then click Add.
Leave the General Settings as-is and click Next.
On the Sign-On Options screen, choose SAML 2.0 as your sign-in method.
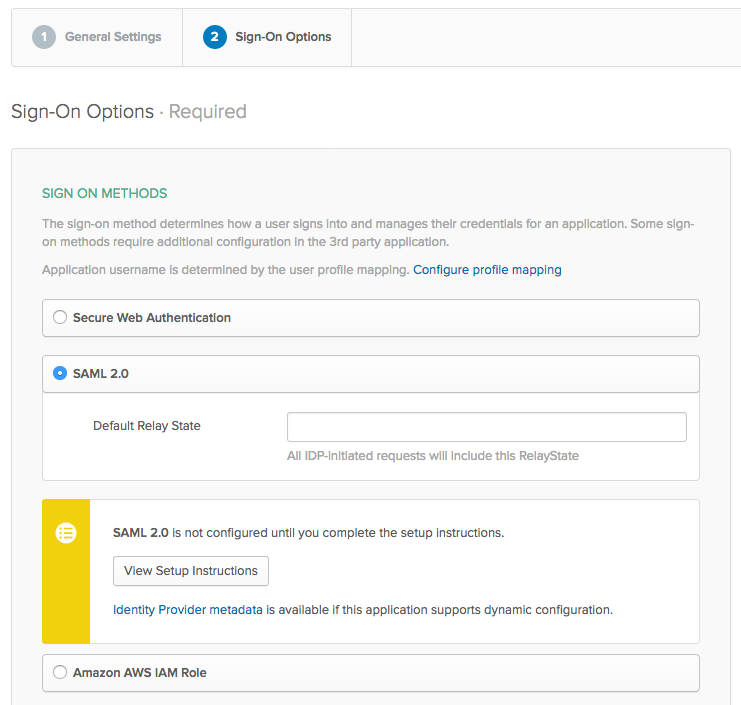
Right-click on the Identity Provider Metadata link and select save link as...
Save the metadata.xml file to a convenient location.
Click Done for now to save the new application in Okta. We'll come back in a moment to fill in the Identity Provider ARN.
We'll be using a CloudFormation template to:
- set up Okta as an identity provider
- set up an Okta service user, used to list available roles in your AWS account
- set up a new example role:
okta_sso_s3_read_only - attach policies to the
okta_sso_s3_read_onlyrole- a trust policy to allow the Okta identity provider to assume the role
- an access policy that allows read access to s3
If you are already logged in to your AWS account, you can just launch the stack here:

Or,
Go to CloudFormation
Click Create Stack
Select Template is ready
In the Specify template section, choose Amazon S3 URL
Paste the following URL into the URL field:
https://s3.amazonaws.com/tom-smith-okta-demo-images/aws-labs/okta.yml
Click Next
On the Create Stack screen, enter "CreateOktaIDP" or another name you choose in the Stack name field.
Copy the xml from your metadata.xml file, and paste it into the Metadata field.
Click Next
You can leave all of these settings as-is, unless you want to change them.
Click Next
You can leave all of these settings as-is, unless you want to change them.
Make sure to tick the checkbox at the bottom of the page to acknowledge that AWS CloudFormation might create IAM resources.
Click Create stack
When the stack finishes creating, click on the Outputs tab.
Leave the Outputs tab open for the next step.
Go to Okta and open the AWS app that you saved in Step 1
Applications->Amazon Web Services
Click on the Sign On tab
Click the Edit button
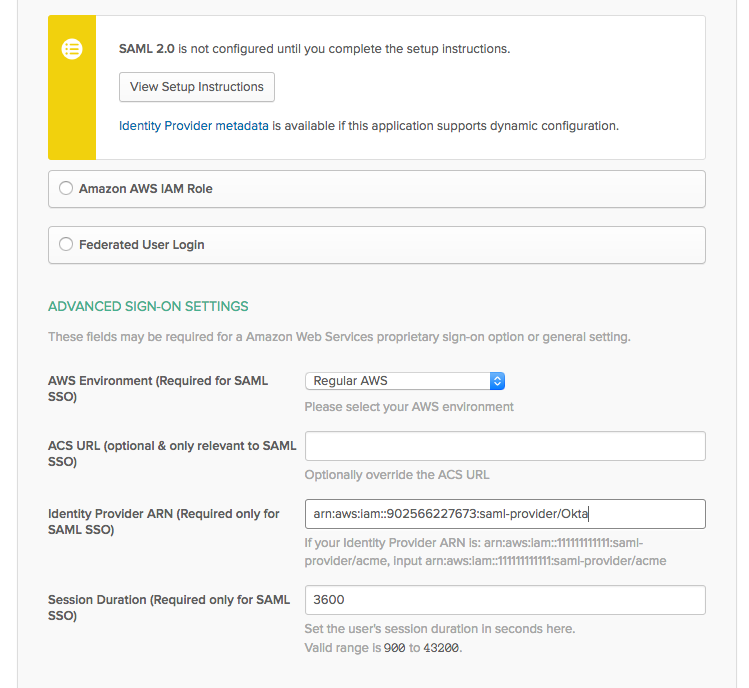
Paste the IdentityProviderArn from the CloudFormation outputs into the Identity Provider ARN field.
Click Save
Click on the Provisioning tab
Note: Okta does not actually create users in AWS - because it's not necessary with this architecture - but we'll use the Provisioning tab to add the AWS AccessKeyId and SecretAccessKey to Okta.
Click Configure API Integration
Check the box for Enable API Integration
Enter the AccessKey and SecretKey from the Outputs tab in the appropriate fields.
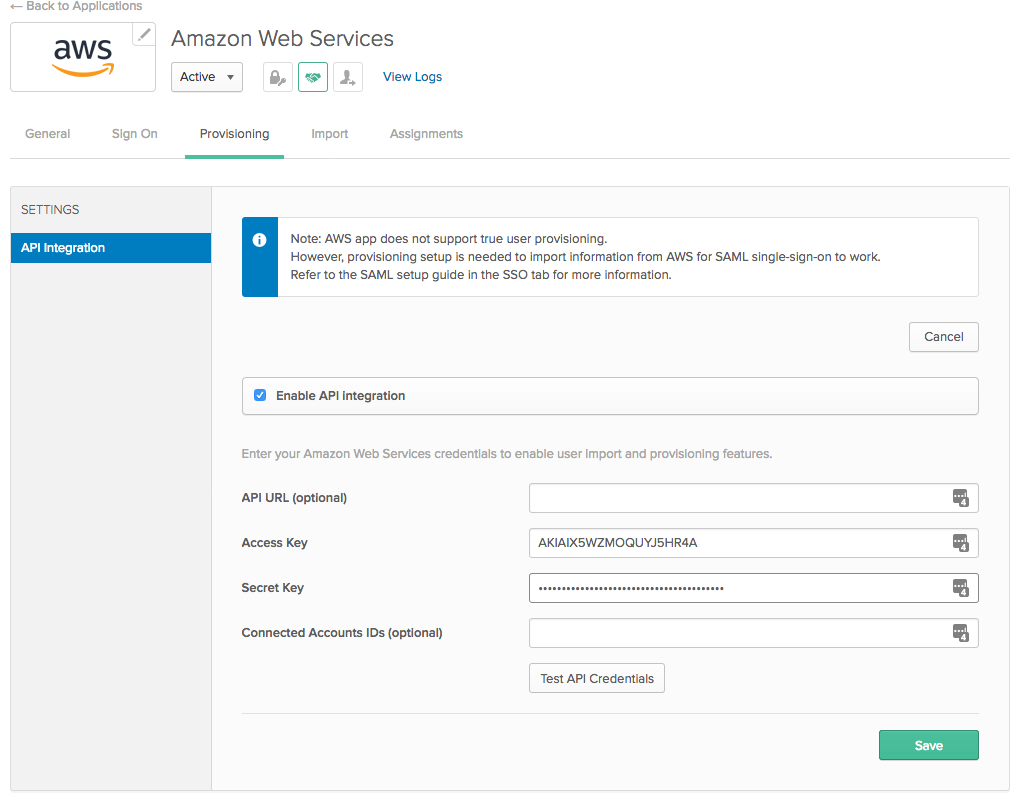
Click Test API Credentials to test your key.
Click Save
Your Provisioning tab should now look something like this:
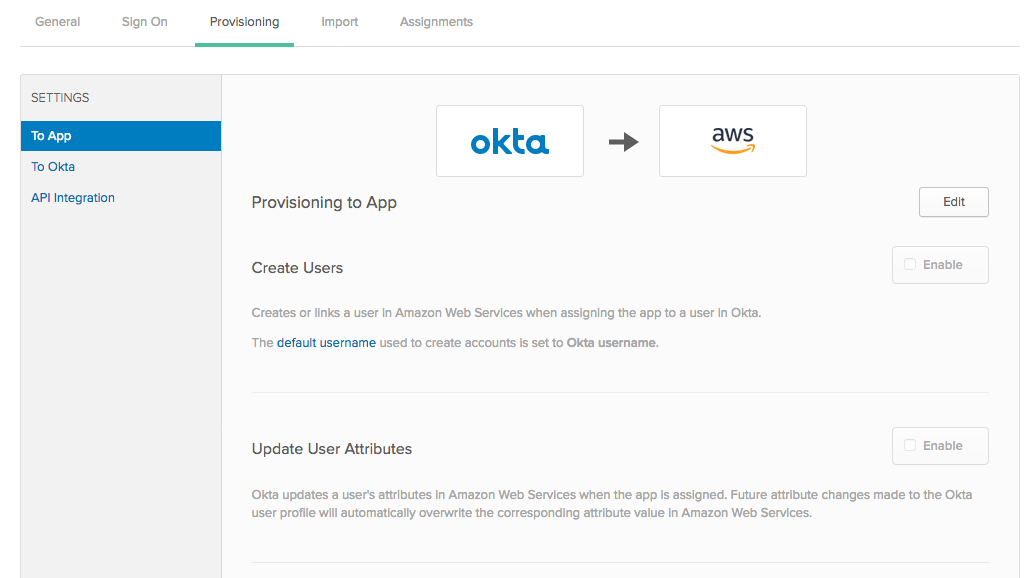
Click Edit
Check the box for Enable for the Create Users section, but not for Update User Attributes
Click Save
Go to Okta and open your AWS application, if it is not already open.
Click on the Assignments tab.
Click on the green Assign button.
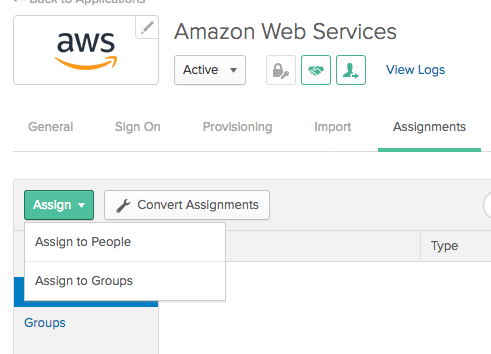
In a production environment, you would likely assign the application to group(s). For now, we are going to just assign the application to a single user.
Click Assign to People
Click Assign for the user you want to test
Ignore the Role field for now.
Select a role (or roles) from the list of SAML User Roles.
Note: You will see all roles from your AWS account in this list. You can choose any roles you want to assign to the user, but only those roles that have trusted the Okta IDP in AWS will work. The role that the CloudFormation template in this exercise has created is:
okta_sso_s3_read_only
Note: If you assign more than one AWS role to a user, the user will be able to choose from a list of their assigned AWS roles after they authenticate with Okta and click on the AWS chiclet. If you assign just one AWS role, then when the user clicks the AWS chiclet they will go directly to the AWS dashboard without having to choose their role.
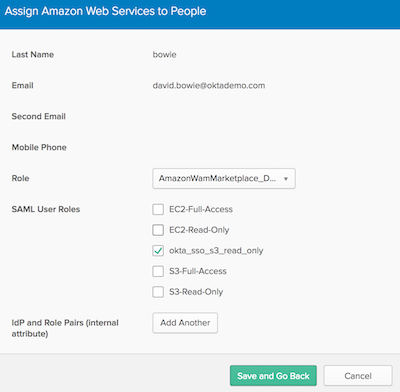
Click Save and Go Back, then Done.
Now you can log in to Okta as the user that you assigned your AWS application to. If you assigned the application to the currently-logged in user, then you can just click on the Dashboard link.
Otherwise, you can open an incognito window or another browser to log in to your Okta account as another user.
When you log in to Okta, you will see an AWS chiclet on your dashboard. Click on the chiclet to go to the AWS dashboard. As noted above, if this user has been assigned more than one role, then AWS will prompt the user to choose the role they wish to use.
In this exercise, the CloudFormation template has created a single role: okta_sso_s3_read_only. So, when the user goes to the AWS dashboard with this role, they will only be able to see S3 resources.
Note: If you try to upload a file to an S3 bucket, the AWS UI will allow you to go all the way through this process, but will error out in the end.
That's how you access AWS resources via SSO through Okta.
Now, if you go to CloudTrail (after the standard delay for AWS to write the logs) you will be able to see the authentication event, and the authentication event will include the Okta user name.
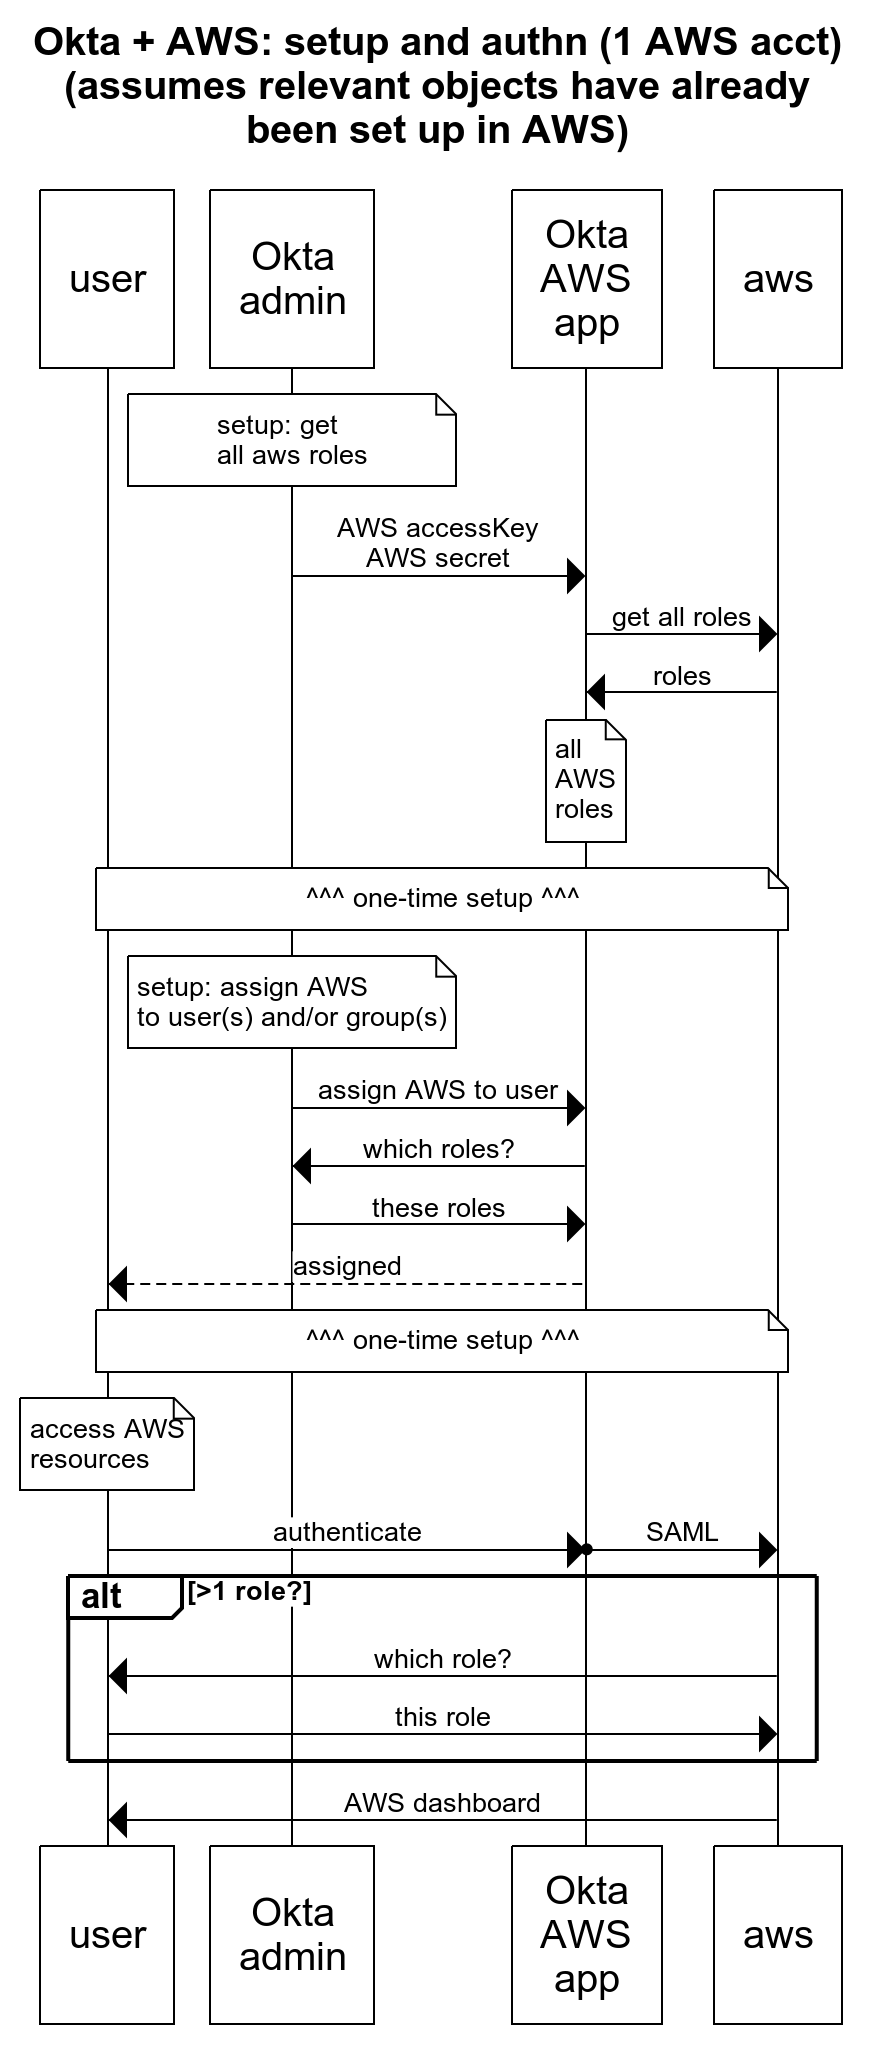
In this example, we focus on a basic scenario: a single Okta account connected to a single AWS account.
The basic setup is this:
- Set up Okta as an Identity Provider in AWS
- For any AWS role that you want to expose to Okta users:
- Add a Trust Policy that allows the Okta IDP to assume the role
- Note: using Okta, you will be able to select which Okta users will have access to which AWS roles
- Set up a role and user in AWS that allows the Okta service to list all roles in the AWS account
- In Okta, assign AWS roles to users and/or groups
These are the essential AWS objects:
| AWS Objects | ||||
| Policies | ||||
| User | Identity Provider | Role | Trust | Access |
| Okta API | iam:ListRoles* | |||
| Okta | ||||
| okta_sso_s3_read_only | Okta | s3:Get* | ||
And, this is how the admin set up and user authentication works: