GUI for controlling NI DAQ devices and monitoring output/input voltages in multiple channels.
For standalone application, just download main.exe in the 'dist' and run the file.
Recommended to use Python 3.7.8 (able to run on Windows Vista)
Install NI DAQ API and Matplotlib version 3.2.2 (stability issues with newer version)
Use PyQt5 version 5.9.2 to work on Windows Vista
For newer machines, install Python 3.8.9 and the following modules:
pip install nidaqmx
pip install pyqt5
pip install git+https://github.com/pyqtgraph/pyqtgraph@master
Run pyqt_main.py and the interface should show up.
There are two states for the interface, debug or not. Use debug when the National Instruments DAQ device is not connected to the PC, and all signal generated will be simulated. This is to prevent the nidaqmx library from throwing errors. To set this, go into the config.py file and change the variable DEBUG_MODE to True. If DAQ is connected, change to False
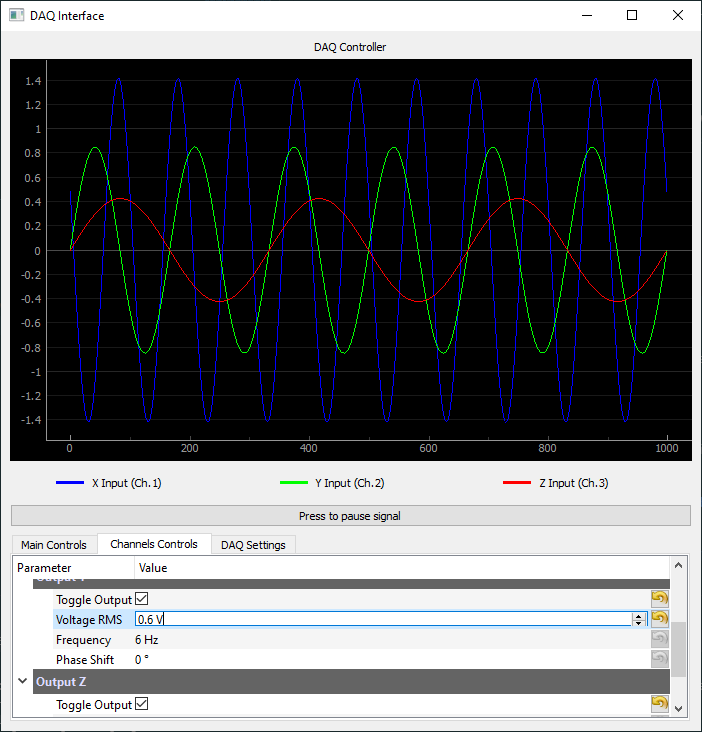
There is a graph/legend, master start/stop button, and a tab layout within the interface. Press the master start/stop button to start and stop all signals. The explanation of the tabs are as follows:
This is where the device name, channel configurations, and sample rate/size is set for both input and output DAQs.
- Device Name: Name assigned to the DAQ. By default the output DAQ is Dev1 and input DAQ is Dev2.
- I would recommend downloading the NI MAX Software which allows you to see which device has what device name. It is also the official software for controlling NI DAQ hardware.
- Sample Rate: The number of samples per second both the writer and reader will write/read per second.
- Sample Size: The number of samples the DAQ will write/read in each pass
- X/Y/Z Output Channel: The channel with which the DAQs will read/write from for the corresponding name.
- The name assigned to each channel can be changed by going into config.py and changing strings inside the CONFIG_NAMES variable.
- Commit Settings: This button saves and updates the current configuration to the applied settings. Will restart the DAQ write and read process.
This is where each channel can be independently controlled.
- Toggle Output: Turns the channel on/off
- Voltage RMS: Sets the RMS voltage of the wave signal generated
- Frequency/Phase: Changes frequency and phase. Frequency of 0 creates a DC signal.
This is where synchronous channel manipulations are controlled.
- Rotating Field: Generates a polyphase wave where each wave is equally phase shifted from each other.
Update channels in legend when settings are committed- ???
This is a myriad of solutions I had to use to figure out how to run a bunch of stuff on different systems
NWM Software:
- QT Creator wouldn't run on Debian/Ubuntu ("Failed to load platform plugin "xcb"...), solution somewhere in here https://forum.qt.io/topic/93247/qt-qpa-plugin-could-not-load-the-qt-platform-plugin-xcb-in-even-though-it-was-found/66
This application uses Open Source components. You can find their source code below:
Project: MuControl
Link: https://github.com/czimm79/MuControl-release/blob/master/LICENSE.txt
Project: Python DAQmx examples
Link: https://github.com/tenss/Python_DAQmx_examples/blob/master/LICENSE