Full article available here. How to build a real-time collaborative plugin in TinyMCE
Following the great, but somehow confuse TinyMCE documentation, it’s very quick to get started with a plugin example. Using the Yeoman generator you create a sample plugin project where you can start testing and deploying your plugin.
`npm install --global yo generator-tinymce
yo tinymce`
…and to start the project
npm start
I suggest using VSCode with Live Reload server to open the demo HTML file where you can access your plugin and its changes.
Having the sample plugin created, we can start to build our own logic in the code. Let’s start from the beginning, in the demo.js we have to add a new property object to the TinyMCE Editor. In this example let’s call our plugin budwriter.
tinymce.init({
  selector: 'textarea.tinymce_1',
  plugins: 'code budwriter',
  budwriter: {
    name: 'Andre',
    photoUrl: 'https://www.biggalyoga.com/wp-      content/uploads/2018/07/profilecircle-768x814.png',
    key: 'free4all',
    socketUrl: 'http://localhost:3000'
  },
  toolbar: 'budwriter',
  height : "600",
  branding: false,
});
As you can see, I’ve added four properties into our budwriter plugin, special interest in socket_url that will represent the URL of our socket.io server. The other properties are my custom properties to represent a User.
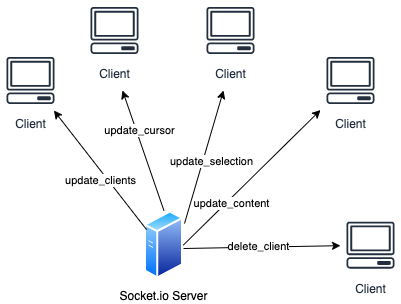
Having all these properties created, we can start to develop our logic, let’s create a file inside the core and start creating our collaborative class. The plugin should connect to a socket.io server to listen for event messages. These events will be split into the following:
-
Update clients - Event received when other clients connect to the server.
-
Update cursor — Changes cursor position of a client.
-
Update selection — Changes selection of a client.
-
Delete client — Deletes user container’s when a client disconnects from the server.
As depicted in the above image, all the connected clients will send a set of events updating its TinyMCE editor status. Following my other article regarding ranges and selections we can easily implement the logic of cursor’s and selection’s, you can access the article from here.
Note: Since our socket.ioclient uses node.js modules, such as require, I added a step to our Grunt file (Browserify) to compile these modules and use it as a bundle in the browser.
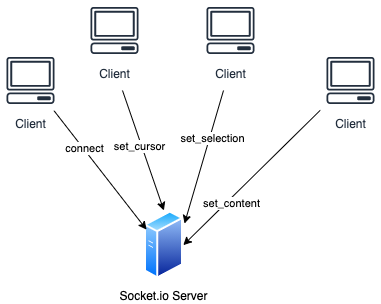
The server side of this project, as we already discussed will be implemented using socket.io. For that, I’ve created a Node.js project where I added the socket.io package into the project.
Once the socket.io package is ready to go, we have to create the event listeners for the events sent from the clients.
io.on("connection", (socket: Socket) => {
  io.sockets.emit('update_clients', list_of_users);
  socket.on('disconnect', () => {
      io.sockets.emit('delete_client', deleted_client);
  });

  /**
  * TinyMCE Clients event types
  */
  socket.on("set_cursor", (message: string) => {
     io.sockets.emit('update_cursor', message);
  });
  socket.on("set_selection", (message: string) => {
     io.sockets.emit('update_selection', message);
  });
  socket.on("set_content", (message: string) => {
     io.sockets.emit('update_content', message);
  });
});
In each one of these event listeners we have to propagate the change to the other clients, so they can update their plugin status (as depicted in the following image).