
Deploy Wordpress with Docker on vCloud / Swisscom DCS+
This Terraform module supports you in deploying a WordPress installation with Docker on Swisscom DCS+ infrastructure. Its purpose is to serve as an example to demonstrate how to use Terraform for Infrastructure-as-Code provisioning of a collection of Docker containers on DCS+.
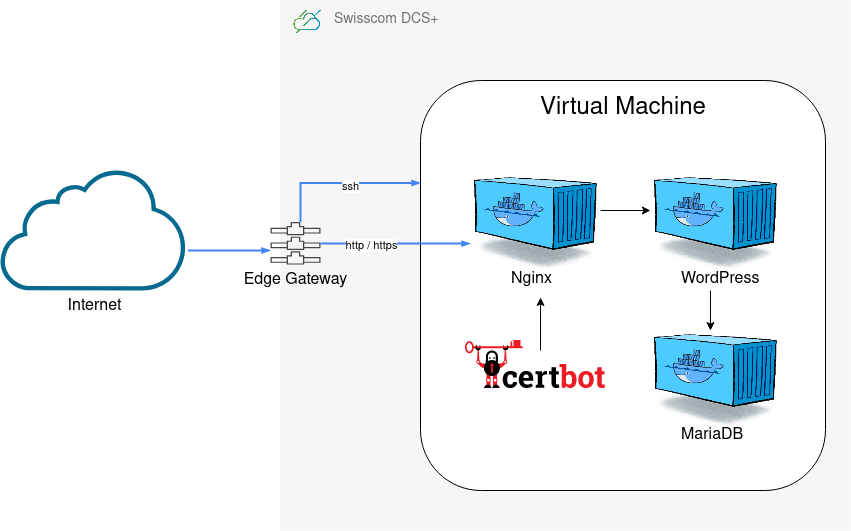
It consists of two different submodules, infrastructure and docker.
The infrastructure module will provision resources on DCS+ and setup a private internal network (10.10.0.0/24 CIDR by default), attach an Edge Gateway with an external public IP, configure NAT and firewall services, setup a virtual machine, attach it to the private network, and then install and configure Docker on it.
The docker module will then connect via SSH to the Docker host and deploy a WordPress container, along with MariaDB and Nginx on it. It will also setup automatic TLS certificates using certbot and Let's Encrypt.
The final result is a fully functioning WordPress deployment, having MariaDB as a database backend, accessible via HTTPS and with automatic TLS certificate management.
| Component | Type | Description |
|---|---|---|
| WordPress | CMS | Content management system, for creating blogs or building websites |
| MariaDB | Database | The "MySQL" database backend for WordPress |
| Nginx | Webserver | Acts as a reverse proxy in front of WordPress |
| certbot | Certificates | Automated TLS certificate management using Let's Encrypt |
To use this Terraform module you will need to have a valid account / contract number on Swisscom DCS+.
Configure your contract number (PRO-number) in terraform.tfvars -> vcd_org.
For deploying WordPress with Docker on DCS+ you will need to manually create the following resources first before you can proceed:
- a Virtual Data Center (also called Dynamic Data Center / DDC on DCS+)
- an Edge Gateway with Internet in your VDC/DDC
- an API User
Login to the DCS+ management portal and go to Catalog. From there you can order a new Dynamic Data Center. Pick the appropriate "Service Level" you want.
See the official DCS+ documentation on Dynamic Data Center for more information.
Configure the name of your newly created DDC in terraform.tfvars -> vcd_vdc.
Login to the DCS+ management portal and go to My Items view. From here click on the right hand side on "Actions" and then select Create Internet Access for your Dynamic Data Center. Make sure to check the box "Edge Gateway" and then fill out all the other values. For "IP Range Size" you can select the smallest value available, this Terraform module will only need one public IP for external connectivity. On "Edge Gateway Configuration" it is important that you select the Large configuration option to create an Edge Gateway with an advanced feature set, otherwise it might be missing some features and not function correctly!
See the official DCS+ documentation on Create Internet Access for more information.
Configure the name of this Edge Gateway in terraform.tfvars -> vcd_edgegateway.
Note: Also have a look in the vCloud Director web UI and check what the external/public IP assigned to this newly created Edge Gateway is by going to its Configuration -> Gateway Interfaces page and looking for the Primary IP. You will need this IP to set up a DNS A record with it.
Login to the DCS+ management portal and go to Catalog. From there you can order a new vCloudDirector API User. Make sure to leave "Read only user?" unchecked, otherwise your new API user will not be able to do anything!
See the official DCS+ documentation on Cloud Director API Users for more information.
Configure the new API username and password in terraform.tfvars at vcd_api_username and vcd_api_password.
Make sure you also set the API URL at vcd_api_url. Check out the official DCS+ documentation on how to determine the API URL value, see Cloud Director API - API access methods.
For deploying this Terraform module you will need to have all the following CLI tools installed on your machine:
This module has so far only been tested running under Linux and MacOSX. Your experience with Windows tooling may vary.
All possible configuration variables are specified in the variables.tf file in the root of this repository. Most of them already have a sensible default value and only a small handful are required to be configured manually. For any such variable that does not have a default (or you want to set to a different value) you will have to create and add a configuration entry in your terraform.tfvars file (Also to be placed in the root of this repository).
To get you started quickly there is also an example configuration file included, terraform.example.tfvars, which contains the minimal set of variables required to use this Terraform module.
vcd_api_url      = "https://vcd-pod-bravo.swisscomcloud.com/api"
vcd_api_username = "api_vcd_my_username"
vcd_api_password = "my_password"

vcd_org         = "PRO-0123456789"
vcd_vdc         = "my-data-center"
vcd_edgegateway = "PRO-0123456789-my-gateway"

dns_hostname = "my-wordpress.my-domain.com"
You can just copy this file over to terraform.tfvars and start editing it to fill in your values:
$ cp terraform.example.tfvars terraform.tfvars
$ vim terraform.tfvarsThe variable dns_hostname plays an important role in setting up your WordPress deployment. As part of the entire installation an Nginx reverse proxy will also be deployed and configured with that domain name as the server name / hostname it is serving, thus WordPress will become available under https://<dns_hostname>.
In order for this to work correctly you should setup a new DNS A record for the hostname you want to be using, pointing it to the external/public IP of the Edge Gateway. Look for the IP in the vCloud Director web UI.
For example, if you want to use my-wordpress.my-domain.com, the DNS entry would look something like this:
;; ANSWER SECTION:
my-wordpress.my-domain.com. 600 IN A 147.5.206.13Note: If you do not configure
dns_hostnameproperly then the WordPress deployment will fail and not work! A valid DNS A record is required for automated Let's Encrypt certificates and correctly working HTTPS traffic!
Install Terraform on your machine if you do not have it already. See the section about local CLI tools above for all required tools needed.
After you have configured terraform.tfvars you can use the provided Makefile to run all deployment steps automatically.
To provision the infrastructure, network, VM, etc., run make infrastructure, and type yes and hit Enter to proceed:
$ make infrastructureIf this is your first run this will likely show you a huge list of changes and missing resources. Everything shown here is what Terraform will create for you in order to provision all the necessary infrastructure on DCS+.
To provision the Docker deployments of WordPress, MariaDB and Nginx, run make docker, and type yes and hit Enter to proceed:
$ make dockerNow Terraform will create all the necessary Docker configuration and deploy the container. This will also setup a crontab entry for certbot to automatically renew the TLS certificate before it expires.
Alternatively you could also just run make all to run all steps in one command.
The first run is likely going to take quite a bit of time to finish, up to 10 minutes, as it needs to create a lot of new resources on DCS+. Just let it run until it finishes.
At the end you should see something like this in the output:
Outputs:

wordpress_url = "https://my-wordpress.my-domain.com"
The wordpress_url is the URL under which your new WordPress installation is now reachable.
Once Terraform has finished provisioning your deployment, you can also run make test to check if it works as expected:
$ make test