
Deploy Kubernetes with Kubermatic KubeOne on vCloud / Swisscom DCS+
- Kubernetes clusters with KubeOne
- How to deploy
- Up and running
- Troubleshooting
- Q&A
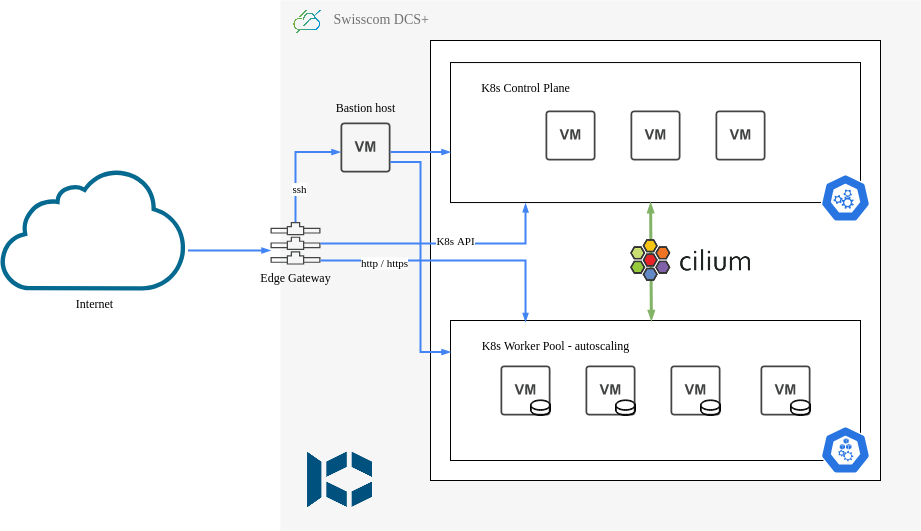
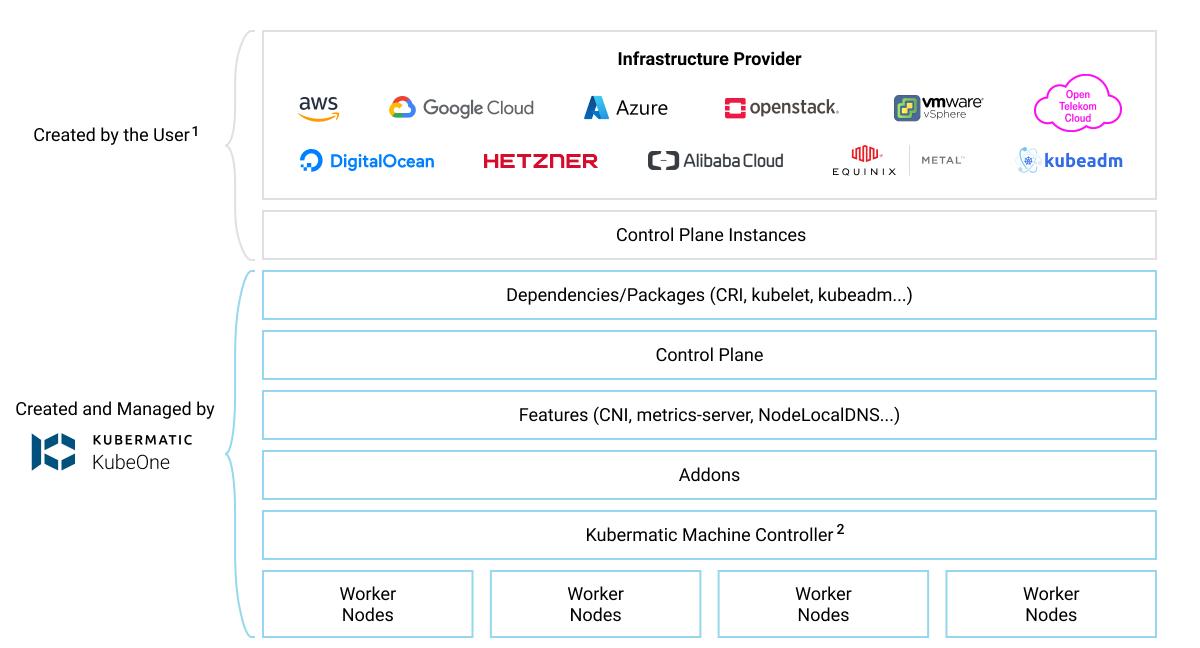
This repository supports you in creating an autoscaling Kubernetes cluster with Kubermatic KubeOne on Swisscom DCS+ infrastructure. It also installs and manages additional deployments on the cluster, such as ingress-nginx, cert-manager, oauth2-proxy, longhorn and a whole set of logging/metrics/monitoring related components. It consists of three main components:
- Infrastructure provisioning via
/terraform/ - Kubernetes cluster and autoscaling workers via
kubeoneandmachine deployments - Helm chart
/deployments/for all additional components Each of these is responsible for a specific subset of features provided by the overall solution.
The Terraform module will provision resources on DCS+ and setup a private internal network (192.168.1.0/24 CIDR by default), attach an Edge Gateway with an external public IP and configure loadbalancing services and firewall rules, deploy a bastion host (jumphost) for external SSH access into the private network, and finally a set of Kubernetes control plane VMs.
The KubeOne automation will then connect via SSH over the bastion host to all those control plane nodes and install a vanilla Kubernetes cluster on them. It will also install the machine-controller and cluster-autoscaler, which will then dynamically provision additional VMs to be used as worker nodes for hosting your workload.
Finally the Deployments component is responsible for installing all other system components and software on to the Kubernetes cluster. It does most of its work through official Helm charts, plus some additional customization directly via kubectl / manifests and some shell scripting.
The final result is a fully functioning, highly available, autoscaling Kubernetes cluster, complete with all the batteries included you need to get you started. Ingress Controller for HTTP virtual hosting / routing, TLS certificate management with automatic Let's Encrypt certificates for all your HTTPS traffic, IDP integration for authentication and authorization over OIDC, dynamic cluster-autoscaling of worker nodes, PersistentVolume support, and an entire monitoring stack for metrics and logs.
| Component | Type | Description |
|---|---|---|
| Cilium | Networking | An open-source, cloud native and eBPF-based Kubernetes CNI that is providing, securing and observing network connectivity between container workloads |
| vCloud CSI | Storage (Default) | Container Storage Interface (CSI) driver for VMware vCloud Director |
| Longhorn | Storage (Alternative) | Highly available persistent storage for Kubernetes, provides cloud-native block storage with backup functionality |
| Machine-Controller | Compute | Dynamic creation of Kubernetes worker nodes on VMware Cloud Director |
| Ingress NGINX | Routing | Provides HTTP traffic routing, load balancing, SSL termination and name-based virtual hosting |
| Cert Manager | Certificates | Cloud-native, automated TLS certificate management and Let's Encrypt integration for Kubernetes |
| Dex | OIDC | A federated OIDC provider that allows to integrate identity providers into Kubernetes |
| OAuth2 Proxy | Proxy | A proxy that provides authentication with Google, Azure, OpenID Connect and many more identity providers |
| Kubernetes Dashboard | Dashboard | A general purpose, web-based UI for Kubernetes clusters that allows users to manage and troubleshoot applications on the cluster, as well as manage the cluster itself |
| Prometheus | Metrics | An open-source systems monitoring and alerting platform, collects and stores metrics in a time series database |
| Loki | Logs | A horizontally scalable, highly available log aggregation and storage system |
| Promtail | Logs | An agent which collects and ships the contents of logs on Kubernetes into the Loki log storage |
| Grafana | Dashboard | Allows you to query, visualize, alert on and understand all of your Kubernetes metrics and logs |
| OpenCost | Dashboard | Measure and visualize your infrastructure and container costs in real time |
| Kured | System | A daemonset that performs safe automatic node reboots when needed by the package management system of the underlying OS |
| Falco | Security | A cloud-native security tool to provide real-time alerts, designed for use in Kubernetes |
| WireGuard | Security | An extremely simple, fast and modern VPN utilizing state-of-the-art cryptography |
To use this repository you will need to have a valid account / contract number on Swisscom DCS+.
Configure your contract number (PRO-number) in config.yaml -> vcd.org.
For deploying a Kubernetes cluster with KubeOne on DCS+ you will need to manually create the following resources first before you can proceed:
- a VDC / Dynamic Data Center (DDC)
- an Edge Gateway with Internet in your VDC/DDC
- an API User (with OVA/OVF Import ExtraConfig permissions)
Login to the DCS+ management portal and go to Catalog. From there you can order a new Dynamic Data Center (a Virtual Data Center or VDC in vCloud terminology). The "Service Level" does not matter for Kubernetes, pick anything you want.
See the official DCS+ documentation on Dynamic Data Center for more information.
Configure the name of your newly created VDC in config.yaml -> vcd.vdc.
Login to the DCS+ management portal and go to My Items view. From here click on the right hand side on "Actions" and then select Create Internet Access for your Dynamic Data Center. Make sure to check the box "Edge Gateway" and then fill out all the other values. For "IP Range Size" you can select the smallest value available, this installation will only need one public IP for an external LoadBalancer. On "Edge Gateway Configuration" it is important that you select the Large configuration option to create an Edge Gateway with an advanced feature set, otherwise it will be missing loadbalancing features and not function correctly!
See the official DCS+ documentation on Create Internet Access for more information.
Configure the name of this Edge Gateway in config.yaml -> vcd.edge_gateway_name.
Note: Also have a look in the vCloud Director web UI and check what the external/public IP assigned to this newly created Edge Gateway is by going to its Configuration -> Gateway Interfaces page and looking for the Primary IP. You will need this IP to set up DNS A and CNAME records with your Kubernetes cluster hostname.
Login to the DCS+ management portal and go to Catalog. From there you can order a new vCloudDirector API User. Make sure to leave "Read only user?" unchecked, otherwise your new API user will not be able to do anything!
See the official DCS+ documentation on Cloud Director API Users for more information.
Note: Once you have created the API user, you will need contact Swisscom Support and request the additional permission "vApp > Preserve ExtraConfig Elements during OVA Import and Export" to be configured for that user, it is required if you want to use the vCloud-CSI in your Kubernetes cluster!
Configure the new API username and password in config.yaml -> vcd.user | vcd.password.
Make sure to also set the API URL at vcd.url. Check out the official DCS+ documentation on how to determine the API URL value, see Cloud Director API - API access methods.
For deploying a Kubernetes cluster with this repository you will need to have all the following CLI tools installed on your machine:
A quick way to get those CLI tools installed on your machine is to run the helper command make install-tools. This will download and install most of the required binaries in your home directory, under ~/bin/. Make sure to add that directory to your $PATH environment variable afterwards.
# run the command
make install-tools

Installing CLI tools into [~/bin]:
-> downloading binaries for Linux ...
 -> checking [kubectl] ...
 -> downloading [kubectl] ...
 -> checking [jq] ...
 -> downloading [jq] ...
 -> checking [yq] ...
 -> downloading [yq] ...
 -> checking [kubeone] ...
 -> downloading [kubeone] ...
 -> unpacking [kubeone.zip] ...
 -> checking [terraform] ...
 -> downloading [terraform] ...
 -> unpacking [terraform.zip] ...
 -> checking [helm] ...
 -> downloading [helm] ...
 -> unpacking [helm.tgz] ...
 -> checking [trivy] ...
 -> downloading [trivy] ...
 -> unpacking [trivy.tgz] ...

# add installation directory to your PATH
export PATH=$PATH:~/bin
This repository has so far only been tested running under Linux and MacOSX. Your experience with Windows tooling may vary.
Note: For macOSX users, some scripts may fail if you are not using the GNU version of sed. Please make sure to use the GNU sed instead of the macOS's version. The default macOS's sed can be replaced with GNU by installing gsed via Brew and adding the path to your .zshrc file.
All configuration data for the entire project and all its components has been consolidated into a single configuration file: config.yaml.
To get you started quickly there is also an example configuration file included, config.example.yaml, which contains all the properties and variables required.
You can just copy this file over to config.yaml and start editing it to fill in your values:
$ cp config.example.yaml config.yaml
$ vim config.yaml
Once you have configured everything, you can run the following command to create all the additional configuration files needed for the project:
$ make configThis will generate additional files based on the values in the main config.yaml and by rendering the templates / examples found under /templates. These generated files are used by Terraform and KubeOne.
All data for the infrastructure provisioning part via Terraform lives in the /terraform subdirectory of this repository, and all possible configuration variables are defined in the variables.tf file. Most of them already have a sensible default value and only a small handful are required to be configured manually. For any such variable that does not have a default (or you want to set to a different value) have to be specified inside the terraform.tfvars configuration file.
Please note that this file automatically gets generated and overwritten by running the make config command. If you want to configure any values please do so in the main config.yaml (and the templates /templates/terraform.template.tfvars if you want to make further modifications)
The variable kubernetes.hostname in the main config.yaml plays an important role in setting up your Kubernetes cluster. Many of the components that are installed will have Ingresses created and configured with that domain name as part of their hostname. For example Grafana will be made available on https://grafana.<hostname>.
In order for this to work correctly you should set up a new DNS A record for the domain name you want to be using, pointing it to the external/public IP of the Edge Gateway. Look for the IP in the vCloud Director web UI. After that you will also have to add a wildcard CNAME record, pointing to the newly created A record.
For example, if you want to use my-kubernetes.my-domain.com, the DNS entries would look something like this:
;ANSWER
*.my-kubernetes.my-domain.com. 600 IN CNAME my-kubernetes.my-domain.com.
my-kubernetes.my-domain.com. 600 IN A 147.5.206.13There are also separate configuration variables for each aspect of the virtual machines that will be provisioned by Terraform initially and later on dynamically by the machine-controller and cluster-autoscaler components. These are all the variables starting for the control_plane.* or worker.* properties in config.yaml.
Here are some examples for possible cluster size customizations:
| Node type | Setting | Variable name | Value |
|---|---|---|---|
| Control plane | Number of VMs | control_plane.vm_count |
1 |
| Control plane | vCPUs | control_plane.cpus |
1 |
| Control plane | Memory (in MB) | control_plane.memory |
2048 |
| Worker | Initial number of VMs | worker.initial_machinedeployment_replicas |
1 |
| Worker | Minimum number of VMs | worker.cluster_autoscaler_min_replicas |
1 |
| Worker | Maximum number of VMs | worker.cluster_autoscaler_max_replicas |
3 |
| Worker | vCPUs | worker.cpus |
2 |
| Worker | Memory (in MB) | worker.memory |
4096 |
| Worker | Disk size (in GB) | worker.disk_size_gb |
80 |
| Node type | Setting | Variable name | Value |
|---|---|---|---|
| Control plane | Number of VMs | control_plane.vm_count |
3 |
| Control plane | vCPUs | control_plane.cpus |
2 |
| Control plane | Memory (in MB) | control_plane.memory |
4096 |
| Worker | Initial number of VMs | worker.initial_machinedeployment_replicas |
2 |
| Worker | Minimum number of VMs | worker.cluster_autoscaler_min_replicas |
2 |
| Worker | Maximum number of VMs | worker.cluster_autoscaler_max_replicas |
5 |
| Worker | vCPUs | worker.cpus |
4 |
| Worker | Memory (in MB) | worker.memory |
8192 |
| Worker | Disk size (in GB) | worker.disk_size_gb |
250 |
| Node type | Setting | Variable name | Value |
|---|---|---|---|
| Control plane | Number of VMs | control_plane.vm_count |
3 |
| Control plane | vCPUs | control_plane.cpus |
4 |
| Control plane | Memory (in MB) | control_plane.memory |
4096 |
| Worker | Initial number of VMs | worker.initial_machinedeployment_replicas |
5 |
| Worker | Minimum number of VMs | worker.cluster_autoscaler_min_replicas |
3 |
| Worker | Maximum number of VMs | worker.cluster_autoscaler_max_replicas |
15 |
| Worker | vCPUs | worker.cpus |
4 |
| Worker | Memory (in MB) | worker.memory |
16384 |
| Worker | Disk size (in GB) | worker.disk_size_gb |
150 |
Note: The more worker nodes you have, the smaller the disk size gets that they need in order to distribute and cover all your
PersistentVolumeneeds if you are using the Longhorn storage class. This is why the worker nodes in the Large cluster example actually have a smaller disk than in the Medium example. If you don't intend to use Longhorn volumes and mostly rely on the vCloud-CSI, you can reduce your worker disks to less than 100 GB each for example.
Set the amount of control plane nodes to either be 1, 3 or 5. They have to be an odd number for the quorum to work correctly, and anything above 5 is not really beneficial anymore. For a highly-available setup usually the perfect number of control plane nodes is 3.
The initial, minimum and maximum amount of worker nodes can be set to anything between 1 and 100. Do not set it to a number higher than that unless you know what you are doing, other variables would need to be changed too since by default the network configuration currently supports only a maximum of 100 worker nodes!
Note: Please be aware that if you use only 1 worker or control plane VM your workload will not be highly-available anymore, for if any of these VMs crashes or becomes unavailable it might affect your running containers.
KubeOne's purpose is to install Kubernetes itself onto the virtual machines provisioned by Terraform. As part of that process it will also install machine-controller onto the cluster, a component which will allow Kubernetes via cluster-autoscaler to dynamically provision further virtual machines on Swisscom DCS+, serving as additional worker nodes for the cluster.
For KubeOne and the machine-controller to work correctly they will need to know about the infrastructure in advance and more specifically also the credentials necessary to interact with Swisscom DCS+.
All configuration information for KubeOne and its components is stored within credentials.yaml and kubeone.yaml.
Please note that these two files are automatically generated and overwritten by running the make config command. If you want to configure any values please do so in the main config.yaml (and the templates files /templates/credentials.template.yaml and /templates/kubeone.template.yaml if you want to make further modifications)
The generated kubeone.yaml is the main configuration file of KubeOne itself. This file will contain information on various aspects of the Kubernetes cluster setup that KubeOne will perform, what version to install, what CNI to use, what CSI to use, etc..
Please refer to the Kubermatic KubeOne - v1beta2 API Reference for a full list of all configuration settings available.
The kubeone.yaml generated by make config should mostly already have sensible defaults and only really needs to be adjusted if you either don't want to make use of the vCloud-CSI for volumes on Kubernetes and set it as your default storage-class, or to make further adjustments to the storageProfile for your Swisscom DCS+ storage.
Before you can use the vCloud-CSI you will need to open up a Service Request with Swisscom first in order to request your API user being able to upload OVF templates while preserving the ExtraConfig: disk.EnableUUID=true parameter. By default API users on DCS+ unfortunately do not have the necessary permissions unless explicitely requested. Without that permission the uploaded OS template and any VMs created based on it will not allow the vCloud-CSI to detect attached disks by UUID, and thus not function properly.
If you are sure your API user has the necessary permission, then all that is left to do is to modify the kubernetes.csi.storage_profile property in config.yaml and regenated all the configuration files.
Please adjust all the storage_profile's in config.yaml to one of the storage policies available to you in your Swisscom DCS+ data center. You can view the storage policies from the DCS+ UI by clicking on Data Centers -> Storage -> Storage Policies.
Note: When using the vCloud-CSI you must adjust the
kubernetes.csi.storage_profileproperty and have the additional permissions for OVF upload on your user/API accounts, or PersistentVolumes will not work! Make sure that your API user has the necessary "vApp > Preserve ExtraConfig Elements during OVA Import and Export" permission!
If you do not want to go through the trouble of having to request these extra permission for your API users, then you simply don't need to deploy the vCloud-CSI. To disable it go into kubeone.template.yaml (or the generated kubeone.yaml directly) and comment out the csi-vmware-cloud-director and default-storage-class addons. This repository will then automatically configure Longhorn to be the default storage class on your cluster and use it provide volumes.
If you want to install a WireGuard VPN server in your Kubernetes cluster, you will need to configure some more additional information in the config.yaml.
Have a look at the wireguard section in the provided config.example.yaml. You will need to at the very least generate a WireGuard keypair for the server, and configure all the clients you want to allow access to the VPN in advance.
  wireguard:
    serverAddress: 10.242.42.1/24 # choose wireguard server address, default if not set is '10.242.42.1/24'
    privateKey: aFNRgUHsMqyrj7cwWwsSKQvkEgXqTbJxiuTOjU3KB1c= # privateKey for wireguard server, generate keypair with: wg genkey | tee server.private.key | wg pubkey > server.public.key
    clients:
    - name: my-computer # name of your client
      publicKey: pTAAvK3WkMy1MHgTlWJCdvoNpMSEy/WnfNblV96XUQw= # publicKey of your client, generate keypair with: wg genkey | tee client.private.key | wg pubkey > client.public.key
      allowedIPs: 10.242.42.10/32 # IP for your client, choose one that is part of the server address network
The server address you can leave as is. For the server-side private key you will need to generate a keypair with wg genkey. The easiest would be to run it like this:
wg genkey | tee server.private.key | wg pubkey > server.public.keyYou will need to install the necessary WireGuard client software on your local machine in order to setup a VPN connection to the Kubernetes cluster once it is up and running, and also to have access to the tools for generating keypairs as mentioned.
For example if your laptop runs on Ubuntu then use these commands to install the WireGuard client:
sudo apt update
sudo apt install wireguard
For other operating systems you can go to the WireGuard Installation website and check out the documentation there on how to install all necessary client software.
Once you have WireGuard installed on your local machine you will need to prepare and client configuration file for it, configured to connect to the WireGuard endpoint running on your new Kubernetes cluster. For this you will need again a keypair (wg genkey) for your local machine, and also provide the public key of the server-side endpoint.
On Ubuntu the file would be /etc/wireguard/wg0.conf, here's an example:
[Interface]
Address = 10.242.42.10/32
DNS = 169.254.20.10
PrivateKey = wMq8AvPsaJSTaFEnwv+J535BGZZ4eWybs5x31r7bhGA=

[Peer]
PublicKey = uJ0bUIe8Kc+vp27sJVDLH8lAmo4E3dfGtzRvOAGQZ0U=
Endpoint = my-kubernetes.my-domain.com:32518
AllowedIPs = 0.0.0.0/0, ::/0
PersistentKeepalive = 25
The local address 10.242.42.10/32 should correspond to what was configured as a client in the server-side configuration. The public key for Peer is the server-side public key generated earlier.
Note: Be aware of the
DNSproperty. This will instruct all traffic going through the WireGuard VPN tunnel to use169.254.20.10for DNS resolution, which is the NodeLocal DNSCache inside the Kubernetes cluster, allowing you to resolve Kubernetes services.
config.yaml:
make config
make all
Continue reading for a detailed explanation on what this all entails.
This repository includes a Makefile in the root directory. All steps necessary to provision a Kubernetes cluster are defined within there.
To get a list of all possible make commands available, you can consult the help message:
$ make help

Usage:
  help                          print this help message
  all                           runs all steps to provision and setup Kubernetes
  check-env                     verify current working environment meets all requirements
  config                        (re)generate all configuration files
  install-tools                 download and install all required CLI tools into ~/bin
  terraform                     provision all infrastructure
  terraform-init                initialize Terraform
  terraform-check               validate Terraform configuration and show plan
  terraform-apply               apply Terraform configuration and provision infrastructure
  terraform-refresh             refresh and view Terraform state
  terraform-output              output Terraform information into file for KubeOne
  terraform-destroy             delete and cleanup infrastructure
  kubeone                       run all KubeOne / Kubernetes provisioning steps
  kubeone-apply                 run KubeOne to deploy Kubernetes
  kubeone-kubeconfig            write kubeconfig file
  kubeone-generate-workers      generate a machinedeployments manifest for the cluster
  kubeone-apply-workers         apply machinedeployments to the cluster
  kubeone-addons                list KubeOne addons
  deployments                   install all deployments on Kubernetes
  deploy-longhorn               deploy/update Longhorn storage
  deploy-ingress-nginx          deploy/update Nginx Ingress-controller
  deploy-cert-manager           deploy/update Cert-Manager
  deploy-dex                    deploy/update Dex
  deploy-oauth2-proxy           deploy/update oauth2-proxy
  deploy-kubernetes-dashboard   deploy/update Kubernetes dashboard
  dashboard-token               create a temporary login token for Kubernetes dashboard
  deploy-prometheus             deploy/update Prometheus
  deploy-loki                   deploy/update Loki
  deploy-promtail               deploy/update Promtail
  deploy-grafana                deploy/update Grafana
  grafana-password              get the admin password for Grafana
  deploy-opencost               deploy/update OpenCost
  deploy-falco                  deploy/update Falco Security
  deploy-wireguard              deploy/update WireGuard VPN
  oidc-setup                    setup OIDC for the Kubernetes cluster (install Dex first!)
  ssh                           login to bastion host
  ssh-control-plane             login to all control plane nodes (requires TMUX)
trivy-scan run a Kubernetes cluster scan with TrivyThe first step towards our goal is to provision the infrastructure.
Install Terraform on your machine if you do not have it already. See the section about local CLI tools above for all required tools needed.
After you have generated the terraform.tfvars file (by running make config) you can start the entire Terraform infrastructure provisioning by simply typing:
$ make terraformThat command will run all necessary steps. If it is the first run then it is likely going to take quite a bit of time to finish, up to 15-20 minutes, as it needs to create a lot of new resources on DCS+. Just let it run until it finishes.
If you want to have more fine-grained control over the various steps being executed, you could also run them manually in this order:
$ make check-env # verifies current working environment meets all requirements
$ make terraform-init # initializes Terraform
$ make terraform-apply # applies Terraform configuration and provisions infrastructure
$ make terraform-output # outputs Terraform information into file for KubeOne
Each time before you provision or modify the infrastructure you can do a "dry-run" first and check what changes Terraform would do:
$ make terraform-check # validates Terraform configuration and shows planEverything shown here is what Terraform will create or modify for you in Swisscom DCS+.
The second step is to setup (or upgrade) a Kubernetes cluster on our newly provisioned infrastructure with KubeOne.
Install KubeOne on your machine if you do not have it already. See the section about local CLI tools above for all required tools needed.
After you have generated the kubeone.yaml and credentials.yaml files (by running make config) you can proceed with the installation of Kubernetes by typing:
$ make kubeoneThat command will then connect via SSH over the bastion host to the previously provisioned control plane VMs and install Kubernetes on them.
Note: The KubeOne commands will only work if you previously ran the Terraform steps, as they depend on output files being generated there.
If you want to have more fine-grained control over the various steps being executed, you could also run them manually in this order:
$ make check-env # verifies current working environment meets all requirements
$ make kubeone-apply # runs KubeOne to deploy Kubernetes
$ make kubeone-kubeconfig # writes the kubeconfig file
$ make kubeone-generate-workers # generates a machinedeployments manifest for the cluster
$ make kubeone-apply-workers # applies machinedeployments manifest to the clusterThe final step is to deploy all other additional components on to the newly installed Kubernetes cluster.
Install Helm on your machine if you do not have it already. See the section about local CLI tools above for all required tools needed.
After you have installed Kubernetes via KubeOne you can install all additional components by typing:
$ make deploymentsThat command will then install a collection of useful addons and components via Helm charts onto your Kubernetes cluster.
All of them are optional and not strictly required, but provide quality-of-life improvements for your Kubernetes experience. If you want to have more fine-grained control over all the various components being installed, you could also deploy them manually and pick and choose which ones you want to install:
$ make deploy-ingress-nginx # deploys or updates Nginx Ingress-controller
$ make deploy-cert-manager # deploys or updates Cert-Manager
$ make deploy-kubernetes-dashboard # deploys or updates Kubernetes-Dashboard
$ make deploy-prometheus # deploys or updates Promethes
$ make deploy-loki # deploys or updates Loki
$ make deploy-promtail # deploys or updates Promtail
$ make deploy-grafana # deploys or updates Grafana
$ make deploy-opencost # deploys or updates OpenCost
$ make deploy-falco # deploys or updates Falco Security
$ make deploy-wireguard # deploys or updates WireGuard VPNThere is one final step remaining after the deployments, and that is to configure your Kubernetes cluster for OIDC authentication and authorization.
This can be done by simply running the following command:
$ make oidc-setupFor this command to work you will need to have the kubectl kubelogin plugin installed.
When you run make oidc-setup it will open up a browser window and ask you to login either via your configured IDP or with the static admin credentials.
The static admin credentials will have admin@<hostname> as the username, and the password is set to the value you configured under kubernetes.admin_password in config.yaml. This set of admin credentials allows full cluster-admin access to the Kubernetes cluster itself, and also via OAuth2 to any of its components, such as Grafana, Prometheus, the Longhorn UI, etc..
The entire OIDC setup is done via a combination of Dex and oauth2-proxy.
To integrate or add additional identity providers, you can configure Dex connectors in the main config.yaml under kubernetes.dex.connectors.
For example:
kubernetes:
  ...
  dex:
    connectors:
    - type: github
      id: github
      name: GitHub
      config:
        clientID: a6324d7bda05daec7ec2
        clientSecret: eecfce1c786d0fcc426edea89ebf56790c5e8169
        redirectURI: https://dex.my-kubernetes.my-domain.com/dex/callback
        orgs:
        - name: my-company-org
          teams:
          - team-a
          - team-b
        - name: other-org
Please refer to the Dex connectors documentation on how to configure additional connectors for the IDP of your choice into Dex.
Once the installation of all the components has finished you should have a fully functioning Kubernetes cluster up and running in your Swisscom DCS+ data center. Here are a few examples on how to access these components and the cluster itself:
There should be a kubeone-kubeconfig file written to the root directory. This file contains the configuration and credentials to access and manage your Kubernetes cluster. You can set the environment variable KUBECONFIG to this file to have your kubectl CLI use it automatically for the remainder of your terminal session.
$ export KUBECONFIG=kubeone-kubeconfigNow you can run any kubectl commands you want to manage your cluster, for example:
$ kubectl cluster-info
Kubernetes control plane is running at https://my-kubernetes.my-domain.com:6443
CoreDNS is running at https://my-kubernetes.my-domain.com:6443/api/v1/namespaces/kube-system/services/kube-dns:dns/proxy
KubeDNSUpstream is running at https://my-kubernetes.my-domain.com:6443/api/v1/namespaces/kube-system/services/kube-dns-upstream:dns/proxy

$ kubectl get nodes -o wide
NAME                                   STATUS   ROLES           AGE     VERSION   INTERNAL-IP    EXTERNAL-IP   OS-IMAGE             KERNEL-VERSION      CONTAINER-RUNTIME
kubeone-cp-1                           Ready    control-plane   4d22h   v1.25.6   192.168.1.10   <none>        Ubuntu 20.04.5 LTS   5.4.0-144-generic   containerd://1.6.18
kubeone-cp-2                           Ready    control-plane   4d22h   v1.25.6   192.168.1.11   <none>        Ubuntu 20.04.5 LTS   5.4.0-144-generic   containerd://1.6.18
kubeone-cp-3                           Ready    control-plane   4d22h   v1.25.6   192.168.1.12   <none>        Ubuntu 20.04.5 LTS   5.4.0-144-generic   containerd://1.6.18
kubeone-worker-pool-64578b898d-kbbgs   Ready    <none>          4d16h   v1.25.6   192.168.1.54   <none>        Ubuntu 20.04.5 LTS   5.4.0-144-generic   containerd://1.6.18
kubeone-worker-pool-64578b898d-sqlhk   Ready    <none>          4d16h   v1.25.6   192.168.1.55   <none>        Ubuntu 20.04.5 LTS   5.4.0-144-generic   containerd://1.6.18

$ kubectl get namespaces
NAME                   STATUS   AGE
cert-manager           Active   4d21h
cloud-init-settings    Active   4d22h
default                Active   4d22h
dex                    Active   4d22h
falco                  Active   4d19h
grafana                Active   4d20h
ingress-nginx          Active   4d21h
kube-node-lease        Active   4d22h
kube-public            Active   4d22h
kube-system            Active   4d22h
kubernetes-dashboard   Active   4d21h
loki                   Active   4d20h
longhorn-system        Active   4d22h
oauth2-proxy           Active   4d22h
opencost               Active   4d20h
prometheus             Active   4d21h
promtail               Active   4d21h
reboot-coordinator     Active   4d22h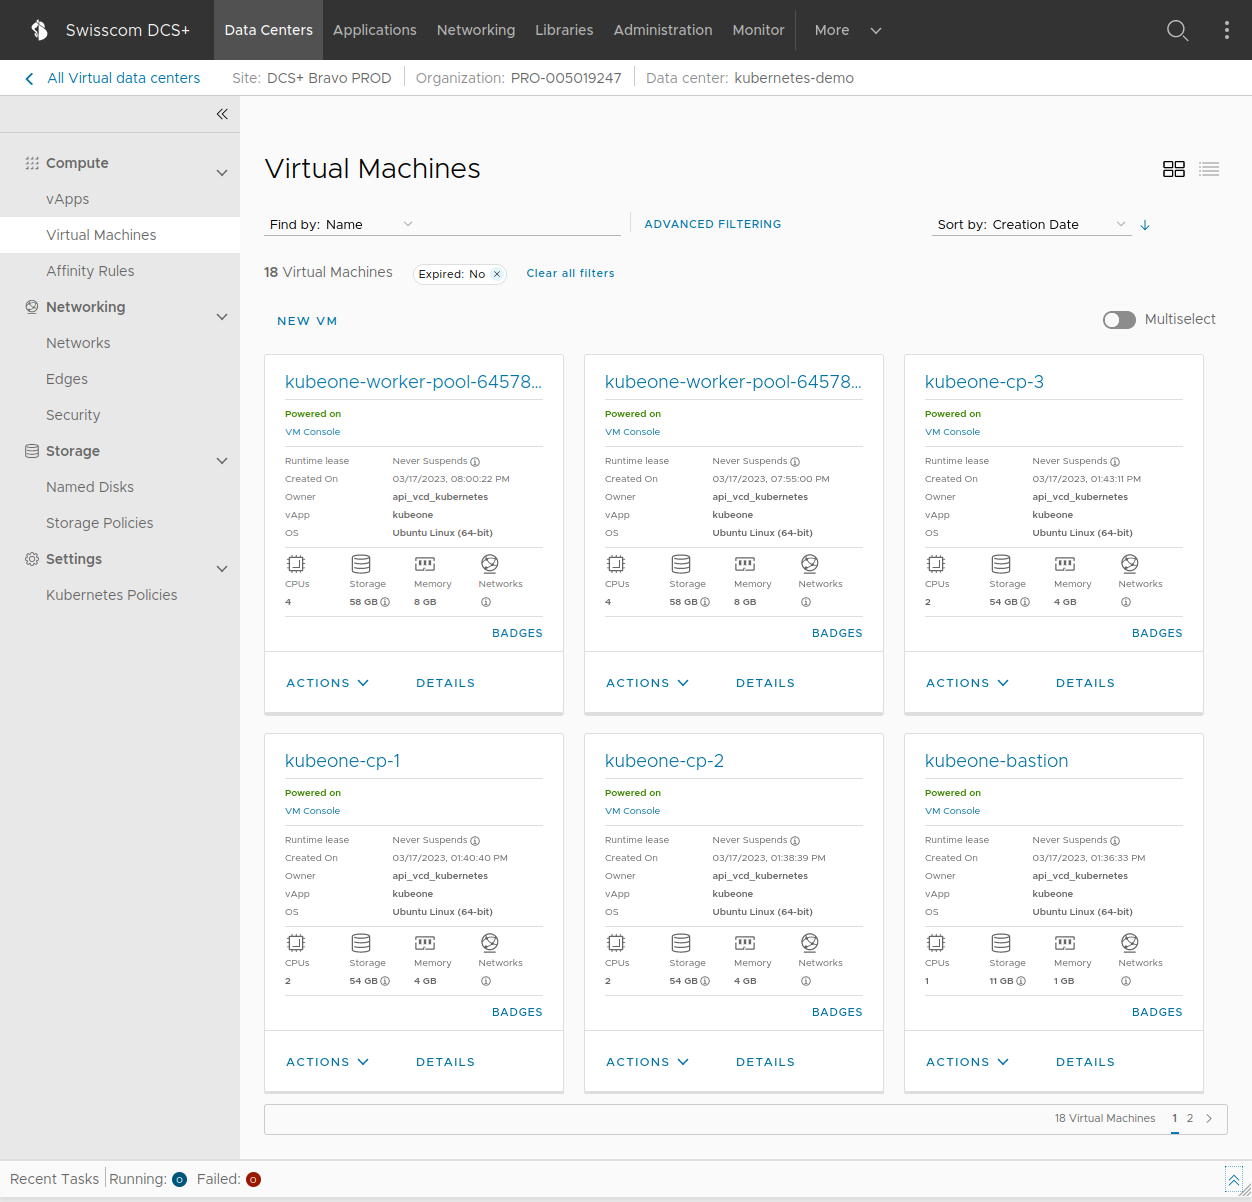
By default (unless configured otherwise in your config.yaml) once the deployment is done you should see something similar to the picture above in your DCS+ UI. There will be 1 bastion host (a jumphost VM for SSH access to the other VMs), 3 control plane VMs for the Kubernetes server nodes, and several dynamically created worker VMs that are responsible for running your Kubernetes workload.
The Kubernetes cluster will be set up to use OIDC RBAC for authentication and authorization.
See the KubeOne OIDC documentation for further information on how OIDC is implemented in a KubeOne Kubernetes cluster.
All web UI components will be automatically exposed externally via Ingress resources annotated to automatically require sign-in and secured by Dex / oauth2-proxy. To access any of these either use the OIDC static admin credentials (as mentioned in the OIDC setup) or your integrated IDP accounts.
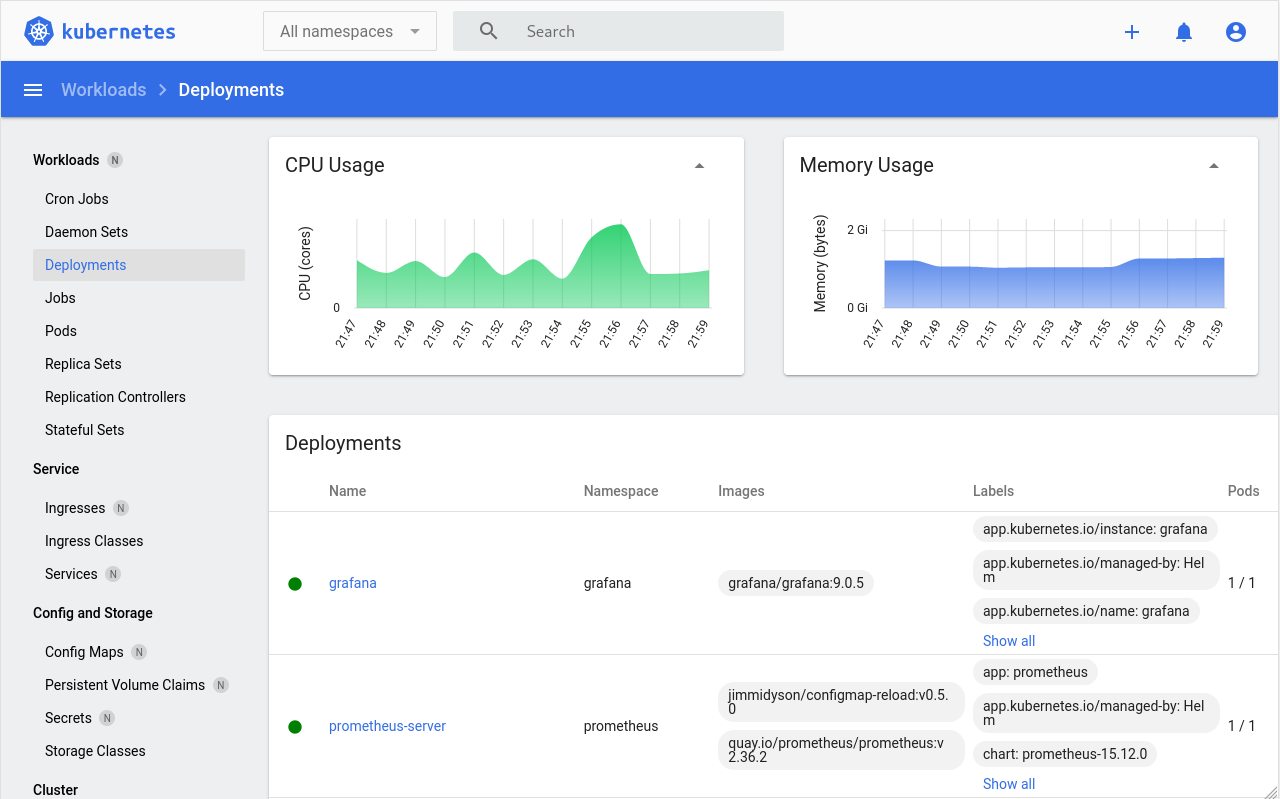
The Kubernetes dashboard will automatically be available to you after the installation under https://dashboard.my-kubernetes.my-domain.com (with my-kubernetes.my-domain.com being the value you configured in config.yaml -> kubernetes.hostname)
In order to login you will need to request a temporary access token from your Kubernetes cluster:
$ kubectl -n kubernetes-dashboard create token kubernetes-dashboard --duration "60m"With this token you will be able to sign in into the dashboard.
Note: This token is only valid temporarily, you will need request a new one each time it has expired.
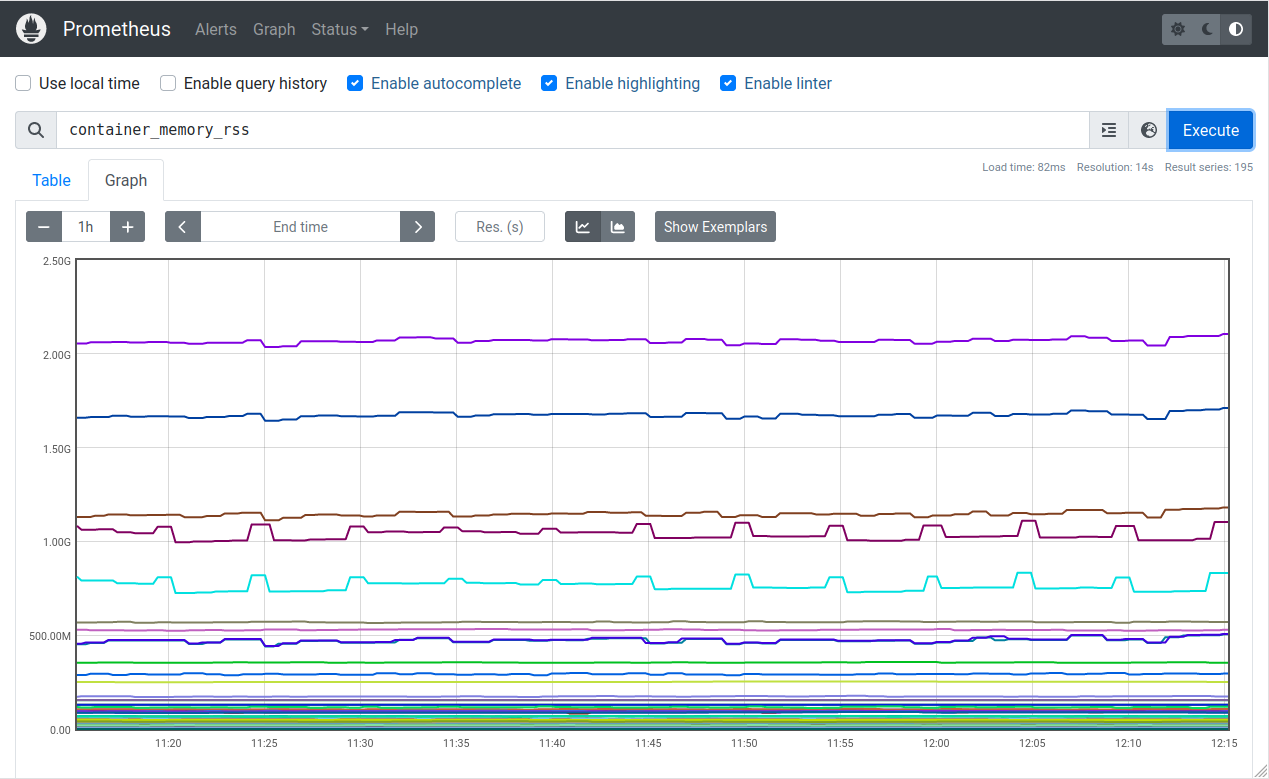
You can access the Prometheus UI in your browser by going to https://prometheus.my-kubernetes.my-domain.com and login with your IDP / OIDC account.

The Grafana dashboard will automatically be available to you after installation under https://grafana.my-kubernetes.my-domain.com (with my-kubernetes.my-domain.com being the value you configured in config.yaml -> kuberneters.hostname)
If you use the OIDC static admin credentials you will automatically login in with the Admin role and be able to manage and configure all aspects of Grafana.
If for whatever reason the OIDC login does not work, you can fallback to the Grafana internal admin account. The username will be admin and the password can be retrieved from Kubernetes by running:
$ kubectl -n grafana get secret grafana -o jsonpath='{.data.admin-password}' | base64 -d; echo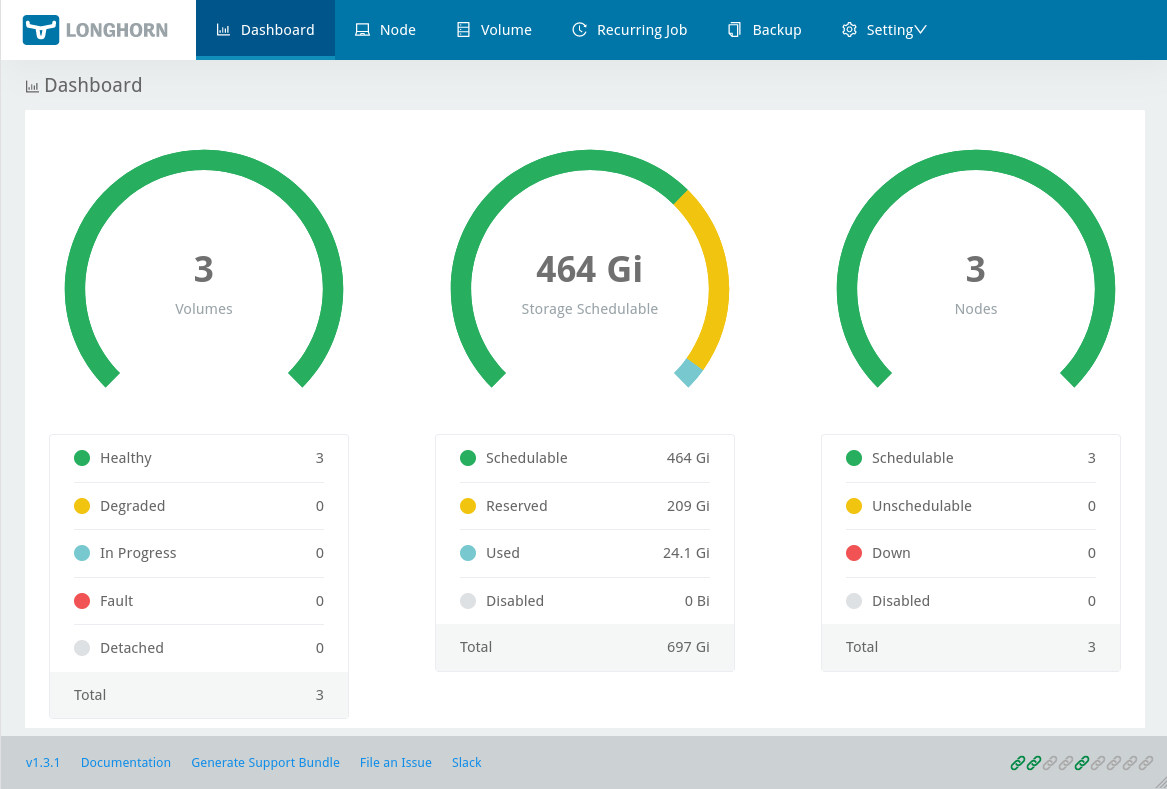
You can access the Longhorn dashboard your browser by going to https://longhorn.my-kubernetes.my-domain.com and login with your IDP / OIDC account.
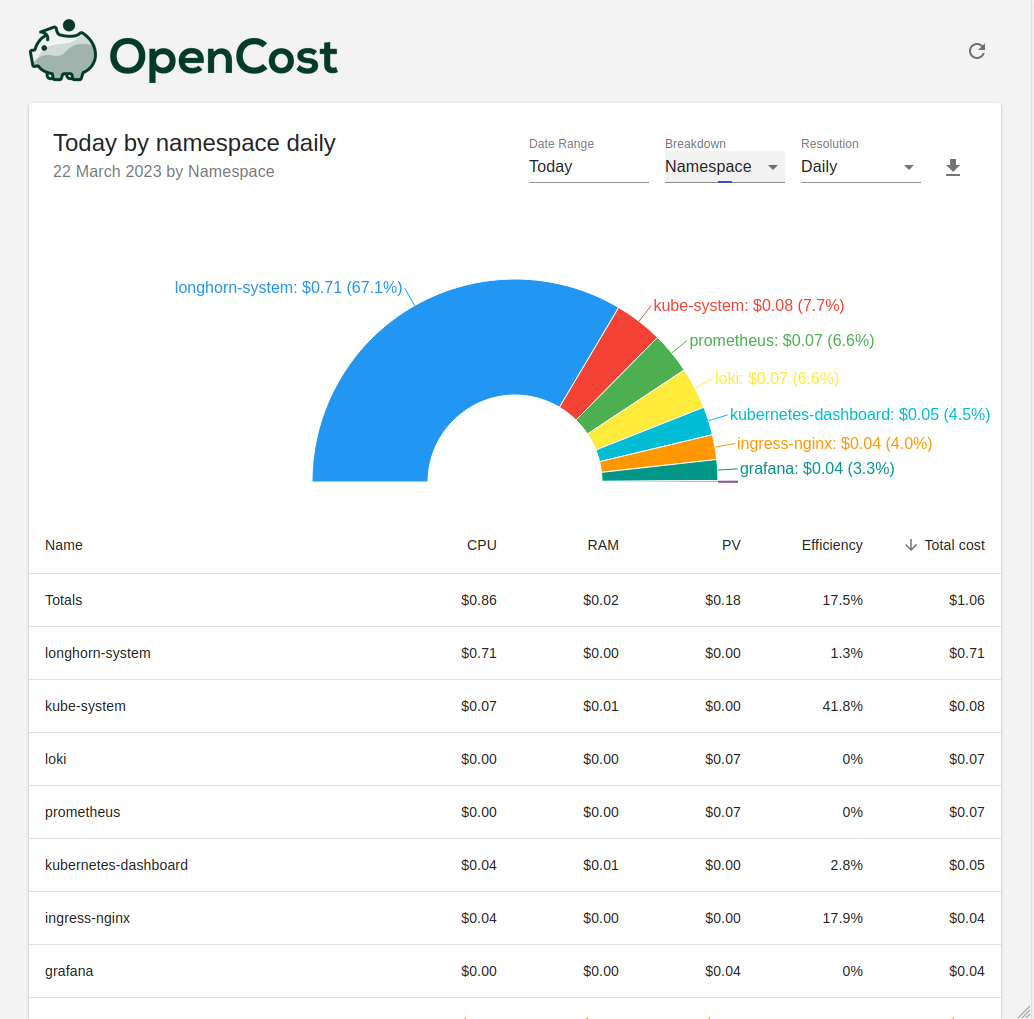
You can access the OpenCost dashboard your browser by going to https://opencost.my-kubernetes.my-domain.com and login with your IDP / OIDC account.
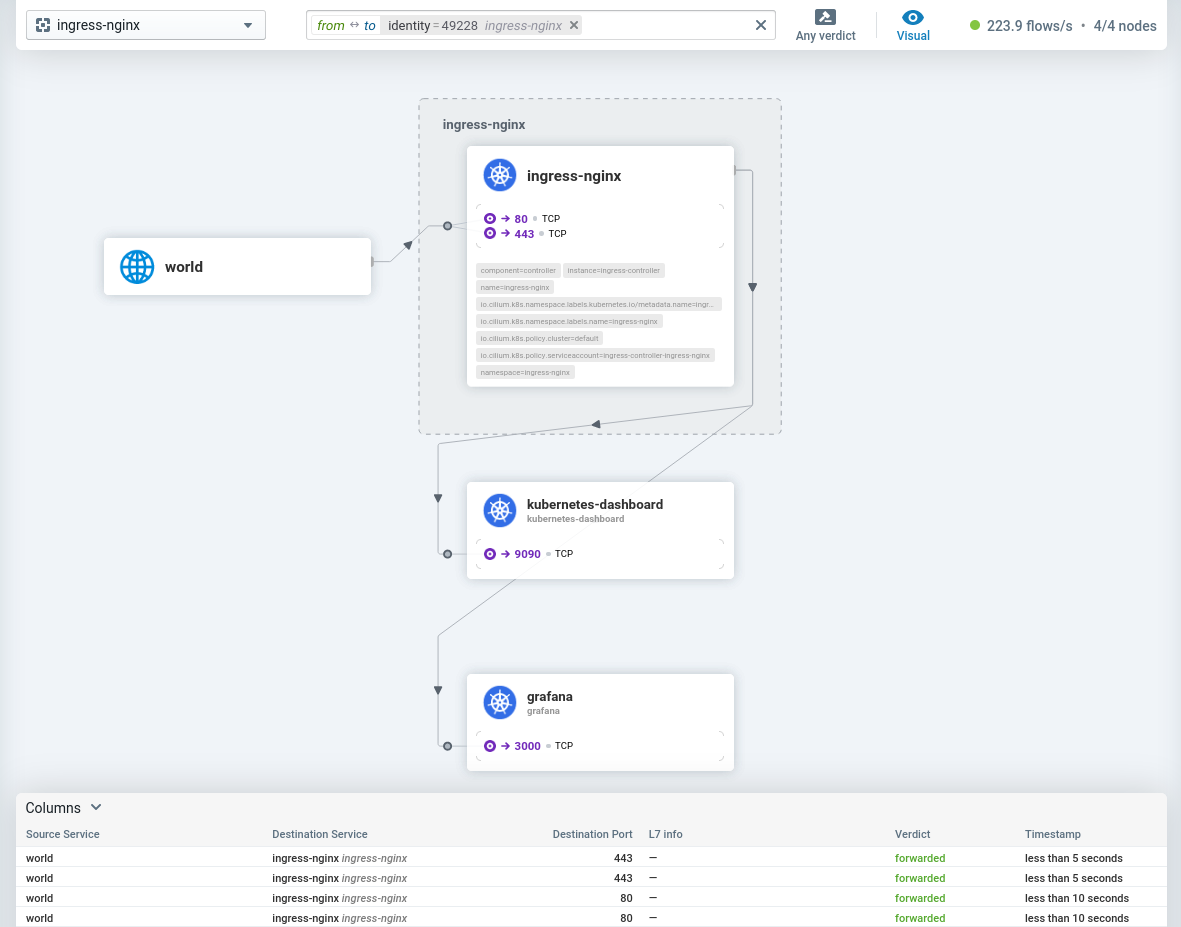
You can access the Hubble UI in your browser by going to https://hubble.my-kubernetes.my-domain.com and login with your IDP / OIDC account.
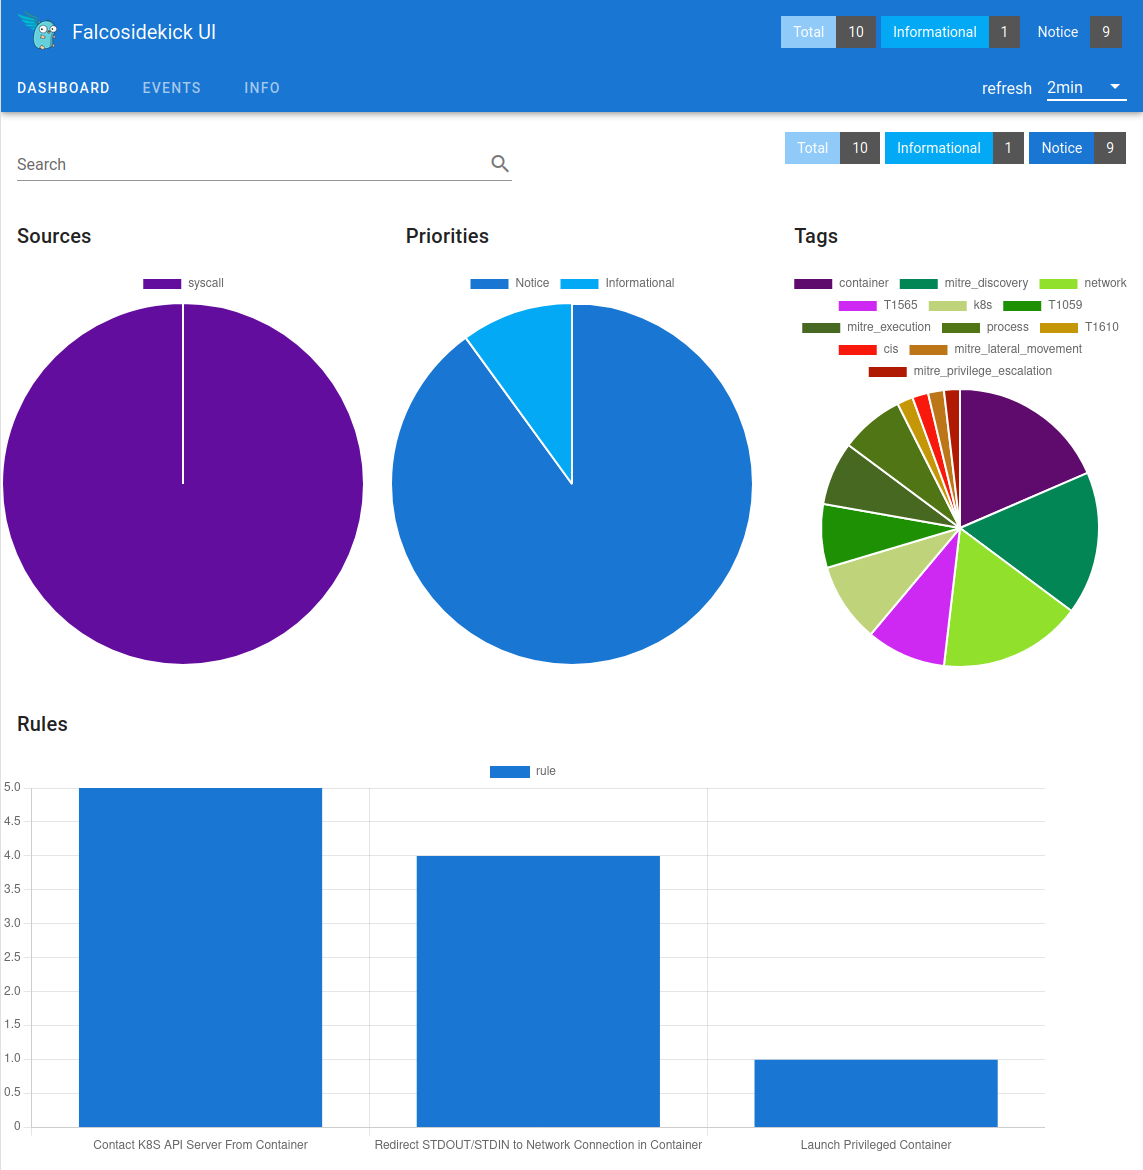
You can access the Falco Sidekick UI in your browser by going to https://falco.my-kubernetes.my-domain.com and login with your IDP / OIDC account. The login credentials for the UI itself will be "admin:admin".
Note: Falco is an optional component of this project and thus not installed by default! If you want to install it please run the additional command
make deploy-falcoafter all other deployments are up and running.
Once your Kubernetes cluster is up and running with WireGuard being installed both on the server-side and on your local machine (see WireGuard configuration section), you can then connect and establish a VPN tunnel with it.
To do so simply use the wg-quick command (if you are on an Ubuntu machine), like this:
wg-quick up wg0This will use the configuration file /etc/wireguard/wg0.conf that you prepared earlier and establish a VPN tunnel to your Kubernetes cluster.
Once the connection has been established, you can check the status by using wg show:
wg show

interface: wg0
  public key: pTAAvK3WkMy1MHgTlWJCdvoNpMSEy/WnfNblV96XUQw=
  private key: (hidden)
  listening port: 40162
  fwmark: 0xca6c

peer: uJ0bUIe8Kc+vp27sJVDLH8lAmo4E3dfGtzRvOAGQZ0U=
  endpoint: my-kubernetes.my-domain.com:32518
  allowed ips: 0.0.0.0/0, ::/0
  latest handshake: 14 seconds ago
  transfer: 772.75 KiB received, 773.89 KiB sent
  persistent keepalive: every 25 seconds
To stop the VPN connection again, simply run wg-quick down wg0.
Note: WireGuard is an optional component of this project and thus not installed by default! If you want to install it please first consult the WireGuard configuration section and then run the additional command
make deploy-wireguard.
There could be an issue where a Helm chart deployment fails with an error message such as this:
Error: UPGRADE FAILED: another operation (install/upgrade/rollback) is in progress
In order to fix this issue the release has to either be deleted entirely or rolled back to a previous revision. The commands for rolling back would be the following:
# check for failed deployments
helm list --failed -a -A
# show history of a specific chart
helm history [chart] -n [namespace]
# rollback chart to a previous revision
helm rollback [chart] [revision]
helm history should return information regarding the chart revisions, their status and description as to whether it completed successfully or not.
Run the Helm deployment again once the chart rollback is successful and it is not listed as pending anymore.
Due to the nature of Longhorn and how it distributes volume replicas, it might happen that the draining and eviction of a Kubernetes node can get blocked. Longhorn tries to keep all its volumes (and their replicas) in a Healthy state and thus can block node eviction.
If you use Longhorn as your default storage class instead of the vCloud-CSI and you noticed that the cluster-autoscaler or machine-controller cannot remove an old node, scale down to fewer nodes, or a node remaining seemingly forever being stuck in an unschedulable state, then it might be because there are Longhorn volume replicas on those nodes.
To fix the issue, login to the Longhorn UI (check further above on how to do that), go to the "Node" tab, click on the hamburger menu of the affected node and then select "Edit Node and Disks". In the popup menu you can then forcefully disable "Node Scheduling" and enable "Eviction Requested". This will instruct Longhorn to migrate the remaining volume replicas to other available nodes, thus freeing up Kubernetes to fully drain and remove the old node.
Why not using just helm install ... directly or KubeOne's addon or helmReleases functionality, and instead have custom shell scripts for each and every additional Helm chart that gets installed into the cluster?
Consider these examples: https://github.com/prometheus-community/helm-charts/tree/prometheus-19.7.2/charts/prometheus#to-190 or https://grafana.com/docs/loki/latest/installation/helm/upgrade-from-2.x/
Some Helm charts require manual actions to be taken by users when upgrading between major/minor versions of theirs. Your Helm upgrade might fail if you miss these steps (actually it will almost definitely fail in the mentioned examples). While the easy way out would be to just casually mention such issues in the release notes (if you don't forget), it's not exactly very user friendly however.
From experience Helm has also otherwise proven itself to be flaky quite often during upgrade operations, frequently getting stuck in pending or failed states, and in general not being a very effective tool for deployments and resource management. Much better tools, like for example kapp, would be available for this, but "unfortunately" the ubiquity of pre-packaged Helm charts makes it necessary to turn a blind eye towards Helm's shortcomings in that regard.
Customized shell scripts on the other hand can contain very specific if/else/case code paths for any such upgrade scenarios to be taken into consideration and implemented accordingly.
See /deployments/prometheus.sh as an example, it deals specifically with the upgrade path from pre-v15.0 to v18.0+.