Basic Usage
This page will cover basic usage of the Serial 7-Segment Display. "Basic" as in how get the display to show number (0-9), and the limited characters and special characters it can display. Also covered are two of the more fundamental commands: cursor control and clearing the display.
Display data is written to the display as a single byte. 8-bit values from 0 to 15 are displayed respectively as 0-9 and A-F. The display also accepts display data in ASCII-coded format.


To display 12Ab, any of the following 4-byte patterns would be acceptable:
[0x01][0x02][0x0A][0x0B] (Actual binary values 1, 2, 10 and 11)
[0x31][0x32][0x41][0x42] (ASCII-code for '1', '2', 'a', 'b')
Or any combination of binary and ASCII values could be used.
Sample Arduino Snippet (Serial mode):
// ... after initializing Serial at the correct baud rate...
Serial.write(0x01);  // Hex value for 1, will display '1'
Serial.write('2');   // ASCII value for '2', will display '2'
Serial.write(0x0A);  // Hex value for 10, will display 'A'
Serial.write('B');   // ASCII value for 'B', will display 'b'
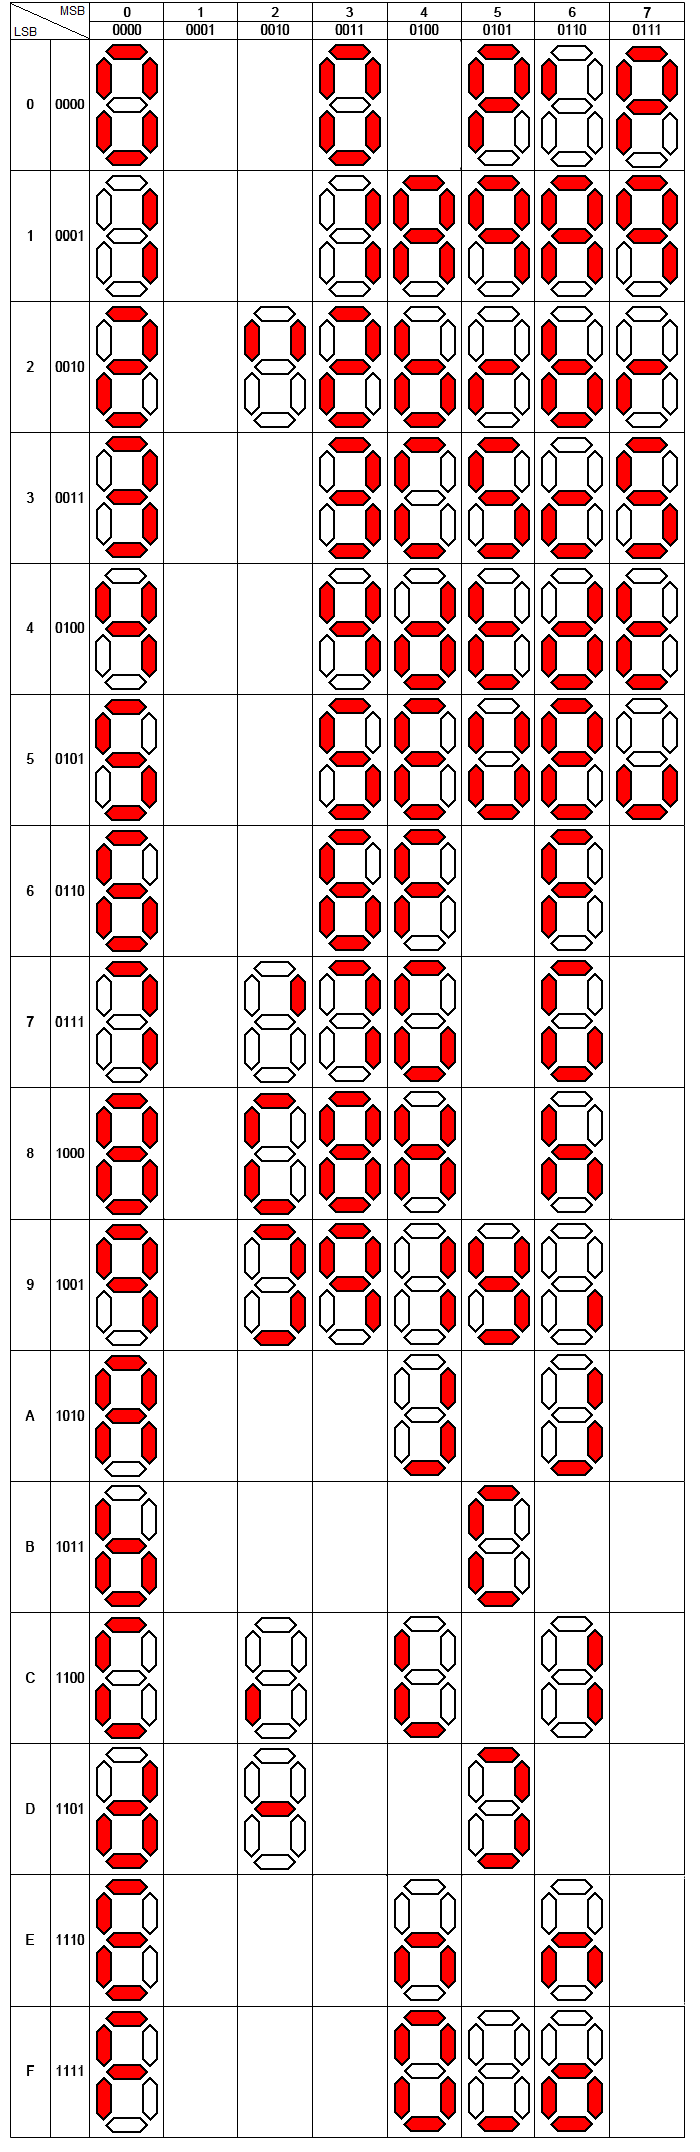
Bytes of value 0-15 will display their hex equivalent (0-F) on the display. ASCII values for characters that can actually be displayed with the limited segments will generate an equivalent display. Not all characters are displayable (the display does what it can with its limited resolution). Here's a table of byte values and the character's displayed:
Click to embiggen:
When displayable data is received, the character is displayed at the current cursor position, and then the cursor progresses one spot forward. Upon displaying a character on the fourth digit (right-most), the cursor will progress to the first digit (left-most).
In the example above (printing 12Ab), we assumed the cursor was positioned at digit 1.

Only displayable data will advance the cursor. Command bytes, and command byte data are non-displayable bytes, they will not advance the cursor.
You can control the cursor using the cursor control command. To move the cursor, first send the cursor control byte (0x79), then send an 8-bit data byte with value between 0 and 3. A data value of 0 will set the cursor to position 1 (left-most), a value of 3 will set the cursor to the right-most digit.
###Example: Using the Move Cursor Command
To set the cursor to the second digit (the digit immediately left of the colon), send the following 2-byte sequence: [0x79][0x01]
Sample Arduino Snippet (Serial Mode):
// ... after initializing Serial at the correct baud rate...
Serial.write(0x79); // Send the Move Cursor Command
Serial.write(0x01); // Send the data byte, with value 1
Serial.write(7);    // Write a 7, should be displayed on 2nd digit
If the data byte is outside the allowable range (0-3), the cursor command is ignored.
Or, you can reset the cursor to position 1 by issuing the clear display command...
The clear display command performs two functions:
- Clear the display - all LEDs, including segments and decimal points, are turned off.
- Reset the cursor to position 1, the left-most digit.
The clear display command byte is 0x76.
There is no data byte, so any displayable data sent after the clear display command will be displayed on digit 1.
Arduino Sample Snippet (Serial Mode): In the above example, we can't be guaranteed that the cursor is at position 1. To ensure that it is, we can use the clear display command before sending our data.
// ... after initializing Serial at the correct baud rate...
Serial.write(0x76);  // Clear display command, resets cursor
Serial.write(0x01);  // Hex value for 1, will display '1'
Serial.write('2');   // ASCII value for '2', will display '2'
Serial.write(0x0A);  // Hex value for 10, will display 'A'
Serial.write('B');   // ASCII value for 'B', will display 'b'
Note: The clear display command byte value is equivalent to the ASCII value for the 'v' character. This value was chosen because 'v' is not all that displayable on a 7-segment display.
- Datasheet Homepage
- Hardware Specifications - Electrical characteristics, voltage ratings, current usage, timing
- Interface Specifications - UART, SPI, and I2C explanations
- Basic Usage - Displaying Numbers and Characters, Clearing, Cursor Control
- Special Commands - Reset, Decimal, Cursor, Brightness, Baud, TWI address, and Individual segment control
- Arduino Examples - Example Code for SPI and I2C
- Customizing the Display - Uploading a custom Arduino Sketch