This is a starter to fast-track WordPress websites. It provides a way to skip many of the steps required when setting up a WordPress installation. Create a new repository from this template.
Out of the box, this template provides a minimal WordPress theme with basic support for core WordPress features with some boilerplate templates, JS, and CSS that can easily be removed or replaced as needed. Key features of this repo include:
- A docker development workflow to make local development predictable and consistent
- Support for SCSS with an ITCSS structure already in place
- Support for bundling JS with
esbuildand testing JS withvitest - Support for Twig templates using Timber
- Database import and export scripts to make syncing between environments simple and fast
- Generator scripts to speed up the process of adding:
- Page templates
- Custom post types
- Shortcodes
- Custom taxonomies
- Reusable patterns
- Meta boxes
- Sample custom blocks which you can reference to create your own custom blocks
- Code style rules that are enforced by language-specific linters
- GitHub Action workflows for code quality, release management, and deployment processes
| Developer Documentation |
|---|
| Quickstart |
| Customization |
| Local Development Setup |
| WordPress |
| Project Structure |
| Generators |
| Plugins |
| Custom Blocks |
| Deployment |
| How to Contribute |
| Code of Conduct |
This project requires Docker and Node.js for local development. You may also find it useful to install Composer for linting in your editor, but it isn't strictly necessary. To run the project for the first time, do the following:
- Duplicate
.env.exampleand rename it.env, changing variables as needed - Run
npm install - Make sure Docker is running
- Either run
npm startor runnpm run build:devandnpm run serve:devin separate terminals - Based on whether you have a database to import or not, do one of the following:
- Visit
http://localhost:8000/wp-adminand run through the WordPress setup - Follow the instructions for importing a DB
- Visit
- Go to
http://localhost:8000to ensure the home page loads - Use
Ctrl+Cto stop any processes running in the terminal when you are done working or need to restart a process to pick up changes
After generating a new repo from the Sparkpress template, you will need to change the following things to make the project your own:
- References to "sparkpress", "SparkPress", or "sparkpress-wordpress-starter"
-
composer.json(organization/project name innamefield) -
docker-compose.yml(webcontainer_name) -
docker-compose.yml(theme folder volume mapping) -
docker-compose.yml(dbcontainer_name) -
Dockerfile(link to repo) -
Dockerfile(theme folder name) -
package.json(namefield) -
package-lock.json(namefields) -
.github/workflows/deploy.docker.yml(references to the container registry or delete the file if not using a docker deployment process) -
.github/workflows/deploy.pantheon.yml(theme folder names) -
.github/workflows/release-please.yml(package-namefield) -
scripts/export-db.sh(db container name) -
scripts/import-db.sh(db container names) -
scripts/run.sh(container name) -
src/php/style.css(theme name plus the other metadata in the file) -
src/php/inc/theme-scripts.php(metadata and prefixes for function/script names) -
src/php/inc/theme-setup.php(metadata and prefixes for function names) -
src/php/inc/theme-styles.php(metadata and prefixes for function names) -
src/php/inc/theme-widgets.php(prefixes for function names) -
wp-configs/wp-config.php(default theme name)
-
-
READMEupdates- Update main heading and project description
- Delete the Sparkpress Team section with the list of contributors
- Update the references to the GitHub Container registry in the Deployment section
- Delete this Customization section (once finished with the other steps)
Beyond that, it's up to you to customize the site based on your project's needs. You can use or discard as much of the boilerplate JS, SCSS, or templates as you want, and you can use generators to scaffold new features to get up and running quickly.
For the local environment we are using a .env to define the username, passwords, and the database name used in the Docker container.
MYSQL_USERis the username WordPress will use to access the databaseMYSQL_PASSWORDis the password forMYSQL_USERMYSQL_DATABASEis the name of the database for the WordPress installationMYSQL_ROOT_PASSWORDcan be anything, it needs to be specified for your build to runWP_ENVis used to determine the environment. If it ends with-local, debugging will be enabledSITE_URLis used for DB imports/exports. It is used in find/replace operations to swap localhost URLs for staging/production environment URLs in the database
This theme uses the following files for linting:
- ESLint for JS files with recommended rules for vanilla JS and React
- Stylelint for SCSS files with standard CSS and SCSS rules
- PHP_Codesniffer for PHP Files with rules from
wp-configs/phpcs-rules-standard.xmlwhich extends the WordPress Coding Standards. - Twig_Codesniffer with default rules
The preferred mechanism for syncing your environment with others is to use database/uploads imports and exports. This repo has a few scripts to make this process as easy as possible. While your containers are running, you can run any of these commands to import, export, or backup a database or your uploads folder. Here are the quick commands, with more instructions below.
# import a DB from the `sync/sql` folder
npm run import:db

# import images/files into your uploads folder from a zip file in `sync/uploads`
npm run import:uploads

# run both a DB import and an uploads import at once
npm run import

# export your DB
npm run export:db

# export your DB with a custom name
npm run export:db validation-data

# export your uploads folder as a zip file
npm run export:uploads

# export your uploads with a custom name
npm run export:uploads validation-uploads

# run both a DB export and an uploads export at once
npm run export

# run DB/uploads exports with a custom name
npm run export validation

# backup your DB in case you need to restore it later
npm run backup:db

# backup your DB with a custom name
npm run backup:db work-in-progress-data

# backup your uploads folder in case you need to restore it later
npm run backup:uploads

# backup your uploads folder with a custom name
npm run backup:uploads work-in-progress-uploads

# run both a DB backup and an uploads backup at once
npm run backup

# run DB/uploads backups with a custom name
npm run export work-in-progressYou can import databases from production, a saved backup, or another developer's DB export with the import:db script. To use it, put a *.sql.gz file directly inside of a sync/sql folder in the repo and run npm run import:db. This will first back up your existing database to sync/sql/backups in case you need to revert back to it, and then it will import the database from the given file, effectively replacing your database with a new one. The imported SQL script will then be moved to sync/sql/previous-imports.
You can export your database for another developer to import or to import to a staging environment by running npm run export:db. By default, this will create a timestamped and gzipped file in sync/sql/exports, but you can specify a name by running npm run export:db <your-db-name-here>. The exported file will still be timestamped, but it will use the name you give it instead of the default prefix.
This will happen automatically when you import a database, but if you want to manually backup your database, you can run npm run backup:db. This functions nearly identically to the export:db script, except for using a different prefix and putting the file in sync/sql/backups. As with export:db, you can specify a name for your DB backup if you want.
You can import a zipped copy of the uploads folder from another environment, saved backup, or another developer's export with the import:uploads script. To use it, put a *.tar.gz file directly inside of a sync/uploads folder in the repo and run npm run import:uploads. This will first back up your current uploads folder to sync/uploads/backups, and then it will replace your uploads folder with the contents of the zip file. The imported .tar.gz file will then be moved to sync/uploads/previous-imports.
You can export your uploads folder for another developer to import or to import to another environment by running npm run export:uploads. By default, this will create a timestamped zip file in sync/uploads/exports, but you can specify a name by running npm run export:uploads <your-descriptive-name-here>. The exported file will still be timestamped, but it will use the name you give it instead of the default prefix.
This will happen automatically on import, but if you want to manually backup your uploads folder, you can run npm run backup:uploads. This functions nearly identically to the export:uploads script, except for using a different prefix and putting the zip file in sync/uploads/backups. As with export:uploads, you can specify a name for your backup if you want.
If you use Atom, go to Preferences > Packages. Open the language-php Core Package settings. Go to the Tab Type setting and set the drop down option to hard.
If you use Microsoft VS Code, create a settings.json inside a .vscode directory at the root of the project. Include this in your setting (it will help make developing with PHP_Codesniffer much easier):
{
	"phpcs.standard": "wp-configs/phpcs-rules-standard.xml",
	"editor.tabSize": 2,
	"[php]": {
		"editor.tabSize": 4,
		"editor.insertSpaces": false,
		"editor.detectIndentation": false
	}
}
Helpful VS Code Extensions:
Whenever a new version of WordPress is released, follow this process to update to the new version.
- Through your local WordPress admin, update the WordPress install to the latest version
- If you can confirm the update made no breaking changes:
- Change
WP_VERSIONinDockerfileto the latest version - Submit a PR with the update
- If your hosting provider manages the WordPress version, update it through their mechanism for staging, test, and/or production enviroments
- Change
- If the update made breaking changes, create a bug card and do not push any changes
Most likely, you want your urls to be more user/SEO friendly, like example.com/category-name/name-of-page rather than example.com/?page_id=2 and example.com/category-name rather than example.com/?cat=1. To accomplish this:
- Go to
Settings>Permalinksin the admin dashboard - Select "Custom Structure" for the permalink setting
- Set
/%category%/%postname%/in the text field - Set
.in the "Category base" field - Hit "Save Changes"
For other options see the WordPress docs for more info.
Comments for posts are supported out of the box, but can be turned off for single posts or for any new posts going forward. Comments can be approved, edited, or trashed from the "Comments" menu from the admin dashboard.
- From the admin dashboard, navigate to the "Edit Post" page
- Access the Post settings menu on the right side of the page, if it is not already open (the settings menu can be opened with the button to the right of the "Update" button)
- Scroll down the menu to the option with the heading "Discussion", uncheck "Allow comments" and update the post
This will uncheck "Allow comments" on individual posts going forward by default, but comments can be enabled for select posts.
- From the admin dashboard, click on "Discussion" under the "Settings" menu on the left side
- Under "Default post settings", uncheck "Allow people to submit comments on new posts"
- Scroll to the bottom and hit "Save Changes"
By default, comments are turned off for pages, but can be enabled for pages individually:
- From the admin dashboard, navigate to "Edit Page"
- Access the Page settings menu on the right side of the page
- Scroll down the menu to the option with the heading "Disucssion", check "Allow comments", and update the page
A footer widget area and a sidebar widget area (which appears below content on smaller screens) are built into the theme. Widgets can be added to these areas by navigating to Appearance > Widgets from the admin dashboard. Navigating to the widgets admin page will automatically fill the sidebar widget area with default content. Blocks can be added, edited, or removed here. If you wish to deactivate widgets but keep them available for later, widgets can be dragged and dropped into the Inactive widgets area. This is easiest done from the List View, which can be accessed via the button on the top left side of the page.
This starter template covers the generic templates needed for things like single post pages, archive (or listing) pages, the 404 page, and the search page, but you can override those using WordPress' template hierarchy.
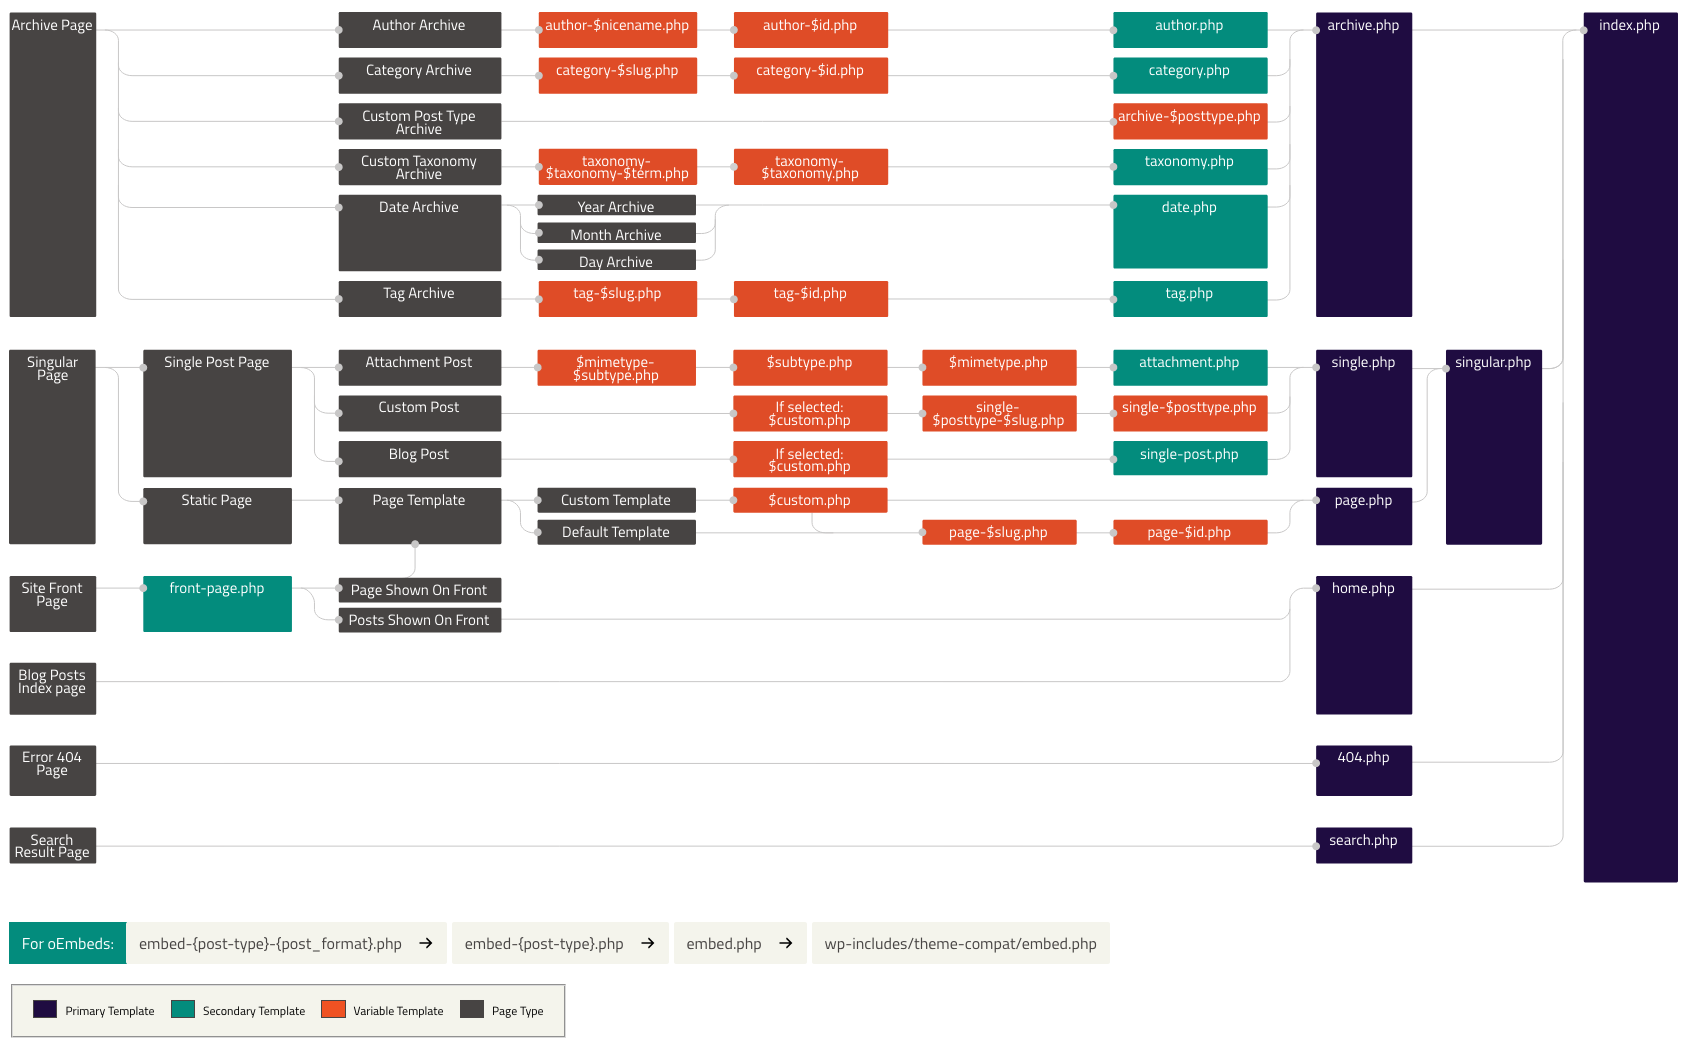
For example, if you have a post type with the slug "news", you could create single-news.php and archive-news.php to take precedence over the default back-end logic and point them to single-news.twig and/or archive-news.twig if those pages need unique markup.
All the files regarding editing the theme can be found in the src directory. Inside this directory are four sub-directories:
The js/ directory holds our individual JavaScript files. These are built with esbuild, which uses index.js as the entry point. The built file is written to theme/js/scripts.js, which is referenced by WordPress in src/php/inc/theme-scripts.php.
eslint is used to lint JS for code issues, and vitest is used to run JS tests. Use the following npm scripts to lint/test JS.
# lint JS files only
npm run lint:js

# run JS tests once
npm run test

# run JS tests in watch mode
npm run test:watch

# run JS tests and get a coverage report
npm run test:ciThe scss/ directory holds our styles for the site which are written using Sass and follows a modified BEMIT approach to naming and organizing. stylelint is used to check that SCSS files conform to our standards. Run npm run lint:scss to check SCSS files for issues.
We use SCSS partials to organize our styles according to Inverted Triangle CSS. Files should be organized into the following folders, depending on their purpose.
settings- variables for things like colors, fonts, etc. to be reusedtools- functions and mixinsgeneric- used mainly for CSS resets and non-site-specific styleselements- styling for bare HTML elements (h1,p,a, etc.)objects- used mainly for generic layouts and high level structural stylescomponents- specific component styles (most CSS will live here)vendors- third party stylesutilities- helper classes to override any styles declared earlier in the cascade
See the custom blocks section for details.
The php/ directory holds the PHP template files for the WordPress theme. Other core, non-php files are included here as well. It structured to have a “lean” functions.php and include functionality in the inc subdirectory. phpcs will check that PHP files follow the WordPress Coding Standards, and twigcs will check Twig templates for linting issues as well. Run npm run lint:php to check PHP files and npm run lint:twig to check Twig templates for issues.
inc/- Includes directory, to keep thefunctions.phpfile clean. Some important files to note are:custom-post-types/*.php- Register custom post typeshelpers/*.php- Add helper functions here, separated by purposeshortcodes/*.php- Add shortcodes for the content editor to usetaxonomies/*.php- Register custom taxonomies to be made available to certain post typessetup-queries.php- Specify query variables here so WordPress can read them from HTTP requeststheme-scripts.php- Add JavaScript files heretheme-setup.php- Configure theme settings and supported features heretheme-styles.php- Add CSS files heretheme-widgets.php- Register widgets for admins to utilize and add them to Timber context here.
views/- Twig is used to separate presentation from logic, and all.twigcomponents can be found here. Some Twig extensions, notably HTML Extension and String Extension have been added to enhance templates with data URIs, class management, text manipulation, and ASCII-safe string transformations.layouts- Any twig templates that include the full document structure should go here. That includes the defaultbase.twigtemplate and any alternatives, such as for art-directed posts.partials- Twig templates for components or pieces of the page to be reused should go here.shortcodes- Twig templates for shortcodes should go here.
We have a handful of generators to make it easier to add new custom post types, taxonomies, shortcodes, and page templates. If none of the generators give you what you need, you can try using https://generatewp.com/ to get more relevant code snippets.
The generator for custom post types will prompt you for some details that it will use to create the necessary files for registering the post type. You can specify whether to create scripts and templates for single and archive pages for the post type. If you opt not to, the default scripts/templates will be used based on WordPress' template hierarchy.
npm run generate:post-typeThe following files will be created based on your inputs:
src/php/inc/custom-post-types/<post-type-name>.phpsrc/php/single-<post-type-name>.php(optional)src/php/archive-<post-type-name>.php(optional)src/php/views/single-<post-type-name>.twig(optional)src/php/views/archive-<post-type-name>.twig(optional)
To allow for posts from your new custom post type to be shown on archive pages, you will also need to update src/php/inc/setup-queries.php to look for posts and your custom post types by default.
Custom Post Types documentation
The generator for custom taxonomies will prompt you for some details that it will use to create the necessary files for registering the taxonomy. You can specify whether to create a script/template for the taxonomy listing page, and if you choose not to, the default archive script/template will be used. You will also be prompted to specify which post types the taxonomy should be associated with.
npm run generate:taxonomyThe following files will be created based on your inputs:
src/php/inc/taxonomies/<taxonomy-name>.phpsrc/php/taxonomy-<taxonomy-name>.php(optional)src/php/views/taxonomy-<taxonomy-name>.twig(optional)
Custom Taxonomies documentation
The generator for shortcodes will prompt you for a name, then create minimal files to register a shortcode. The bulk of implementation will still be up to you, but the boilerplate should speed things up a bit.
npm run generate:shortcodeThe following files will be created based on your input:
src/php/inc/shortcodes/<shortcode-name>.phpsrc/php/views/shortcodes/<shortcode-name>.twig
The generator for custom page templates will prompt you for a name, then create minimal files to register a custom page type.
npm run generate:page-templateThe following files will be created based on your input:
src/php/<page-template-name>.phpsrc/php/views/<page-template-name>.twig
The generator for reusable patterns will prompt you for a name, description, and categories for the pattern, then create a script to register a reusable pattern with metadata based on your inputs and instructions for how to create the markup for the pattern.
npm run generate:patternThe following file will be created based on your input:
src/php/patterns/<pattern-name>.php
Reusable pattern (a.k.a. Block pattern) documentation
The generator for custom blocks plugins will prompt you for a plugin name and description, WordPress and PHP versions (for compatibility info), and author. It uses this info to scaffold the configuration and readme files for a custom blocks plugin that initially does not have any blocks.
npm run generate:custom-blocks-pluginThe following files will be created based on your input:
src/plugins/<plugin-name>/src/.gitkeepsrc/plugins/<plugin-name>/<plugin-name>.phpsrc/plugins/<plugin-name>/readme.txt
It will also modify these files to automatically updated the build/development processes and configuration:
package.jsondocker-compose.yml
The generator for custom blocks will prompt you for the plugin that the block should belong to, a block name and description, and whether the block needs a view.js file for client-side JS. Note: this should only be run after a custom blocks plugin has been generated from npm run generate:custom-blocks-plugin.
npm run generate:custom-blockThe following files will be created based on your input:
src/plugins/<plugin-name>/src/<block-name>/block.jsonsrc/plugins/<plugin-name>/src/<block-name>/edit.jssrc/plugins/<plugin-name>/src/<block-name>/editor.scsssrc/plugins/<plugin-name>/src/<block-name>/index.jssrc/plugins/<plugin-name>/src/<block-name>/save.jssrc/plugins/<plugin-name>/src/<block-name>/styles.scsssrc/plugins/<plugin-name>/src/<block-name>/view.js(optional)
See custom block structure for more info on what these files are for.
The generator for meta boxes will prompt you for a meta box name, a label for an input, which post type(s) the meta box should be enabled for, and where the box should be positioned based on context and priority. The generator only adds a single text input field for demonstration purposes. Different input types and advanced use cases will require developers to implement them. It may be better to use a plugin like Advanced Custom Fields for some situations, especially when a WordPress admin should be able to manage the fields without devloper help.
npm run generate:meta-boxThe following file will be created based on your input:
src/php/inc/meta-boxes/class-<meta-box-name>.php
Install plugins via composer by running npm run php:run composer require wpackagist-plugin/<plugin-name>:<version-number-or-range>. For example:
# install a specific version/range for advanced-custom-fields
npm run php:run composer require wpackagist-plugin/advanced-custom-fields:^6.1

# or just install the latest version, letting composer resolve the range
npm run php:run composer require wpackagist-plugin/advanced-custom-fields
Running this command will update composer.json and composer.lock, but you will need to rebuild (docker compose build) and restart your container (npm start or npm run serve:dev) to see the new plugin reflected in the WordPress admin.
You can run composer require as above to update existing plugins, or you can do the following.
- Update the version number in the "require" list in
composer.json. - Run
npm run php:run composer updateto updatecomposer.lock.
Again, you'll need to rebuild and restart your container to see the changes reflected in WordPress.
This is a non-comprehensive list of plugins that we have found useful on other projects.
We have two generators that can be used in tandem to create the necessary scaffolding for custom blocks. The first is npm run generate:custom-blocks-plugin, which should be run first to create the plugin config, readme, directory, and package.json/docker-compose.yml changes necessary to make the plugin available to WordPress. The second is npm run generate:custom-block, which creates the boilerplate files necessary to create a single custom block within the plugin.
Note: you will need to restart your development process to pick up the changes after adding a custom blocks plugin and/or a custom block.
Once you have created a custom blocks plugin that has at least one custom block, you should be able to activate it in the WordPress admin page for Plugins.
The custom blocks plugin generator should handle creating the npm scripts for you, but the general format is as follows:
"plugins:dev": "run-p plugins:dev:* || echo \"Unable to build plugins\"",
"plugins:build": "run-s plugins:build:* || echo \"Unable to build plugins\"",
"plugins:dev:<plugin-name>": "wp-scripts start --webpack-src-dir=src/plugins/<plugin-name>/src --output-path=src/plugins/<plugin-name>/build",
"plugins:build:<plugin-name>": "wp-scripts build --webpack-src-dir=src/plugins/<plugin-name>/src --output-path=src/plugins/<plugin-name>/build"
The plugins:dev and plugins:build scripts will automatically pick up any plugins:dev:* and plugins:build:* scripts that get added, minimizing the maintenance overhead from adding more plugins.
Similarly, the docker-compose.yml volume mapping should automatically be updated by the generator, but if not, each plugin needs to be mapped to a folder within the container's /var/www/html/wp-content/plugins/<plugin-name> folder, like so:
services:
  web:
    volumes:
- ./src/plugins/<plugin-name>:/var/www/html/wp-content/plugins/<plugin-name>Each custom block will have most, if not all, of the following files:
block.json: configuration/metadata for the blockedit.js: the component used while editingeditor.scss: custom styles for the editor viewindex.js: entry point for the JS bundlesave.js: the component rendered on the sitestyle.scss: custom styles for the block when rendered on the siteview.js: any JS that needs to run when the block is rendered on a non-admin page (optional)
It's important to note that while save.js is written like a React component, it does not have reactivity when rendered on the site. The React component is used to serialize HTML that is sent to the client from the server, so hooks like useEffect will not run when the component is rendered. If your component requires JS for its functionality, you need to provide that JS in the view.js file.
Once the boilerplate files have been created, follow these steps to build out the custom block to fit your needs.
- Configure the custom block by updating
block.json. Depending on how you answered prompts from the generator, this may be mostly done. You'll likely want to update theiconfield with a dashicon name - Implement the edit function, which will control how the block is rendered/created in the Gutenberg editor
- Implement the save function, which will consume the attributes defined in
index.jsand render the block's desired markup - Implement the front-end JS for the component in
view.jsif needed
This starter template includes a couple of options for deployment workflows, including:
- Docker
- Pantheon
This repo includes a GitHub workflow for building a docker image that gets pushed GitHub's container registry. This image can be deployed to any hosting provider that supports docker containers.
The image includes all core WordPress files for the version specified for WP_VERSION in the Dockerfile, as well as the theme and plugin files necessary for the site. The other element required for the site to run is the database, which is excluded, since each environment should have its own database that is specified by environment variables. This allows local developers to test against local data without interfering with production or staging environments.
Deployment via Docker requires setting the following variables and secrets in Github. See these instructions for creating variables and secrets.
DEPLOY_WITH_DOCKER: set the value totruein order to enable the workflow
Before you can pull the docker image, you'll need to authenticate with GitHub's Container Registry. To do that, follow these steps:
- Generate a Personal Access Token (classic) with at least
read:packagesaccess - Copy the access token (you won't be able to see it again)
- Run
docker login ghcr.ioand use your GitHub username and the access token for username/password
The Docker image can be tested locally by connecting it to the local development database. To test the published Docker image locally, follow these steps:
- Run
docker compose up dbto run the local database container - Run
docker pull ghcr.io/sparkbox/sparkpress:latest(see above if you're denied access) - Run
cp .env .docker.test.envto copy your environment variables to a new file we can test with - Set
MYSQL_HOST=host.docker.internal:3309in.docker.test.envso our container can find the running database - Run
docker run -p 8000:80 --rm -v ./.docker.test.env:/var/www/html/.env -v ./uploads:/var/www/html/wp-content/uploads --name wordpress-web ghcr.io/sparkbox/sparkpress:latestto start the web container - Visit http://localhost:8000 to see the site running from the image
This repo includes a Github workflow for deployment to Pantheon.
When enabled and configured, this workflow will deploy to Pantheon when commits are added to the main branch. This workflow is disabled by default. See instructions below for configuration.
Pantheon maintains its own git remote containing the WordPress core files. To deploy, we:
- Build our theme artifacts
- Fetch the Pantheon remote repo
- Copy our theme artifacts into the appropriate locations in the Pantheon codebase
- Commit the changes to the Pantheon repo
- Push to the Pantheon remote
- See these instructions to add a site to your Pantheon account.
- Visit your Pantheon site dashboard and make sure your site's Development Mode is set to Git (it will likely be set to SFTP by default).
- Click the "Clone with Git" button, follow the instructions to clone the repo locally.
- In the cloned repo, open the
wp-config.phpfile. - At the top of the file, directly under the
<?phpline, add this line:require __DIR__ . '/vendor/autoload.php';- This allows the Pantheon site to autoload our vendor dependencies.
- Commit the changes to this file.
- Push the commit to Pantheon's
masterbranch.
Deployment to Pantheon requires setting the following variables and secrets in Github. See these instructions for creating variables and secrets.
DEPLOY_TO_PANTHEON: set the value totruein order to enable deployment
PANTHEON_ID_RSA- The private ssh key that will be used to connect to Pantheon. See instructions for generating an ssh key.PRODUCTION_REPO- The address of the Pantheon remote repo. See instructions below for obtaining the value.PRODUCTION_USER_EMAIL- The email address that will be used for deployment commit messages.PRODUCTION_USER_NAME- The username that will be used for deployment commit messages.KNOWN_HOSTS- Required in order to authenticate with Pantheon. See instructions below for obtaining the value.
- Visit your Pantheon site dashboard.
- In the "Development Mode" section, click "Clone with git" and copy the value.
- Extract the server address from the copied value. It will have the format
ssh://*.git. Use this as the value forPRODUCTION_REPO.
- First, follow the instructions for generating an ssh key and obtaining the
PRODUCTION_REPOvalues. You will use both of these to SSH into the Pantheon remote server to obtain theKNOWN_HOSTSvalue. - Ensure that the ssh key generated from step 1 is added to your local ssh agent by running:
ssh-add ~/.ssh/id_rsa(replaceid_rsawith your key name)
- SSH into the Pantheon server. The server address is a modified version of the
PRODUCTION_REPOvalue, removing/~/repository.gitfrom the end. The ssh command will look like this:ssh ssh://<SERVER_ADDRESS>.drush.in:2222, where<SERVER_ADDRESS>is a unique value for your site.
- After running the above command, you should be prompted to accept the server's fingerprint. Type
yesand press enter. - This will add an entry into your
~/.ssh/known_hostsfile. You will likely see a message thatshell request failed on channel 0, this can be ignored. - Open the file at
~/.ssh/known_hosts. - In the file, locate the line that contains a server address matching
PRODUCTION_REPO. Copy this entire line and use it as the value forKNOWN_HOSTS.