Write rich Kodi addons using the .NET framework (C#/VB.NET/F#/...)
The idea started when i was writing an addon for Kodi. I was frustrated by the way addons work.
Every time you click on a menu entry, all variables are destroyed and the script is re-invoked again.
You can pass some data to the new script by using a querystring, but the size is limited and the only workaround is to use temporary files.
On top of that, not all Python modules can be used. They have to be repackaged specifically for Kodi.
By using the .NET runtime, we can
- Use Nuget to manage dependencies
- Use a hosted .NET runtime, which is never destroyed and can keep variables alive.
- Run background activities without blocking the Kodi process
- Use the .NET ecosystem: rich APIs, fast runtime (NOTE: see Performance)
KodiSharp works by injecting the .NET Runtime into the Kodi process.
The .NET Runtime is provided by CLRHost (for Windows users) or MonoHost (Windows/Mac/Linux), which offer functionality to load and run addons written in .NET (C#/VB.Net/F#).
Python uses ctypes to load one of the providers and to interact with .NET
This gives us an important advantage over stdout based REPL (spawning a .NET process and reading its output - e.g https://github.com/CRialDev/KSHarp)
Once the .NET runtime is loaded in the process, it persists until the host process (Kodi) terminates
We can run plugins quickly by recycling their instances: persist both static and instance variables (no more temporary files!).
The plugin gets detatched and reattached when required. If the plugin is no longer needed, it can be disposed explicitly by the developer.
To achieve Python interoperability, KodiSharp uses an in-process JSON RPC that evaluates Python code.
I explored the possibility of using the Python interpreter directly through libpython, but it isn't worth the extra effort. Ultimately, we'd still use PyRun_SimpleString, and the improvements would be minimal.
In the current implementation, every call to Kodi APIs has to undergo the following steps, involving a round-trip:
- [C#] Escape call arguments
- [C#] Encode to JSON
- [C#] Pass the JSON message to Python
- [Python] Decode the JSON message
- [Python] Eval the code and store the result in a special accumulator variable called
LastResult - [Python] Send the result back to C# in JSON format
Due to this, code making frequent calls to Kodi or Python should be optimized to reduce the transitions where possible
- Events support (xbmc.Monitor and xbmc.Player)
- Python interfaces
- Code eval
- Variable management
- Value escaping
- Function calls
- Python console logging
- C# Bindings for Kodi modules (xbmc, xbmcgui, ...)
- URL Routing: define handlers for different plugin sections/functionalities, and connect them to menu entries
- Support for Service addons (executed in background, as defined in addon.xml)
- Addons can run in the background, and persist across script invocation.
You can load the TestPlugin project for a working sample.
On Windows you can also try the SpeechRecognizerPlugin project, which is an example of speech recognition inside a Kodi Addon. Note that the speech recognition API uses the UWP APIs, and requires that you have enabled speech services. On Windows 10, you can do that from the privacy menu in the modern control panel.
First of all, target kodi.exe as the process we want to debug for your Class Library project
- Right click on the plugin project
- Properties
- Debug
- Start external program -> Browse for Kodi.exe
This method works only on Windows, since it uses AllocConsole and Debugger.Launch, features that are not available on Unix
Set enable_debug to True in default.py, at the following line
bridge = Bridge(lib_path, assembly_path, enable_debug=False)If you are on Windows, the JIT Debugger Window will pop-up and a console window will appear
Navigate to "%appdata%\Kodi\userdata" Create a file called "autoexec.py" and insert the following code to start your plugin when kodi starts
import xbmc
xbmc.executebuiltin("RunAddon(plugin.video.test)")
Replace "plugin.video.test" with the plugin name you used in addon.xml
This method avoids having to select the debugger from the JIT window every time
Create a new C# Class Library, add the KodiInterop assembly/project as reference.
Model the plugin class like this
using Smx.KodiInterop;
using Smx.KodiInterop.Builtins;
namespace TestPlugin
{
public class TestPlugin : KodiAddon
[Route("/")]
public int MainHandler(NameValueCollection parameters){
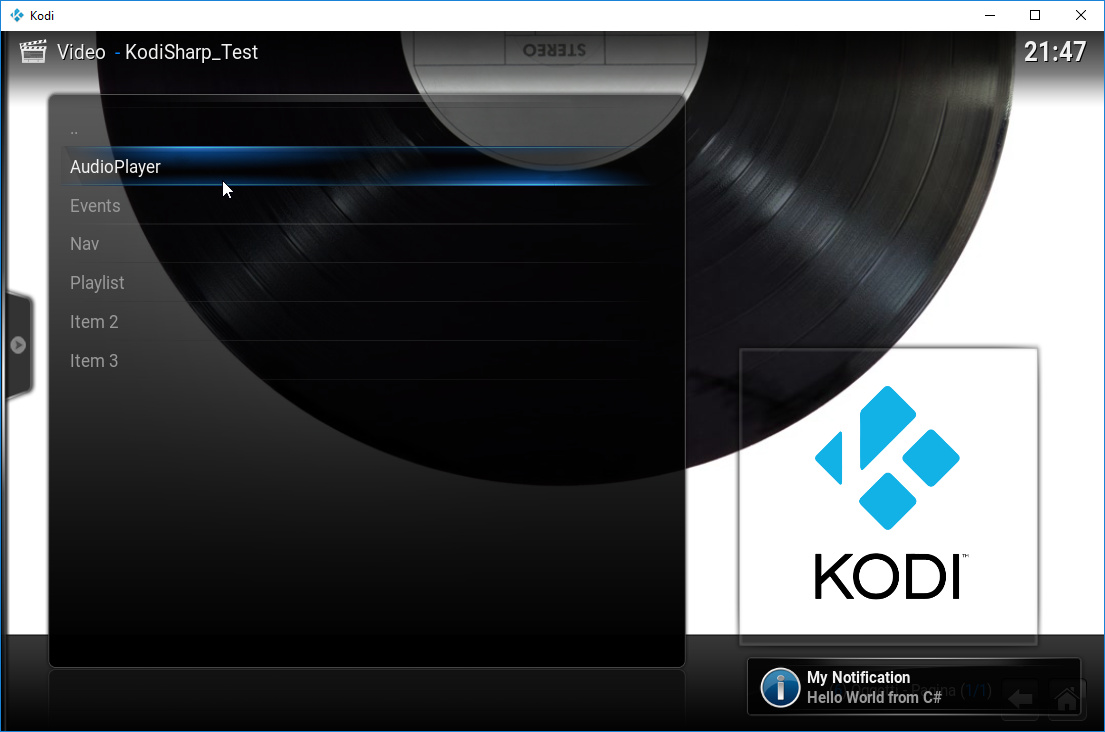
UiBuiltins.Notification(
header: "My Notification",
message: "Hello World from C#",
duration: TimeSpan.FromSeconds(1)
);
}
[PluginEntry]
public static int PluginMain() {
return GetInstance<TestPlugin>(enableDebug: true, persist: true).Run();
}
}cd MonoHost
mkdir build
cd build
cmake ..
cmake --build .Edit default.py to specify the location of the plugin assembly. The script is configured for an in-tree build of the project.
You can use it as a starting point, changing the following variables accordingly:
| File | Variable | Default Location |
|---|---|---|
| Mono Host | monohost_path |
KodiInterop/Mono/build/libMonoHost.so|dll|dylib |
| CLR Host | clrhost_path |
KodiInterop/bin/<build_arch>/<build_type>/CLRHost.dll |
| Plugin Assembly | assembly_path |
KodiInterop/TestPlugin/bin/<build_arch>/<build_type>/TestPlugin.dll |
If you are on Windows, you can set mono_on_windows=True if you want to use Mono instead of .NET
NOTE: it's important to use os.path.join to construct paths
- Implement remaining builtins
- Implement remaining modules functionality (xbmc, xbmcgui, ...)
- Implement a JSON interface (via executeJSONRPC)