CX Chains Overview
This document has the purpose of dissecting CX chains into its different parts and to describe the processes that involve these parts. As the CX chains feature is still in a prototype/alpha stage, the descriptions contained in this file are subject to change. Changes can be expected after a new release of CX is created and after Github pull requests are merged into the develop branch.
Each of the following sections describe either a process or a module that is part of the composition of a CX chain. The document starts explaining what a Blockchain Code and a Transaction Code are, and how and why Merging the Blockchain and Transaction Codes is necessary for the functionality of a CX chain. After reviewing these concepts, it is then explained how these programs are necessary to create, modify and query a CX chain's Program State. The Program State Structure is then described, which helps the reader understand how a CX chain stores its state and what are the capabilities of a CX chain.
In order to create a CX chain, a number of parameters need to be set first in different files by using different methods. First, it is described how a Coin Template file is used to generate a program that can be used to run something similar to a cryptocurrency. Then, a process to generate a Genesis Address and Genesis Private and Public Keys is described, which outputs data that will be used to populate a fiber.toml Configuration File that is used for Initializing a CX Chain. After this initialization process completes, it is explained how a Wallet is created using a Seed and how we can start Testing and Injecting Transactions.
For any encountered bug or feature request, we encourage the reader to create a Github issue with the inquiry.
- Blockchain Code
- Transaction Code
- Merging the Blockchain and Transaction Codes
- Coin Templates
- Genesis Address and Genesis Private and Public Keys
- fiber.toml Configuration File
- Initializing a CX Chain
- Publisher and Peer Nodes
- Wallet
- Testing and Injecting Transactions
"Blockchain code" plays a similar role to that of a programming language library: it defines a series of subroutines (functions), types (structs) and variables, and it can be imported into a program. The differences between blockchain code and a library are the following:
- It is used to initialize a CX chain.
- The global variables defined in the packages that compose the blockchain code act as the program state of a CX chain.
- It includes a
mainfunction. This function is used to initialize the program state of a CX chain. - After initializing the program state, the
mainfunction is removed from the blockchain code.
The program state of a CX chain is generated by serializing the CX program represented by a blockchain code. This serialization includes all the blockchain code with the exception of the main function which serves solely for the initialization of the program state of a CX chain. This program state is stored on the blockchain as part of an unspent output of a transaction.
The entirety of the program state can be queried or mutated. As is described in the following subsections, it can be seen that the code segment – which represents the blockchain code – is also part of the program state. As a consequent of this design, the code of a CX chain can be modified. Although this feature is not implemented yet, the modification of a CX chain blockchain code is intended to be modified by the use of affordances.
The program state of a CX chain is equivalent to the serialization of the initialized blockchain code, minus its main function. The structure of this serialization is composed of four memory segments: code, stack, data and heap. The code segment represents the source code in the blockchain code; the stack segment represents the CX program's stack, which stores the local variables of the different function calls that are performed when running a CX program; the data segment stores any global variable and primitive literals found in the source code (for example, in the function call foo(5), the value 5 is stored in the data segment); lastly, the heap segment stores objects that can shrink or expand in size (strings and slices) and objects that are being pointed to by pointers and that escape their function call scope (see Escape Analysis). A diagram of this structure is shown below:
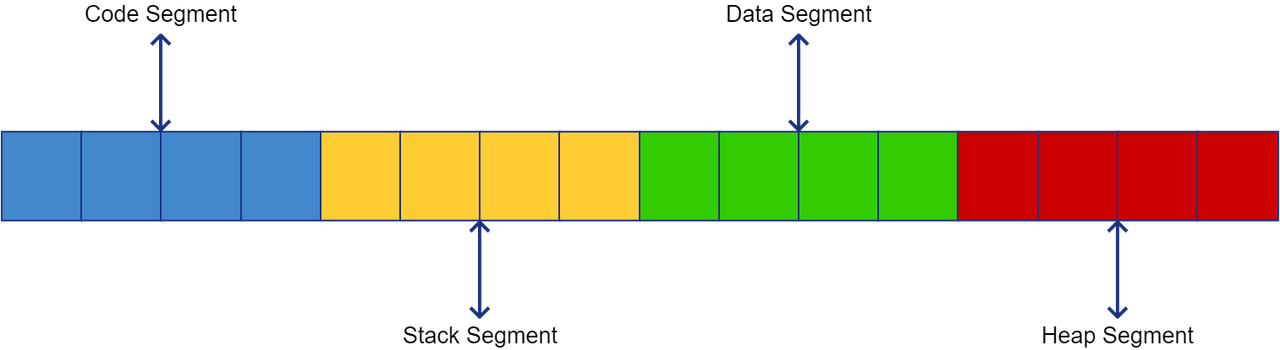
It must be noted that the stack and heap segments are not being included at the moment, but this can/should change in the future versions of CX chains. Despite this limitation, the role of these segments in a CX chain are also described in this document.
The code segment in the program state of a CX chain represents the blockchain code, without its main function. This code can be imported into the transaction code, in order to have its different packages, functions and types be used by the transaction code to modify the program state.
package viewsChain

var views i32

func GetViews() (currentViews i32) {
	return views
}

func IncrementViews() {
	views++
}

func main() {
	// Initialize views.
	views = 78
}
The code above shows a minimal library to manage video views in an application. After initializing a CX chain with the code above, we will have a code segment with two functions (GetViews and IncrementViews), a global variable (views) and a package containing these elements (viewsChain). Additionally, views will be pointing to a 78, but this number is stored in a different memory segment.
The code segment has an additional property: it can be modified by using affordances. For example, a user with the required permissions to a CX chain could call a function that adds more functions to the code segment. It is noteworthy that this feature has not been implemented nor fully designed yet.
The stack segment stores all the values of the local variables of a function call. This memory segment is volatile, as the values stored in it can suddenly be considered garbage after a function call is finished. Storing this memory segment in the program state enables a CX chain to be paused and resumed in a subsequent transaction.
It must be noted that the stack segment will always be wiped out after initializing the program state. In other words, after running the blockchain code, the values left in the stack by calling its main function will not be preserved.
Although the other segments can also be used to preserve the state of a CX chain, the data segment results in the most reliable of the segments due to its nature. The code segment only stores data that represents source code; the stack segment is volatile, which means that the data contained in there can suddenly become garbage, depending on the behavior of the function calls in a program; and the heap segment stores data objects that could be removed by the garbage collector at any moment. In contrast, the data segment has a fixed size, where every chunk of bytes represents the value of each of the global variables declared in the blockchain code, and these global variables will always point to the same addresses in the data segment.
The heap segment should be seen as an auxiliary mechanism for storing data in a CX chain. Although variables in function calls can point to objects in the heap, these objects will sooner or later be destroyed by the garbage collector if the function call containing that local variable has finished its execution. However, the heap segment works well together with the data segment, as the heap segment allows a CX chain to have pointer global variables, slices and strings, as these are objects that are always allocated in the heap segment in CX.
The program state that is stored on the blockchain can either be mutated or queried by running a program that "imports" the program state. Actually, in order to have any sort of access to the program state, a program needs to import packages that are stored in the program state. As a minimalist example, consider the following code:
package number

var Num i32

func main() {
	Num = 10
}
In order to modify the value of Num, the following transaction code can be used:
package main
import "number"

func main() {
	number.Num = 11
}
As can be seen, this resembles exactly what would happen in a CX program that is importing a package, either located in the same file or in an external file. The difference between a CX chain and the aforementioned situation is that in a CX chain, the program state will be preserved. For example, consider the following transaction code:
package main
import "number"

func main() {
	i32.print(number.Num)
}
In the case above, i32.print(number.Num) will print 11, because the previous transaction code modified the value of number.Num.
Both the program state and the transactions that are run against this program state are stored as serializations of CX programs. In order to run a transaction against the program state, a merging of both serializations needs to be performed. This merging – although not so trivial – results in a structure similar to the one depicted in the diagram below:

As can be seen, each of the memory segments of the serialization of the transaction code is appended at the end of each of the memory segments of the serialization of the blockchain code. The merging of both serializations results in a serialization representing a CX program that both includes the blockchain and the transaction code.
After running the merged program, the program needs to be separated into two parts again: the program state and the serialized transaction code, where the new program state is stored as part of an unspent output, and the serialized transaction code is stored as part of the transaction.
A coin template is used by the newcoin command to generate a Go source file that is used to run a CX chain. These templates are located in the template/ directory.
The coin.template file is used to generate the cmd/cxcoin/cxcoin.go source file, while the file params.template is used to generate the file src/params/params.go source file. The former is used to run the peer and publisher nodes for the CX chain, while the latter is used to hold multiple configuration parameters for the CX chain nodes.
In order to initialize a new CX chain, secret and public keys need to be generated to create the genesis transaction. Generating these keys is achieved by running the following command:
cx --generate-address
The output of this command will be similar to the one below:
{
    "meta": {
        "coin": "skycoin",
        "cryptoType": "",
        "encrypted": "false",
        "filename": "2019_05_23_a737.wlt",
        "label": "cxcoin",
        "lastSeed": "64ceea88ba937fecab483ab6d2d9f51d4a02548cba71dbc494bab9550c0e6346",
        "secrets": "",
        "seed": "2a998dcce5470b87207a790db446219c046972b1f5bb618b0a5e851c972cc3e8",
        "tm": "1558675717",
        "type": "deterministic",
        "version": "0.2"
    },
    "entries": [
        {
            "address": "U84KDcpRbEK8ReHs7Z85MZd3KiFCCjUYPY",
            "public_key": "027ab554fef1fb125c5ec5317b830126cba5ba554f56ce08afb44eef8ead9cdfc1",
            "secret_key": "e2529cf862bd5a01c044966897e3ab4173e3df39cf2034f4c1c749e1ef0c3672"
        }
    ]
}
The bits of interest from this output are the values of the JSON keys address, public_key and secret_key.
These values are used for editing the file fiber.toml, with the exception of secret_key. At the moment, the modification of this file needs to be done manually, but this process should be performed automatically in later versions of CX. The value of the secret key must be kept secret, as the name implies, as this key could be used to sign transactions by anyone who posseses it.
fiber.toml is used to set parameters that are used during the initialization and operation of a CX chain. The file already contains some values that can be considered as default, such as the genesis_timestamp or max_block_size, but other fields need to be set up with different values for every CX chain. Particularly, the fields:
blockchain_pubkey_strgenesis_address_strgenesis_signature_str
need to be updated. The values of the first two fields are updated with the values obtained by following the instructions in the section Genesis Transaction, while the last one is automatically generated and added to fiber.toml by initializing a blockchain by running a command of the form cx --blockchain --public-key $PUBLIC_KEY --private-key $PRIVATE_KEY blockchain-code.cx.
Other fields that can be of interest in this file are:
create_block_max_transaction_sizemax_block_size-
unconfirmed_max_transaction_size.
These fields control how large a CX chain's transactions can be. The default is set to be 5 Mb for all of these parameters.
Lastly, any field related to the configuration of a cryptocurrency should be ignored and left untouched for the functionality of a CX chain, specifically:
genesis_coin_volumecreate_block_burn_factorunconfirmed_burn_factormax_coin_supplyuser_burn_factor
Currently, CX has the newcoin command as a dependency (located in cmd/newcoin). In order to initialize a new CX chain, newcoin needs to create the cxcoin command (located in cmd/cxcoin) using the parameters defined in ./fiber.toml. This process should be simplified by mimicking the process defined by cmd/cxcoin/cxcoin.go in cxgo/main.go. In other words, instead of having to call the process defined by cxcoin, we can embed the process in CX to eliminate the newcoin and cxcoin dependencies.
The workflow – which occurs when running, for example, cx --blockchain --secret-key $SECRET_KEY --public-key $PUBLIC_KEY examples/blockchain/counter-bc.cx – is as follows:
-
newcoinis installed by runninggo install ./cmd/newcoin/... -
newcoinis run in order to createcxcoin
It is worthy to note that the name
cxcoincould be changed to something else by using the--program-nameflag, but this behavior has not been tested yet.
-
cxcoinis installed by runninggo install ./cmd/cxcoin/... -
cxcoinis run to initialize the CX chain. This process involves:- Running
go run ./cmd/cxcoin/cxcoin.go --block-publisher=true --blockchain-secret-key=$SECRET_KEY.
The data directory for the publisher node is stored in
$HOME/.cxcoin/. Every time a new CX chain is initialized, its data directory is deleted first. The name of this directory can change, depending on the value of--program-name.- As this is a new blockchain, the genesis block will be created and a genesis signature is generated. This genesis signature will be different for every blockchain, even if the blockchain private and public keys are the same.
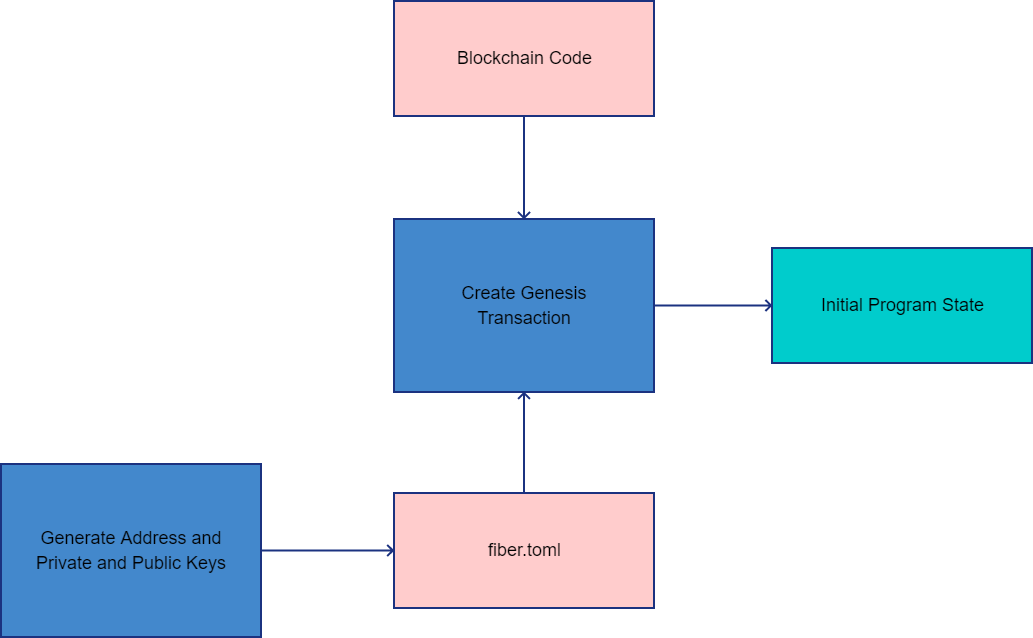
- Using the genesis signature and the secret key, a CX chain creates the first transaction in the genesis block, which is a transaction without a transaction code and with an unspent output storing the initial program state, defined by running the blockchain code.
-
fiber.toml's fieldgenesis_signature_stris updated automatically with the new genesis signature. - The genesis signature is printed to standard output, so the user can take note of it.
- Running
The diagram below illustrates how the different parts and processes that have been reviewed until now interact among them in order to generate the initial program state.
A CX chain works by using the Skycoin platform. In order to start broadcasting transactions and storing them on a blockchain, you need to have a publisher and a peer node. The publisher node is in charge of signing the blocks that are being created on the blockchain, while the peer node has the purpose of receiving the transactions and running them against the current program state of a CX chain.
In order to start a publisher node, the --publisher flag needs to be given to the cx command. For example:
cx --publisher --genesis-address $GENESIS_ADDRESS \
   --genesis-signature $GENESIS_SIGNATURE \
   --secret-key $SECRET_KEY \
   --public-key $PUBLIC_KEY
In the case of a peer node, the --peer flag is given to the cx command. For example:
cx --peer --genesis-address $GENESIS_ADDRESS \
   --port 6001 \
   --genesis-signature $GENESIS_SIGNATURE \
   --public-key $PUBLIC_KEY
The data directory for the publisher node is stored at $HOME/.cxcoin, while the data directory for the peer node is stored at tmp/6001. This will be changed in the future, as the peer node's data will be deleted every time the server storing the data directory is rebooted.
Note that if a new CX chain (a different blockchain code) needs to be created, the data directory of the peer node is required to be manually deleted (for example, by running the command rm -r /tmp/6001).
The transactions that are going to be run against the program state that is being stored on the blockchain need to be signed in order to meet the constraints imposed by the Skycoin blockchain platform.
Although, in theory, a secret key should be enough to sign a transaction, CX chains require at the moment to generate a wallet to be used to sign transactions. This wallet can be generated using the cx command, for example:
$ cx --create-wallet --wallet-seed "museum nothing practice weird wheel dignity economy attend mask recipe minor dress"
Any transaction that occurs in a CX chain can be seen as a transaction between two accounts, which are represented by two addresses. At the moment, these addresses involved in the transactions are hardcoded in CX. As a consequent, in order to run any transaction in a CX chain, a wallet created from the seed "museum nothing practice weird wheel dignity economy attend mask recipe minor dress" needs to be created.
The two addresses involved in any CX chain transaction are TkyD4wD64UE6M5BkNQA17zaf7Xcg4AufwX and 2PBcLADETphmqWV7sujRZdh3UcabssgKAEB. If this was a transaction involving the transfer of SKY from one address to another, the former would be the address that is sending SKY to the latter.
Once a CX chain has been initialized, transactions can be run against the program state stored on the blockchain. There are two flags that can be used for this purpose: --transaction and --broadcast, where the first flag is used to only retrieve the current program state of a CX chain and run the transaction code against it locally, and the latter is used to additionally broadcast the transaction. For example, consider the following blockchain and transaction codes:
package number

var Num i32

func main() {
	Num = 10
}
package main
import "number"
func main() {
number.Num = 11
}If the transaction code in the second snippet is run using the --transaction flag, the program state of the CX chain represented by the first code snippet will still be holding 10 as the value of the global variable Num. In contrast, if the second code snippet is run using the --broadcast flag, the program state of the CX chain will be mutated, and the value of the global variable Num will now be changed to 11.
The diagram below depicts the workflow of a CX chain after its initialization. It can be seen how blockchain codes are used to form a transaction that will be changing the current program state in order to generate a new program state to be used by future transactions.
