UsingSmartCardAPI
This document explains how the SmartCard API can be used to develop and test Android applications which communicate with Secure Elements available in the real device or the emulator.
The tutorial refers to the shared library based SmartCard API implementing the Open Mobile API interface and is not suitable for application development relying on the MSC SmartCardService.
Note: Bear in mind that Nexus Dev phones won't support SIM access out of the box as they have vanilla Android.
- The development phone is flashed with SmartCard API support according to BuildingTheSystem
- Basic knowledge of Java Card applets and smart card communication
- Eclipse or Android Studio development IDE with the Android Development Tools (ADT) installed on the host (although Eclipse/Android Studio are not mandatory). See http://developer.android.com/sdk/eclipse-adt.html
- Basic understanding of the Android development platform. See http://developer.android.com/sdk/index.html
The Eclipse/Android Studio development environment needs to be configured in order to use the official SDK from Google as described in the Google documentation. In addition, the SDK needs to have access to the Open Mobile API addon package.
- Start the Android SDK Manager by launching
androidon the command line - Click on Tools -> Manage Add-on Sites...
- Go to User Defined Sites and add the new repository
http://seek-for-android.github.io/repository/21/addon.xmland close the dialog. The different entries in the list are required for the different API levels:- 15 - API level 15, Android 4.0.3
- 16 - not available
- 17 - API level 17, Android 4.2
- 18 - API level 18, Android 4.3
- 19 - API level 19, Android 4.4
- 20 - developer preview, not available
- 21 - API level 21, Android 5.0
Note: When the application should be compiled for different API levels it's recommended to add all versions of the Open Mobile API to the addon manager
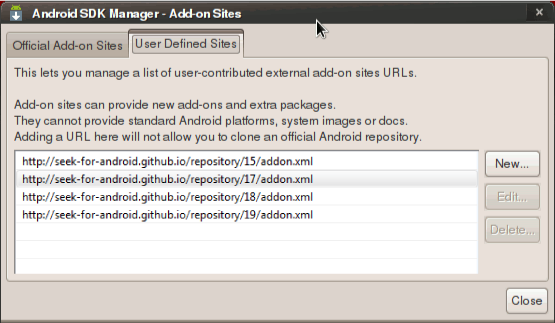
- Reload the packages selecting Packages -> Reload
- Select Open Mobile API under Android 5.0 and install the package add-on
- The Android SDK Manager just installed the Open Mobile API addon package from SEEK to develop Secure Element aware applications.

For developers, the most important code to get started within a new development environment is the Hello, World. sample. The text to be displayed will be created from the applet installed on the Secure Element.
The Android application communicates with the applet installed on the Secure Element and displays the response from the APDU command on the screen of the device.
The Hello Smartcard Java Card applet available in this Git repository needs to be installed on the Secure Element by using any kind of card management tool similar to JLoad.
The sample code referenced here can also be found in this other GIT repository.
- Using the Eclipse project wizard, create a new Android project
File -> New -> Project
- Select Android Application Project and click Next
- To create the project, fill in the required fields
Application name: Hello Smartcard
Project name: HelloSmartcard
Package name: com.gieseckedevrient.android.hellosmartcard
Build SDK: Open Mobile API (Giesecke & Devrient GmbH) (API 21)
Minimum Required SDK: API 21: Android 5.0 (Lollipop)
Unselect Create custom launcher icon unless your logo matters
-
Click Next to move to the next wizard page
-
Leave the default options: Create Activity -> BlankActivity and hit Next
-
Enter the activity name: MainActivity and hit Finish to create a blank project
Applications using the SmartCard API need to declare that the component is required in order to be able to get installed. Especially when publishing the APKs to Google Play it is required to declare such. An example of an AndroidManifest.xml which requires the Open Mobile API looks like
<?xml version="1.0" encoding="utf-8"?>
<manifest xmlns:android="http://schemas.android.com/apk/res/android"
  <application android:label="@string/app_name">

    <uses-library android:name="org.simalliance.openmobileapi" android:required="true" />

    <activity android:name=".MainActivity">
      ...
    </activity>
  </application>
</manifest>
Refer to the official documentation under uses-library element for more information.
The Secure Element service uses an asynchronous callback mechanism to inform the application when the service is connected. Therefore, the SEService.Callback interface is implemented in MainActivity with the callback method serviceConnected().
import org.simalliance.openmobileapi.*;

public class MainActivity extends Activity implements SEService.CallBack {
  ...
  public void serviceConnected(SEService service) {
    Log.i(LOG_TAG, "seviceConnected()");
  }
}
Let's not care too much about the user interface, just create a button which starts the communication with the applet on the Secure Element when pressed.
In MainActivity.java, add the following code to the onCreate() method.
@Override
public void onCreate(Bundle savedInstanceState) {
  final String LOG_TAG = "HelloSmartcard";

  super.onCreate(savedInstanceState);

  LinearLayout layout = new LinearLayout(this);
  layout.setLayoutParams(new LayoutParams(
          LayoutParams.WRAP_CONTENT,
          LayoutParams.WRAP_CONTENT));

  Button button = new Button(this);
  button.setLayoutParams(new LayoutParams(
          LayoutParams.WRAP_CONTENT,
          LayoutParams.WRAP_CONTENT));

  button.setText("Click Me");
  button.setOnClickListener(new OnClickListener() {
    public void onClick(View v) {
      // TODO: Secure Element access
    }
  });

  layout.addView(button);
  setContentView(layout);
}
Add the required Java imports for the new code manually or use Ctrl+Shift+O within Eclipse to organize all imports.
Create a handle to the SEService API. At the end of the onCreate() method, add
  try {
    Log.i(LOG_TAG, "creating SEService object");
    seService = new SEService(this, this);
  } catch (SecurityException e) {
    Log.e(LOG_TAG, "Binding not allowed, uses-permission org.simalliance.openmobileapi.SMARTCARD?");
  } catch (Exception e) {
    Log.e(LOG_TAG, "Exception: " + e.getMessage());
  }
and create a seService object within the MainActivity class
private SEService seService;
If the sample application is executed on the phone now, a security exception is thrown complaining about a missing SMARTCARD permission. See the log output of the command when starting the application in its current stage
$ adb logcat *:v
In order to be allowed to use the SmartCard API, an application must declare the org.simalliance.openmobileapi.SMARTCARD permission. This permission notifies a user when installing an application that requests access to a Secure Element.
Define the permission in the AndroidManifest.xml file
<uses-permission android:name="org.simalliance.openmobileapi.SMARTCARD"/>
and the sample application will launch properly.
Note that the constructor of SEService will automatically bind to the SmartCardService component in the background. Since service binding is asynchronous in Android, the proper way to initialize the library is to wait for a notification event as discussed previously.
To clean up the service binding, call the shutdown method when the application is closing or is not using SmartCardService anymore like in onDestroy()
@Override
protected void onDestroy() {
   if (seService != null && seService.isConnected()) {
      seService.shutdown();
   }
   super.onDestroy();
}
Add the following code snippet inside the onClick() handler of the button
   try {
      Log.i(LOG_TAG, "Retrieve available readers...");
      Reader[] readers = seService.getReaders();
      if (readers.length < 1)
         return;

      Log.i(LOG_TAG, "Create Session from the first reader...");
      Session session = readers[0].openSession();

      Log.i(LOG_TAG, "Create logical channel within the session...");
      Channel channel = session.openLogicalChannel(new byte[] {
                          (byte) 0xD2, 0x76, 0x00, 0x01, 0x18, 0x00, 0x02,
                          (byte) 0xFF, 0x49, 0x50, 0x25, (byte) 0x89,
                          (byte) 0xC0, 0x01, (byte) 0x9B, 0x01 });

      Log.d(LOG_TAG, "Send HelloWorld APDU command");
      byte[] respApdu = channel.transmit(new byte[] { (byte) 0x90, 0x10, 0x00, 0x00, 0x00 });

      channel.close();

      // Parse response APDU and show text but remove SW1 SW2 first
      byte[] helloStr = new byte[respApdu.length - 2];
      System.arraycopy(respApdu, 0, helloStr, 0, respApdu.length - 2);
      Toast.makeText(MainActivity.this, new String(helloStr), Toast.LENGTH_LONG).show();
   } catch (Exception e) {
      Log.e(LOG_TAG, "Error occured:", e);
      return;
   }
In this code, a logical channel to the HelloSmartcard applet identified by its AID D2 76 00 01 18 00 02 FF 49 50 25 89 C0 01 9B 01 is created. The HelloSmartcard applet
specific APDU command 90 10 00 00 00 is sent to retrieve the applet response.
The last two bytes of the response, which contain the status word (SW1SW2=90 00 on successful execution), are truncated and the result is displayed on the screen.
In Eclipse, click on Run or press Ctrl+F11 to execute the sample on the phone.
Each time the applet is accessed, the counter is incremented by one and stored in NV memory on the Secure Element. This shows the data persistence of the applet installed on the Secure Element.
To debug the application, you need to
- Add additional
Log.e()messages - Run
$ logcat *:vin a terminal to show all log messages - Use Eclipse to set breakpoints and step through the code
Other samples are available in Git as well as a complete JavaDoc for a complete reference.