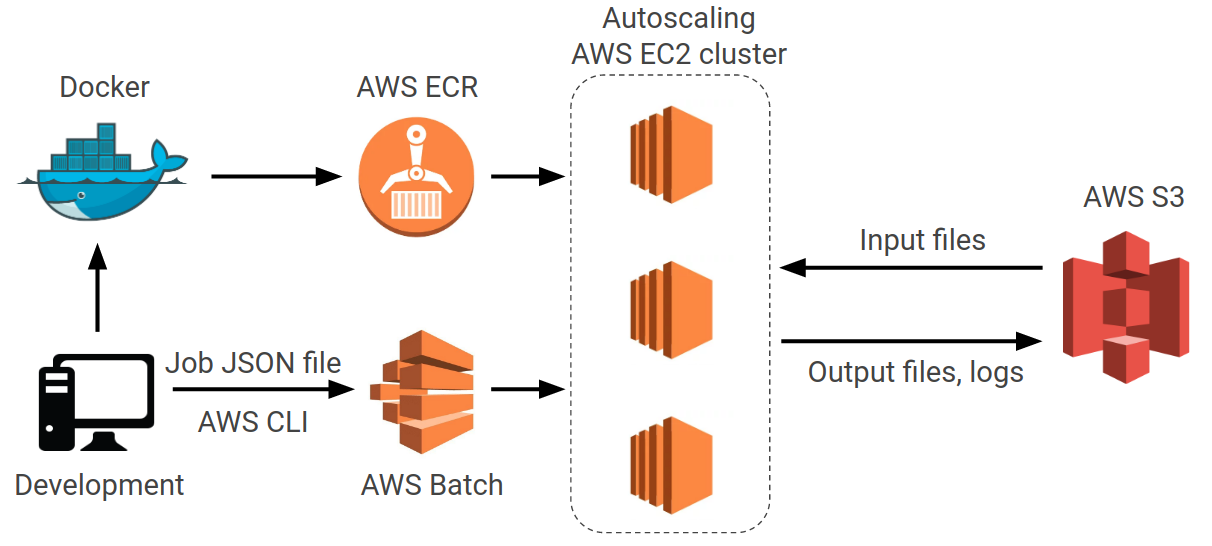
AWS batch allows you to easily submit many jobs simultaneously, each with their own set of input parameters. AWS will then manage the queue of jobs, provision EC2 instances as necessary, run the job, and then terminate the instances automatically.
This tutorial is meant to act as a quick and straight forward guide to setting up and running Python scripts using AWS Batch.
Please note that while any costs should be minimal, you may be charged for the AWS resources used by this tutorial.
Several steps and commands will contain values unique to your AWS account, for example your <Account ID>. Be sure to replace these with your values as you work through the tutorial.
Please feel free to create an issue on this repository if you have any problems!
- An AWS account
- Docker
- AWS Command Line Interface
AWS CLI will be used to submit batch jobs, and configuring the CLI requires access keys be generated. It is not recommended that you use root account's access keys. Instead an IAM user will be created with sufficient permissions to create and submit batch jobs.
The policies used here are more permissive than necessary and can be restricted based on your use case.
- Log into your root account and navigate to the IAM service.
- If desired create a new user.
- Attach either of the following policies:
- Navigate to your desired user's permissions, select "Attach existing policies directly", and select the "AdministratorAccess" policy. Click "Review" and then "add Permissions" to complete.
- From the user summary page click "add inline policy". Select the json tab and paste in the following policy. Click "Review", give the policy any name ("aws-batch-policy"), and click "Create". This policy is less permissive than administrator access, but still give this users full access to each of the resources listed below.
{
    "Version": "2012-10-17",
    "Statement": [
        {
            "Sid": "VisualEditor0",
            "Effect": "Allow",
            "Action": [
                "iam:*",
                "applicationinsights:*",
                "batch:*",
                "logs:*",
                "ecr:*",
                "ec2:*",
                "s3:*"
            ],
            "Resource": "*"
        }
    ]
}- Log into your new user, this account will be used for the remainder of this tutorial.
The example scripts used in this tutorial will download and upload files from an S3 bucket. To allow for this we need to create an appropriate role to be used by the batch job.
- Navigate to the IAM service.
- Click on "roles" and then "Create Role"
- Under "Select type of trusted entity" select "AWS service"
- Under "Choose a use case" select "Elastic Container Service"
- Under "Select your user case" select "Elastic Container Service Task, Allows ECS tasks to call AWS services on your behalf."
- Click "Next: Permissions"
- Type "S3" into the filter policies box
- Check the box next to "AmazonS3FullAccess"
- Click "Next: Tags" and then "Next: Review"
- Enter a role name such as "ecs_role" and click "Create role"
If you have not already done so you will need to configure AWS CLI to your account.
- Install AWS CLI, there is a link in the Prerequisites section.
- Navigate to the users section of the IAM dashboard.
- Select the user you configured in the previous section.
- Click the "Security credentials" tab.
- Click "Create access key". Copy down both the Access key ID and secret access key to a secure location.
- Open a terminal on your local machine and enter
aws configure - Enter the access key and secret access key from Step 4. Choose a default region name and output format, the defaults are fine if you are not sure.
Each time you submit a batch job you will be able to pass a different set of parameters to your Python script. In this tutorial the parameters will be passed as command line argument, and your script must be able to accept these arguments.
It is recommended here to use the argparse package to parse command line arguments. This will automatically create a --help document for your python script, which is parsed later to obtain a list of command line arguments.
An example script, script.py, is provided here to complete the tutorial. This script takes var_a and var_b as input arguments, multiplies them and saves the results to a pickle file named using a save_name input argument.
An S3 bucket is used to store files that will either be downloaded and used by your python script, and to store the results/logs that the python script produces.
- Navigate to the S3 service in AWS console.
- Click "Create Bucket".
- Entire a bucket name (e.g., aws-batch-python-tutorial). Note that this bucket name must be unique across all existing S3 buckets.
- All remaining settings can remain at their default value, click through and create bucket.
- Select your newly created bucket in the "Buckets" section
- Create appropriately named folders to contain results, logs, etc. In this tutorial a "logs" and "results" folder is used.
A bash script is used to perform several steps before and after running the python script. An example script run_job.sh is provided here. This script will have to be modified to reflect the S3 bucket and folder names you just created.
There are 4 steps performed by this script. You must modify step 4 as described below to run this tutorial.
- (optional) The bash script will first check and download any necessary files from the S3 bucket. This step is currently commented out in the script, but left in case your script requires this step.
- The bash script will parse the possible command line arguments used by your python script using
python3 script.py --help. For each command line argument name, if a environment variable exists with the same name then it will be added to the arguments used to call the Python script. - The Python script is then called.
- The results file and log created by the Python script will be uploaded to the S3 bucket. You need replace
<your S3 bucket>with the name of the S3 bucket you just created. If you did not create folders namedresultsandlogsin this bucket you will have to modify the folder names, or go back and create these folders in the bucket.
Each batch job will be pointed toward the docker image it will run. This tutorial will push our docker image to the AWS Elastic Container Repository.
A Dockerfile is provided for this tutorial, this will have to be adapted or replaced when running your own code.
Docker images can very quickly grow in size, the one used here will be about 170MB. If your internet is slow this can make the pushes to ECR painful. A second option is to upload or clone your project onto an EC2 instance and build/push your image there. If you are dealing with slow upload speeds this will make the process significantly quicker.
- Navigate to the ECR service in the AWS console.
- Select Create repository.
- Give your repository a name, this tutorial will use aws-batch-test.
- After creating the repository copy down the URI (e.g.,
<Account ID>.dkr.ecr.us-east-1.amazonaws.com/aws-batch-test) - Build the docker image on your local machine,
docker build -t aws_batch_tutorial . - Tag your docker image with the ECR URI,
docker tag aws_batch_tutorial <Account ID>.dkr.ecr.us-east-1.amazonaws.com/aws-batch-test - Get an ECR authorization token,
$(aws ecr get-login --region us-east-1 --no-include-email) - Push the docker image to the repository,
docker push <Account ID>.dkr.ecr.us-east-1.amazonaws.com/aws-batch-test
The compute environment describes the EC2 instances that will be provisioned when running batch jobs.
- Select the "Compute Environments" section and select "Create environment"
- Leave the compute type as "Managed".
- Specify any name for this environmental, for example "batch_tutorial_m5a".
- Select "Create new role" for service and instance roles. If you have previously created roles from this step, or other appropriately configured roles, you can select those.
- Select or create an EC2 key pair, you will not need this key pair for the remainder of this tutorial.
- Remove "optimal" from allowed instance types and select "m5a.large". Note that this instance will cost $0.086/hr to run, but the test scrits used here should only run for seconds.
- Make sure "Minimum vCPUs" is set to 0. If it is not AWS will keep instances running, and charging you, even if no jobs are running.
- Click create, the rest of the options can remain at their default values.
The queue is responsible for accepting new job submissions and scheduling them onto the compute environment.
- Select the "Job Queues" section and click "Create job queue".
- Specify a name for the queue, (e.g., "batch_tutorial_queue").
- Specify any number for priority (e.g., 1).
- Select the compute environment you created in the last section and click "Create job queue"
A job definition specifies the parameters for a particular job. The parameters defined include a link to the docker image that will be run, the commands to run, memory/cpu/gpu requirements, and any environmental variables.
Here we will create a job definition in the AWS console that will act as a template for future job definitions. Job submissions will point to this particular job definition template, and then define any modifications to the parameters that particular task.
- Select "Job Definitions" and click "create"
- Enter any job name (e.g., "batch_tutorial_job_definition")
- Enter 60 format the execution timeout, this will automatically kill the job if it runs for more than 60 seconds. You will likely have to enter a much higher value when using your own code
- For Job Role, select the select container service user role created earlier (e.g., ecs_role)
- For container image, paste in the ECR URI that you generated in the "Building your Docker Image..." section, for example
<Account ID>.dkr.ecr.us-east-1.amazonaws.com/aws-batch-test - For command, enter
./run_job.sh. This command will be executed inside the docker container once it begins. - Enter 1 for vCPUs and 1000 for Memory(MiB).
- Leave the remaining values at their default and select Create Job Definition
JSON files are used to define job submissions. Each job JSON file used here will define a job name, point to the queue and job definition we just created, and define any desired arguments to pass to the Python script.
AWS Batch allows you to define environment variables for each job submission. The run_job.sh script which will be called at the start of our job will convert those environment variables to command line arguments for the python script. This is done by parsing the python script.py --help command, whose output is created by the argparse package. To pass command line arguments to the script you must specify environment variables in the JSON file with names that match the desired command line argument name.
The contents of sample_job_1.sh are shown below. You need to modify several values:
jobNamecan be any string you desire.jobQueueneeds to be the name of the queue you created previouslyjobDefinitionis the name of the job definition template created earlier.- Finally, set you can the desired environment variables that will be used by the bash script and/or passed as command line arguments to the Pythons script. In our sample script
save_nameis the name assigned to the results and log files. Here we also assign a new value tovar_a. All other parameters in the script will take on their default values defined inparse_arg().
{
    "jobName": "sample_job_1",
    "jobQueue": "batch_tutorial_queue",
    "jobDefinition": "batch_tutorial_job_definition",
    "containerOverrides": {
        "environment": [
            {
                "name": "save_name",
                "value": "sample_job_1"
            },
            {
                "name": "var_a",
                "value": "6"
            }
        ]
    }
}Once your job JSON file is created open a terminal in the folder containing this file and run the following command:
aws batch submit-job --cli-input-json file://sample_job_1.json
In the AWS console you can navigate to Batch service and select "Dashboard". This will allow you to monitor the status of each of your jobs, note that it may take several minutes before Batch provisions the compute instances and executes the job.
By clicking the numbers under each type of job status (e.g., "Succeeded") you can see a list of all jobs with this status. You can see a job's details by clicking the Job ID, if you scroll to the bottom of these details there will be a link view the Cloudwatch Logs.
Once a job is complete you can retrieve the results one of two ways. First, you can navigate to the S3 bucket in the AWS console and view or download the files. Alternatively, you can use the AWS CLI to sync folders in the S3 bucket to your local directory, for example:
aws s3 sync s3://<your S3 bucket name>/results ./results
After completing this tutorial you can modify it to run your own python scripts by following these steps:
- Edit your code to accept command line arguments using the
argparsepackage, as is done in the sample script provided here. - Edit
run_job.shand update the buckets/folders/file names of any input and output files used by your script. - Make a new Dockerfile for your code with any required dependencies. Once built, create a new ECR repository for this image and point the job definition to it.
- When creating the compute environment select the instance type appropriate for your work.
- When defining a job enter an appropriate execution timeout time. It should be long enough that you are very confident your script will finish, but short enough that it will eventually terminate should your script fail to complete. If your script hangs you will be charged until the timeout time is reached or you manually terminate the job.
- Specify an appropriate vCPU number and memory size for your job. It is best not to put more than required. AWS batch will put multiple jobs onto a single instance if that instance has sufficient resource to support multiple jobs.
You will be charged for the memory your docker images use when uploaded to the ECR, and for the files contained in your S3 bucket. You will be continuosly charged for these resources even when not running jobs. To avoid this make sure you delete your unused ECR repositories and S3 buckets/files once finished.