![]()
![]()
![]()
![]()
This repository contains demos performed in the "Secure development for Muggles" talk.
Check out the official slides for:
Check out the site devsec.fyi and its repository for more resources and info.
In this repository we have enabled several GitHub Actions to perform different tasks, listed below. These are mainly focused to perform security analysis of the code, and to detect vulnerabilities in the code and in the dependencies. There are other actions to simply build some of the demos and provide them out-of-the-box to use them.
Note: all of this actions can be executed in any CI/CD platform (we have no vendor lock-in), since the tools are available as binaries and docker images in some cases. Also you can try out the nektos/act project, which allows you to run this actions locally (or in other machine).
Purpose: perform static analysis of all the code in this repository.
Workflow in ./.github/workflows/code_ql.yml.
With CodeQL we can perform static analysis of the code, and detect vulnerabilities in the code and in the dependencies. It's provided by GitHub in a very simple way to use it, and it's free for public repositories to set-up and integrate with the "Security" tab in the repository. Nevertheless, we can use it in private repositories, and we can also use it in our local machines (via CLI).
In this case the CodeQL action is only meant to be executed on manual demand, and not in every push to the repository (via the workflow_dispatch event), for demo purposes.
The action will list all available languages by executing a Python script and try to autobuild all the compiled languages, and then it will execute the CodeQL analysis for all the languages that have been built successfully (if any), along the analysis for the rest of the languages.
We can see the results of this analysis in the "Security" tab of the repository, in the "Code scanning alerts" section (if enabled).
Sources used: thedave42/multi-lang-monorepo.
Purpose: perform static analysis of all the code in this repository with multiple OSS tools for this (the ones defined by Microsoft Defender for DevOps action). We could see them in Microsoft Defender for Cloud in our Azure Subscription.
Workflow in ./.github/workflows/microsoft_defender_devops.yml.
This action only executes the Microsoft Defender for DevOps action with the default configuration, which is to execute the following tools:
- AntiMalware: will inspect the code and artifacts for malware.
- Bandit: a tool designed to find common security issues in Python code (we are using Python for some demos).
- BinSkim: a binary static analysis tool that provides security and correctness results for Windows Portable Executable and *nix ELF binary formats.
- ESlint: a tool for identifying and reporting on patterns found in ECMAScript/JavaScript code.
- Template Analyzer: a tool for identifying security and compliance issues in Azure Resource Manager (ARM) templates and Bicep files.
- Terrascan: a static code analyzer for Terraform.
- Trivy: all-in-one security scanner to detect vulnerabilities & IaC misconfigurations, risks and others.
The action also publishes a SARIF file as an artifact, which can be used to integrate with other tools, and inspected for example using Microsoft SARIF Viewer.
This SARIF report will be also integrated and available in the "Security" tab of the repository, in the "Code scanning alerts" section along with others scan results (if enabled). Also, alerts will be present in Microsoft Defender for Cloud in our Azure Subscription.
Purpose: perform static analysis of all the code in this repository with multiple OSS tools for this.
Workflow in ./.github/workflows/security_scan.yml.
With this action we use the following tools to perform static analysis of the code, and detect vulnerabilities in the code and in the dependencies (and secrets in the code):
- trivy: all-in-one security scanner to detect vulnerabilities & IaC misconfigurations, risks and others.
- TruffleHog: utility to search Git repositories for secrets, digging deep into commit history and branches. This is used to detect secrets in the code.
- tfsec: Security scanner for Terraform code (used for some demos).
- bandit: a tool designed to find common security issues in Python code (we are using Python for some demos).
The action also publishes a SARIF file as an artifact, which can be used to integrate with other tools, and inspected for example using Microsoft SARIF Viewer.
This SARIF report will be also integrated and available in the "Security" tab of the repository, in the "Code scanning alerts" section along with others scan results (if enabled). Also, alerts will be present in Microsoft Defender for Cloud in our Azure Subscription.
Purpose: perform a full scan of a target URL with OWASP ZAP (in this case JuiceShop, for demo purposes).
Workflow in ./.github/workflows/owasp_zap.yml.
With this action we use OWASP ZAP to perform a full scan of a target URL (in this case JuiceShop, for demo purposes).
The action will scan the target URL with some common checks and report all detected issues in a new GitHub issue in the repository.
The action will also upload as artifact the reports (in multiple formats) generated by OWASP ZAP, which can be inspected to see the detected issues.
Purpose: build the spy-extension and publish it as a GitHub release.
Workflow in ./.github/workflows/build-spy-extension.yml.
With the artifact published, we can download the extension and install it in our browser (in development mode, unpacked). With this extension we can intercept a lot of things that happen in the target browser, and use them (ex. requests, responses, cookies...).
Go to the actions tab, and select the workflow "CI Build for spy-extension", and click on the latest run. In the summary details, you can see in the "Artifacts" section the zip ready to download and use.
View all the demos in this YouTube Playlist.
Upstream repository (from INE labs, INE web): https://github.com/ine-labs/AzureGoat/
LICENSE: MIT
Videos: Explotation demo.
This repository has been modified to avoid to deploy extra unneeded resources for this demo, such as VMs, runbooks and others...
**View more about this demo**
Video explanation: Youtube.
Step by step:
-
Login into your Azure account in portal.azure.com.
-
Create an empty resource group with the name
azuregoat_app. -
Open an Azure Cloud shell in the portal (note: this needs an storage account, that you can create when initializing the shell the first time, which may incur in additional charges).
-
Clone this repository in your shell:
git clone https://github.com/rpiraces-plain/security-development-muggles.git -
Get into the folder
./azure-goatfolder of this repository by executingcd security-development-muggles/azure-goat. -
Once in the folder, initialize the terraform state by executing
terraform init. -
Deploy the infrastructure by executing
terraform apply(the command will prompt for confirmation, confirm the deploy). -
Wait until the deployment finishes.
-
Once the deployment finishes, you will see the output of the terraform execution, which will contain the main URL of the deployed application (all deployed resources are in the resource group
azuregoat_app).
Note: the deployed resources incur in charges, make sure to stop the function apps to reduce charges.
The application has several vulnerabilities and weaknesses, but the main one that we are going to demonstrate is the following:
SSRF in the user portal, when submitting a new post.
When we are logged in the application, we can create a new post, and we can specify the URL of the image to be displayed in the post. The application is not secure enough and its vulnerable to SSRF. We can use this vulnerability to make the application to make a request to an internal resource, and get sensitive information from it (with the URI format file://):

Examples of URIs to use:
file:///etc/passwdfile:///proc/self/environfile:///home/site/wwwroot/local.settings.config(this file contains the connection string to the Cosmos database, and the storage account key)
When submitting by clicking the "Upload" button and keeping open the browser "Dev Tools" we can see the request being made to the internal resource, which will return the content of the file in a invalid png file we can download (copying the URL sent in the request in the body property of the JSON object sent in the response):

When we open the downloaded image in a text editor (such as Notepad++, VSCode or others), we can see the content of the file we requested:

From there, we can use the leaked credentials to access the Cosmos database and the storage account, and get more information from there (or modify it, or delete it...).
Exploitation steps: Youtube (specifically the videos named "AzureGoat Exploitation : Server Side Request Forgery Part 1" and "AzureGoat Exploitation : Server Side Request Forgery Part 2").
Using static analysis tools, we can detect the vulnerability before deploying the application to production. In this case we have a GitHub Action which runs the following tools:
- Trivy: has multiple scanners that look for security issues, and targets where it can find those issues.
- TruffleHog: to find and verify credentials in this repo.
- tfsec: to find security issues in the terraform code.
- Bandit: to find security issues in the python code.
With these tools we can see in the latest execution of the action that there are several issues in the code, and we can see the details on the run log. We also publish the results in "serif" format, which we can download and see in any compatible tool (ex. Microsoft Sarif Viewer).
We can see the code causing the SSRF with bandit (along many others not shown in the image):

We can also see some private keys uploaded to the repository with Trivy:

Finally with tfsec, we can see multiple issues as well:

Note: regarding the credentials obtained in the SSRF with file:///home/site/wwwroot/local.settings.config, it does not contain secrets, the secrets are put in there in the deployment process and should not be accessible. Also note that Static Analysis is NOT a "silver bullet".
Upstream repository (from Pro Code Guide, Pro Code Guide web): https://github.com/procodeguide/ProCodeGuide.Samples.BrokenAccessControl
Videos:
This repository has been modified to improve security and some customization for this demo. One very important change is the use of HashIds for posts ids (instead of sequential numbers), which makes it harder to guess the id of a post and access it. Posts are kept stored in the DB with the original id, and the HashId is generated on the fly when needed to be provided to the user.
**View more about this demo**
Step by step:
-
Login into your Azure account in portal.azure.com.
-
Create a Azure SQL Server instance (minimum tier recommended).
-
Create two Databases in the SQL Server instance, one named
brokenaccesscontroland another namedbrokenaccesscontrol_fixed. -
Create an App Service Plan (minimum tier recommended).
-
Create two Web Apps in the App Service Plan, try to give them different and coherent names to differentiate them.
-
Clone this repository in your shell:
git clone https://github.com/rpiraces-plain/security-development-muggles -
Get into the folder
./broken-access-controlfolder of this repository by executingcd security-development-muggles/broken-access-control. -
Open the main solution file
ProCodeGuide.Samples.BrokenAccessControl.slnin Visual Studio (Rider or your IDE of preference). -
Ensure that the
appsettings.jsoncontains the correct connection string to the SQL Server instance and the correct database name as well as theHashidssection for the 'Final' (the fixed one) project. -
Run the database migrations in both
ProCodeGuide.Samples.BrokenAccessControlprojects by executingdotnet ef database update(you may need to install thedotnet-eftool first) in the./broken-access-control/ProCodeGuide.Samples.BrokenAccessContrrol/Finaland./broken-access-control/ProCodeGuide.Samples.BrokenAccessContrrol/Initialfolder. -
Build the application in order to publish it as a package (you can use extensions to directly deploy to your created resources).
-
Wait until the deployment finishes.
-
You are done! You can access both vulnerable and "security hardened" versions of the web in different URLs and check for the main vulnerability to exploit.
Note: the deployed resources incur in charges, make sure to stop/delete the web apps and SQL server to reduce charges.
In the vulnerable version of the web, you can access any post by just changing the id in the URL (when you are logged in), for example: https://<your-web-app>.azurewebsites.net/Posts/Details/1 (where 1 is the id of the post). Then you can enumerate and see all the posts in the web (even if the administrators ones).
This is a A01 – Broken Access Control vulnerability. If you inspect the source code, we are only checking if the user is logged in, but not if the user is the owner of the post. This is a very common mistake, and it is very important to check the authorization of the user in the backend (in this case, in the controller).
We will fix this vulnerability in the "Final" version.
One of the best ways to avoid this is to ensure that we understand the actual logic of our app and make authorization tests that run in our CI pipeline. Using these approach we will be checking for all cases and ensuring the authorization is working as expected for all cases.
When developing our tests, we should realize they are failing, and we should fix them before deploying to production. We will use an authorization guard to check if the user is the owner of the post, and if not, we will return a "Not found" response.
Note: in order to avoid enumeration attacks and let bad actors know if an specific id exists as a post, we will be returning the same response when the post don't exist and when the user has no access. This difficults a lot an enumeration attack.
Another effort we can do to avoid enumeration attacks, is to map each incremental id of posts we have in the database to an specific id in the web. This can be done by using HashIds, which is a library that allows us to generate a unique id for each post, and then map it to the actual id in the database. This way, we can avoid enumeration attacks, and we can also avoid the use of incremental ids in the web, which is a bad practice.
Note: it's very important to ensure our "HashIds" salt (also alphabet and steps) is kept secret, otherwise bad actors can decode them as we do...
Checkout the "Final" version of the web to see how we fixed this vulnerability, compare with the "Initial" version to see the difference:
- HashIds to avoid incremental ids and enumeration attacks.
- Authorization guard to avoid unauthorized access to posts.
Another approach is to make an E2E test with Playwright, were we log-in as a user with no posts and try to navigate manually across several posts, and check that we are not able to access them. This is a very good approach to ensure that our authorization is working as expected.
Upstream repository (from OWASP Juice Shop, OWASP Juice Shop webpage): https://github.com/juice-shop/juice-shop
LICENSE: MIT
Main web: JuiceShop.
Video: Explotation demo.
**View more about this demo**
No infrastructure to deploy by now! 🎉 (nevertheless you can always deploy your own version, checkout the main repository).
Just access the JuiceShop web and start hacking! at JuiceShop.
As you could see in the OWASP Juice Shop documentation, there are lots of vulnerabilities to exploit. We will focus on the A01 – Broken Access Control vulnerability.
For this reason we will get started by logging in as a user (you can create a new user or use a Google Account).
Navigating through the web, it appears that several routes are available... let's check if we can enumerate all the paths available.
Let's start by checking the source code of the page and searching by a route word, for example contact. For this, we will use the browser developer tools (F12 in most browsers) and simply search for the word contact each of the JS files in the source code:

Success! If we filter by the whole word and avoid all strings we get to the definition of the routes in the main.js file.
If we analyze all the routes, there is one that is very interesting: administration:

Maybe this route is for admins only? Let's try to access it:

We cannot access the administration page administration we can see that there is a Gt function (it's because it has been minimized, can vary) that checks if the user canActivate that page:
Tc = [{
    path: "administration",
    component: pa,
    canActivate: [Gt]
}]
Ok, ok... making progress... let's check the Gt function, go search for Gt in the source code as we performed before with the contact word:

We can see that the Gt has a canActivate function that decodes a token, checks for the role and performs some validations to know if a user can access...
We will try for this function to return true and see if we can access the administration page. For this, we will use the browser developer tools and set a breakpoint the canActivate function to investigate it and override variables to see if we can bypass this validation:

We can see that the token variable is the one that contains the role of the user, and it's set to customer by default. Let's change it to admin and see if we can access the administration page:

Now that we have override the token data to match the requirements let's continue execution and see if we can access the administration page:

Success! We are now in the administration page! 🎉 And look! We can perform admin action too! Such as viewing users and deleting some reviews...
What failed here?
First of all, all client side code is subject to be modified by the user, so we cannot trust it. We should always validate the data in the server side.
This is very important... always validate both in frontend and backend, but never trust the frontend validations. We can obfuscate, minimize functions, and perform lots of tricks to make it harder to modify the code, but we cannot avoid it (the code is on client side and they can do whatever they want with it).
In this case, we should have validated the role in the backend, and not in the frontend. We should have checked the role of the user in the backend and return a 403 error if the user is not an admin. This way, we would have avoided the user to access the administration page.
We should have also validated the user role in the backend when performing admin actions, so that the user cannot perform admin actions if it's not an admin.
One way to test for this vulnerabilities and attempt not to reach production is to make test for authorization both in frontend and backend (for all protected endpoints). We should cover all the cases, and try to bypass the authorization in all of them.
Other approach could be to use BurpSuite or OWASP ZAP to intercept the requests and modify the data sent to the server. We could try to modify the role of the user and see if we can access the administration page.
Upstream repository (from Matt Frisbie, Matt Frisbie web): https://github.com/msfrisbie/spy-extension
LICENSE: MIT
Videos: Explotation demo.
This repository has been modified to upgrade dependencies.
**View more about this demo**
Video explanation: Youtube.
Related article: Substack.
Note: the extension is build and zipped ready to use by the action available in the repository at .github/workflows/build-spy-extension.yml. You can go to the related action and download the artifact from the last run.
Step by step:
-
Clone this repository in your shell:
git clone https://github.com/rpiraces-plain/security-development-muggles -
Get into the folder
./spy-extensionfolder of this repository by executingcd security-development-muggles/spy-extension. -
Install the dependencies by executing
yarn(ensure you have Yarn 1.x installed). -
Build the extension by executing
yarn build. -
You are done! You can load the extension unpacked (will be available at the path
./spy-extension/dist) in your browser and check for the main vulnerability to exploit.
Once you have the extension loaded in your browser, you can inspect it by going to the Extensions page:

Take a look at the details of the extension (you will notice the vast amount of permissions it requires, used to spy on the user):

Try now to navigate a little bit and open the extension popup (it looks pretty legit):

Now click on the extension logo and in the "The goods" button to see the data collected by the extension (it will be opened in a new tab):

It's pretty impressive all the data it has been collecting... You can click on the buttons to collect more data such as "Cookies", which will be used in the next step.
Since the extension is spying on the user, it is collecting all the cookies from all the websites the user visits. This means that if the user visits a website with a session cookie, the extension will be able to collect it and send it to the attacker.
We are going to simulate an account takeover at GitHub.com by using the extension to collect the session cookie of the user and then use it to login into the user account in another browser.
Step by step:
-
We will be using two browsers, one with the extension installed and another one without it. Open the browser without the extension and go to GitHub.com and log in to your account.
-
Open the browser with the extension and go to GitHub.com and click on the extension logo and in the "The goods" button to see the data collected by the extension (it will be opened in a new tab).
-
Click on the "Cookies" button and search for all cookies related with GitHub. Copy the values of the cookie in the format displayed in your clipboard.
-
Go to the second browser, install the Cookie-Editor extension (this is a legitimate extension that allows you to edit your cookies) and open it.
-
Go to Github.com, click on the "Cookie-Editor" button and then on the "Import" button. Paste the values of the cookie you copied in the previous step and click on the "Import" button (make sure to surround the copied values by brackets
[and]). -
Refresh the page and you will be logged in as the user you spied on! Success!
You have to be very cautious with these... Do not ever install an extension that you do not trust. If you are not sure about an extension, you can check the source code of the extension (if it is open source) or you can check the permissions it requires (if it requires a lot of permissions, it is kind of suspicious).
You can also check if this extension it's listed in the Chrome Web Store, or the store for your browser (it is not, so it is not a good sign).
There are also some AVs that can detect malicious extensions.
Video: explanation demo.
First, to have an initial idea of what a clickjacking is, check the following image:
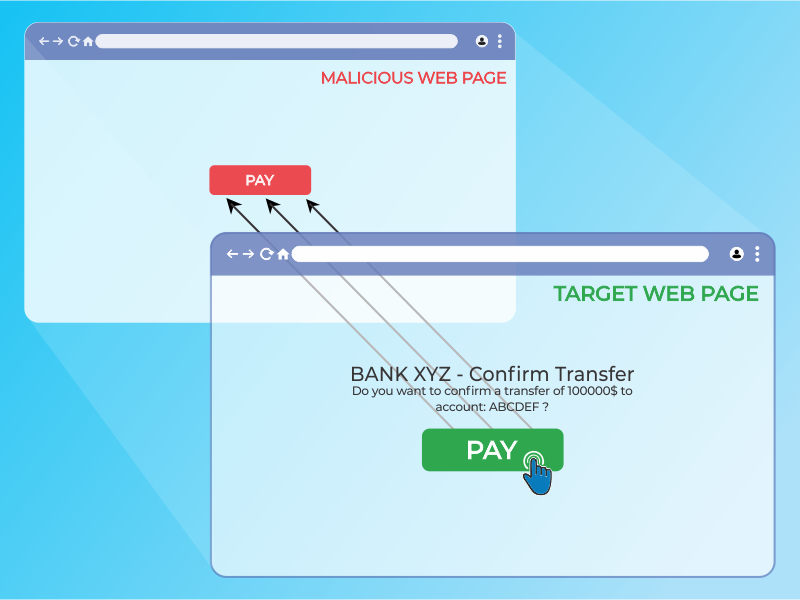
In short, the clickjacking attack is an UI trick where the attacker hides several layers that represent different domains, causing the user to click in a button or link, thinking that will cause an specific action in the top window, when it is really clicking somewhere else. This is a behavior usually seen in terms of aggressive advertisement in domains that inject you malware or any other unwanted application. "The attacker hijacks the user clicks."
The core idea of this demo is to understand the necessity of implementing the right headers in your backend. We will defend our web applications blocking any unwanted framing in any third party domain. To do so, the key lies in an HTTP header that can control in which domains you can load your webpage. In this demo, we will see two options to configure this security measure.
Finally, if wou want to fully understand and perform the attack, check the ./clickjacking folder, you will find the code and documentation.
Video: explanation demo.
We have been told that cookies are evil, and indeed they can be. However, as a standard mechanism to work with the user session of an application, there are security protections in place we can use in order to make them safe to go.
In this demo we will discuss the topics SameSite, HttpOnly and Secure. In short, what dangers we can face if we don't set the right flags for our cookies. For example, we could potentially modify information set beforehand in them.
If you want to dig deeper into cookies, have a look at the ./cookies folder. There you will find how to protect them and further documentation to help you out securing them.
Important Note: Keep in mind that browsers are becoming stricter with cookies every day. Check this chromium article if you are working with iframes, or cross-site domains as a regular basis for your business (among others).
Video: explanation demo.
As OWASP describes it, CSP is an extra layer to defend our applications mainly against Cross-Site Scripting (XSS) and injection attacks. With CSP you can control where are the sources of your scripts, fonts, images, audios, videos (and so on) coming from.
In other words, your browser will only accept resources coming from a whitelist of domains you provide. It even gives you the opportunity of providing different domains for several types of resources. With this approach, we mitigate the impact of potential XSS and injection attacks. The attacker has fewer options of injecting specific code to compromise the application.
If you want to check the demo, there is an initial broken scenario that you can try to fix. Jump right into it at the ./csp folder.
Video: explanation demo.
A CSRF is a type of attack where the user is authenticated in a given application, and the attacker takes advantage of that session sending an unwanted request that the server thinks its valid. This malicious request can be triggered, for example, from a link inside an email (phishing).
The key lies in the requests themselves, they are predictable. You just need to investigate any request in your browser opening the developer tools. You will realize that the endpoint and the payload can be guessed. If we add that to the fact that the user is authenticated in an application, we can forge an attack performing unwanted actions: changing the password, buying an item, deleting our account, etc.
Therefore, if we want to "randomize" those requests, so an attacker can not simply perform the attack, that is where the CSRF tokens come in handy.
Check the folder ./csrf to play around with the demo and discover how to implement these tokens.
Video: explanation demo.
Hashes, cryptography... they are usually misunderstood even though they represent the base of any secure communication. But what is a hash? We can say that it is a function that resolves an specific string for a given input. The magic comes with the algorithm that will resolve the same-size hashed_input no matter how large is your input.
//
function hash(input) {
    hashed_input = algorithm_hash(input);
    return hashed_input;
}
Moreover, hashes have the characteristic that always resolve the same hashed_input for the same input, no matter how many times you try, the MD5 hash of 1234Qwert is 4afb3b269893ba18266b68feb7e222e7. What it is even more interesting is that you should never find the same hashed_input for two different inputs.
However, why do we need hashes? We usually need hashes for the user passwords. We NEVER want to store them in plain text, right? Because if we end there, we take the risk of eventually compromising all passwords if our database is breached. But are we protected only by hashing our passwords?
No. To protect our passwords we must at least use salt, which adds a secret string to every input so the computed hashed_input is not easily guessed. If you want to test a simple example, have a look at the demo in the ./hashes folder.
Note: Do you know "Have I Been Pwned"? Either way, if you want to understand why you should select a good password, and a good password policy, check the demo folder as well.
All of this demos and its contents are vulnerable by default for educational and demo purposes only.
Do not install any demo on a production account.
This repository contains several bad practices and secrets (for educational purposes only), but not used in production environments.
We do not take responsibility for the way in which any one uses these applications. We have made the purposes of the application clear and it should not be used maliciously. We have given warnings and taken measures to prevent users from installing the repository demos on to production accounts.