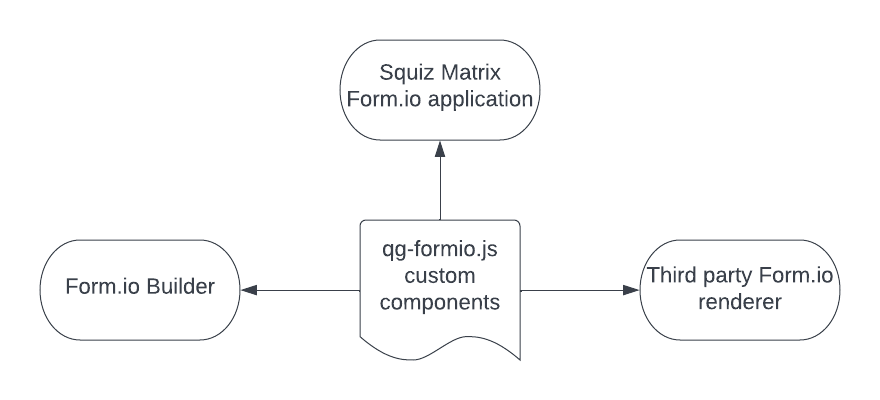
This repository provides a bundled JS custom component library to form.io builder / form.io renderer / Squiz Matrix form application.
Storybook of this project: https://qld-gov-au.github.io/formio/?path=/docs/welcome--page
Following are the goals of this repository.
| Goal | Description | Solution |
|---|---|---|
| JS Bundling | Bundles a single JS file used in Form.io builder project settings, which also can be attached by any renderer applications | Webpack + Babel |
| Support IE11 | es5+ JS will be used in dev environment, but needs to be compiled in the bundled file | Babel polyfill |
| CI/CD | Needs a automatic pipeline for doc and CDN deployment | Github Actions |
| CDN deployment | Bundled JS file needs to be delivered by CDN | Separate Bitbucket repository + Bamboo |
| Goal | Description | Solution |
|---|---|---|
| Development environment | for local development | Storybook |
| Documentation deployment | for hosting the doc generated by Storybook | Github Page |
| Testable | provides testing infrastructure for local testing and CI/CD | Jest + Testing Library |
| Code quality | for development consistency and reducing merge conflicts due to code format | esLint + Prettier |
| Goal | Description | Solution |
|---|---|---|
| Visual testing | Optional because this project focus more on functionality and doesn't involve style modification | Chromatic |
| Typescript | improve code quality but require more development resources and developer skill | Typescript |
Storybook is the main development environment in this repository.
- Create a feature branch from
main. - Before installing, make sure you are linking to nexus registry in your ~/.npmrc, ie. have these 2 lines in the file, please consult qol.development@smartservice.qld.gov.au for the auth code.
registry=https://nexus.tools.services.qld.gov.au/nexus/repository/npm_all/
_auth="xxxxxx"
- Install packages with
npm install. - Start development environment with
npm run storybook. - Create / Modify components in
src/components. - Update
src/components/index.jsfor new component. - Lint and test with
npm run validate. - Push your branch and create pull request to merge to
mainbranch.
There are 2 approaches to debug your feature branch in Squiz Matrix.
- Validate your feature branch with
npm run validate. - Review the latest tag number by
git tag -l, and decide a new version number. - Create a tag in https://github.com/qld-gov-au/formio, by running
git tag -a vx.x.x-beta00x -m "your message"(eg. v1.0.4-beta001), with the new version number you just updated. - Push the tag to remote by
git push origin vx.x.x-beta00x, with the new version number you just updated. - If your branch is valid and Github actions is executed, your branch will be deployed to CDN DEV environment after few minutes. You can check the status of deployment in https://servicesmadesimpler.govnet.qld.gov.au/bamboo/browse/QSA-FOR/deployments.
- In the Squiz Matrix Formio template, you could test your change by select
devinScript environment, and leaveScript versionto default or enter the version you just created, eg.v1/v1.0.4-beta001. Please refer to https://www.qld.gov.au/_resources/matrix-documentation/components/form.io-forms-v2 for instruction of using the Formio template in Squiz Matrix. - If you've updated your feature branch and want to deploy to CDN and test again, you could remove the existing tag with
git tag -d vx.x.x-beta00x(to remove the local tag) andgit push --delete origin vx.x.x-beta00x(to remove the remote tag), and re-create the tag again. You may run into building error in Github action, you just need to re-run the failed task in this case.
- Validate your feature branch with
npm run validate. - Push your branch
- A new brach will be automatically created in https://github.com/qld-gov-au/formio-qld through Github action.
- In Squiz Matrix, we have a gitBridge in asset
formio-cdn #248740 - Sync the gitBridge with the branch you just created in https://github.com/qld-gov-au/formio-qld.
- In the Squiz Matrix Formio template, you could test your change by select
gitbridgeinScript environment, and leaveScript versionto default. Please refer to https://www.qld.gov.au/_resources/matrix-documentation/components/form.io-forms-v2 for instruction of using the Formio template in Squiz Matrix. - If you've updated your feature branch and want to test again, you'll have to repeat the process of pushing and re-sync the gitbridge.
Deploy to https://github.com/qld-gov-au/formio-qld
Push any branches in https://github.com/qld-gov-au/formio will create a co-responding branch in https://github.com/qld-gov-au/formio-qld. Then you can use gitBridge to test the modules in Squiz Matrix.
- Update the version number in
package.json, you can review the latest tag number bygit tag -l. - Create a tag in https://github.com/qld-gov-au/formio, by running
git tag -a vx.x.x -m "your message"(eg. v1.0.4), with the new version number you just updated. - Push the tag to remote by
git push origin vx.x.x, with the new version number you just updated. - Create a PR on this commit/branch, then this will trigger the github action.
- https://github.com/qld-gov-au/formio-qld-cdn
releasebranch will automatically generated a folder for the new version. - The new folder in the above branch will automatically deploy to bamboo https://servicesmadesimpler.govnet.qld.gov.au/bamboo/browse/QSA-FOR/deployments DEV environment
- To deploy to TEST/BETA/PROD, simply manually deploy the release in https://servicesmadesimpler.govnet.qld.gov.au/bamboo/browse/QSA-FOR/deployments
You can consume this library either in Form.io Builder or Form.io Renderer.
To use custom components in the Form.io platform builder, please go to the Project stage settings and update the Custom javascript URL with the CDN URL of this library:
https://static.qgov.net.au/formio-qld/v2/v2.x.x-latest/formio-qld.min.js
and update the Custom CSS property with
https://static.qgov.net.au/formio-qld/v2/v2.x.x-latest/formio-qld.min.css

To use custom components in the Form.io JS renderer, please include the script AFTER the formio script. Pleaser refer to Form.io doc for how to initiate your form application in a HTML page.
<script src="https://static.qgov.net.au/formio-qld/v2/v2.x.x-latest/formio.full.min.js"></script>
...
<script src="https://static.qgov.net.au/formio-qld/v2/v2.x.x-latest/formio-qld.min.js"></script>
<link
  rel="stylesheet"
  href="https://static.qgov.net.au/formio-qld/v2/v2.x.x-latest/formio-qld.min.css"
/>To use this custom component library in QG Squiz Matrix, please refer to the following guides:
- https://www.qld.gov.au/_resources/matrix-documentation/components/form.io-plsplusaddress-component
- https://www.qld.gov.au/_resources/matrix-documentation/components/form.io-forms-v2
The scripts files in the lib folder will be copied and hosted in the CDN, which are coming from these libraries:
- https://github.com/formio/formio.js
- @formio/premium (private repo)
We will need to sync the version of these files with the version of the QG form.io platform https://api.forms.platforms.qld.gov.au/#/.
At the bottom of the page in https://api.forms.platforms.qld.gov.au/#/, you can get the server version, eg. Application: 7.3.0, Renderer: 4.14.0
Based on the server version 7.3.0, you could find the required version of all the dependency libraries in https://github.com/formio/enterprise-release/blob/master/API-Server-Change-Log.md#api-server-version-730.
eg. formiojs@4.14.0 premium@1.17.1
Then you could copy the corresponding script files to the lib folder.
Another way to copy the correct version script is:
- create a new feature branch from
main. - update the
formiojsand@formio/premiumversion number in package.json. - run
npm i - in
node_modules/@formio/premium/distcopy and replace the files that already inlibfolder. - in
node_modules/formiojs/distcopy and replace the files that already inlibfolder. - commit and push and follow the steps to create a release.
Nicer way
- update .github/workspace/formiojs and .github/workspace/prem package.json with correct locked version
- run mvn clean install (or npm install && npm run copy-all )
- commit and push and follow the steps to create a release.
Github actions has been setup for this repo to fetch the latest versions of scripts from formiojs and premium, automatic creates PR to merge the latest script to the main branch.
At the mean time we need to sync the version with QG form.io platform, we could merge these PRs if the version is the same as the form.io server otherwise we'll have to ignore them.
Although we don't need to support multiple themes at the moment for formio, the multi-theme architecture has been setup in this repository.
Currently there are 2 themes in this repository:
- SWE: default theme, will be bundled into
dist/formio-qld.min.cssanddist/formio-qld-swe.min.css(they are identical). - Design System: experimental theme, will be bundled into
dist/formio-qld-ds.min.css.
You could preview each of the theme in storybook with the theming button in storybook toolbar.
To modify a theme for a formio component, simply create a scss file with theme id in the file extension in the component folder. ie. src/components/Radio/sass/radio.swe.scss.
Then import the file in src/sass/formio.form.swe.scss.
Please refer to src/components/Radio/sass for how to customise theming for any formio components.
- Duplicate
src/sass/formio.form.swe.scsswith a new theme id. - Modify
src/sass/formio.form.stories.scssadd the new theme id, for adding the theme in storybook environment. - Modify
.storybook/preview.jsadd the new theme inparameters, for adding the theme in storybook environment. - Modify
webpack.config.jsadd a new entry point that points to the new theme file, for adding the theme to the build.
Modify ./webpack.config.js, change the formio-qld entry point to point to the theme you like.
- Move formio component style from SWE library to this repository.
- Add Visual testing (eg. Chromatic) to CI/CD pipeline.
Custom Formio components. Please refer to src/components/BoilerplateButton if you need a boilerplate for developing custom component.
Helper modules for integrate Formio into Squiz Matrix/consumer application.
Sample usage of Formio implementation in any applications.
Entry points of css theme
Third party library files that going to be served by the CDN.
Backup/archived code snippet to be used in Formio platform.
To not require install npm/node on your system, you can use the maven bootstrap method.
Install Java8+, Install Maven.
To run lint, tests, compile and build dist folder.
mvn clean installto run storybook dev mode
mvn com.github.eirslett:frontend-maven-plugin:npm@storybookThe custom component library under src/components is using OOP (Object Oriented Programming) pattern. As we are extending formio.js components which are already written with this pattern.
Other part of the project is using FP (Functional programming) pattern instead of OOP (Object Oriented Programming) pattern.
https://tsh.io/blog/7-reasons-to-use-functional-programming-on-frontend-1-2/ https://medium.com/@bananicabananica/functional-programming-on-frontend-86d5b5fcf5a8 https://medium.com/@shaistha24/functional-programming-vs-object-oriented-programming-oop-which-is-better-82172e53a526
Vscode is recommended for this project, with the following extensions:
- dbaeumer.vscode-eslint
- esbenp.prettier-vscode
- silvenon.mdx
With the default Vscode settings in the repo, you'll be able to:
- Auto lint on save
- Real time linting feedback
- Hint and quick fix for lint error