OneinStack Guide
By default, network access is turned off to a ECS instance. You can specify rules in a security group that allows access from an IP address range, port, or ECS security group.
You must specify port numbers (for TCP):
- 22 (ssh)
- 80 (http)
- 443 (https)
- 21, 20000~30000 (ftp)
- Nginx
- PHP7.4~5.3
- Tomcat
- JDK
- MySQL or MariaDB
- Redis
- Memcached
- Jemalloc
- Pure-FTPd
- phpMyAdmin
- Source compiler installation, download the latest and most stable version from the official, security optimization
- Providing multiple PHP versions (PHP-7.1,PHP-7.0, PHP-5.6, PHP-5.5, PHP-5.4, PHP-5.3)
- Providing multiple JDK versions (JDK-11.0,JDK-1.8,JDK-1.7)
- Jemalloc optimize Nginx, MySQL/MariaDB
- Providing add a virtual host script, include Let's Encrypt SSL certificate
- Add ftp acount to apache via the shell script menu
- Provide Nginx, MySQL/MariaDB, PHP, Redis, Memcached, phpMyAdmin upgrade script
- Provide local backup and remote backup (rsync between servers),Alibaba cloud OSS backup(Intranet) script
- Nginx install directory:
/usr/local/nginx - Tomcat install directory:
/usr/local/tomcat - JDK install directory:
/usr/java/jdk-$jdk_version - Database install directory:
/usr/local/mysqlor/usr/local/mariadb - Database data directory:
/data/mysqlor/data/mariadb - Database Configuration File:
/etc/my.cnf - PHP install directory:
/usr/local/php - PHP Configuration Path:
/usr/local/php/etc - PHP Configuration File:
/usr/local/php/etc/php.ini - PHP Additional .ini File:
/usr/local/php/etc/php.d/ - Memcached install directory:
/usr/local/memcached - Memcached Configuration File:
/etc/init.d/memcached - Redis install directory:
/usr/local/redis - Redis Configuration File:
/usr/local/redis/etc/redis.conf - Web Context document root:
/data/wwwroot/default - phpMyAdmin install directory:
/data/wwwroot/default/phpMyAdmin - Web logs directory:
/data/wwwlogs - Index demo url:
http://<Public net IP> - Opcache Control Panel url:
http://<Global IP Address>/ocp.php - phpmyadmin url:
http://<Public net IP>/phpMyAdmin#Pay attention to upper and lower case, rename or delete for security advice - PHP Proberv url:
http://<Public net IP>/proberv.php
The default ip direct access to the contents of the corresponding root directory:/data/wwwroot/default, This directory contains the home pagedemo, Opcache Control Panel, phpinfo, phpMyAdmin, Probes and other documents,Directory inside the file can be deleted, the directory can not be deleted.
NOTE:
Use following URL to open phpMyAdmin page:
http://<Public net IP>/phpMyAdmin
phpMyAdmin is an application for MySQL databases management. With it you can create, alter, drop, delete, import and export MySQL database tables. You can also run MySQL queries, optimize, repair and check tables, change collation.
cd /root/oneinstack #Must enter the directory execution under oneinstack
grep dbrootpwd options.conf #Display MySQL root password
As shown below:

cd /root/oneinstack  # Must enter the directory execution under oneinstack
./reset_db_root_password.sh
As shown below:
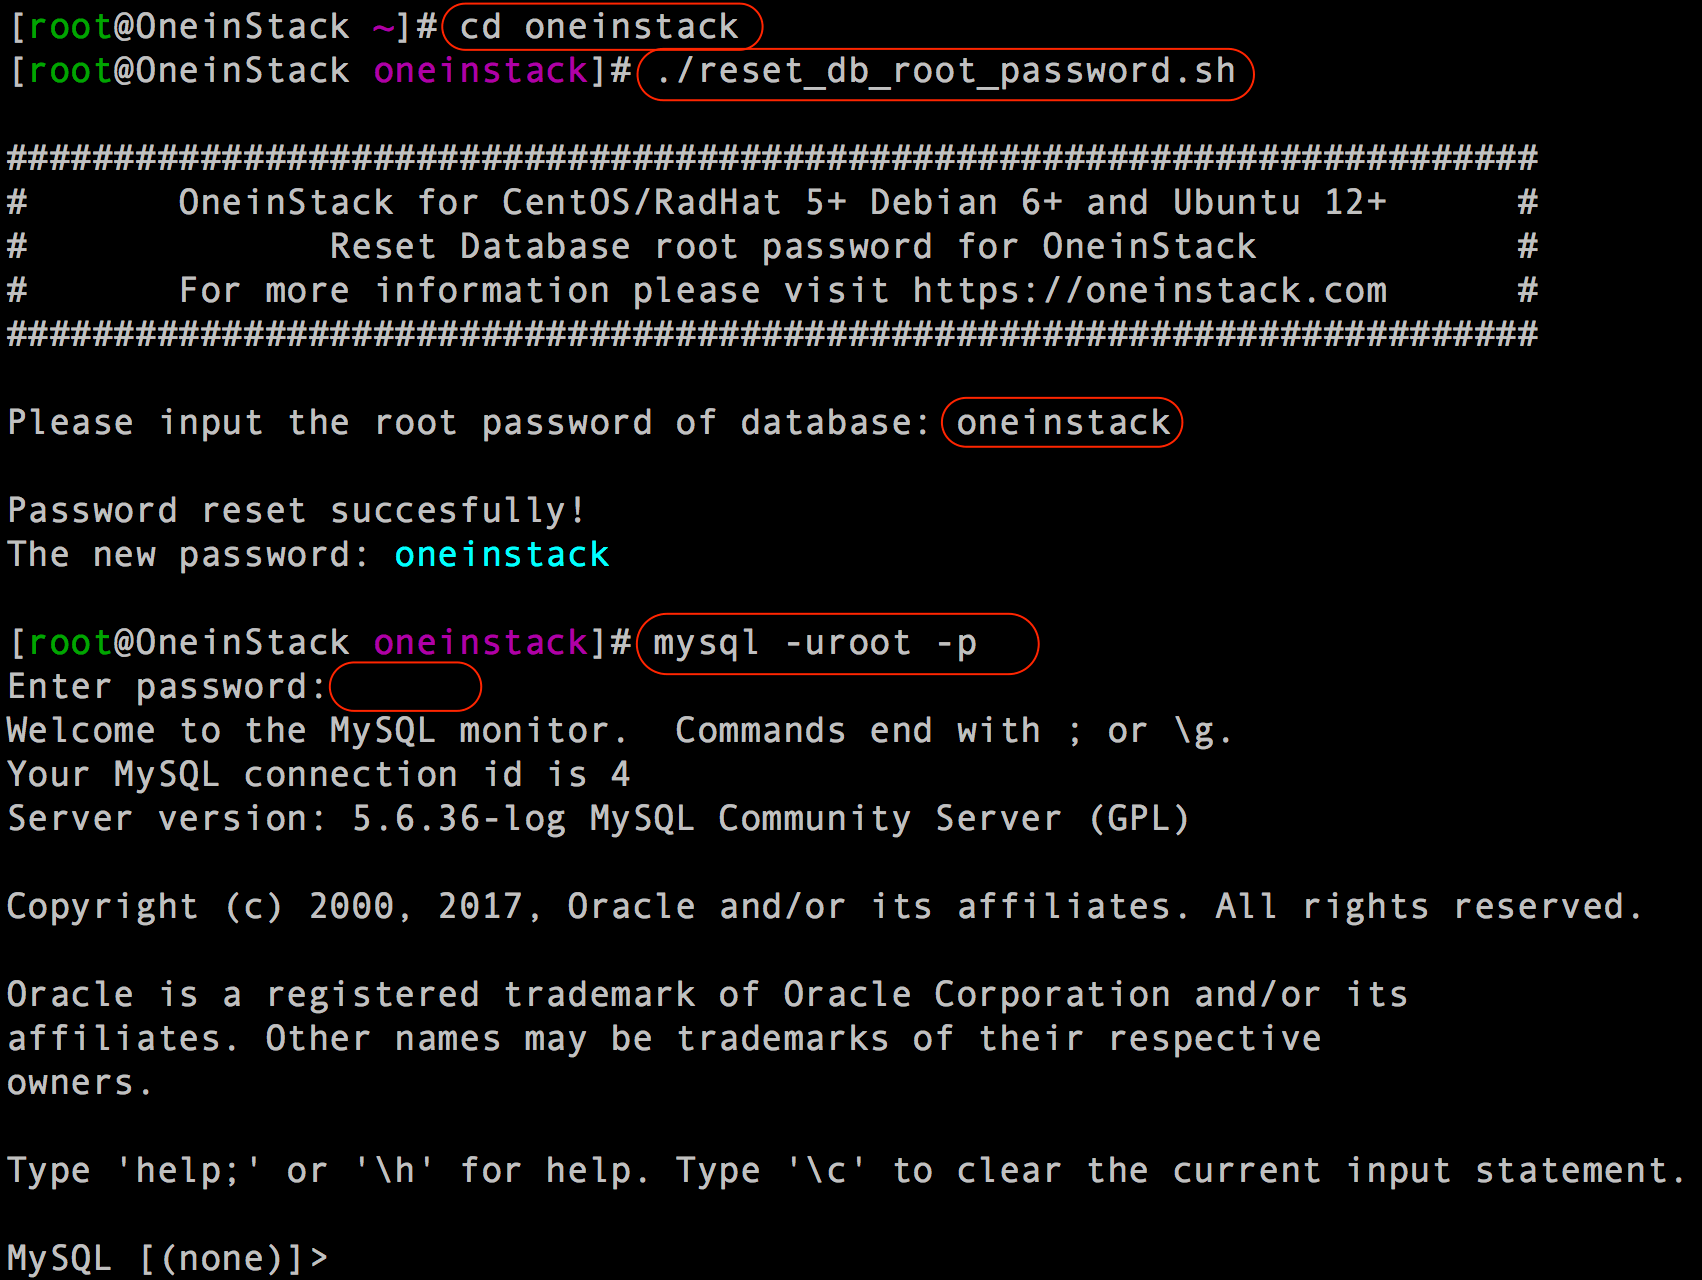
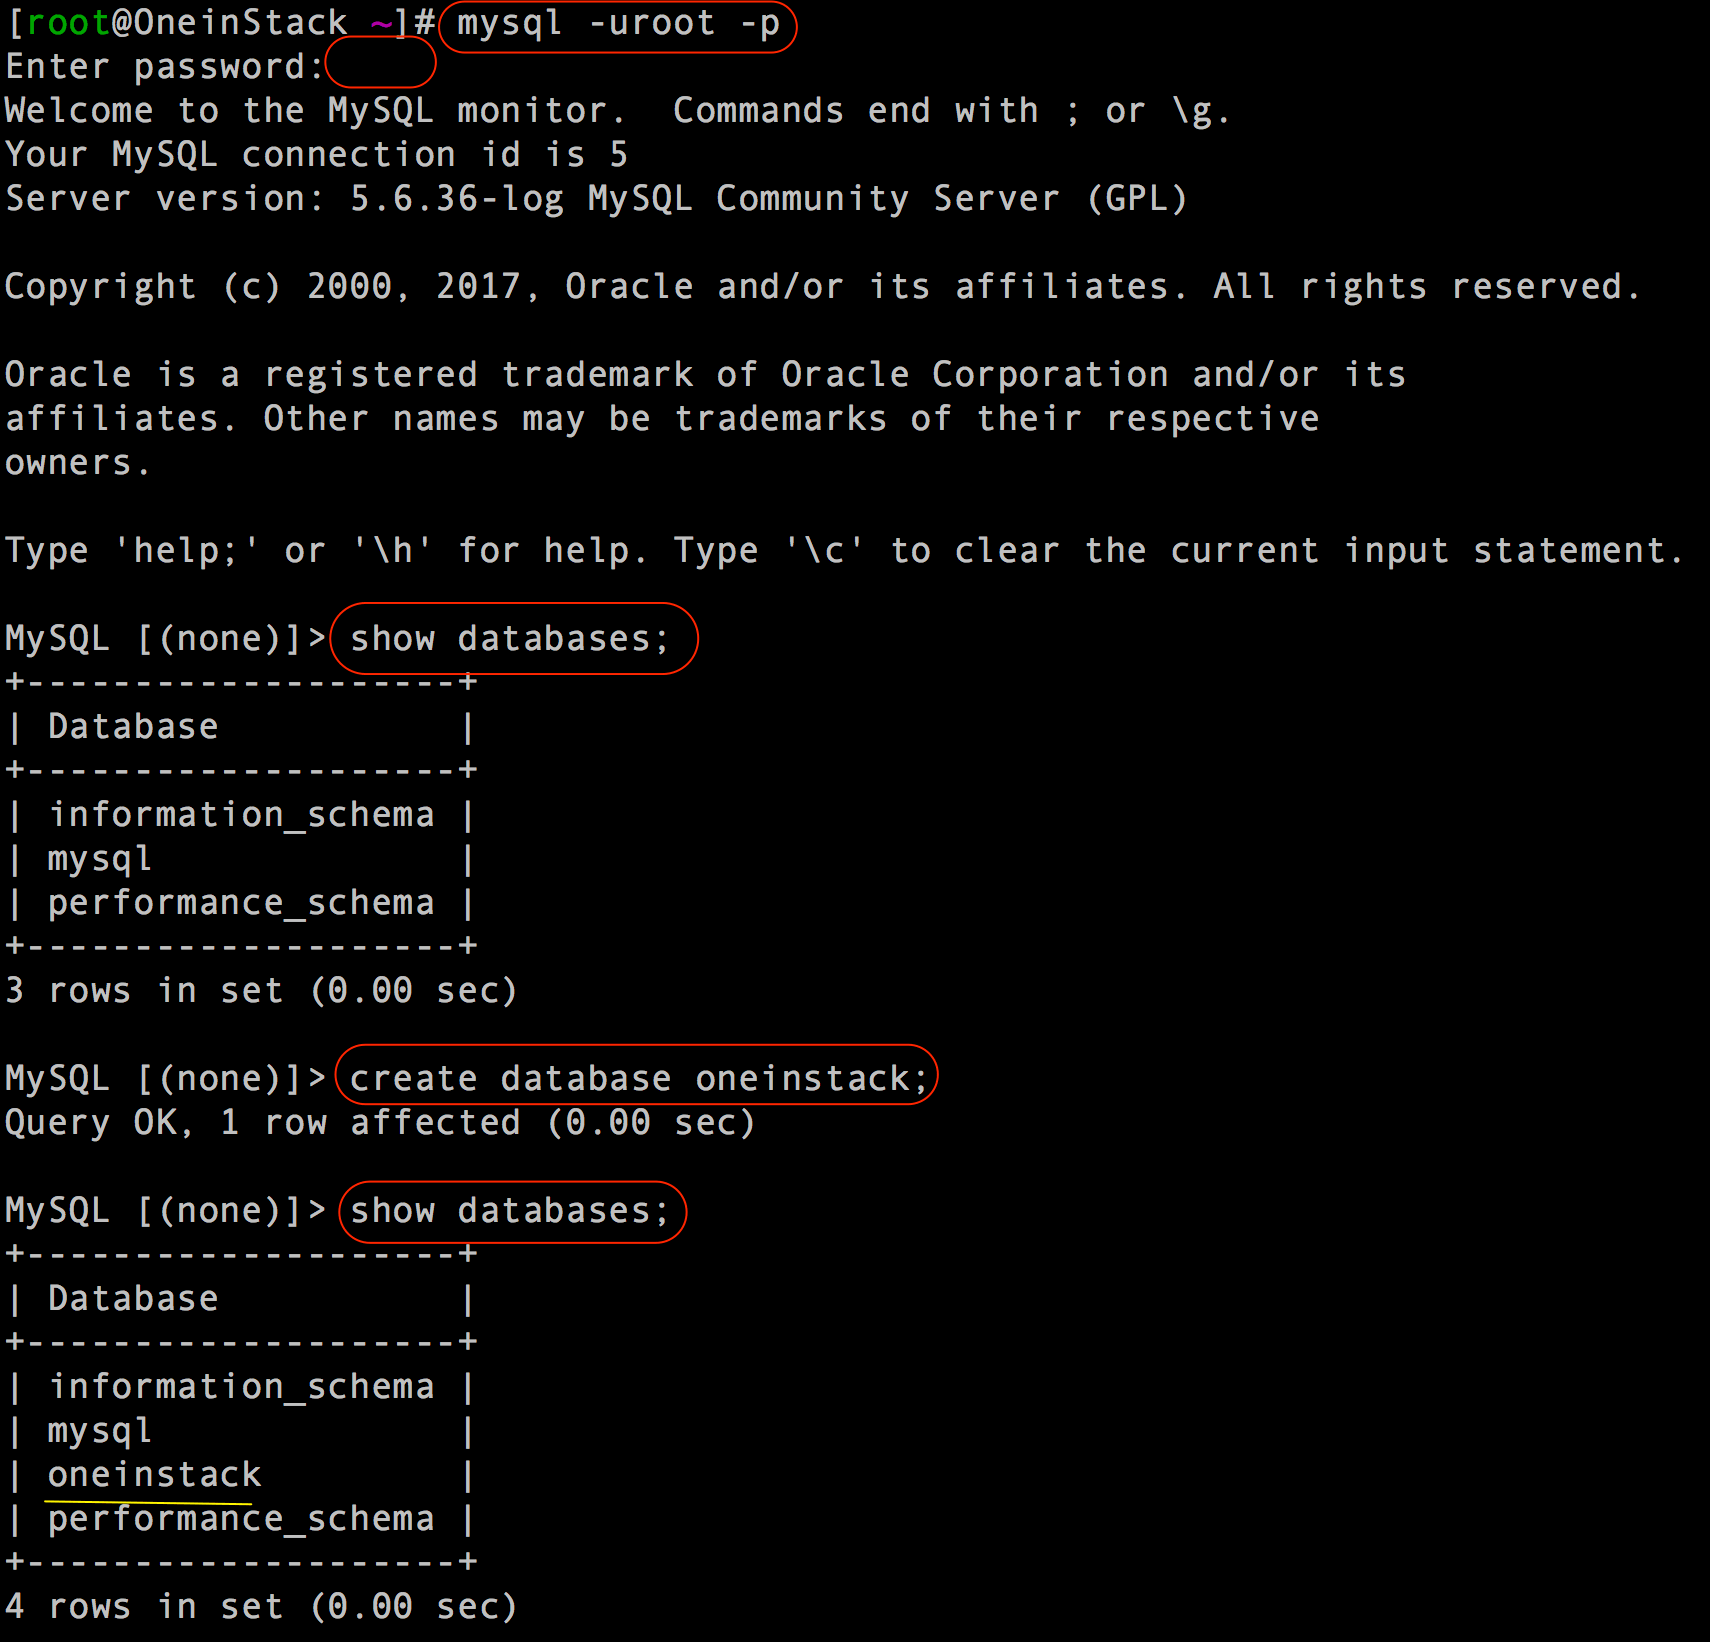
For example: create a database named 'oneinstack'
# mysql -uroot –p   # enter mysql console
Enter password:    # Enter mysql root password
MySQL [(none)]> create database oneinstack;   # Notice the semicolon at the end
MySQL [(none)]> show databases;
MySQL [(none)]> exit;    # quit mysql console,Notice the semicolon at the end
As shown below:
Use following URL to open phpMyAdmin page:
http://<Public net IP>/phpMyAdmin
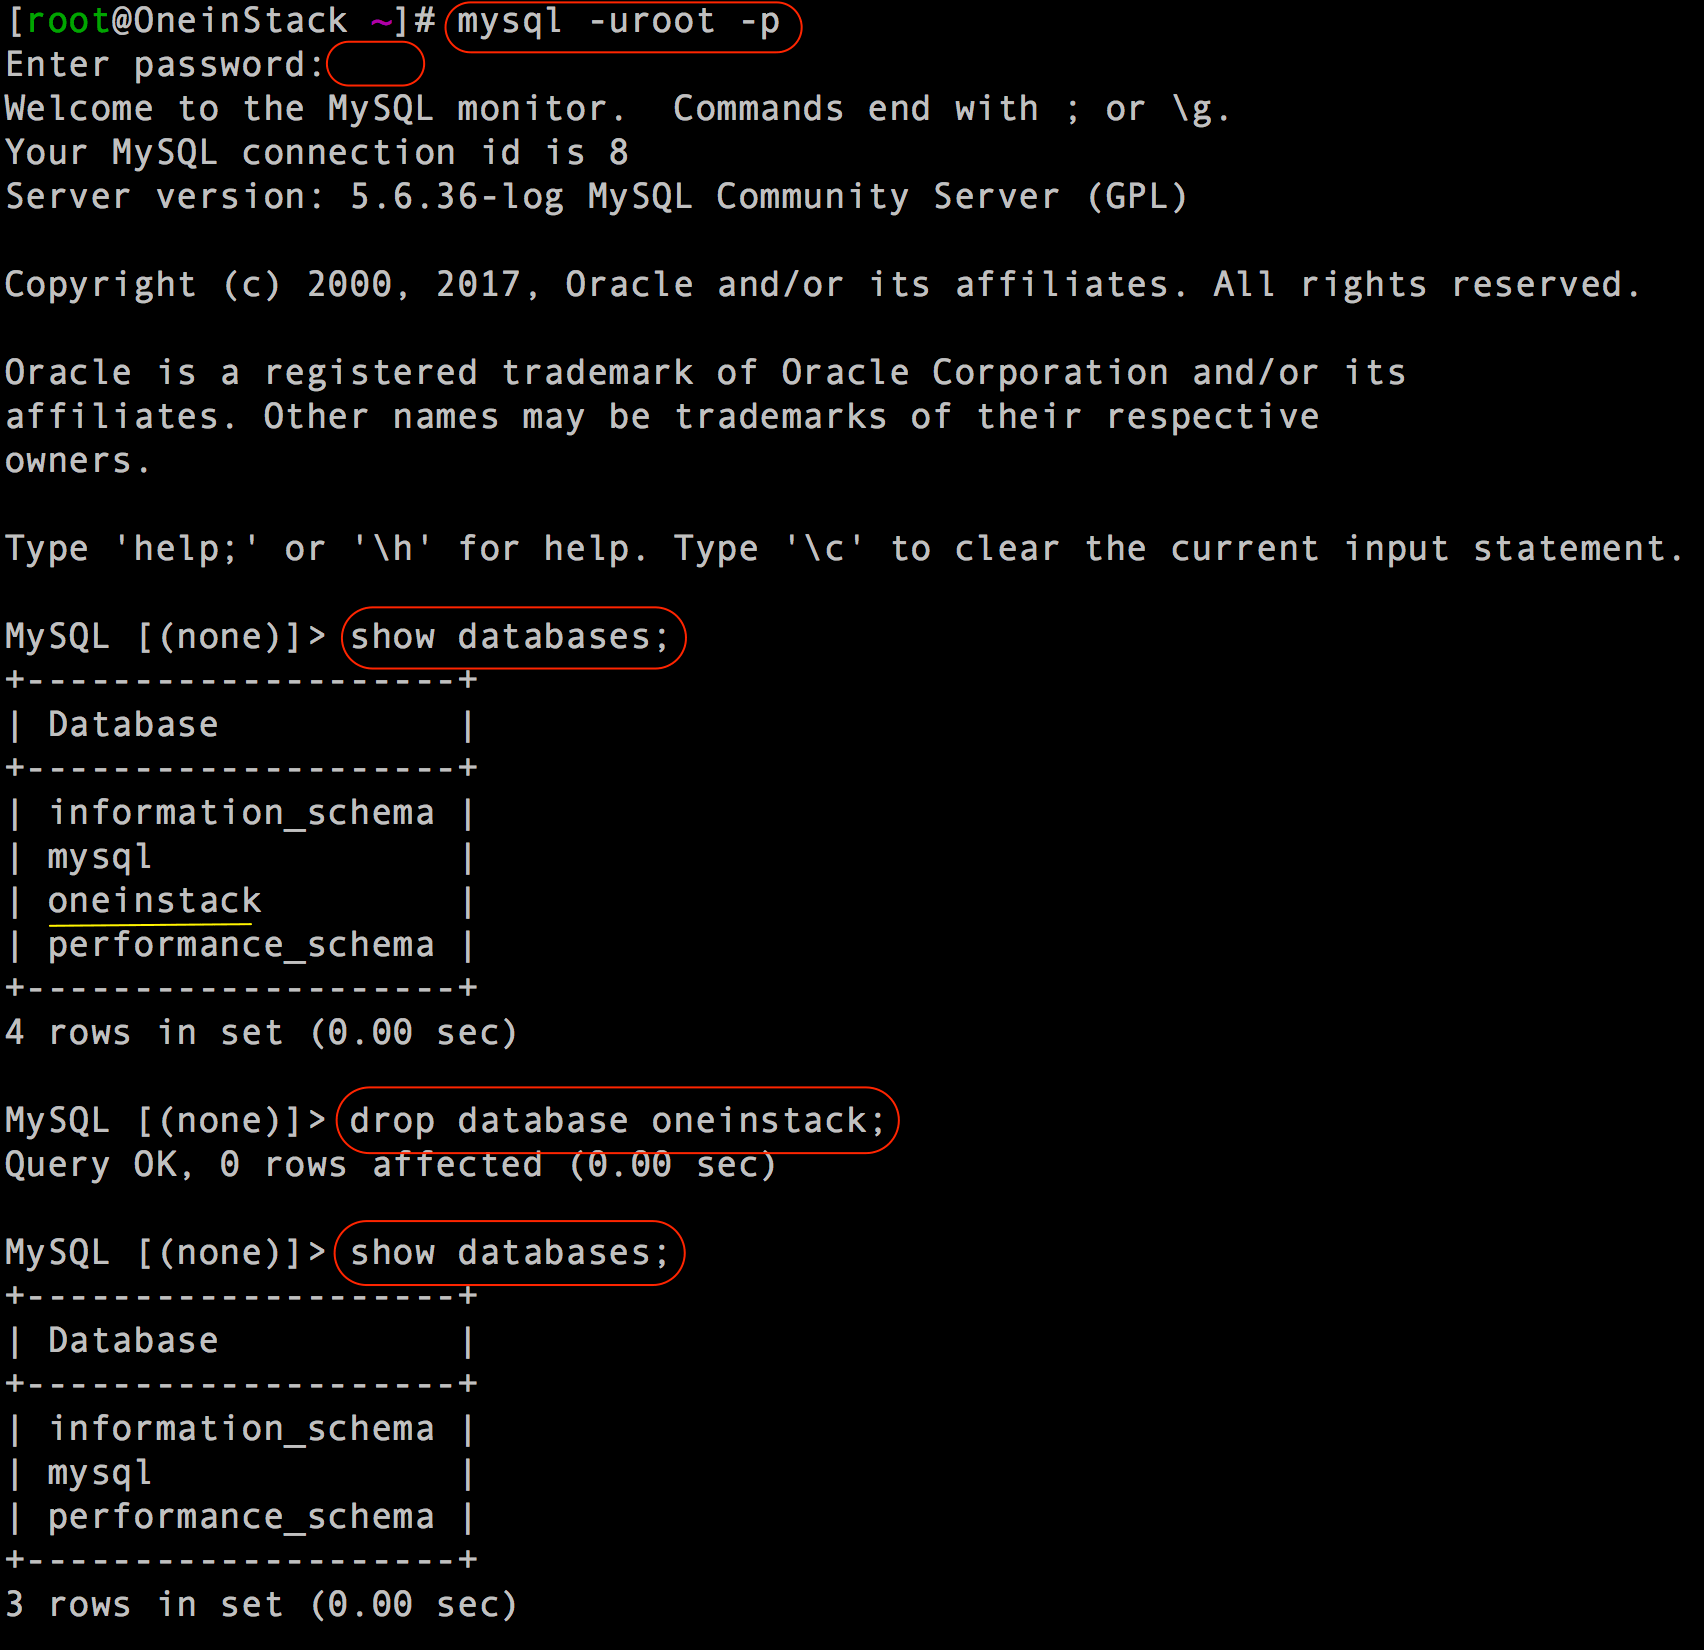
MySQL [(none)]> drop database oneinstack;  #delete oneinstack database
MySQL [(none)]> exit;    # quit mysql console,Notice the semicolon at the end
As shown below:
Use following URL to open phpMyAdmin page:
http://<Public net IP>/phpMyAdmin
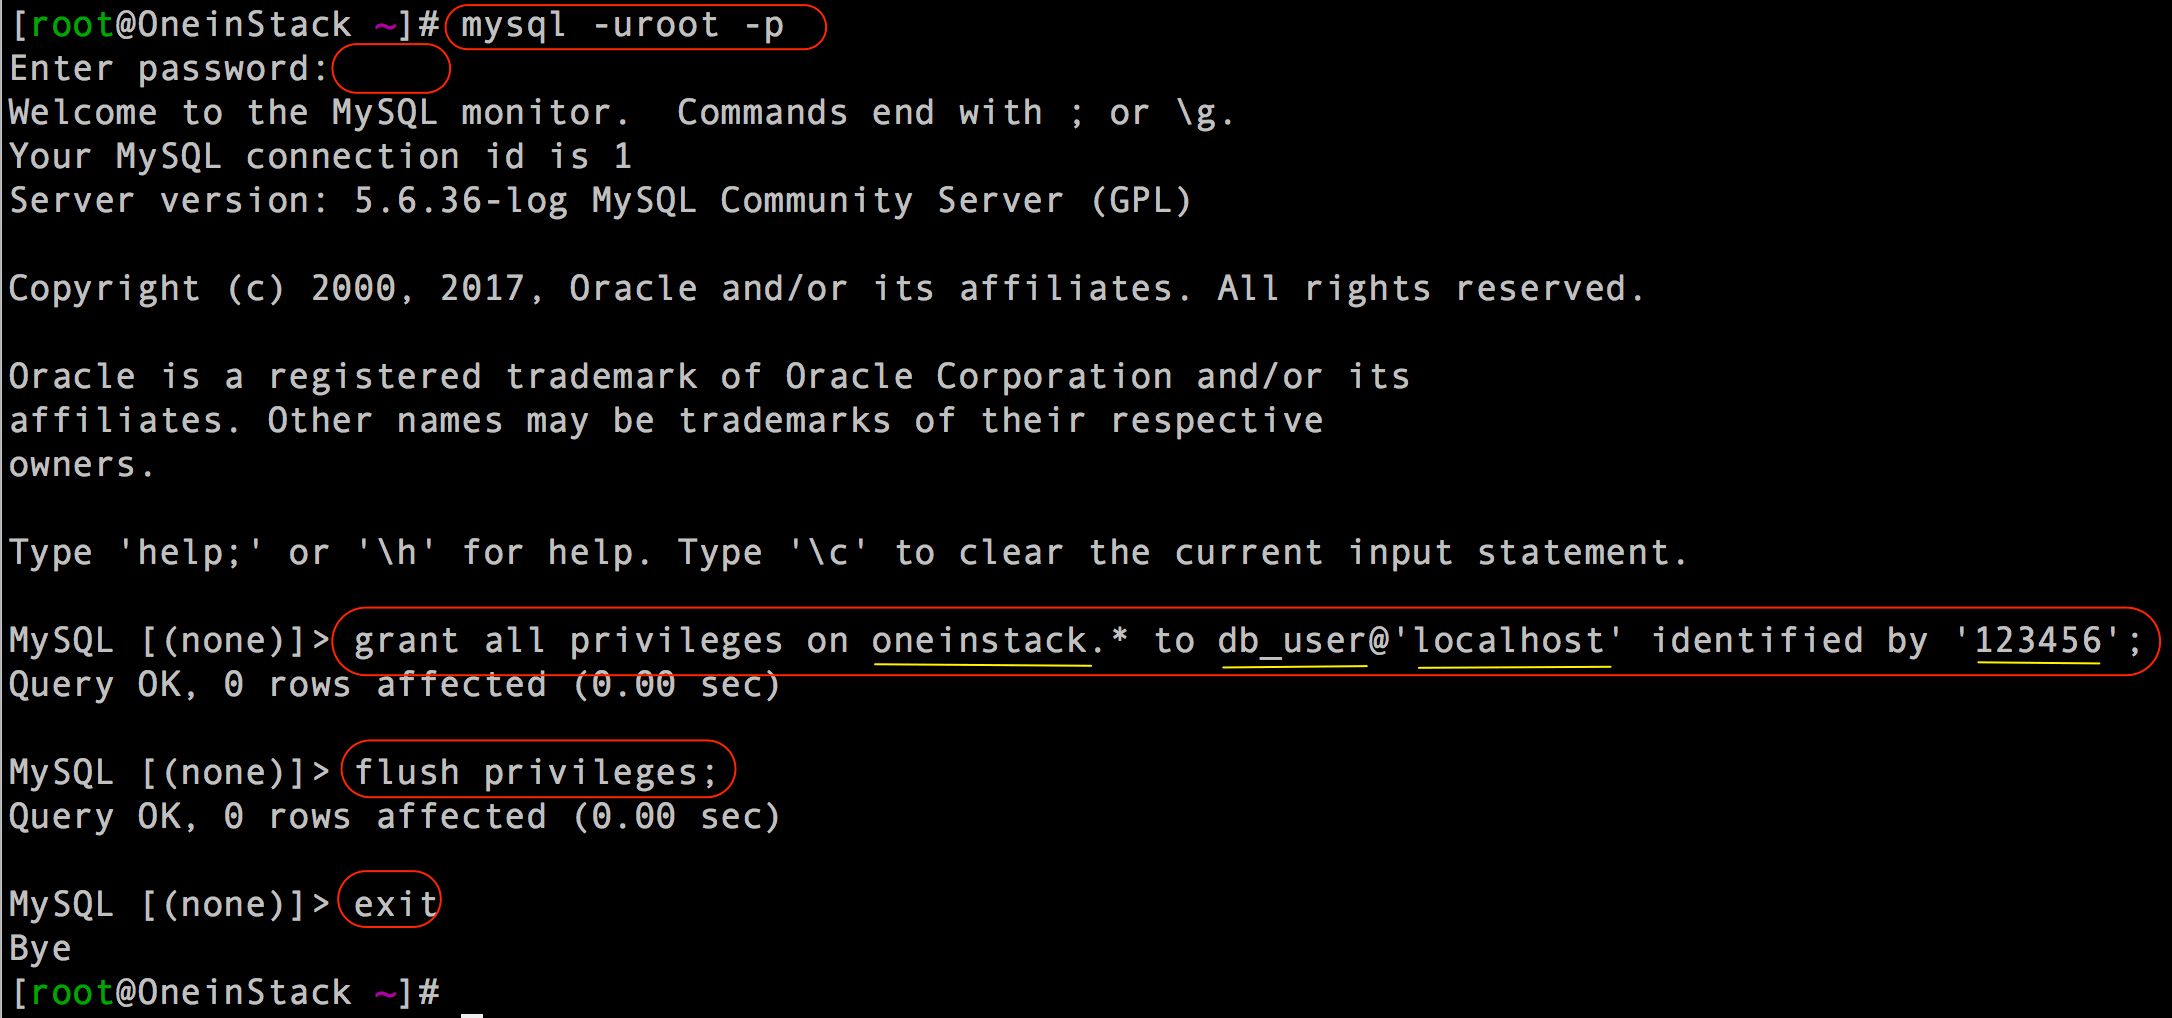
For security purposes, we usually create a unique database connection account for each web application(Account name can not be root). E.g:add a user named: db_user,password:123456, Authorization for the localhost to the oneinstack database all permissions,the commands are as follows:
# mysql -uroot -p
MySQL [(none)]> grant all privileges on oneinstack.* to db_user@'localhost'  identified by '123456';   # Notice the semicolon at the end
MySQL [(none)]> flush privileges;
MySQL [(none)]> exit;  # quit mysql console,Notice the semicolon at the end
As shown below:
For security reasons, OneinStack only allows the cloud host localhost to connect to the database,if you need a remote connection to the database,the following operations are required:
-
You must open port 3306 for Security groups
-
Database authorization
Remote Connection Create a new account(Account name can not be root)
E.g:add a user named db_user, password db_pass,Authorized as % (% Represents all ip can connect, you can set the designated ip)db_name database all authority, the commands are as follows
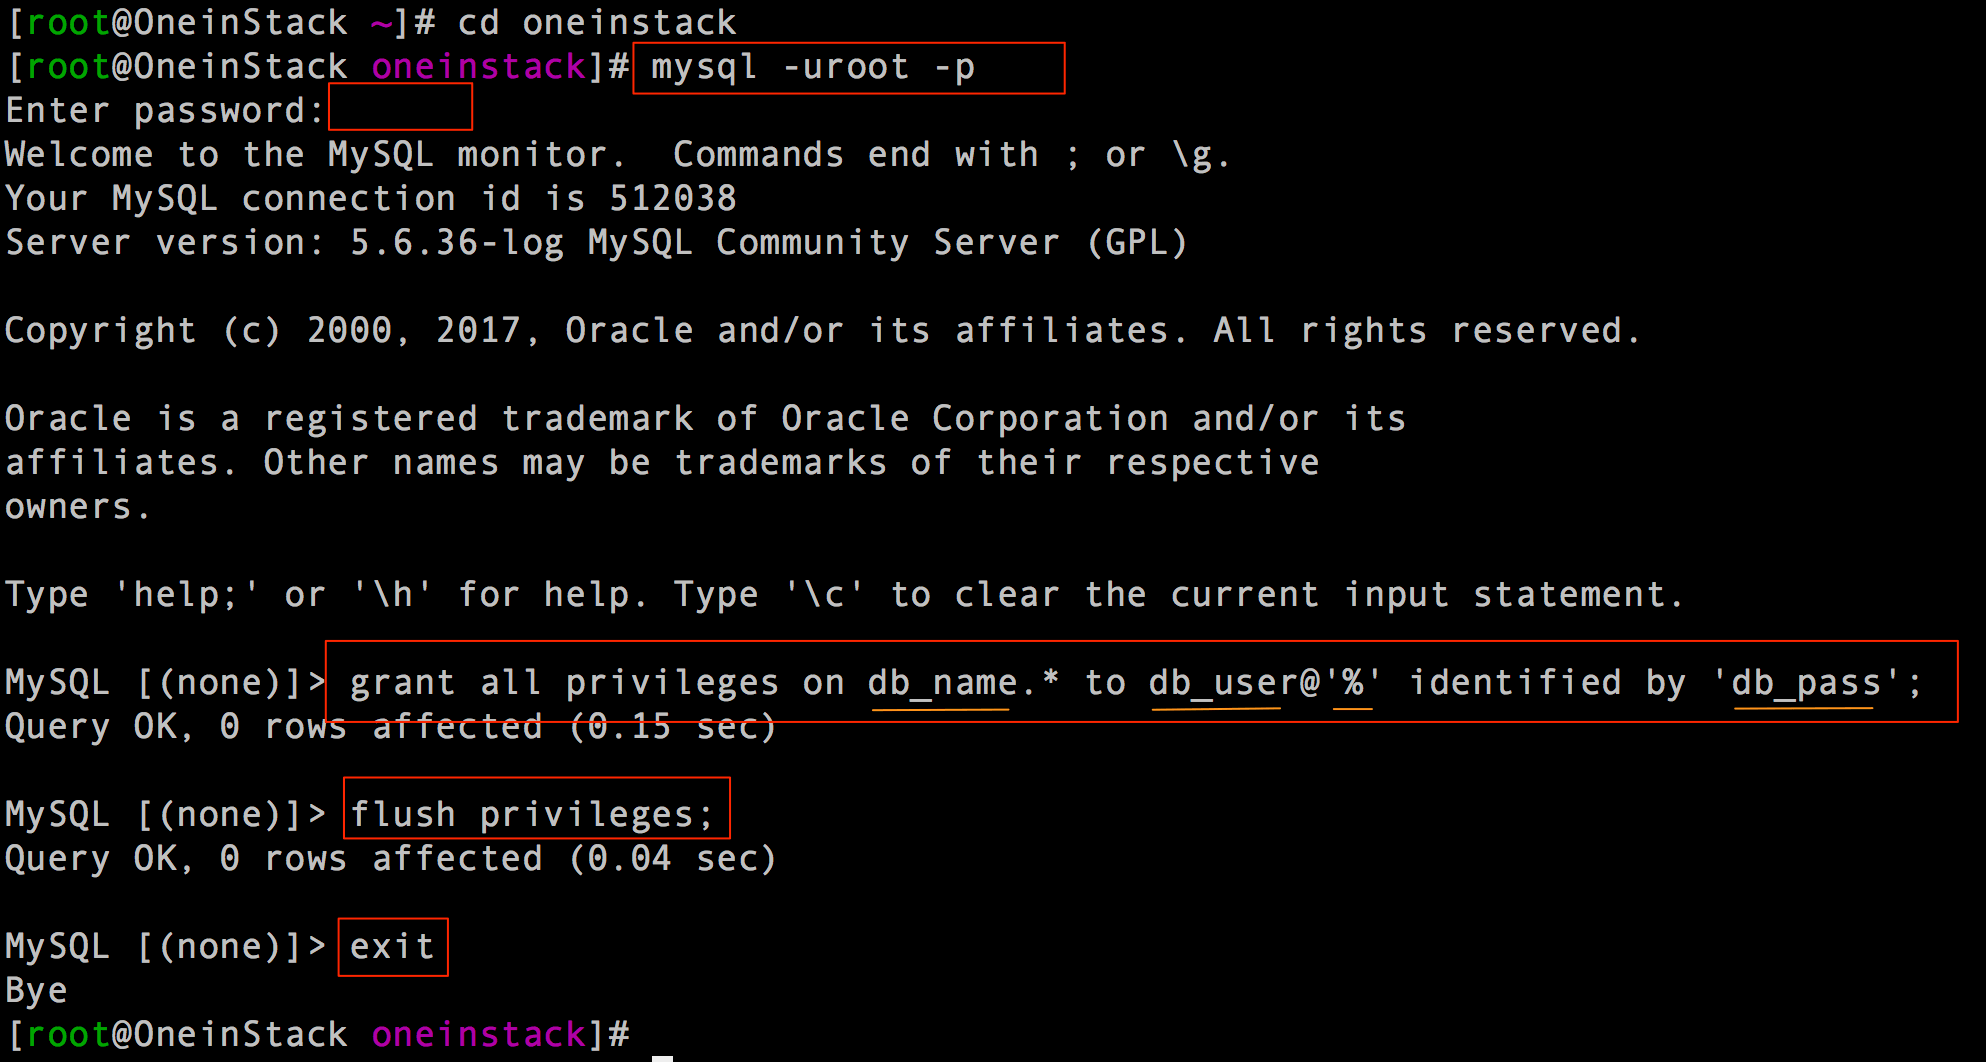
# mysql  -uroot  -p
MySQL [(none)]> grant all privileges on db_name.* to db_user@'%' identified by 'db_pass';  # Authorization statement,Special attention to the semicolon
MySQL [(none)]> flush privileges;
MySQL [(none)]> exit;  # Quit the database console, Special attention to the semicolon
As shown below:
cd /root/oneinstack  # Must enter the directory execution under oneinstack
./vhost.sh  #NOTE: If no SSL certificate is purchased,SSL under Apache please enter n
Create PHP vhost
As shown below:
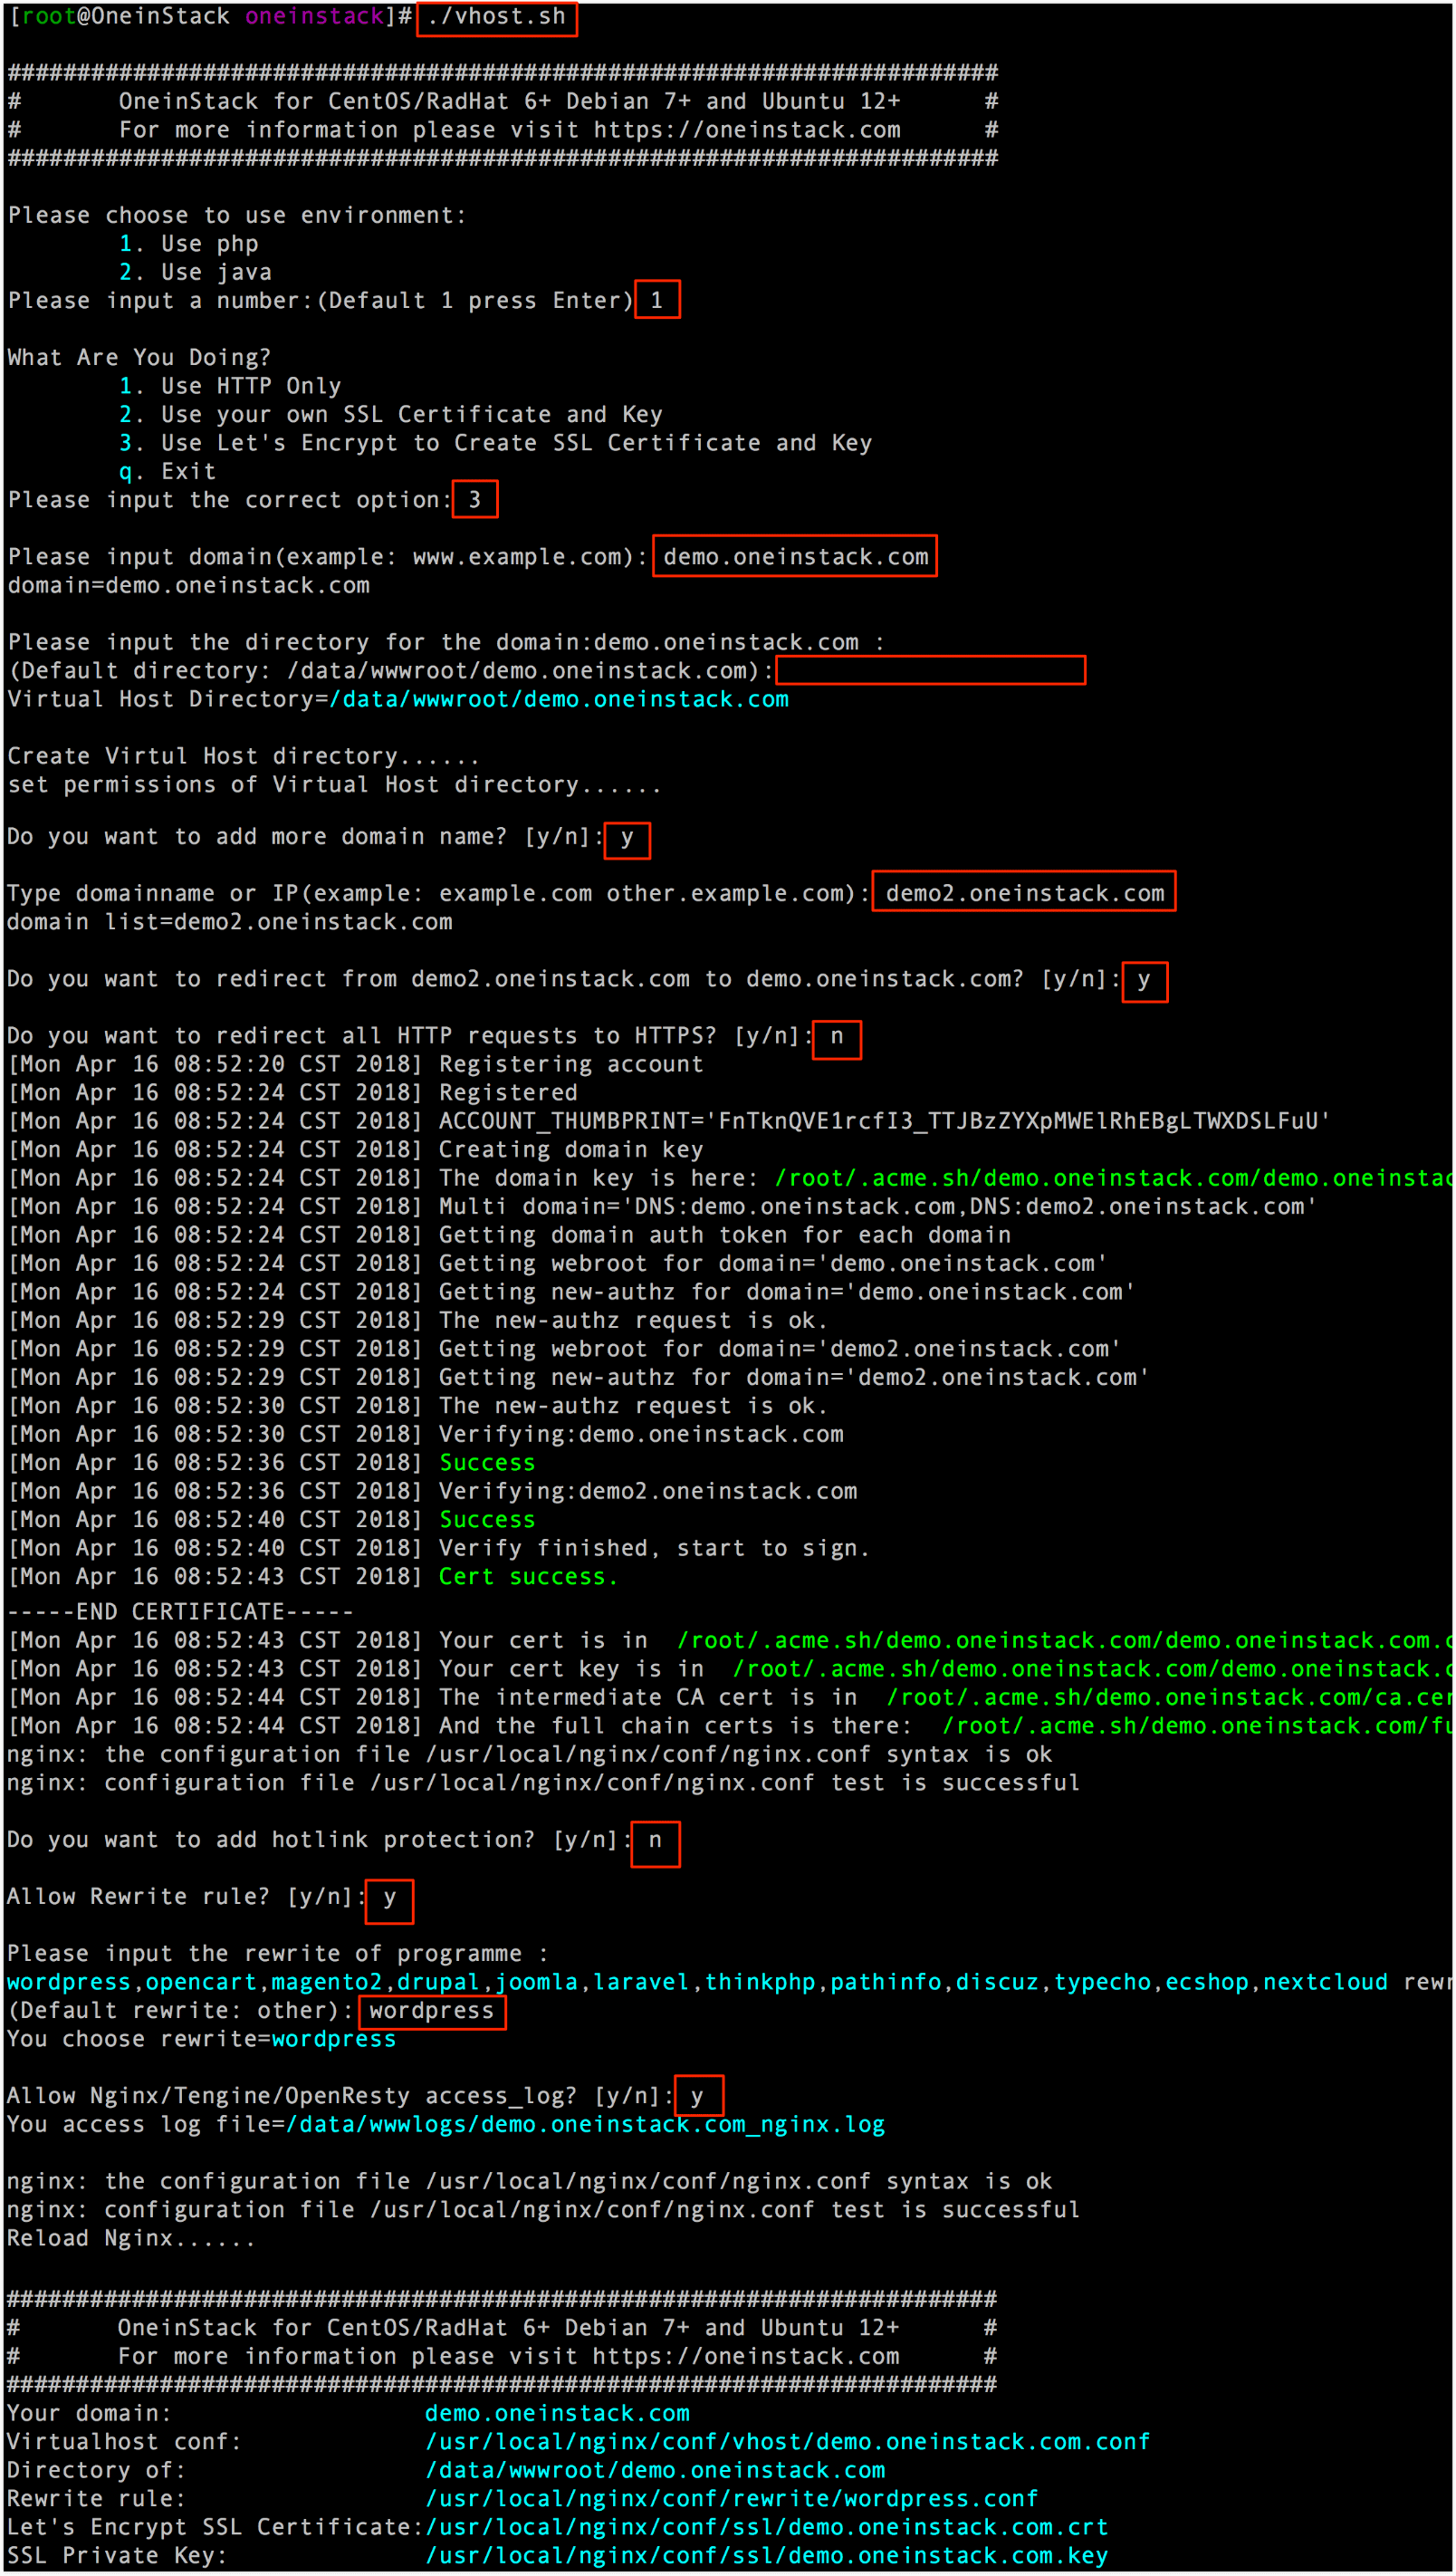
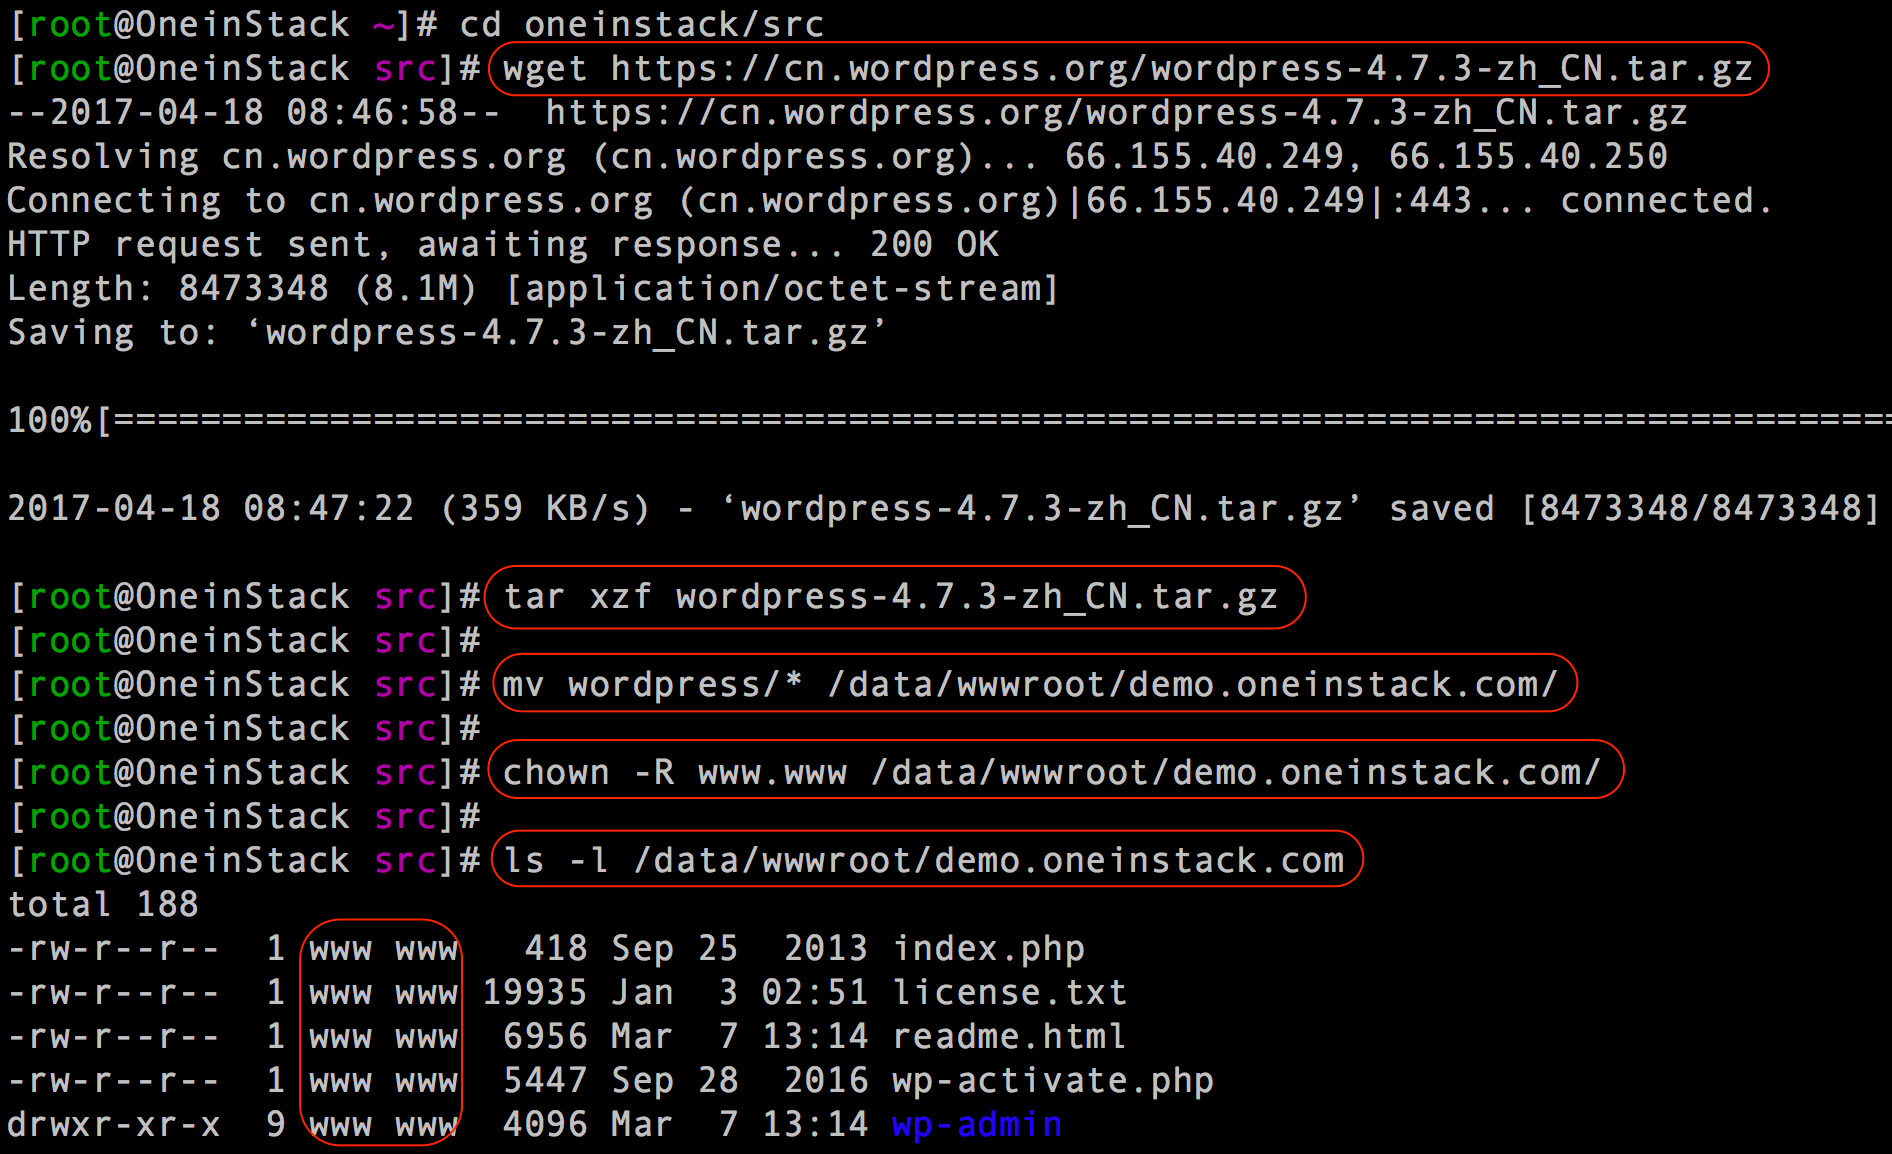
In the above figure, the directory is the root directory of the Web site,the script is created automatically,Upload the code to the directory when deploying the site(the directory, subdirectories, and file permissions are all:www), Add a virtual host will automatically create this directory.
Nginx the configuration file path is:
/usr/local/nginx/conf/vhost/demo.oneinstack.com.conf (demo.oneinstack.com Is the domain name that is bound)
Nginx the rewrite file path is: /usr/local/nginx/conf/rewrite/wordpress.conf
Create JAVA vhost
As shown below:
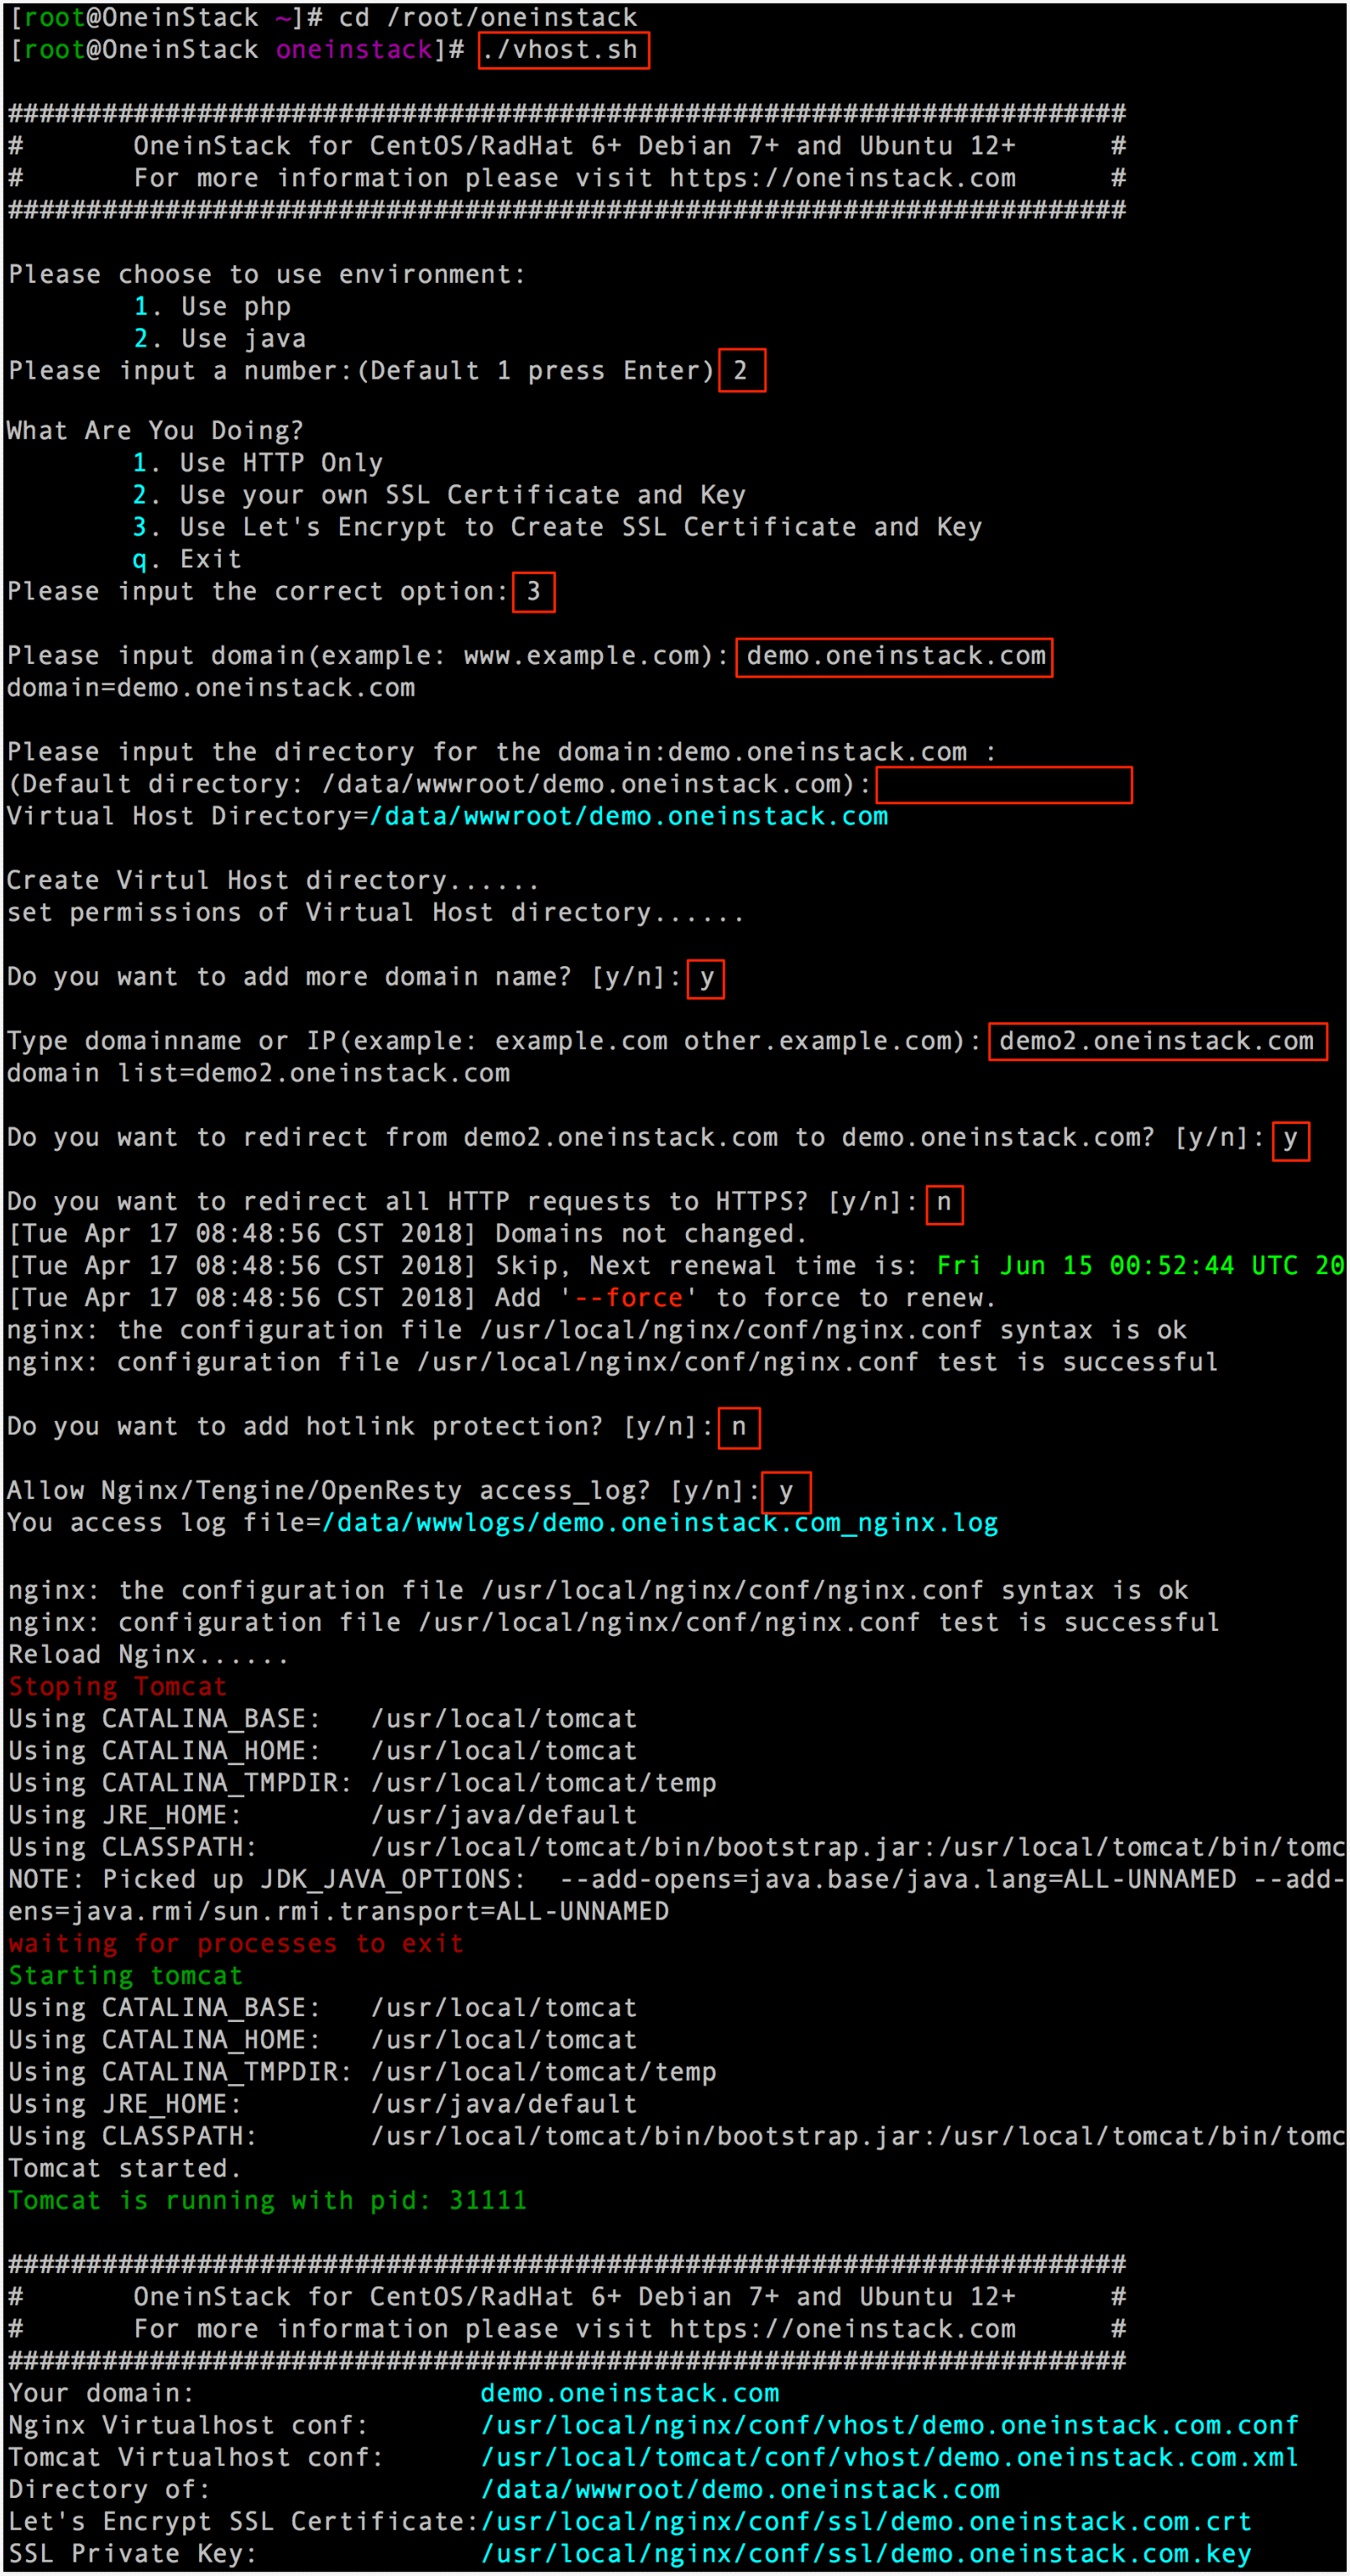
Nginx the configuration file path is: /usr/local/nginx/conf/vhost/demo.oneinstack.com.conf (demo.oneinstack.com Is the domain name that is bound) Tomcat the configuration file path is:/usr/local/tomcat/conf/vhost/demo.oneinstack.com.xml
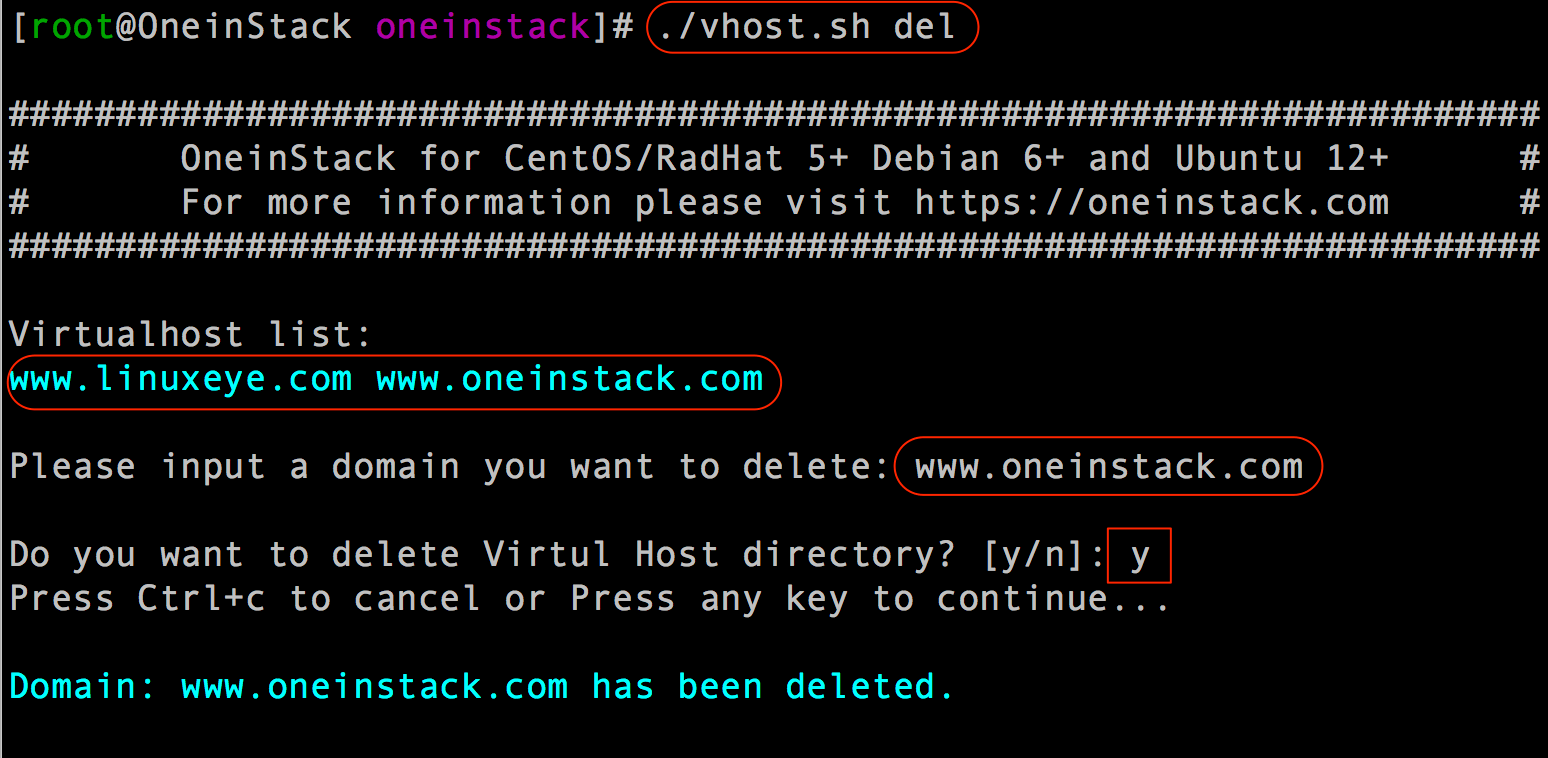
cd  /root/oneinstack  # Must enter the directory execution under oneinstack
./vhost.sh --del
As shown below:
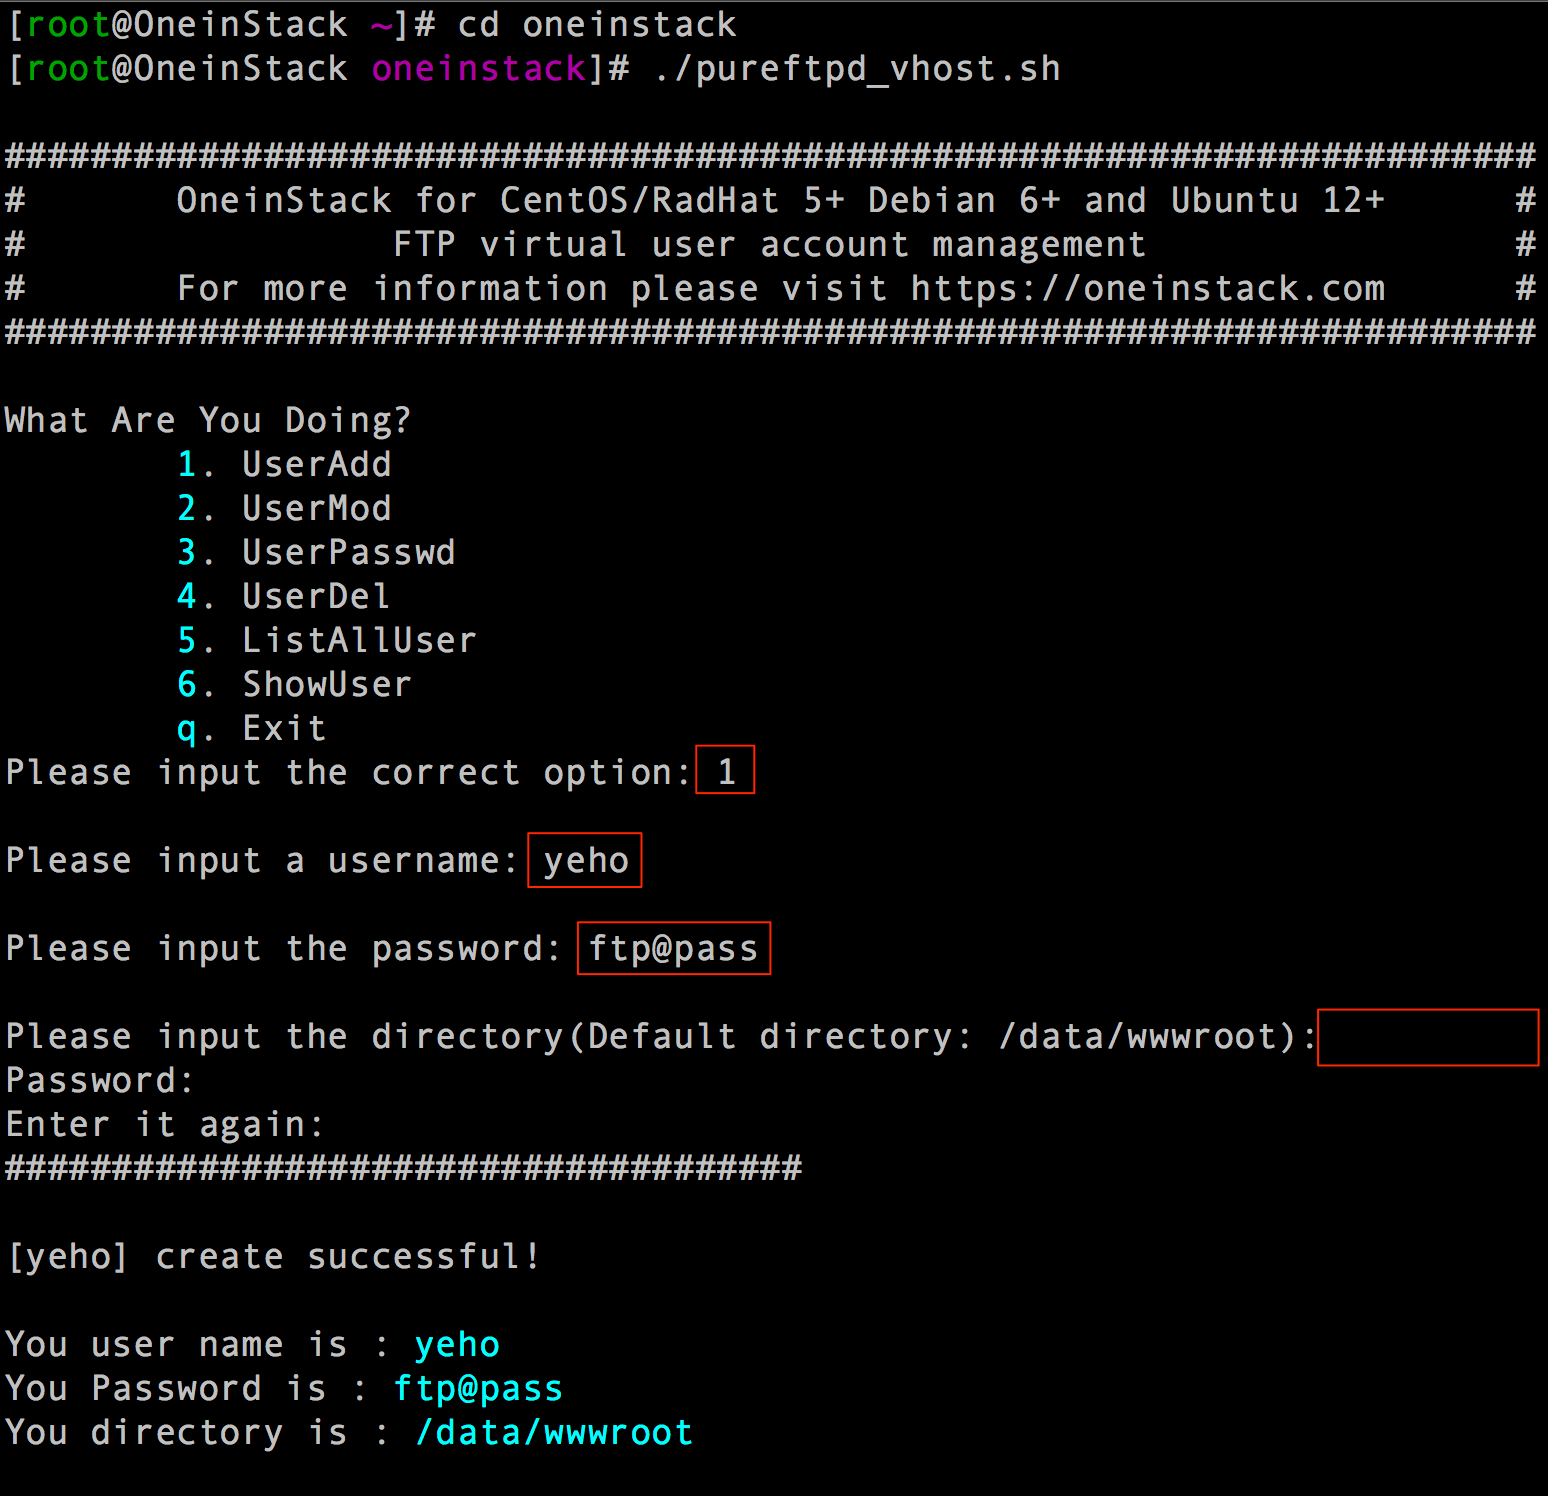
cd /root/oneinstack  # Must enter the directory execution under oneinstack
./pureftpd_vhost.sh  #Do not sh pureftpd_vhost.sh such execution
As shown below:
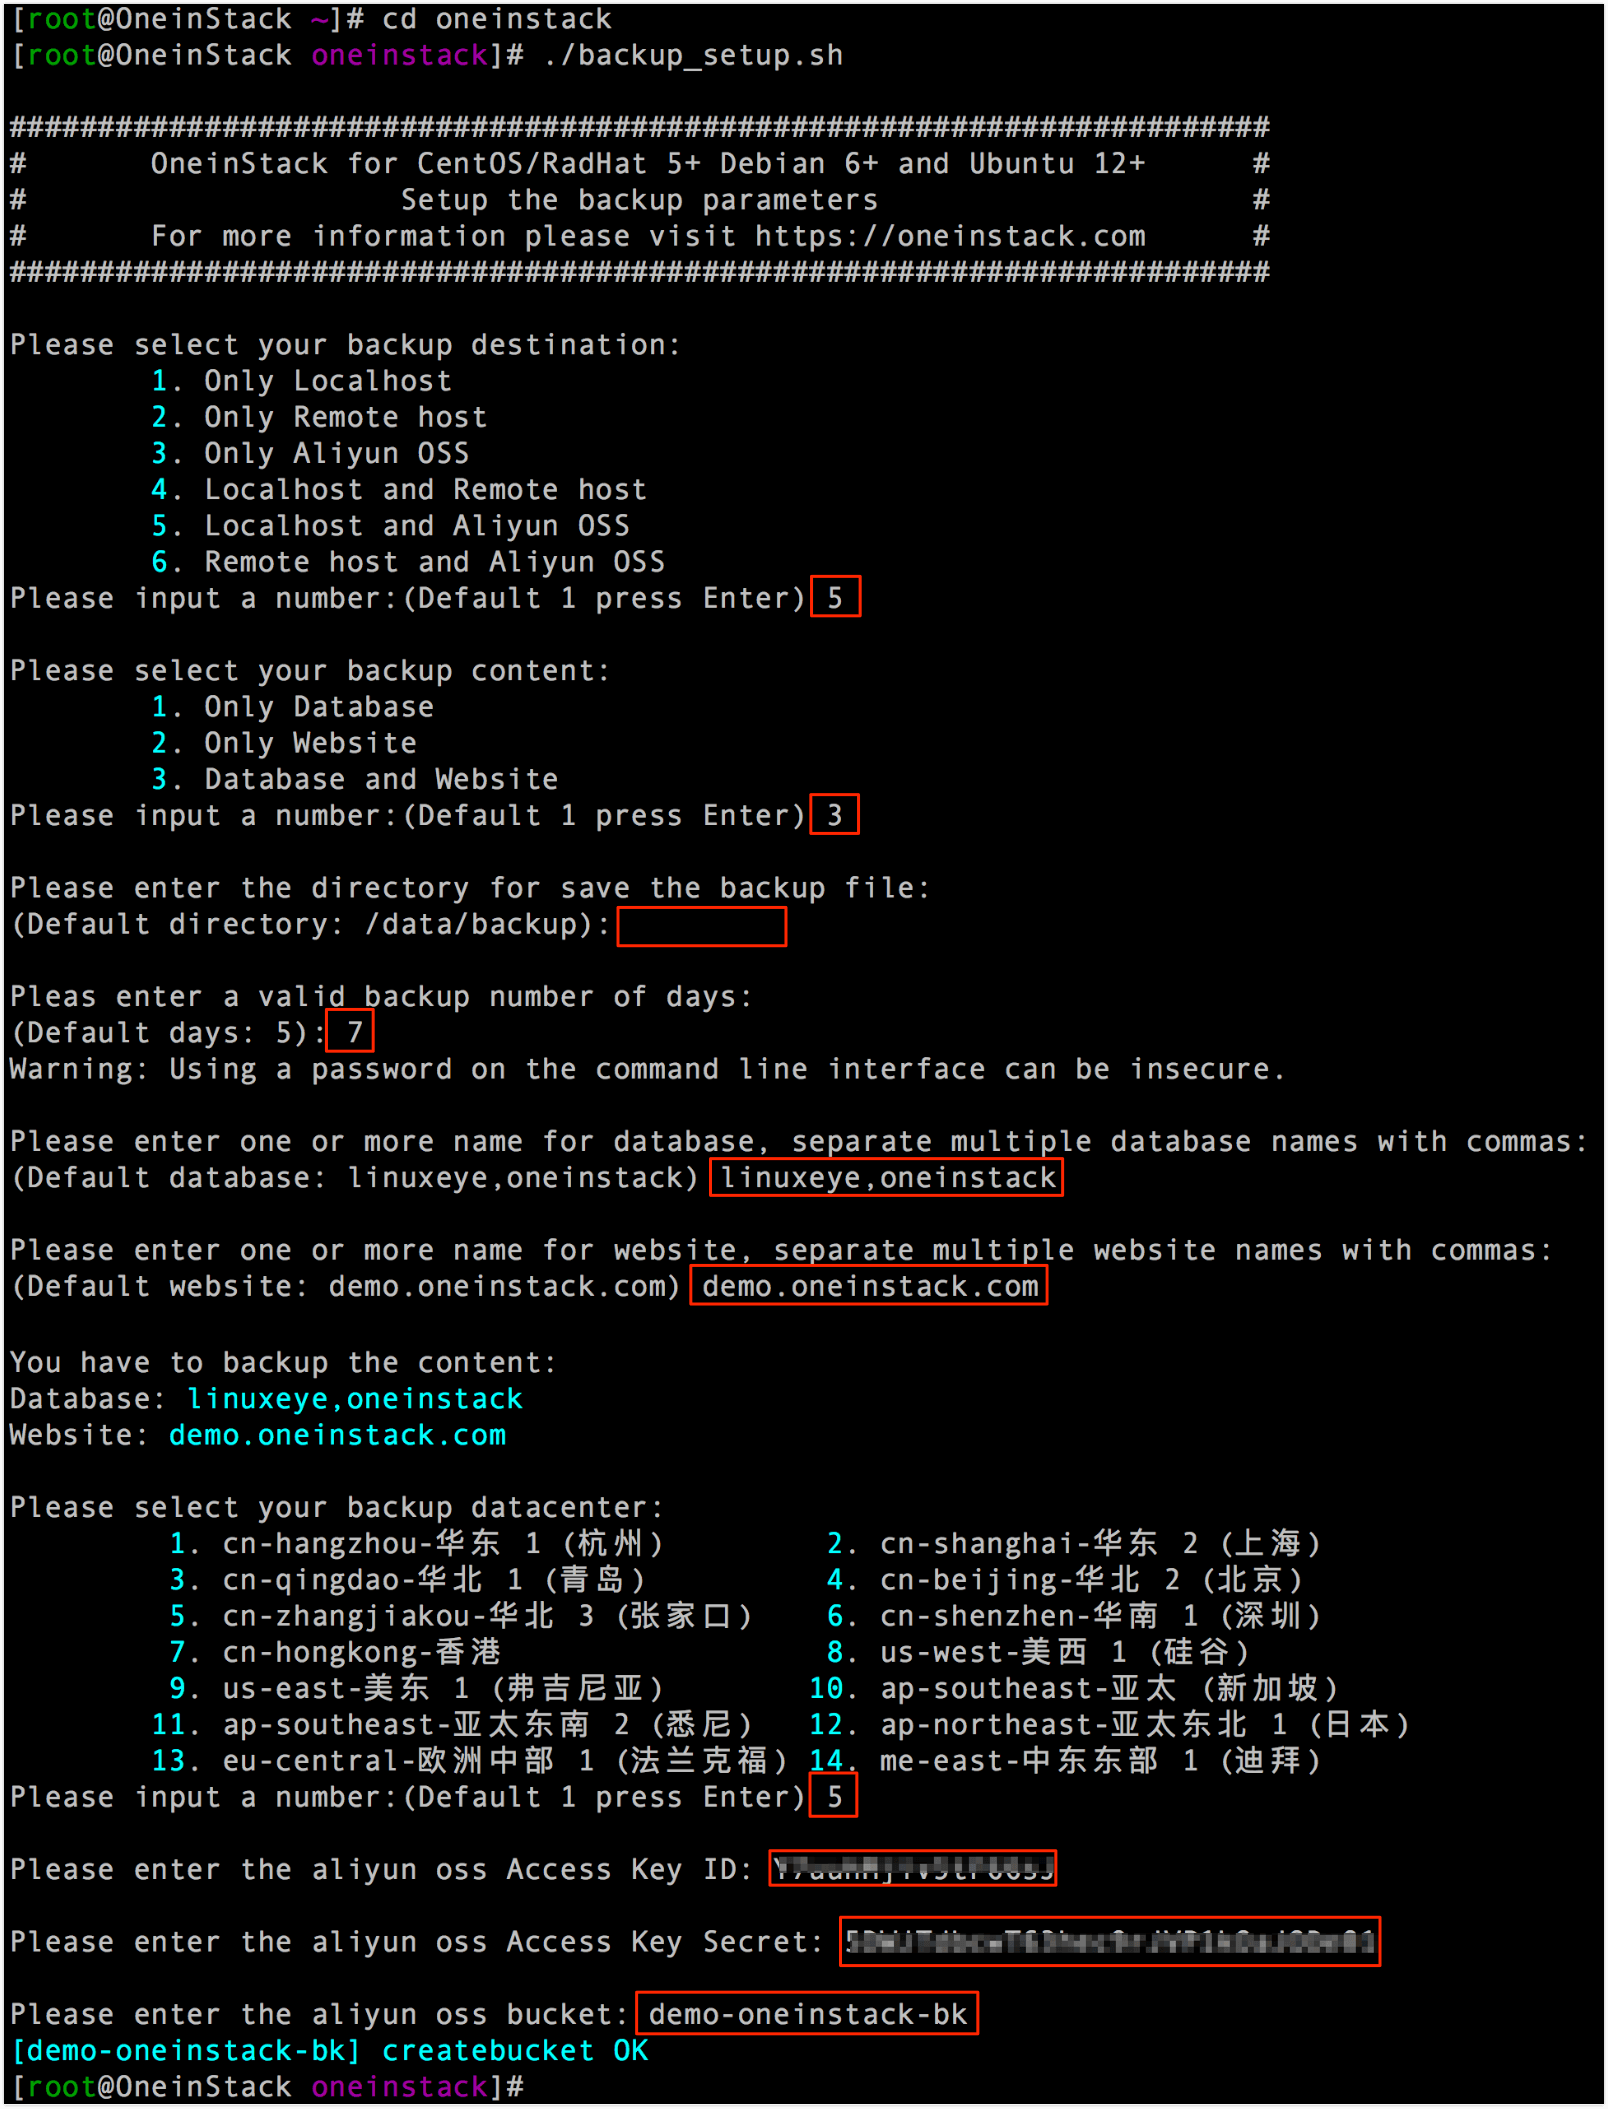
Backup Set Parameters
cd  /root/oneinstack  # Must enter the directory execution under oneinstack
./backup_setup.sh
As shown below:
Perform the backup immediately:
cd /root/oneinstack  #Must enter the directory execution under oneinstack
./backup.sh
Set Scheduled Task Automatic Scheduled Backup:
Example:Can be added to scheduled tasks, such as automatic backups every day 1:00
# echo '0 1 * * * cd ~/oneinstack;./backup.sh > /dev/null 2>&1 & ' >> /var/spool/cron/root
View the backup:
View the local backup:
ls -l /data/backup/
As shown below:

Nginx:
service nginx {start|reload|stop|status|restart}
Tomcat:
service tomcat {start|stop|status|restart}
PHP:
service php-fpm {start|stop|restart|reload|status}
MySQL:
service mysqld {start|stop|restart|reload|status}
Pure-Ftpd:
service pureftpd {start|stop|restart|status}
Redis:
service redis-server {start|stop|status|restart|reload}
Memcached:
service memcached {start|stop|status|restart|reload}
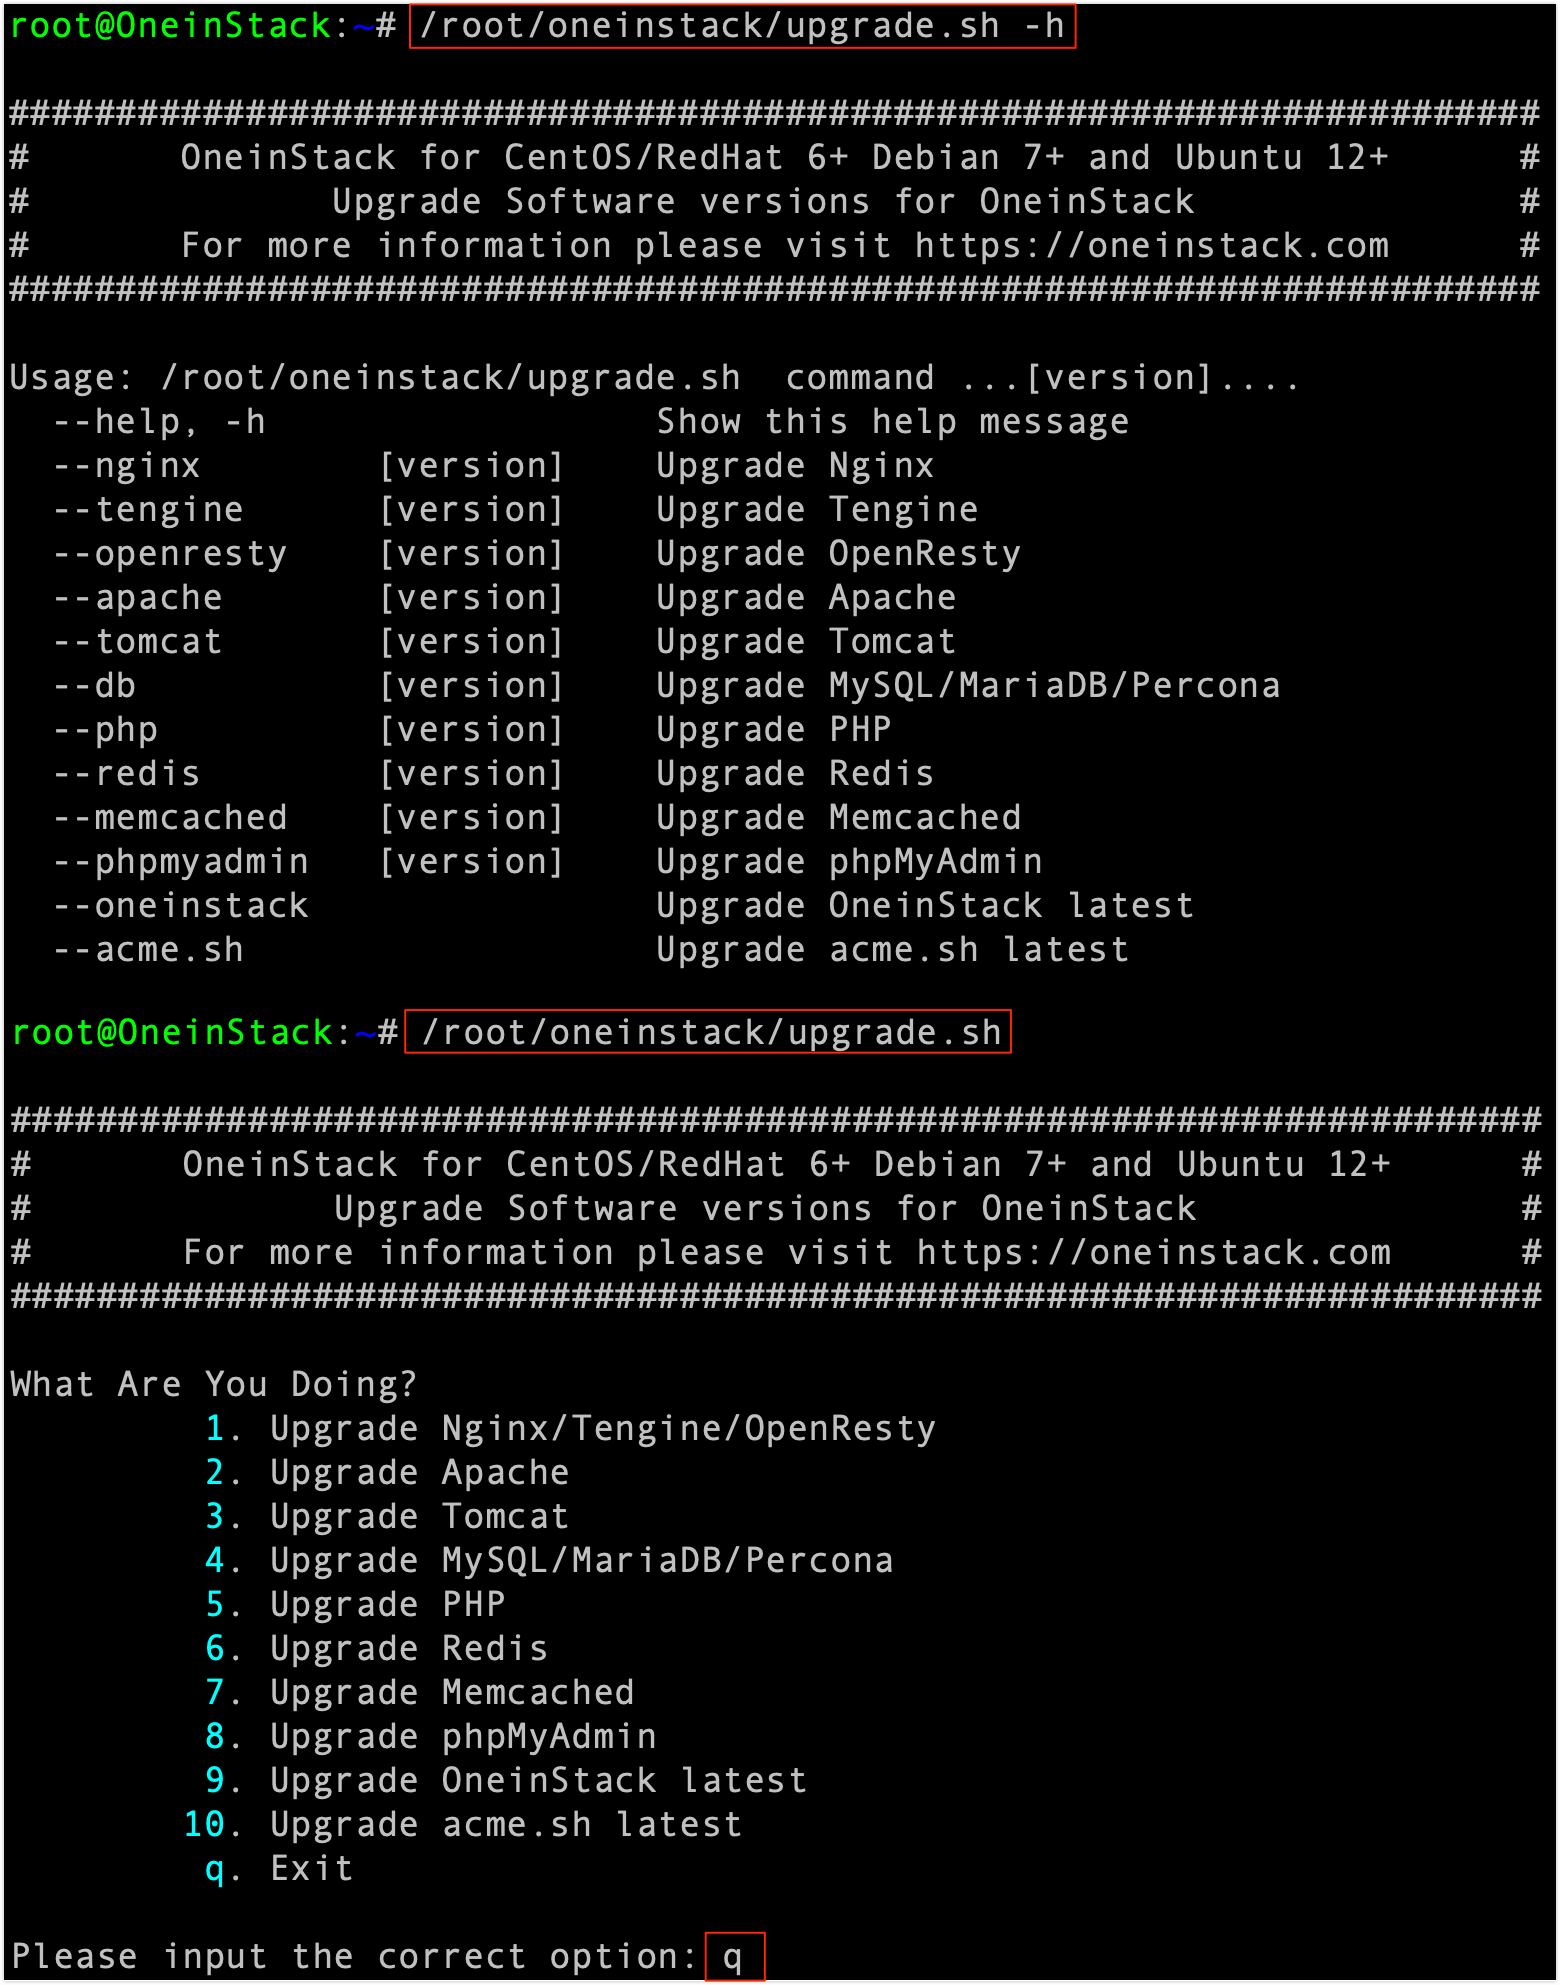
cd /root/oneinstack  # Must enter the directory execution under oneinstack
./upgrade.sh  # Do not sh upgrade.sh or bash upgrade.sh such execution
As shown below:
cd  /root/oneinstack  # Must enter the directory execution under oneinstack
./addons.sh   #NOTE: Support install and uninstall function
As shown below:

Some items can be uninstalled separately, such as RDS database, the database can be uninstalled separately
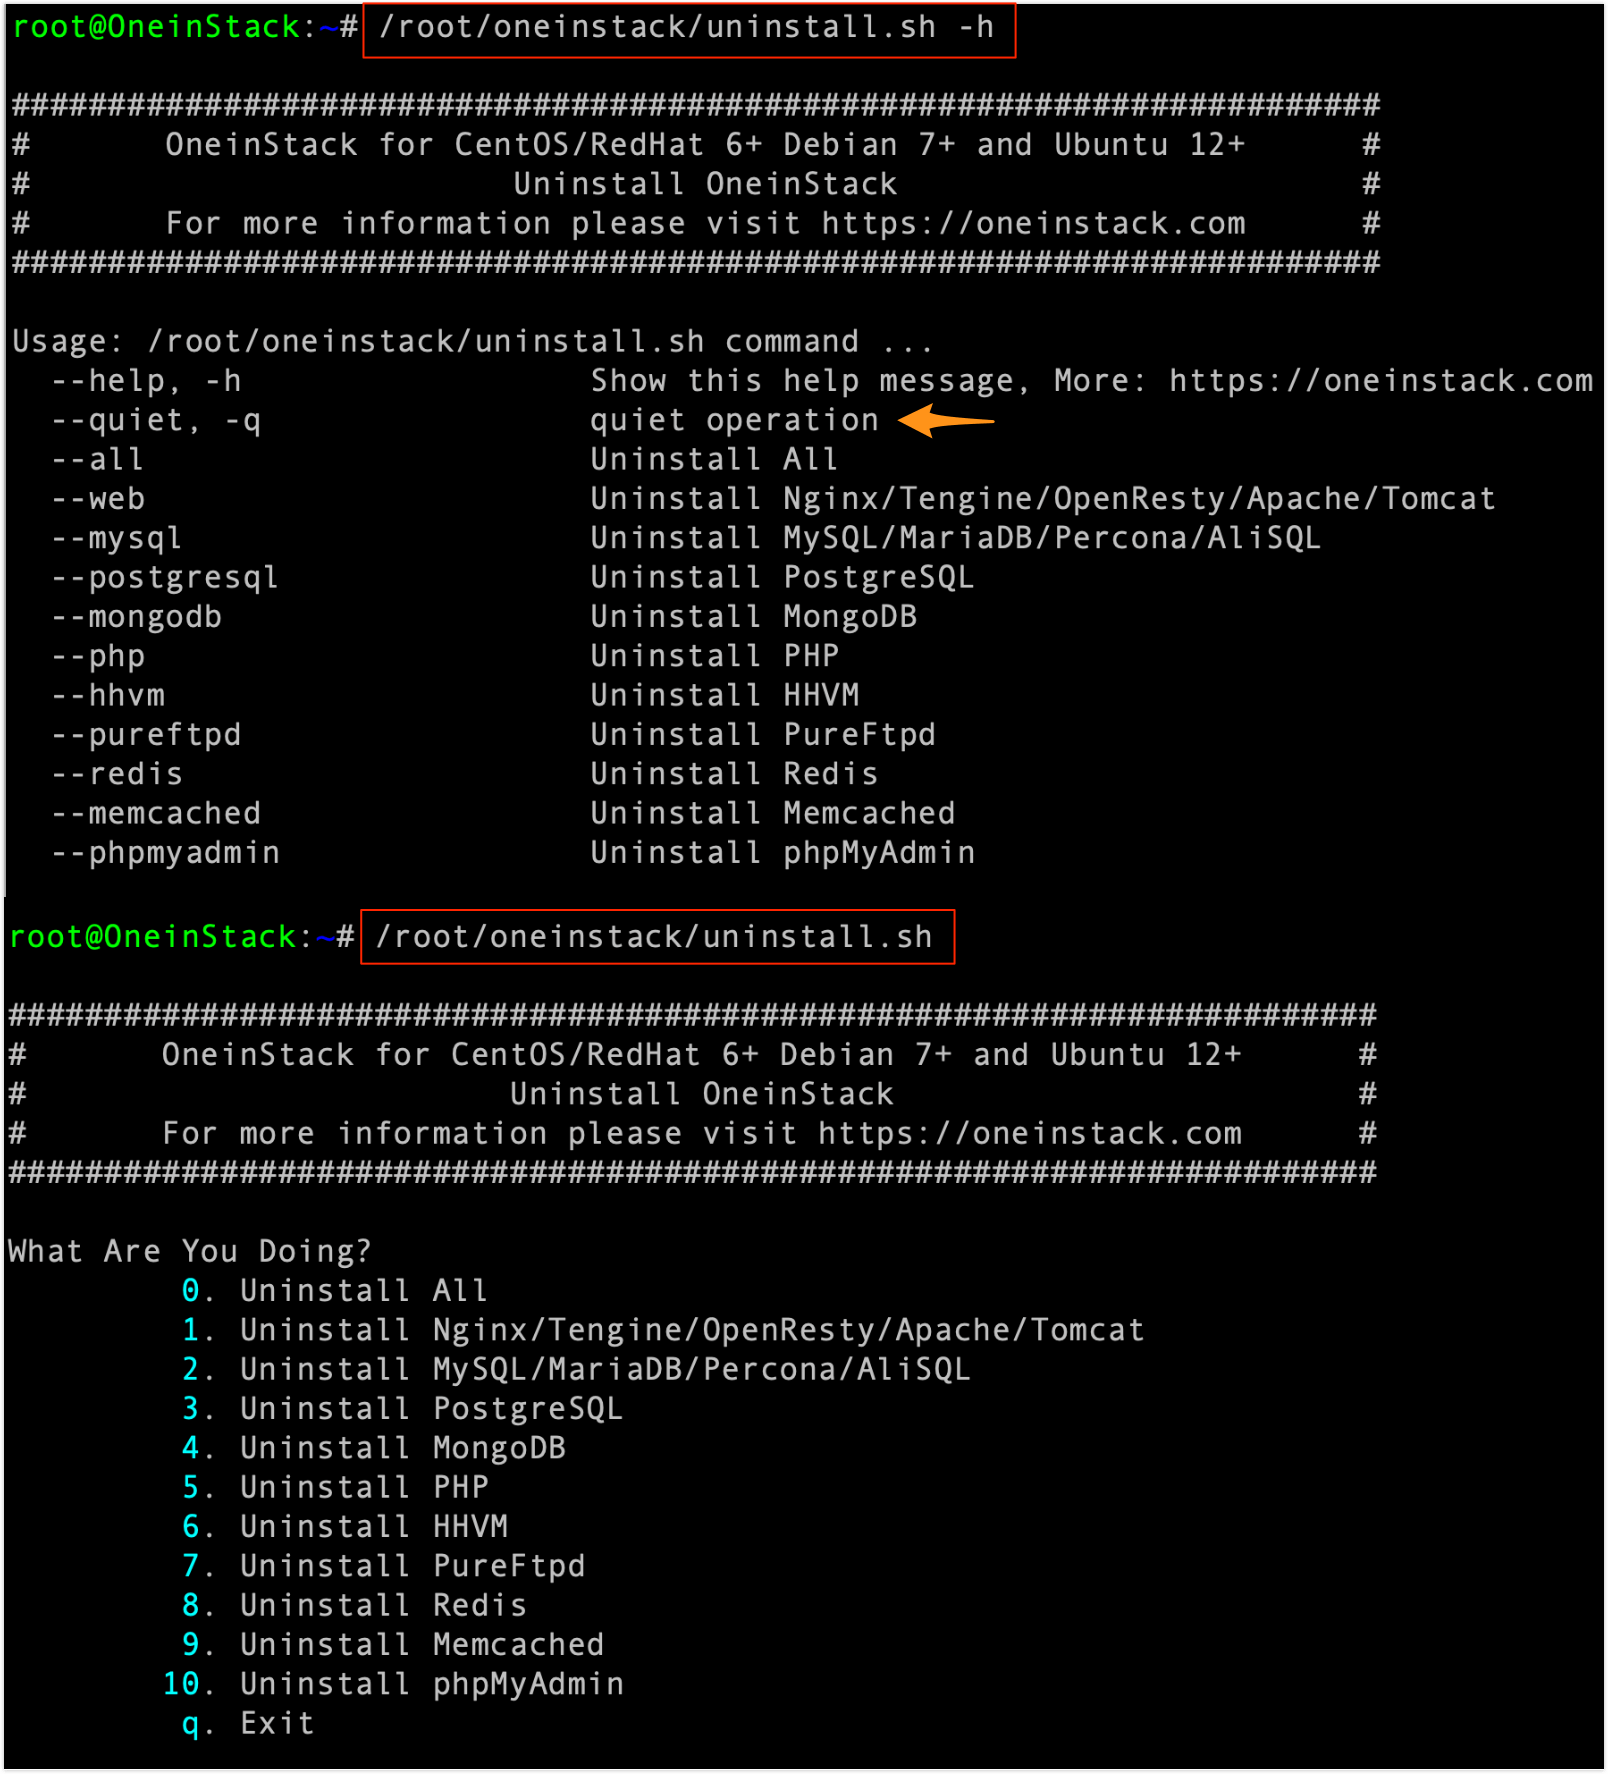
cd /root/oneinstack  # Must enter the directory execution under oneinstack
./uninstall.sh  # NOTE: Please backup your data
As shown below:
- Create the database required for the site,reference《Create a database》
- Add a virtual host,reference《How to add a virtual host》Create PHP vhost
- Create an FTP account,reference《How to manage FTP accounts》
- Deploy the code to the site root directory
NOTE: Ftp upload code do not need to modify permissions,default is already www; Download the code in server, you must modify the site root and subdirectories, Directory file permissions are www; If there is a problem with site permissions,Please refer to《About site root permissions》
wget Download the code to deploy a WordPress,As shown below:
Access http://www.oneinstack.com,enter the database address(localhost), user named(root),password(database root password),。
As shown below:

- Create the database required for the site,reference《Create a database》
- Add a virtual host,reference《How to add a virtual host》Create JAVA vhost
- Create an FTP account,reference《How to manage FTP accounts》
- Deploy the code to the site root directory
_NOTE:_Ftp upload code do not need to modify permissions,default is already www; Download the code in server , you must modify the site root and subdirectories,Directory file permissions are www; If there is a problem with site permissions,Please refer to《About site root permissions》
As shown below:

Create deploy JAVA website:
The default mirror is static and dynamic separation, that is, nginx handles static resources (JSS, CCC, pictures, etc.), and the rest goes to Tomcat processing.
The default (non binding domain) corresponding to the site root directory /data/wwwroot/default (not webapps), the deployment of code recommendations will pack War (such as example.war, jar xf example.war, unzip: note that permissions must be www), the code into the corresponding web site root directory.
If you upload the code, the directory structure is /data/wwwroot/default/WEB-INF, and the access address is: http://IP
If you upload the code, the directory structure is: /data/wwwroot/default/example/WEB-INF, access the web site address is: http://IP/example.
NOTE:
The war package can also be uploaded to the corresponding web root without decompression, but you must pay attention to access paths and static resource directory issues. If you visit the site, the static loading of resources may be the reason is not, do separate static resources directly with nginx, please confirm whether nginx can find relevant static resources (nginx web site root directory: /data/wwwroot/default)
If the vhost.sh binds the domain name, such as www.example.com, the tool automatically generates the corresponding root directory: /data/wwwroot/www.example.com, put the code in this directory.
Tomcat parameter, please modify: /usr/local/tomcat/bin/setenv.sh
by default,in order to reduce PHP compile time,improve performance(Opcache is recommended for production environments), The PHP environment loads the Opcache module by default(PHP7.1,7.0,5.6,5.5), Please refer to the principle:《In-depth understanding of PHP Opcode caching principles》
But this will appear PHP code updates, take 2 to 3 minutes to take effect,This affects the efficiency of the site during the commissioning phase suggest that you close or refresh the cache every time there is a code update(Recommended method two)
cd /root/oneinstack  #Must enter the directory execution under oneinstack
./uninstall.sh --phpcache
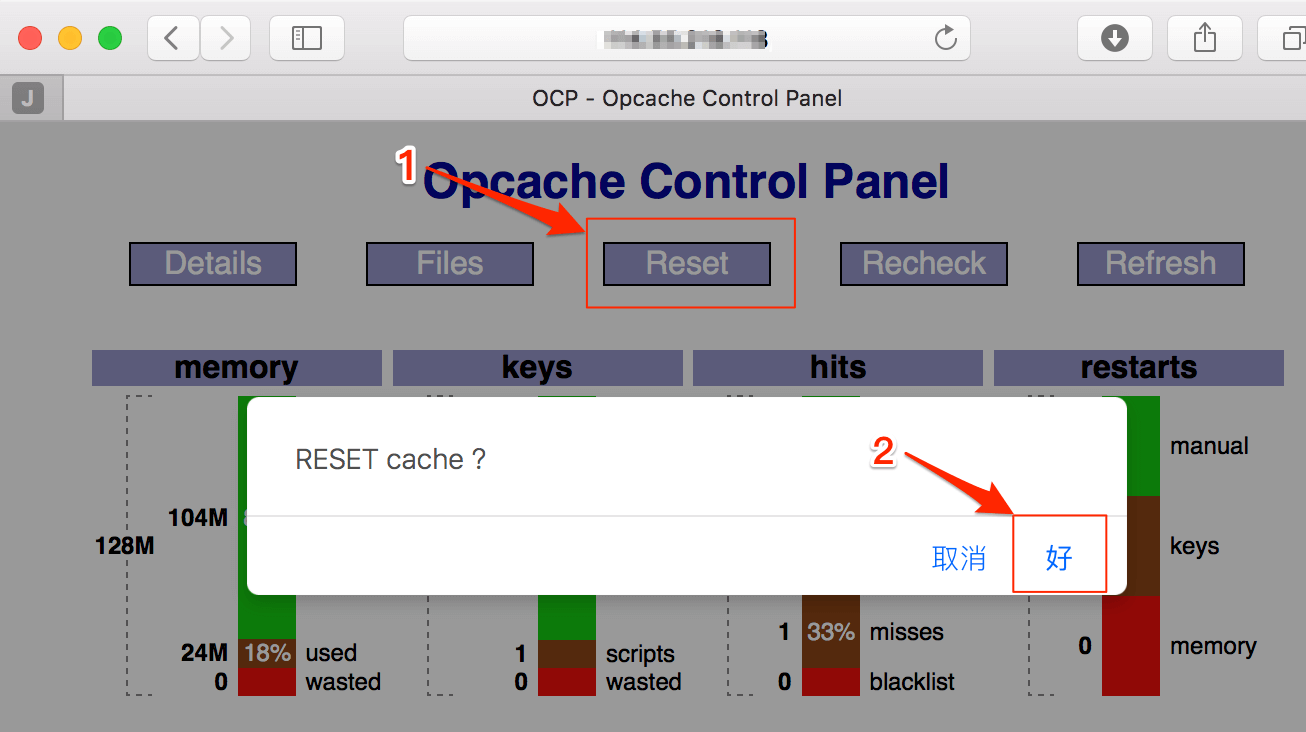
Access http://<Public net IP>/ocp.php,
Or direct access http://<Public net IP>/ocp.php?RESET=1
As shown below:
Web site root permissions to follow:
file 644, folder 755, Permissions Users and groups www
If there is a file permissions problem, execute the following three commands:
chown  -R  www.www  /data/wwwroot/
find  /data/wwwroot/  -type  d  -exec  chmod  755  {}  \;
find  /data/wwwroot/  -type  f  -exec  chmod  644  {}  \;
Redis default port:6379
Memcached default port:11211
default only listen IP:127.0.0.1
How to increase the maximum memory size of Redis?
vi /usr/local/redis/etc/redis.conf
maxmemory 1024000000 #
service redis-server restart # restart the redis for changes to take effect
How to increase the maximum memory size of memcached?
vi /etc/init.d/memcached
CACHESIZE=256 #
service memcached restart # restart the memcached for changes to take effect
How to change the listening port for redis?
vi /usr/local/redis/etc/redis.conf
bind 127.0.0.1 changed to bind 0.0.0.0
service redis-server restart # restart the redis for changes to take effect
How to change the listening port for memcached?
vi /etc/init.d/memcached
OPTIONS="-l 127.0.0.1" changed to OPTIONS=""
service memcached restart # restart the memcached for changes to take effect
By default, iptables firewall is not running.