The guide below and example code will get you started setting up the Raspberry Pi touch display and getting Kivy working with it. Kivy is an "open source Python library for rapid development of applications that make use of innovative user interfaces, such as multi-touch apps."
This guide assumes you have a fresh install of Raspbian (the 2015-05-05 Wheezy release or the 2015-09-24 Jessie release), an Internet connection, and the display is connected and working. It also assumes that you're already familiar with Raspberry Pi enough to get yourself to the command line. You can run this code locally or via SSH.
Note: I don't recommend executing these steps with the desktop envioronment running. It may slow down the set up process and cause problems with running Kivy apps. If you're set up to boot to into the desktop enviroment on Raspbian Jessie, click the Raspberry Menu → Preferences → Raspberry Pi Configuration. Change the Boot setting from Desktop to CLI and then reboot.
The command line is where you'll start:
-
Update your software. This is required with the 2015-05-05 Raspbian image in order to get touch working. This step will take a few minutes:
pi@raspberrypi ~ $ sudo apt-get update && sudo apt-get -y upgrade -
Reboot (this is not required, but might be a good idea if you're working from an older version of Raspbian):
pi@raspberrypi ~ $ sudo reboot -
Back on the command line, check that touch input works by trying it in X11:
pi@raspberrypi ~ $ startx -
If touch works, exit out of X11 and go back to the command line.
-
The next few steps will install Kivy. These instructions are based on the Kivy User’s Guide. Firstly, open the APT sources list:
pi@raspberrypi ~ $ sudo nano /etc/apt/sources.list -
At the end of file, add the APT sources for Gstreamer:
deb http://vontaene.de/raspbian-updates/ . main -
Type
Control+Xto exit nano. Then pressYandEnterto save the file. You'll be back on the command line. -
Download and add the GPG key for the Gstreamer sources:
pi@raspberrypi ~ $ gpg --keyserver pgp.mit.edu --recv-keys 0C667A3E pi@raspberrypi ~ $ gpg -a --export 0C667A3E | sudo apt-key add - -
Install the dependencies:
pi@raspberrypi ~ $ sudo apt-get update pi@raspberrypi ~ $ sudo apt-get -y install pkg-config libgl1-mesa-dev libgles2-mesa-dev \ python-pygame python-setuptools libgstreamer1.0-dev git-core \ gstreamer1.0-plugins-{bad,base,good,ugly} \ gstreamer1.0-{omx,alsa} python-dev -
Install pip from source, as the version that is in the Raspbian apt repository is too old. You can ignore any messages about
InsecurePlatformWarning:pi@raspberrypi ~ $ wget https://raw.github.com/pypa/pip/master/contrib/get-pip.py pi@raspberrypi ~ $ sudo python get-pip.py -
Install Cython, Pygments, and docutils. The Pygments and docutils packages are not actually required for Kivy, but the example code you'll execute uses them. This step will take a few minutes:
pi@raspberrypi ~ $ sudo pip install cython pygments docutils -
Download Kivy and install it globally (this step will take quite a few minutes):
pi@raspberrypi ~ $ git clone https://github.com/kivy/kivy pi@raspberrypi ~ $ cd kivy pi@raspberrypi ~/kivy $ python setup.py build pi@raspberrypi ~/kivy $ sudo python setup.py install -
To enable touch, you'll need to make a modification to the default Kivy configuration file. To create that file, first run an example:
pi@raspberrypi ~/kivy $ python ~/kivy/examples/demo/pictures/main.py -
Quit the example with
Ctrl+Cand then open the newly-createdconfig.inifile for editing:pi@raspberrypi ~/kivy $ nano ~/.kivy/config.ini -
Go into the
[input]section, remove the lines that are in there and put in:mouse = mouse mtdev_%(name)s = probesysfs,provider=mtdev hid_%(name)s = probesysfs,provider=hidinput -
Launch the multi touch pictures demo. Tap, drag, pinch, and rotate should all work like a dream:
pi@raspberrypi ~/kivy $ python ~/kivy/examples/demo/pictures/main.py -
Type
Control+Cto exit the pictures demo. -
Launch the UI showcase. This shows you all the different UI elements that Kivy makes available to you:
pi@raspberrypi ~/kivy $ python ~/kivy/examples/demo/showcase/main.py -
If you'd like, explore the other examples in
~/kivy/examples/. -
To try Kivy and GPIO together, download this repo to your Raspberry Pi if you haven't already:
pi@raspberrypi ~/kivy $ cd ~ pi@raspberrypi ~ $ git clone https://github.com/mrichardson23/rpi-kivy-screen.git -
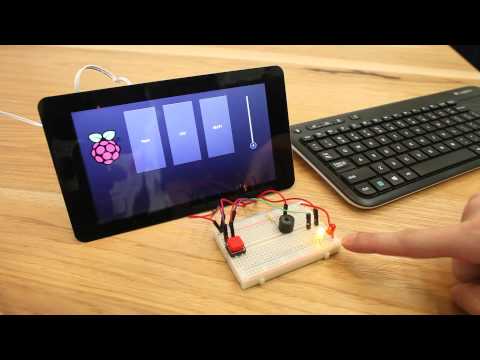
The example uses BCM GPIO pins 17 as a piezo buzzer, 27 and 10 as LEDs, and 22 as a button (with internal pullups set HIGH, so connect one leg of the button to 22 and the other to ground.)

-
First try to run the example as root (in versions of Raspbian before Jessie, root access is required for the GPIO library):
pi@raspberrypi ~ $ cd rpi-kivy-screen/ pi@raspberrypi ~/rpi-kivy-screen $ sudo python main.py -
As you'll see, touch doesn't work. To fix this, you need to make the same change to
config.iniyou made before, but to the root account's config file. Exit (Control+C) and copy over your home directory's Kivy configuration file to overwrite the root account's:pi@raspberrypi ~/rpi-kivy-screen $ sudo cp ~/.kivy/config.ini /root/.kivy/config.ini -
Run the example again and you'll be able to control the LED and buzzer. You'll also be able to see the state of the physical button!
pi@raspberrypi ~/rpi-kivy-screen $ sudo python main.py

Even though root access isn't required for Python GPIO starting with the Jessie version of Raspbian, it may be helpful to copy the config.ini file anyway in case you decide to have the root user execute your project immediately after boot up.