Authors: Huan He (hehuannb@gmail.com), Owen Queen, Teddy Koker, Consuelo Cuevas, Theodoros Tsiligkaridis(ttsili@ll.mit.edu), Marinka Zitnik (marinka@hms.harvard.edu)
Raincoat Paper: ICML 2023
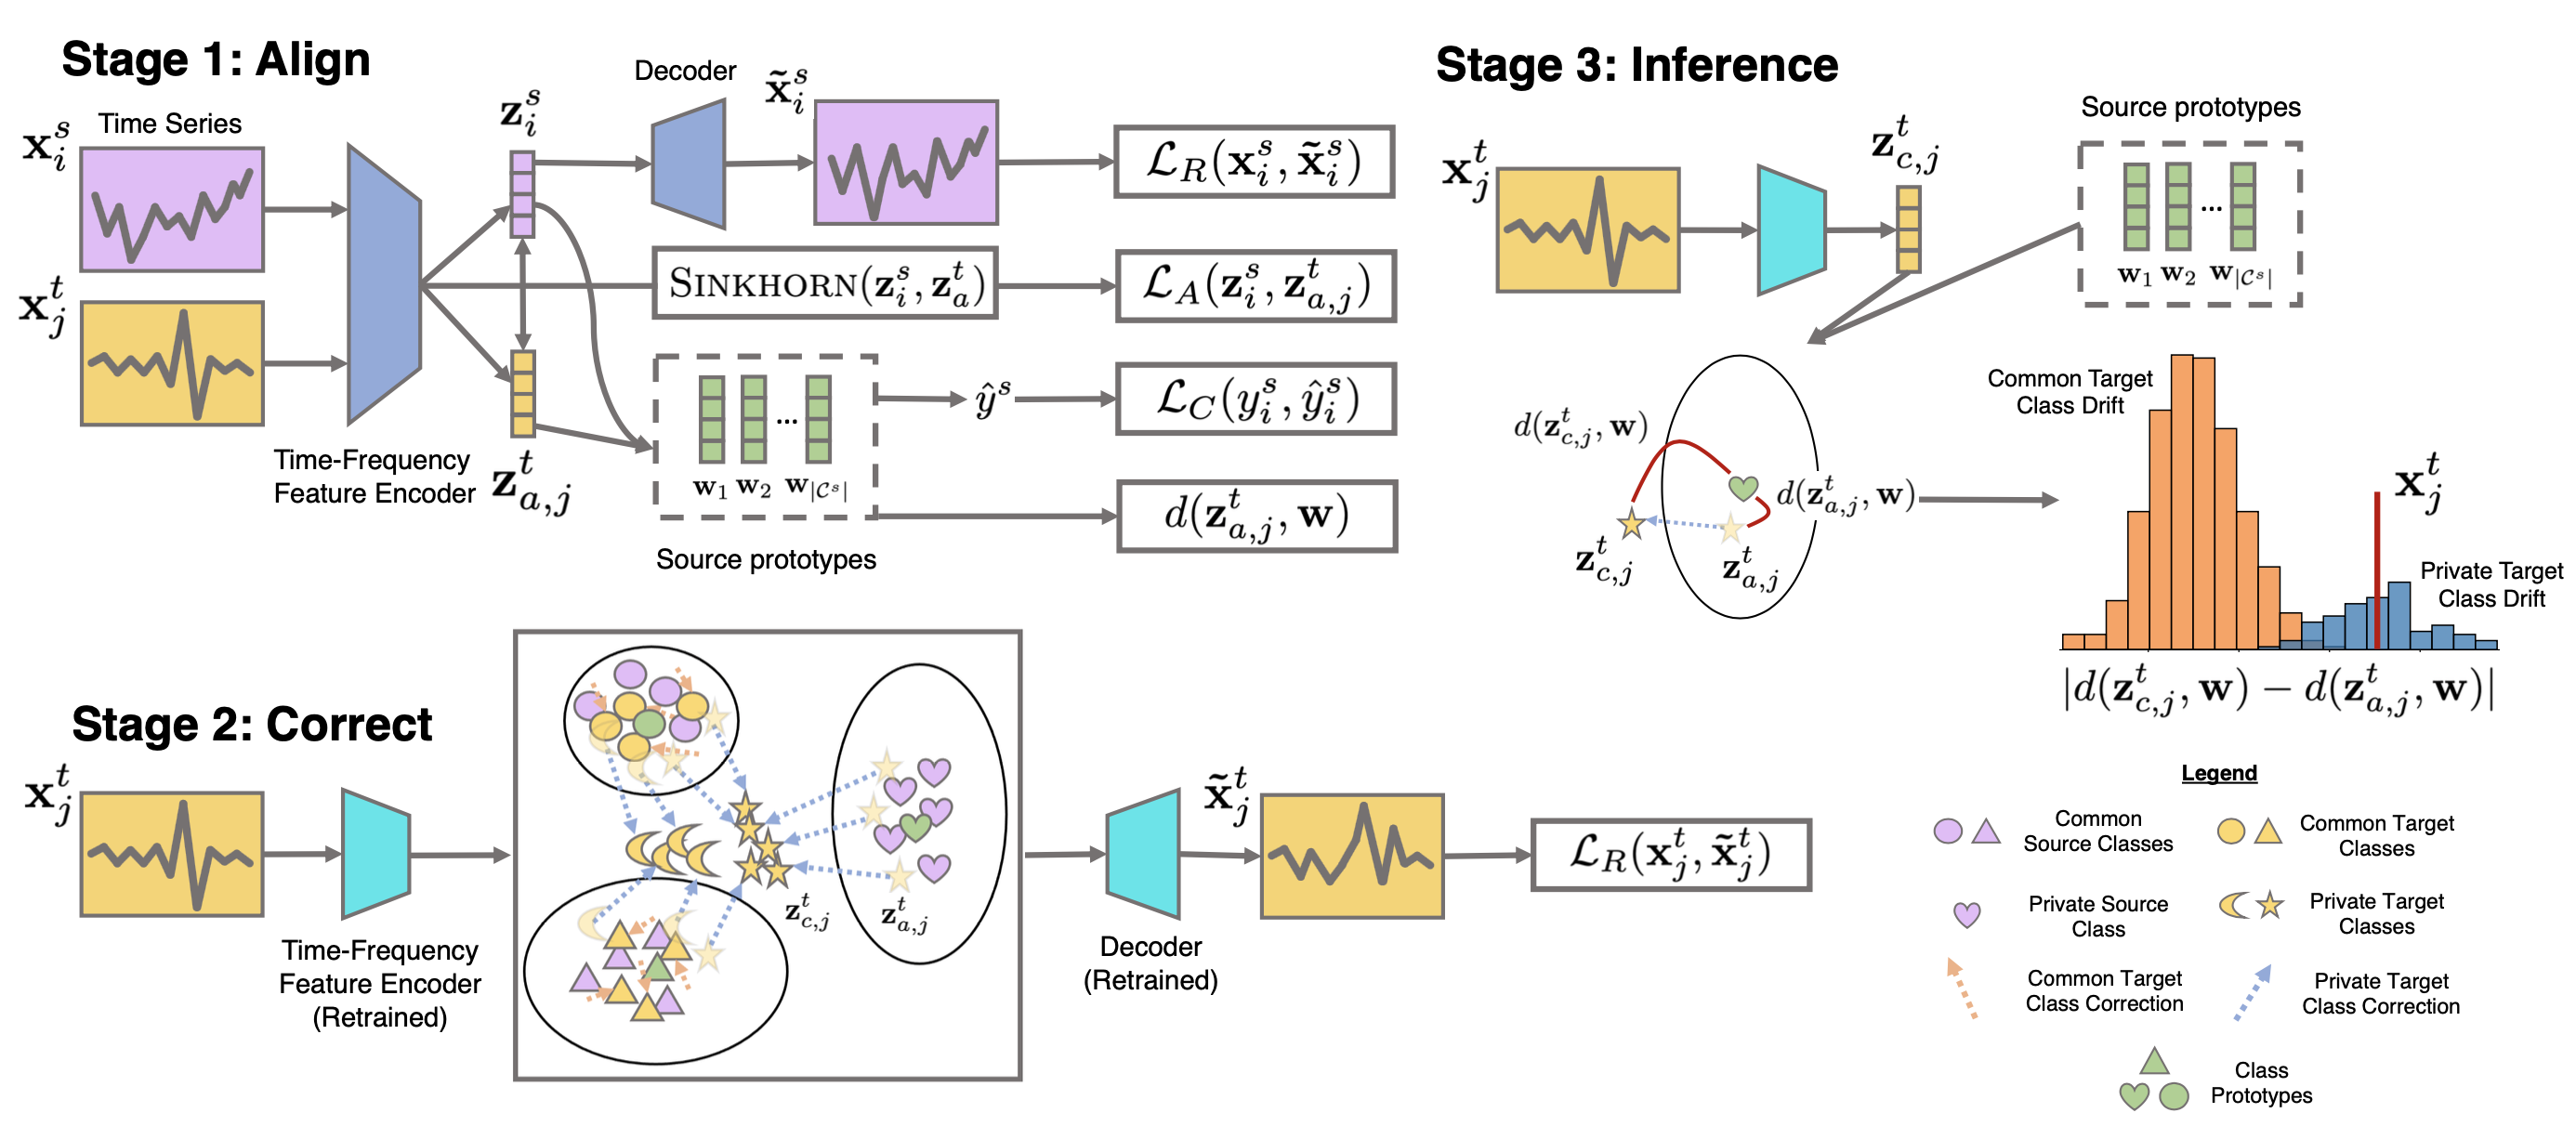
The transfer of models trained on labeled datasets from a source domain to unlabeled target domains is facilitated by unsupervised domain adaptation (UDA). However, when dealing with complex time series models, transferability becomes challenging due to differences in dynamic temporal structures between domains, which can result in feature shifts and gaps in time and frequency representations. Additionally, the label distributions in the source and target domains can be vastly different, making it difficult for UDA to address label shifts and recognize labels unique to the target domain. Raincoat is a domain adaptation method for time series that can handle both feature and label shifts.
First, clone the GitHub repository:
git clone https://github.com/mims-harvard/Raincoat
cd Raincoat
To install the core environment dependencies of Raincoat, use requirement.txt:
pip: -r requirements.txt
- Python3
- Pytorch==1.7
- Numpy==1.20.1
- scikit-learn==0.24.1
- Pandas==1.2.4
- skorch==0.10.0
- openpyxl==3.0.7
Create a folder and download the pre-processed versions of the datasets WISDM, HAR, HHAR, Boiler, and Sleep-EDF.
To add new dataset (e.g., NewData), it should be placed in a folder named: NewData in the datasets directory.
Since "NewData" has several domains, each domain should be split into train/test splits with naming style as "train_x.pt" and "test_x.pt".
The structure of data files should in dictionary form as follows:
train.pt = {"samples": data, "labels: labels}, and similarly for test.pt.
Next, add a class with the name NewData in the configs/data_model_configs.py file.
You can find similar classes for existing datasets as guidelines.
Also, you have to specify the cross-domain scenarios in self.scenarios variable.
Last, you have to add another class with the name NewData in the configs/hparams.py file to specify
the training parameters.
Please check out the jupyter notebook for understanding RAINCOAT.
Our main model architecture can be found here. The freuqency encoder is defined in
The algorithm can be found here. The implementation is build upon a published benchmark work Adatime.
The experiments are organised in a hierarchical way such that:
- Experiments are collected under one directory assigned by
--experiment_description. - Each experiment could have different trials, each is specified by
--run_description. - Each experiment could have different independent runs, which is determined by
--num_runs. - For example, if we want to experiment different UDA methods using Raincoat on WISDM dataset , we can assign
--da_method RAINCOAT --run_description DANNand--dataset WISDM --num_runs 5and so on.
To train a model:
python main.py  --experiment_description WISDM  \
                --run_description W_RAINCOAT \
                --da_method RAINCOAT \
                --dataset WISDM \
                --backbone CNN \
                --num_runs 5 \
An example bash script is provided in scripts/run_WISDM.sh.
To see and/or modify the default hyperparameters, please see configs/hparams.py and configs/data_model_configs.py.
If you find Raincoat useful for your research, please consider citing this paper:
@inproceedings{he2023domain,
title = {Domain Adaptation for Time Series Under Feature and Label Shifts},
author = {He, Huan and Queen, Owen and Koker, Teddy and Cuevas, Consuelo and Tsiligkaridis, Theodoros and Zitnik, Marinka},
booktitle = {International Conference on Machine Learning},
year      = {2023}
}
Raincoat codebase is under MIT license. For individual dataset usage, please refer to the dataset license found in the website.