Model Database
View: User Interface (HTML)
Controller: PHP/Laravel
app
app/Http (main folder, contains routes)
config
database
resources
public
vendor
public (css, javascript, images, etc)
resources/assets/sass (css preprocessor)
resources/views (html files, any files used for users/visitors)
resources/errors (504 pages, etc)
tests (unit tests, test driven development)
vender (extensive dependencies in laravel)
.env (used as a security measure, used in config/database.php)
.gitignore (ignore .env, use templates provided by gitignore.io and github.com
composer.json (required frameworks)
app/Http/routes.php
config/app.php (register classes for packages and/or plugins, Laravel framework service providers)
config/database.php (database connection by way of .env file)
config/mail.php (email configuration, smtp, port, etc)
database/factories/ModelFactory.php (classes used to create content)
database/seeds/DatabaseSeeder.php (create alot of content for a website)
gulpfile.js (compile sass into css)
package.json (required dependencies)
User friendly applications are dependent on use of routes. Routes are in the URL address bar. For example: mydomain.com/contact is related to routes.
Laravel 5.2 Docs, Routes Page: https://laravel.com/docs/5.2/routing
Route::get('/', function () {
return view('welcome'); // points to resources/views/welcome.blade.php
});
Route::get('/about', function () {
return "about page goes here"; // returns text
});
Route::get('/post/{id}', function ($id) { // myapp.com/laravel/post/12345 returns: ID Number: 12345
return "ID Number: " . $id;
});
Route::get('admin/posts/recent/popular', array('as'=>'admin.home' ,function () {
$url = route('admin.home');
return "this url is " . $url;
}));
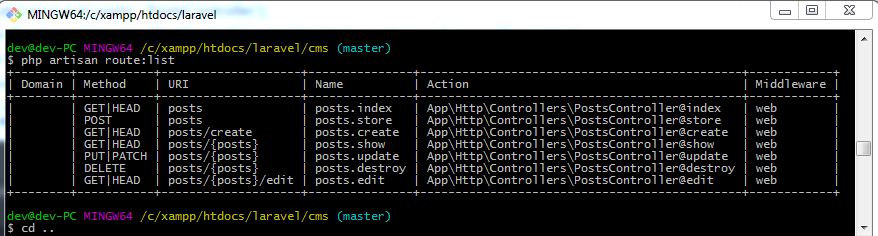
From within bash, cd to root folder and then type(without quotes):
"php artisan route:list"
Classes transfer data from Model(database) to the View(UI) as well as transfer data from View to the Model.(i.e. user logs in to site via login page and retrieve their posts, or vistior fills out form and clicks submit).
Controllers are located in the larvel directory: /app/Http/Controllers
The Controller.php file located in /app/Http/Controllers/ is the main controller.
'namespace' does for functions in classes in the same manor that scope does for variables.
For more information PHP namespaces, check out this tutorial: https://code.tutsplus.com/tutorials/namespacing-in-php--net-27203
For more information on PHP variables and scopes, take a look at the directory: /docs/php
'use' imports a specific glass or namespace into the file that it is used in.
For more information on aliasing/importing with 'use' go to http://uk3.php.net/manual/en/language.namespaces.importing.php
In a terminal, cd to directory of laravel and type(without quotes): "php artisan make:controller YourControllerName"
To create a CRUD contoller, type(without quotes): "php artisan make:controller --resource YourControllerName"
To find other commands in artsian, from the terminal, type: "php artisan"
The following code will route a get request(localhost/post) to a function(@index) within a controller(PostController.php)
Route::get('/post', 'PostsController@index');
Example:
In routes file, add this line:
Route::get('/post/{id}', 'PostsController@index');
In your controller, add this function:
public function index($id)
{
return "I am passing a variable with the number: " . $id;
}
The 'resource' method creates special routes that can be used in the controller.
Using the method 'resource'
In your routes file, type: Route::resource('posts', 'PostsController');
Using the get function, as in: Route::get('/posts', 'PostControllers.php@index'); needs to call a specific method.
The resource function offers full CRUD functionality, and all methods of the controller is passed to the route.
After creating a Route::resource in your routes file, go to a terminal and type in: "php artisan route:list"
This will return your routes, including the Route::resource that validates your route has full CRUD functionality.
Views are located in the directory resources/views/
- add a method to your controller file
- in your views folder add a php file with the name yourfile.blade.php
- in your routes file, add a route that points to the method in your controller file
- In your controller file, add the following method:
public function contact_view(){
return view('contact');
} - In your views folder, create a .php file and name it contact.blade.php
- In your routes.php file, add the following code:
Route::get('/contact', 'PostsController@contact');
Blade is a simple and powerful templating system for laravel.
Example:
To echo the variable $myvar, you would use: {{$myvar)
Default file name: views/layout/app.blade.php
Learn more about laravel blade engine: https://laravel.com/docs/5.2/blade
"Migrations are like version control for your database, allowing your team to easily modify and share the application's database schema."
Upon installation, Laravel creates two migrations, located in the database/migrations folder. The migrations are php classes the create user tables and create password resets table. The functions contained in these classes are extensively powerful, allowing for the creation or deletion(drop) of a table.
To create a migration, using the migrations located in the database/migrations folder, use the Artisan command:
php artisan migrate
To make a migration, type in the command:
php artisan make:migration create_posts_table --create="posts"
Naming scheme for the database table should be lowercase with underscores used as spaces to separate words.
my_database_name
After using the php artisan make:migration command, you should see a new php file in the migrations folder named: yyyy_mm_dd_tttttt_create_posts_table.php
Now, use the migrate command to create the table in your database:
php artisan migrate
Your terminal should return:
Migrated: 2017_05_31_011148_create_posts_table
This can be validated in phpMyAdmin
To delete the last migration that was created, from your command line type:
php artisan migration:rollback
Run the command:
php artisan make:migration add_is_admin_column_to_posts_tables --table="posts"
A new migration file should be added to your migrations folder. In the
function up {
Schema::table{
//add the line here
}
},
add the line:
$table->string('is_admin'); // this is the line to add
To drop the column, add the line:
$table->dropColumn('is_admin');
to the:
function down, schema::table
Now, run the command:
php artisan migrate
Documentation: Database Migrations, Creating Indexes
https://laravel.com/docs/5.2/migrations#creating-indexes
php artisan migrate:reset //deletes(rolls back) all migrations
php artisan migreate:refresh //rolls back and re-runs all migrations. WARNING: This command will delete all data.
php artisan migrate:status //shows what migratiosn have ran
Learn more about laravel migrations: https://laravel.com/docs/5.2/migrations
Documentation: https://laravel.com/docs/5.2/database
These examples are not intended for production use.
Route::get('insert', function(){
DB::insert('insert into posts(title, content) values(?, ?)', ['PHP with Laravel', 'Laravel is the best thing that ever happened to php']);
});
Route::get('/read', function(){
$results = DB::select('select * from posts where id=?', [1]);
foreach($results as $post){
    return $post->title;
}
});
Route::get('/update', function(){
$updated = DB::update('update posts set title="Updated Title" where id=?', [1]);
return $updated;
})
Route::get('/delete', function(){
$deleted = DB::delete('delete from posts where id=?', [1]);
return $deleted;
});
Documentation: https://laravel.com/docs/5.2/eloquent
"The Eloquent ORM included with Laravel provides a beautiful, simple ActiveRecord implementation for working with your database. Each database table has a corresponding "Model" which is used to interact with that table. Models allow you to query for data in your tables, as well as insert new records into the table." ~ laravel.com
php artisan make:model Post -m //note up use of Camel(aka pascal) case in naming scheme. -m (creates migration)
The above model will also create a migration that will be named posts. Models call to lowercase, plural database tables.
Examples:
Model 'Post' == Table 'posts'
Model 'User' == Table 'users'
Model 'Article' == Table 'articles'
Model 'Page' == Table 'pages'
If creating a PostAdmin model for the posts table, Laravel would read the PostAdmin model as being tied to the postadmins table. To resolve this, the following code should be used:
class PostAdmin extends Model
{
protected $table = 'posts';
}
Also, by default, a newly created model believes that the attached table has a primary key of 'id'.
If your primary key is not named 'id', be sure to use a protected view.
class PostAdmin extends Model
{
protected $primaryKey = 'admin_post_id';
}
Documentation: https://laravel.com/docs/5.2/eloquent-relationships
Laravel has several relationships.
- One to One
- One to One (inverse)
- One to Many
- One to Many (inverse)
- Many to Many
- Has Many Through
- Polymorphic Relations
- Many To Many Polymorphic Relations
Example:
Route::get('/user/{id}/post', function($id){
return User::find($id)->post->content;
});
Example:
Route::get('/post/{id}/user', function($id){
return Post::find($id)->user->name;
});
Example:
Route::get('/posts', function(){
$user = User::find(1);

foreach($user->posts as $post){
    echo $post->title . '<br>';
}
});
A pivot table is a lookup table. It is a table that defines how tables relate to other tables.
The "has-many-through" relationship provides a convenient short-cut for accessing distant relations via an intermediate relation. For example, a Country model might have many Post models through an intermediate User model. In this example, you could easily gather all blog posts for a given country. Let's look at the tables required to define this relationship:
Documentation: https://laravel.com/docs/5.2/eloquent-relationships#has-many-through
Polymorphic relations allow a model to belong to more than one other model on a single association. For example, imagine users of your application can "like" both posts and comments. Using polymorphic relationships, you can use a single likes table for both of these scenarios. First, let's examine the table structure required to build this relationship
Documentation: https://laravel.com/docs/5.2/eloquent-relationships#polymorphic-relations
Documentation: https://laravel.com/docs/5.2/eloquent-relationships#many-to-many-polymorphic-relations
In addition to traditional polymorphic relations, you may also define "many-to-many" polymorphic relations. For example, a blog Post and Video model could share a polymorphic relation to a Tag model. Using a many-to-many polymorphic relation allows you to have a single list of unique tags that are shared across blog posts and videos.
Next, we're ready to define the relationships on the model. The Post and Video models will both have a tags method that calls the morphToMany method on the base Eloquent class
Next, on the Tag model, you should define a method for each of its related models. So, for this example, we will define a posts method and a videos method
Once your database table and models are defined, you may access the relationships via your models. For example, to access all of the tags for a post, you can simply use the tags dynamic property:
Tinker is good for playing around with data before implemeting with routes.
Example: From the command line, type:
php artisan tinker
This will return:
Psy Shell v0.7.2 (PHP 7.0.13 ΓÇö cli) by Justin Hileman
Type in:
$post = App\Post::create(['title'=>'PHP from tinker','content'=>'Content created from Tinker']);
Returns:
=> App\Post {#631
title: "PHP from tinker",
content: "Content created from Tinker",
updated_at: "2017-06-06 08:06:23",
created_at: "2017-06-06 08:06:23",
id: 3,
}
Type in:
$post = new App\Post
Returns:
=> App\Post {#626}
Type in:
$post->title = "new title from this object"
$post->content = "This content was created from the command line interface using tinker"
Data has not been saved in database yet.
To save, type in:
$post->save();
Other commands:
$post = App\Post::find(6);
$post = App\Post::where('id',2)->first();
$post = App\Post::whereId(2)->first();
Example:
From command line, type:
$post = App\Post::find(2)
$post->title = "Changed Post Title with Tinker"
$post->content = "Change content with ID=2 with Tinke from command line within phpStorm"
Data is not stored in database.
Type:
$post->save();
Data is now stored in database.
Tinker can be used to find out how relationships are working.
Example: User and Posts Relationship
$user = App\User::Find(1);
Check User with Post relationship, Type:
$user->posts
If the relationship is not set up correctly, a similar message will return:
Illuminate\Database\QueryException with message 'SQLSTATE[42S22]: Column not found: 1054 Unknown column 'posts.user_id' in 'where clause' (SQL: select * frompostswhereposts.user_id= 1 andposts.user_idis not null andposts.deleted_atis null) '
To fix this error, from within your xxxx_xx_xx_xxxxxx_create_posts_table.php script, add the following line:
$table->integer('user_id')->unsigned();
Be sure this line is added within Schema{// insert here} inside the up function
For example:
public function up()
{
Schema::create('posts', function (Blueprint $table) {
$table->integer('user_id')->unsigned();
});
}
If the relationship between User and Roles are correct, when you type in the command:
$user->roles
The command line will return something similar to:
=> Illuminate\Database\Eloquent\Collection {#650
all: [
App\Role {#647
id: 1,
name: "Administrator",
Separate laravel project, located in the /onetoone directory.
Separate laravel project, located in the /onetomany directory.
Separate laravel project, located in the /manytomany directory.
Separate laravel project, located in the /polymorphic directory.
Separate laravel project, located in the /polymorphicmanytomany directory.
Separate laravel project, located in the /login directory.
- Install laravel using composer.
- Using phpMyAdmin, create an empty database.
- Update your connection string in the .env file.
- In terminal, type: php artisan migrate
- In terminal, type: php artisan make:auth

Documentation: https://laravel.com/docs/5.2/authentication
Separate laravel project, located in the /middleware directory.
Make sure to migrate and add user authorization.
Authorization:
php artisan make:auth
To put application in maintenance mode, type:
php artisan down
Back online : php artisan up
-
To create a middleware, type:
php artisan make:middleware RoleMiddleware // naming convention must follow "FirstCase" -
Open file: app/Http/Kernel.php
-
In kernel.php, add an array member to protected $routeMiddleware:
'role' => \App\Http\Middleware\RoleMiddleware::class, -
In your routes file, add a route:
Route::get('/admin/user/role', ['middleware'=>'role', function(){
return "do something";
}]); -
In RoleMiddleware.php, add to public function handle:
return redirect('/'); -
Create a role model and migration:
php artisan make:model Role -m -
Add columns to migrations:
In the *_create_users_table:
$table->integer('role_id');
In the *_create_roles_table:
$table->string('name'); -
In the Role.php file, add:
protected $fillable = [ 'name', 'email', 'password',]; -
in the User.php file, add:
public function role(){
return $this->belongsTo('App\Role');
} -
php artisan make:middleware IsAdmin
-
Register new middleware: In Kernel.php, add to protected $routedMiddleware:
'IsAdmin' => \App\Http\Middleware\IsAdmin::class, -
in phpMyAdmin, insert two rows into the Roles table: administrator, subscriber
-
In the User.php file, add:
public function isAdmin(){
if($this->role->name == 'administrator'){
return true;
}
return false;
} -
In phpMyAdmin,
updatelaravel_middleware.usersSETrole_id= '1' WHEREusers.id= 1; -
In IsAdmin.php, add to public function handle:
$user = Auth::user();
if(!$user->isAdmin()){
return redirect('/');
} -
php artisan make:controller AdminController
-
Add a route:
Route::get('/admin', 'AdminController$index'); -
In the AdminController.php file, add:
public function __construct()
{
$this->middleware('IsAdmin');
}public function index(){
return "you are an admin";
}
Documentation: https://laravel.com/docs/5.2/middleware
Example:
In HomeController.php, append public function index():
public function index(Request $request)
{
// $request->session()->put(['mike'=>'senior developer']); // create session
// $request->session()->get('mike'); // read session
// session(['tina'=>'ceo']); // global function
// $request->session()->forget('mike'); delete mike session
// $request->session()->flush(); // delete all
// return session()->all(); // read all
// return view('home');
}
Documentation: https://laravel.com/docs/5.2/session
Separate laravel project, located in the /mail directory.
Using MailGun API https://www.mailgun.com/
Laravel required package for sending email: composer require guzzlehttp/guzzle
- Signup for an account at mailgun.com
- In the .env file:
change: MAIL_DRIVER=smtp to MAIL_DRIVER=mailgun
add: MAILGUN_DOMAIN=your mailgun domain
add: MAILGUN_SECRET=your mailgun secret api key
Delete: MAIL_HOST=mailtrap.io
Delete: MAIL_PORT=2525
Delete: MAIL_USERNAME=null
Delete: MAIL_PASSWORD=null
Delete: MAIL_ENCRYPTION=null - In mail.php, append:
'from' => ['address' => 'your-email@gmail.com', 'name' => 'Your Name'], - The services.php utilizes configurations set in the .env file.
Documentation: https://laravel.com/docs/5.2/mail
Documentation: https://laravel.com/docs/5.2/helpers
DropzoneJS: http://www.dropzonejs.com/
In your blade template file:
a. add @yield('styles') right before closing body tag.
b. add @yield('scripts') right before closing body tag.
In your view file:
a. Add below first section:
@section('styles')
@stop
b. Add to end:
@section('scripts')
<script src="https://cdnjs.cloudflare.com/ajax/libs/dropzone/5.1.1/min/dropzone.min.js"></script>
@stop
In your controller:
public function store(Request $request){
$file = $request->file('file');
$name = time() . $file->getClientOriginalName();
$file->move('uploads', $name);
Photo::create(['file'=>$name]);
}
https://laravel.com/docs/5.2
https://laravel.com/api/5.2/index.html
https://laravelcollective.com/docs/5.2/html
https://www.jetbrains.com/phpstorm/
https://www.mailgun.com/
http://www.dropzonejs.com/
https://www.udemy.com/php-with-laravel-for-beginners-become-a-master-in-laravel