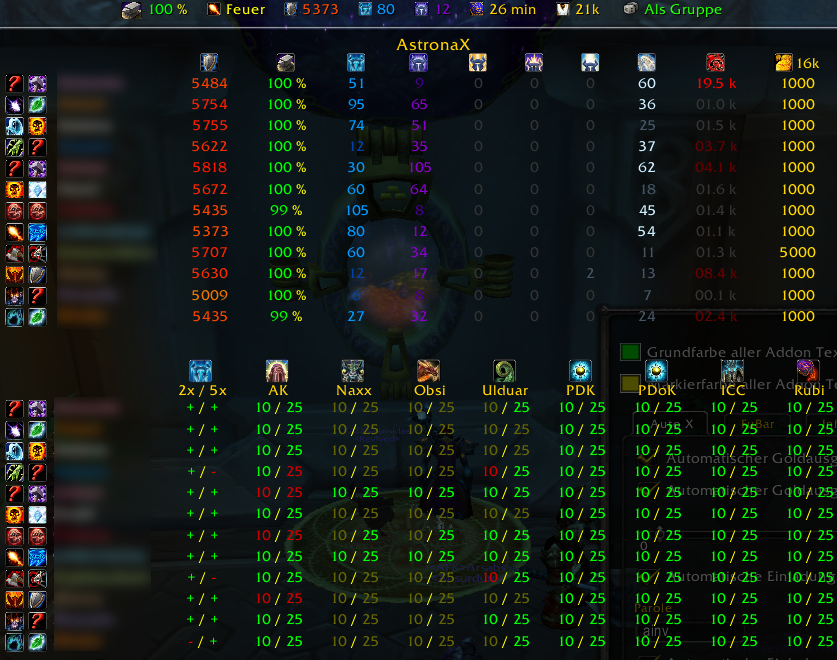
AstronaX is a World of Warcraft Addon for Version 3.3.5a aka Wrath of the Lichking. This is the current development Repository.
Download the latest Version here
Here are some of the features AstronaX currently contains Auto Track Character Stats + Class + Emblems + Gold + Honor + RaidIDs + TalentSpecs") Gui for easy raid apply Gui for simple raid search in world channel Auto Tracking of Daily Heroics and Weekly Raid Quest as well as Weekly 1KW PvP Weekly
TopBar Requires Fubar Broker Version 3+ (Latest for Wotlk) installed otherwise the information are displayed as button next to your minimap


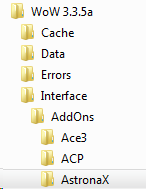
In the End the extracted AstronaX folder should be listed here
C:/Program Files/World of Warcraft/Interface/Addons/AstronaX
In my example screenshot i have installed WoW in the WoW 3.3.5a folder

Exit World of Warcraft completely
Download the addon
    Save the .zip/.rar files to Downloads / Desktop or where ever you want
Extract the file – commonly known as ‘unzipping’
    Windows
        Since Windows XP has a built in ZIP extractor. Double click on the file to open it, inside should be the file or folders needed.
    Mac Users
        StuffitExpander: Double click the archive to extract it to a folder in the current directory.
Verify your WoW Installation Path
    That is where you are running WoW from and THAT is where you need to install your addons.
Extract the files/Folders
    Open your World of Warcraft folder. (default is C:\Program Files\World of Warcraft\)
    Go into the “Interface” folder.
    Go into the “AddOns” folder.
	Create Interface and Addons folder if they do not exist
    Copy or extract all folders from the zip to the addons folder
    The “Addons” folder should have the “AstronaX” folder in it.
Start World of Warcraft
Make sure AddOns are installed
    Log in.
    At the Character Select screen, look in lower left corner for the “addons” button.
    If button is there: make sure all the addons you installed are listed and make sure they are are loaded.
    If the button is NOT there: means you did not install the addons properly. Look at the above screenshots. Try repeating the steps or getting someone who knows more about computers than you do to help.
World of Warcraft vollständig beenden
Das Addon herunterladen
    Speichern Sie die .zip/.rar-Dateien unter Downloads / Desktop oder wo immer Sie wollen
Entpacken der Datei - allgemein bekannt als 'Unzipping'.
    Windows
        Seit Windows XP gibt es einen eingebauten ZIP-Extraktor. Doppelklicken Sie auf die Datei, um sie zu öffnen, darin sollten sich die benötigte(n) Datei(en) befinden.
    Mac-Benutzer
        StuffitExpander: Doppelklicken Sie auf das Archiv, um es in einen Ordner im aktuellen Verzeichnis zu entpacken.
Überprüfen Sie Ihren WoW-Installationspfad
    Von dort aus führen Sie WoW aus, und von dort aus müssen Sie Ihre Addons installieren.
Entpacken Sie die Dateien/Ordner
    Öffnen Sie Ihren World of Warcraft-Ordner. (Standard ist C:\Programme\World of Warcraft\)
    Gehen Sie in den Ordner "Interface".
    Gehen Sie in den Ordner "AddOns".
	Erstellen Sie den Ordner "Interface" und "AddOns", wenn sie nicht existieren.
    Kopieren oder extrahieren Sie alle Ordner aus der Zip-Datei in den Addons-Ordner
    Der Ordner "Addons" sollte den Ordner "AstronaX" enthalten.
World of Warcraft starten
Stellen Sie sicher, dass AddOns installiert sind
    Loggen Sie sich ein.
    Auf dem Bildschirm Zeichenauswahl suchen Sie in der linken unteren Ecke nach der Schaltfläche "Addons".
    Falls die Schaltfläche vorhanden ist: Vergewissern Sie sich, dass alle von Ihnen installierten Addons aufgelistet sind und dass sie geladen sind.
    Wenn die Schaltfläche NICHT vorhanden ist: bedeutet, dass Sie die Addons nicht richtig installiert haben. Schauen Sie sich die obigen Screenshots an. Versuchen Sie, die Schritte zu wiederholen oder jemanden, der sich besser mit Computern auskennt als Sie selbst, um zu helfen.
For this to work, the command prompt (also known as cmd) must be started as admin. To do this, go to Start->Programs->Accessories and activate "Run as administrator" in the properties:
stands for your WoW installation folder, by default this should be C:\Programs\World Of Warcraft. and are your account names, also known as LoginName
cd /WTF/Account mklink /d "" "" mklink /d "" ""
We use the ACCOUNT1 folder as a starting point. This means that we configure or perhaps even have already stored all the settings in the ACCOUNT1 and now want to use this with the ACCOUNT2. cd... we change to the directory of WoW MKlNK We create a virtual folder for the 2nd account, note that the folder must NOT exist before, rename the old folder alternive. the 3rd line is optional for people with more than two accounts, you can do this for any other account.
As already mentioned, there is then only one real folder, the one from Account1. The folders for Account2 and 3 etc, link only to the folder of the 1st account. Addons that save their settings on the account side, not per character, share the settings across all accounts. This also applies to Global Macros, which are available for both accounts. If you edit a macro or delete it in the Global Macro tab, this applies to all accounts we have linked to it.
Damit dies funktioniert, muss die Eingabeaufforderung (auch als cmd bekannt) als Admin gestartet werden. Dazu geht ihr über Start->Programme->Zubehör auf die Eingabeaufforderung und aktiviert in den Eigenschaften "Als Administrator ausführen":
steht für euren WoW Installations Ordner, standartmäßig müsste das C:\Programme\World Of Warcraft\ sein. und stehen für eure Accountnamen, auch als LoginName bekannt
cd /WTF/Account
mklink /d "" ""
mklink /d "" ""
Wir verwenden den Ordner des ACCOUNT1 als Ausgangspunkt. Das heißt wir konfigurieren oder haben sogar vielleicht schon alle Einstellungen im ACCOUNT1 hinterlegt und wollen dies nun mit dem ACCOUNT2 nutzen. cd... wir wechseln in das Verzeichnis von WoW mklink... Wir erstellen einen virtuellen Ordnern für den 2. Account, beachtet dass der Ordner vorher NICHT existieren darf, benennt den alten Ordner alternive um. die 3. Zeile ist optional für leute mit mehr als zwei Accounts, man kann das natürlich auch für jeden weiteren Account machen.
Wie schon erwähnt, gibt es dann nur noch einen einzigen echten Ordner, den von Account1. Die Ordner für Account2 und 3 usw, verlinken nur auf den Ordner des 1. Accounts. Damit teilen sich Addons die Ihre Einstellungen Accountseitig, also nicht pro Charakter, speichern, die Einstellungen über alle Accounts hinweg. Dies gilt auch für Globale Macros, diese sind dann bei beiden Accounts verfügbar, editiert ihr ein Macro oder löscht es im Globalen Macro Reiter, dann gilt das für alle Accounts die wir hiermit verlinkt haben.