How to flash opendps from scratch
This guide is a walk-through on how to how to flash opendps from scratch on Fedora 34. It should be very similar on most other Linux distro's, but no guarantees.
Disclaimer: before you flash, decide if you have the equipment, technical knowledge and patience to do so. While opendps is a fantastic software, it is not without its bugs and issues. If you end up with a bricked device, there is no guarantee you will be able to recover it.
- Hardware requirements
- Software requirements
- Installing GNU Arm Embedded Toolchain
- Clone opendps
- Customize settings
- Compile opendps
- Setup Python venv and install requirements
- Unlock and flash opendps
- Calibration
* st-link programmer (or a jtag programmer)
* USB to serial adapter (i recommend buying your DPS with the USB
  adapter included, but any FTDI / CH340 adapter should work)
* adjustable DC power supply, to power the DPS under calibration
* large power resistor for current calibration (i use a 6.8 ohm 150W resistor)
* multimeter
On a fresh Fedora 34 install you will need the following packages:
* python3-devel
* telnet
* openocd
* ncurses-compat-libs
Install them using the terminal:
sudo dnf install python3-devel telnet openocd ncurses-compat-libs
To access the USB to serial adapter you will need to add your user to the dialout group. Replace brackets with your username:
sudo usermod -aG dialout <user>
Restart for the changes to take effect.
Download the latest GNU Arm Embedded Toolchain.
You should download the GNU-RM package.
Open a terminal, create a directory called opt, and unpack the toolchain there:
mkdir opt
cd opt
tar -xjf ~/Downloads/gcc-arm-none-eabi-<insert version number here>.tar.bz2
(Insert the toolchain-version you downloaded, or use tab to auto-complete.)
To point the terminal to gcc when we ask to compile, we need to give it a path:
export PATH="/home/<user>/opt/gcc-arm-none-eabi-<insert version number here>/bin/:$PATH"
(Insert username and toolchain-version)
You will need to do this every time you open the terminal and want to compile. To add the path permanently, you can append the path to the .bashrc file in you home folder.
Check that the terminal finds gcc and gbd:
arm-none-eabi-gcc --version
arm-none-eabi-gdb --version
The commands should give a similar output:
GNU gdb (GNU Arm Embedded Toolchain 10.3-2021.07) 10.2.90.20210621-git
Copyright (C) 2021 Free Software Foundation, Inc.
License GPLv3+: GNU GPL version 3 or later <http://gnu.org/licenses/gpl.html>
This is free software: you are free to change and redistribute it.
There is NO WARRANTY, to the extent permitted by law.
Now return to your home folder:
cd ~
Create a folder git in your home directory, and clone the opendps repository:
mkdir git
cd git
git clone --recursive https://github.com/kanflo/opendps.git
cd opendps
If your DPS model is NOT the DPS5005, or you want custom settings such as custom colors, max current e.g., you can modify the following file in a text editor before compiling: ~/git/opendps/opendps/Makefile
If you run
make -C libopencm3
it will give an error:
/bin/sh: -c: line 0: unexpected EOF while looking for matching `"'
/bin/sh: -c: line 1: syntax error: unexpected end of file
make: *** [Makefile:64: lib/stm32/f0] Error 1
make: Leaving directory '/home/<user>/git/opendps/libopencm3'
This is caused by opendps using an old version of libopencm3 drivers. Before we can compile, this needs to be fixed. Open the libopencm3 makefile ~/git/opendps/libopencm3/Makefile
Remove the quotation marks on line 64.
Replace:
$(Q)$(MAKE) --directory=$@ SRCLIBDIR="$(SRCLIBDIR)"
With:
$(Q)$(MAKE) --directory=$@ SRCLIBDIR=$(SRCLIBDIR)
Save the file.
We are now ready to compile.
Run:
make -C libopencm3
If successful, the output should end like this:
AR      libopencm3_vf6xx.a
make: Leaving directory '/home/<user>/git/opendps/libopencm3'
Next, compile the opendps firmware:
make -C opendps
If successful, the output should end like this:
CC      protocol_handler.c
LD      opendps_DPS5005.elf
make: Leaving directory '/home/<user>/git/opendps/opendps'
Finally, the bootloader:
make -C dpsboot
If successful, the output should end like this:
CC      protocol_handler.c
LD      opendps_DPS5005.elf
make: Leaving directory '/home/<user>/git/opendps/opendps'
You have now compiled opendps!
Some python packages need to be installed, see requirements.txt. The easiest solution is to install them system wide:
sudo pip install -r requirements.txt
If you rather keep these packages isolated in the opendps folder, you can use a virtual environment.
Create a venv called env:
python3 -m venv env
Activate it:
source env/bin/activate
Install the packages:
pip install -r requirements.txt
To delete the packages later, just delete the env folder! The drawback is that you need to activate the venv every time you open a new terminal and want to talk to your opendps.
We are now ready to unlock and flash!
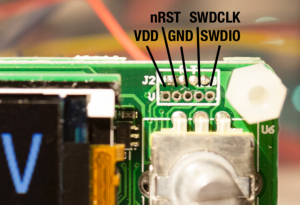
Connect GND, SWDIO and SWDCLK between your st-link and DPS. I just use some breadboard jumper wires, which fit perfectly!
Power on the DPS, and plug in the st-link to your computer.
Keep the python terminal open, and open a new terminal. In the new terminal, run:
lsusb
Make sure the st-link is listed, then:
openocd -f interface/stlink.cfg -f target/stm32f1x.cfg
Next we want to save some dumps of the microcontroller. Let the openocd terminal stay open, and switch to the python terminal. Run:
./ocd-client.py all > 5V-off.txt
The DPS will freeze, so turn off the power to the DPS. Next switch to the openocd terminal, and stop openocd by pressing "Ctrl + C".
Repeat by powering on the DPS, and in the openocd terminal run:
openocd -f interface/stlink.cfg -f target/stm32f1x.cfg
Again, swith to the python terminal, turn on the output on the DPS (on/off button) and run:
./ocd-client.py all > 5V-on.txt
Repeat these steps again with another output voltage, e.g. 15V. When you are done, power on the DPS and run openocd again.
Open yet another terminal. You now have three terminals open:
- One with the python venv activated, navigated to ~/git/opendps
- A second running openocd
- A third for telnet
Now we will use telnet to erase the DPS.
In the telnet terminal:
telnet localhost 4444
reset halt
flash erase_address unlock 0x08000000 0x10000
You will now get an error, and need to do this step again.
Disconnect power to your DPS, stop openocd (Ctrl + C) and connect power again.
In the openocd terminal:
openocd -f interface/stlink.cfg -f target/stm32f1x.cfg
In the telnet terminal:
telnet localhost 4444
reset halt
flash erase_address unlock 0x08000000 0x10000
Now it should confirm that it successfully erased the microcontroller.
We can now flash the files we compiled earlier.
In the python terminal:
make -C opendps flash
Then:
make -C dpsboot flash
If you get:
** Verified OK **
** Resetting Target **
Congratulations! You have now flashed opendps!
You can power it off and close the openocd and telnet terminals.
Now that your DPS is running opendps, it needs to be calibrated.
Connect the USB-serial board between your computer and DPS module. Find out what your adapter is called (e.g. ttyUSB0) by running this command in the python terminal:
dmesg | grep tty
Open the dpsctl folder:
cd dpsctl
Now ping the DPS:
dpsctl.py -d /dev/<ttyXXXX> --ping
(insert correct device name)
If you get a reply, you can start the calibration process. First, adjust the DPS input voltage fairly low, but still within its range (6 - 55VDC for the DPS5005).
Then run:
dpsctl.py -d /dev/<ttyXXXX> -C
Follow the instructions very precisely. Do not have a load connected to the outputs unless specified.
Good luck!
Written by Håvard J.