We will use Centos 8 for the training
- systemd
- journald
- firewalld
- ip
- System V
- Upstart
- Systemd
- /usr/lib
- /run/systemd
- /etc/systemd/system
https://www.stevenrombauts.be/2019/01/run-multiple-instances-of-the-same-systemd-unit/
# Start/Stop/Status
systemctl status sshd.service
systemctl start sshd.service
systemctl stop sshd.service

# See configuration of a service
systemctl cat sshd.service

# Show all running services
systemctl list-units -t service
systemctl -t service

# Show all services
systemctl list-unit-files -t service

# disable/enable a service / is-enabled
systemctl disable sshd
systemctl enable sshd
systemctl is-enabled sshd
echo $?

# mask/unmask
systemctl mask sshd
systemctl unmask sshd
# main.example.com
# adjust interface from eth0 -> ?
ip addr add 10.200.45.100/24 dev eth0

# secondary.example
# adjust interface from eth0 -> ?
# ip addr add 10.200.45.110/24 dev eth0

# Test the link from main.example.com -> secondary.example.com
ping 10.200.45.110
# Test the link from secondary.example.com -> main.example.com
ping 10.200.45.100
###
main.example.com
###
# nano /etc/sysconfig/network-scripts/ifcfg-eth0:0
# And configure the settings:

DEVICE=eth0:0
BOOTPROTO=static
IPADDR=10.200.45.100
NETMASK=255.255.255.0
ONBOOT=yes

###
secondary.example.com
###
# nano /etc/sysconfig/network-scripts/ifcfg-eth0:0
# And configure the settings:

DEVICE=eth0:0
BOOTPROTO=static
IPADDR=10.200.45.110
NETMASK=255.255.255.0
ONBOOT=yes
sudo nmcli show
sudo nmcli con mod "System eth1" +ipv4.addresses "192.168.122.11/24"
sudo nmcli con down "System eth1"
sudo nmcli con up "System eth1"

# Interface name change
nmcli conn modify WC1 connection.id WC1a
- ping
- traceroute
- nmap
- DNS and IP address testing
openssl s_client -connect www.heise.de:https
# STEP 2: Within the connection
openssl s_client -connect www.heise.de:https
GET / HTTP/1.1
HOST: www.thomas-krenn.com
https://www.cloudflare.com/img/learning/dns/what-is-dns/dns-lookup-diagram.png
# Caching Server
yum install bind
# /etc/named.conf
listen-on port 53 { any; };
allow-query     { any; };
systemctl restart named

# Testing
yum provides dig
# instal package
dig @localhost google.com
# makes a recursive request
dig google.de +trace
# /etc/named.conf
# put it just after the other zone
zone "example.com." IN {
            type master;
            file "example.com.zone";
};

# /var/named/example.com.zone
$TTL 30
@ IN SOA  localhost. admin.example.com. (
2012092901 ; serial YYYYMMDDRR format
3H         ; refresh
1H         ; retry
2H         ; expire
1M)        ; neg ttl

                  IN NS localhost.;
www.example.com.  IN A 192.168.111.45
www.example.com.  IN AAAA fe80::22c9:d0ff:1ecd:c0ef
foo.example.com.  IN A 192.168.121.11
bar.example.com.  IN CNAME www.example.com.
;generate one hundred entries host1 thru host100
$GENERATE 1-100 host$.example.com.  IN A 10.20.45.$
cd /etc/httpd/
# cleaner to have the own directory for projects
mkdir sites.d
# add this entry to httpd.conf
echo 'echo "IncludeOptional /etc/httpd/sites.d/*.conf' >> /etc/httpd/conf/httpd.conf
# reload
systemctl reload httpd
# Remember for testing to put the entries in your hosts - file on windows
192.168.56.102 example.com
192.168.56.102 www.example.com
192.168.56.102 static.example.com
# /etc/httpd/sites.d
----
_default.conf
----
NameVirtualHost *
<VirtualHost *>
ServerAdmin webmaster@example.com
DocumentRoot /var/www/html

<Directory /var/www/html>
   Options +Indexes
</Directory>


</VirtualHost>
----
example.com.conf
----
NameVirtualHost *
<VirtualHost *>
ServerAdmin webmaster@example.com
DocumentRoot /var/www/example.com/
ServerName  example.com
ServerAlias www.example.com
ErrorLog logs/example.com-error_log
TransferLog logs/example.com-access_log
</VirtualHost>
----
sites.example.com.conf
----
NameVirtualHost *
<VirtualHost *>
ServerAdmin webmaster@example.com
DocumentRoot /var/www/static.example.com/
ServerName  static.example.com
ServerAlias static2.example.com
ErrorLog logs/static.example.com-error_log
TransferLog logs/static.example.com-access_log
</VirtualHost>
[root@main sites.d]#
# imporant - set this path in
# /etc/httpd/conf/httpd.conf
echo 'IncludeOptional 'sites.d/*.conf' >> /etc/httpd/conf/httpd.conf
# What did letsencrypt change
# folder: /etc/httpd/conf.d
# Upgrade http to https by redirect
# or in # version with mod_rewrite
<VirtualHost *>
  ServerName nb1.t3isp.de
  ServerAlias nb2.t3isp.de
  DocumentRoot /var/www/nb1.t3isp.de/
  <Directory /var/www/nb1.ti3p.de/>
      Options -Indexes +FollowSymLinks
      AllowOverride All
  </Directory>
  ErrorLog /var/log/httpd/nb1.t3isp.de
  CustomLog /var/log/httpd/nb1.t3isp.de combined
#RewriteEngine on
#RewriteCond %{SERVER_NAME} =nb2.t3isp.de [OR]
#RewriteCond %{SERVER_NAME} =nb1.t3isp.de
#RewriteRule ^ https://%{SERVER_NAME}%{REQUEST_URI} [END,NE,R=permanent]

  Redirect permanent / https://nb1.t3isp.de

</VirtualHost>:w
~
~
~
~
"nb1.t3isp.de.conf" 19L, 552C
# To test ssl certificate use:
https://www.ssllabs.com/ssltest
s.o.
# Serve another directory instead of /test
Alias /test /var/www/test
yum install postfix
postconf -e "inet_interfaces = all"
postconf -e "mynetworks_style = subnet"
systemctl restart postfix
# Note: Be aware the firewall may interfere with this test.
# Test from a remote server using telnet (you may need to install telnet):
# Note: The commands (like helo,mail,rcpt, etc) may need to be capitalized on some distributions.

# telnet <IP ADDRESS> 25
helo localhost
mail from:root@localhost
rcpt to:root@localhost
data
Subject: email subject
This is neato
.
quit
#
# Verify the mail was received -> mutt
yum install dovecot
# /etc/dovecot/dovecot.conf
# Adjst line as follows
protocols = imap pop3 lmtp

# /etc/dovecot/conf.d/10-mail.conf
# adjust this line as follow
mail_location = mbox:~/mail:INBOX=/var/spool/mail/%u

# Adjust user directory
# chmod 600 /var/spool/mail/vagrant


systemctl restart dovecot

# Test from secondary with imap
mutt -f imap://vagrant@192.168.33.10
nmcli connection modify enp1s0 +ipv4.routes "192.168.122.0/24 10.10.10.1"
# it is a bit different in Centos 8
# because of NetworkManager
# 1. Show all connections
nmcli con show
# Setup vlan connection with nmtui
# Set static ip
# and 1. deactivate it / 2. activate it

# Manually up connection
nmcli con up "VLAN connection 2"

# Manually down connection
nmcli con down "VLAN connection 2"

# Manually delete connection
nmcli con del "VLAN connection 2"

# show details
nmcli connection show "VLAN connection 2"

# change specific settings
nmcli conn modify "VLAN connection 2" 802.mtu 1496
# Since Centos 8 chrony is the default ntp serer
https://computingforgeeks.com/how-to-configure-ntp-server-using-chrony-on-rhel-8/

# Minimum configuration
pool pool.ntp.org iburst
driftfile /var/lib/chrony/drift
makestep 1 3
rtcsync

# Docs
https://chrony.tuxfamily.org/
# manually update like ntpdate
# updates in 1 second
chronyd -q -t 1 'server 192.168.56.102 iburst maxsamples 1'
acl workinghours time MTWHF 08:00-18:00
http_access allow hourlyworkers workinghours
http_access deny hourlyworkers
# To restrict by a part of the URI:
acl banned_reddit url_regex ^http://.*reddit.com/\.*$
http_access deny banned_reddit
# To allow only authenticated users to use the following configuration:
acl valid_users proxy_auth REQUIRED
http_access allow valid_users
http_access deny all
yum install squid
# add the setings in
# /etc/squid/squid.conf
#
# INSERT YOUR OWN RULE(S) HERE TO ALLOW ACCESS FROM YOUR CLIENTS
#
acl t3isp url_regex ^http://.*.t3isp.de/.*$
http_access deny t3isp

acl examplenetwork src 192.168.33.0/24
http_access allow examplenetwork
squid -k parse
systemctl restart squid
# add proxy in browser
# 192.168.x.x 3128
# test if proxy works by opening
# http://schulung.t3isp.de
# another url, that is not existent
# http://foo.example.com
# Restrict based on ldap
https://workaround.org/squid-ldap/
# Restrict for specific users
# Subset who don't have access to web whatsapp
acl no_web_whatsapp src IP1 IP2 IP3 IP4
acl web_whatsapp dstdomain web.whatsapp.com
# Group incouding IP1-IP4; the rest of group has access to web whatsapp
acl your_group src IP1 IP2 IP3 IP4 IP5 IP6 IP7 IP8 IP9 IP10 IP11

http_access deny no_web_whatsapp web_whatsapp
http_access allow your_group
## Installation

# on centos8 we need the repo from docker
sudo dnf config-manager --add-repo=https://download.docker.com/linux/centos/docker-ce.repo
# containerd version does not fit
# so we take nobest option
sudo dnf install --nobest docker-ce
## Running the show

systemctl start docker
systemctl enable docker
docker pull docker.io/httpd
docker images
docker images --all
docker run httpd
yum install wget
wget -dump http://172.0.0.1
# ctl-c
docker stop httpd
# Important ! remove container
# show all container, also those who are stopped
docker ps -a
docker rm httpd
docker rmi -f docker.io/httpd
systemctl stop docker
systemctl disable docker
# Run private repo
https://linuxhint.com/setup_own_docker_image_repository/
rpm --import https://www.elrepo.org/RPM-GPG-KEY-elrepo.org
yum install https://www.elrepo.org/elrepo-release-8.el8.elrepo.noarch.rpm
sudo dnf install vim drbd90-utils kmod-drbd90
# adjust selinux
sudo dnf -y install policycoreutils-python-utils
sudo semanage permissive -a drbd_t
# if firewall is running
sudo firewall-cmd --add-port=6996-7800/tcp --permanent
sudo firewall-cmd --reload
# Create additional disk in virtualbox
- Hard drive partition (or a full physical hard drive)
- Software RAID device
- LVM Logical Volume
- Any other block device type found on your system.
lsblk
# /etc/drbd.conf
# holds the generic configuration file / nothing needs to changed there

# Create a resource - file
# WE USE THE COMPLETE DISK
# on main
# vi /etc/drbd.d/resource0.conf
resource resource0 {
  on main.example.com {
    device    /dev/drbd1;
    disk      /dev/sdb;
    address   192.168.33.10:7789;
    meta-disk internal;
  }
  on secondary.example.com {
    device    /dev/drbd1;
    disk      /dev/sdb;
    address   192.168.33.11:7789;
    meta-disk internal;
  }
}
# Execute on both nodes main.example.com / secondary.example.com
sudo drbdadm create-md resource0
sudo drbdadm up resource0
# currently inconsistent
sudo drbdadm status resource0
# Now decide with which node to feed the data with
# we go for main.example.com
# -> so -> do this -> on main.example.com
sudo drbdadm primary --force resource0
sudo drbdadm status resource0
resource0 role:Primary
  disk:UpToDate
  secondary.example.com role:Secondary
    replication:SyncSource peer-disk:Inconsistent done:48.29
# 48.29 means percentage here
# populate on master
mkdir /mnt/drbd
mount /dev/drbd1 /mnt/drbd
cd /mnt/drbd
for i in {1..10}; do   sudo touch /mnt/drbd/${i}.txt; done
ls -la
cd ..
# change main.example.com from master to secondary
umount /mnt/drbd
drbdadm secondary resource0
# Change secondary.example.com from secondary to master
sudo drbdadm primary resource0
mkdir /mnt/drbd
mount /dev/drdb1 /mnt/drbd
cd /mnt/drbd

$ModLoad imuxsock  # support for local system logging
$ModLoad imjournal # access to systemd journal
$ModLoad imklog    # kernel logging support
Setup Logging to remote with systemd
#Open the firewall ports on main.example.com (192.168.122.38) and test.
#[root@main:  ̃]# firewall-cmd --zone=public --add-port=19531/tcp --perm
#[root@main:  ̃]# firewall-cmd --zone=public --add-port=19532/tcp --perm
#[root@main:  ̃]# firewall-cmd --reload

cp /usr/lib/systemd/system/systemd-journal-remote.* /etc/systemd/system/

# /etc/systemd/system/systemd-journal-remote.service
[Service]
ExecStart=/usr/lib/systemd/systemd-journal-remote --listen-http=-3 --output=/var/log/journal/remote/ User=systemd-journal-remote

systemctl daemon-reload
systemctl start systemd-journal-remote
systemctl | grep journal
## secondary
cat  /etc/systemd/journal-upload.conf
# See journal-upload.conf(5) for details
[Upload]
URL=http://192.168.122.38:19532
# ServerKeyFile=/etc/ssl/private/journal-upload.pem
# ServerCertificateFile=/etc/ssl/certs/journal-upload.pem
# TrustedCertificateFile=/etc/ssl/ca/trusted.pem
systemctl start systemd-journal-upload

# problems when starting might come from selinux
# sestatus
# troubleshoot with /var/log/audit/audit.log
# You will find the type=AVC there an the port denied
# Fix: might take some time
# does not work
# sudo semanage port -a -t unreserved_port_t -p tcp 19532
716  sealert -a /var/log/audit/audit.log
  717  ausearch -c 'systemd-journal' --raw | audit2allow -M my-systemdjournal
  718  ls -la
  719  vi my-systemdjournal.te
  720  vi my-systemdjournal.te
  721  getsebool nis_enabled
  722  setsebool nis_enabled on
  723  getsebool nis_enabled
  724  systemctl start systemd-journal-upload
  725  systemctl status systemd-journal-upload
  726  history
systemctl status systemd-journal-upload
# systemctl | grep journal
# Monitor the messages from secondary with journalctl.
[root@main  ̃]# journalctl -f -D /var/log/journal/remote
[root@secondary  ̃]# logger "This is a test message sent to the systemd-journal".
http://manpages.ubuntu.com/manpages/bionic/de/man8/systemd-journal-upload.8.html
--> see bottom of file
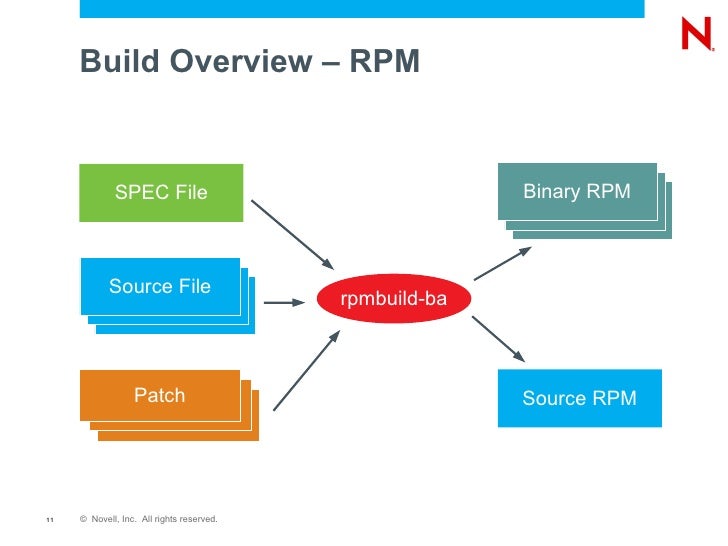
http://ftp.rpm.org/max-rpm/s1-rpm-build-creating-spec-file.html
# root
dnf install rpm-build rpmdevtools git
# security concerns - do not run as root
# non-root
exit # assuming coming from root
cd
rpmdev-setuptree
cd ~/rpmbuild/SOURCES
mkdir HelloWorld-1.0
echo '#!/bin/bash' > HelloWorld-1.0/HelloWorld.sh
echo 'echo "hello world!"' >> HelloWorld-1.0/HelloWorld.sh
chmod 755 HelloWorld-1.0/HelloWorld.sh
touch HelloWorld-1.0/configure
chmod 755 HelloWorld-1.0/configure
tar czvf HelloWorld-1.0.tar.gz HelloWorld-1.0
# now the spec
cd
rpmdev-newspec rpmbuild/SPECS/HelloWorld-1.0.spec

# Now edit the settings
vi ~/rpmbuild/SPECS/HelloWorld-1.0.spec

# Edit the following lines and change it to this:
Name: HelloWorld
Version: 1.0
Release: 1%{?dist}
Summary: Hello World Script
Group: Miscellaneous
License: License text

# URL:
Source0: HelloWorld-1.0.tar.gz
BuildArch: noarch
BuildRoot: %{_tmppath}/%{name}-%{version}-%{release}-root-%(%{__id_u} -n)
# BuildRequires:
# Requires:

%description
This is a text describing what the Package is meant for

%prep

%setup -q

%build

%install

install -d -m 0755 $RPM_BUILD_ROOT/opt/HelloWorld
install -m 0755 HelloWorld.sh $RPM_BUILD_ROOT/opt/HelloWorld/HelloWorld.sh

%clean

rm -rf $RPM_BUILD_ROOT

%files

%defattr(-,root,root,-)

# %doc

/opt/HelloWorld/HelloWorld.sh

%changelog
# building
rpmbuild -ba rpmbuild/SPECS/HelloWorld-1.0.spec

# Assuming no errors occurred, new package is under the RPMS folder ready to be installed.
cd ~/rpmbuild/RPMS/noarch
ls -la
# output
# total 4
# -rw-rw-r-- 1 user user 2104 Sep 26 16:53 HelloWorld-1.0-1.el8.noarch.rpm

rpm -qpl HelloWorld-1.0-1.el8.noarch.rpm
# output
# /opt/HelloWorld/HelloWorld.sh

# switch to root
cd
cd rpmbuild/RPMS/noarch
sudo su
rpm -ihv HelloWorld-1.0-1.el8.noarch.rpm
rpm -qa HelloWorld
# Output
# HelloWorld-1.0-1.el8.noarch

/opt/HelloWorld/HelloWorld.sh
# Output
# Hello world!