tutorial package for build shinyRoughJS with htmlwidgets as shinyRoughJSbasic
i learned with dean attali's this awesome tutorial
as my goal is use rough.js in shiny, we'll make some rectangles that given as example
and i prefer shiny package name as
shiny~~JS, shiny + ~~ + JavaScript
since my first shiny package shinyCyJSso i'll use shinyRoughJS(+basic for tutorial)


R/shinyRoughJSbasic.R
inst/
inst/htmlwidgets
inst/htmlwidgets/shinyRoughJSbasic.js
inst/htmlwidgets/shinyRoughJSbasic.yaml
inst/htmlwidgets/lib
rough.js
inst/htmlwidgets/lib/rough-3.1.0
this yaml file will take format of
dependencies:
  - name:
    version:
    src: (base javascript file's location)
    script: (base javascript file)
    stylesheet: (for dependent css file)
also need empty new line at end of file and make comment with #
i used this content as shinyRoughJSbasic
dependencies:
  - name: rough
    version: 3.1.0
    src: htmlwidgets/lib/rough-3.1.0 # directory
    script: rough-3.1.0.js # script
this javascript consists with
HTMLWidgets.widget({
  name : ,
  type : 'output',

  factory : function(el,width,height){
    return {
      renderValue : function(input){

      }
    }
  }
})
notice that, each base javascript needs different initiation.
i used this for shinyRoughJSbasic
HTMLWidgets.widget({
  name : 'shinyRoughJSbasic',
  type : 'output',

  factory : function(el, width, height) {
	var container = document.getElementById(el.id);

	// Initialisation
	var cv = document.createElement("canvas");
	cv.id = 'minicv'; // mini canvas
	container.appendChild(cv)
	cv.setAttribute('width',container.clientWidth)
	cv.setAttribute('height',container.clientHeight)

    var rc = rough.canvas(document.getElementById('minicv'));
    return {
      renderValue: function(input) {
        var Items = input.items;
        for( var i = 0; i<Items.length; i++){
          var thisItem = Items[i];
          if(thisItem.type=='rectangle'){
            rc.rectangle(thisItem.x, thisItem.y, thisItem.w, thisItem.h, thisItem.options)
          }
        }
      }
    }
  }
});R file needs import htmlwidgets
R file needs 3 function at least with export
- widget function this will take input and options
and make htmlwidgets with base javascript functions
for example, shinyRoughJSbasic will require element, with type, size, location
#' @export
shinyRoughJSbasic = function(items = list(),options = list(),width = NULL, height = NULL, elementId = NULL){
  input = list( items = items, options = options )
  htmlwidgets::createWidget(
    name = 'shinyRoughJSbasic',
    input,
    width = width,
    height = height,
    package = 'shinyRoughJSbasic',
    elementId = elementId
  )
}
and remain two paired function will send/recieve r object to shiny application.
for more information, see this official cheatsheet
- render function
#' @export
renderRough = function(expr, env = parent.frame(), quoted = FALSE){
  if(!quoted){ expr = substitute(expr) } # force quoted
  htmlwidgets::shinyRenderWidget(expr, shinyRoughJSbasicOutput, env, quoted = TRUE)
}- output function
#' @export
shinyRoughJSbasicOutput = function(outputId, width = '100%', height = '400px'){
  htmlwidgets::shinyWidgetOutput(outputId, 'shinyRoughJSbasic', width, height, package = 'shinyRoughJSbasic')
}to pass r object to shiny, it should be capsuled in list
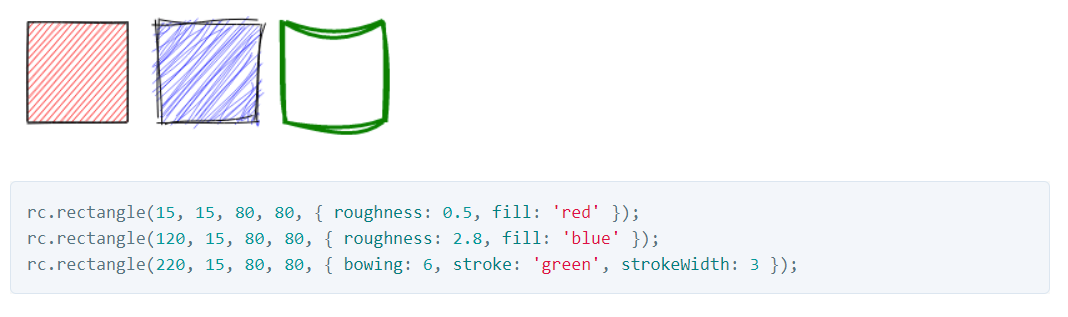
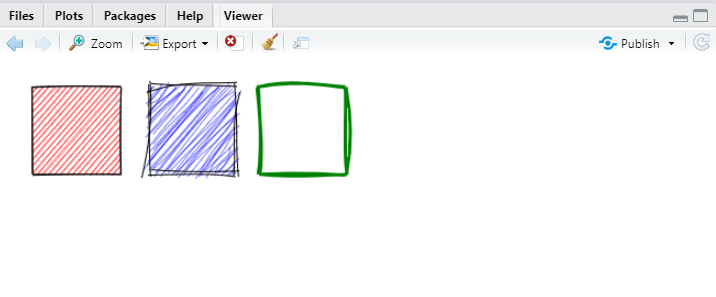
here are codes i used to check shinyRoughJSbasic in viewer or web browser
// RoughRect is function to build rectangle object with (xpos, ypos, width, height)
// which also included in R file

shinyRoughJSbasic(
  list(
  RoughRect(15,15,80,80, RoughOptions(roughness = 0.5, fill='red')),
  RoughRect(120,15,80,80, RoughOptions(roughness = 2.8, fill='blue')),
  RoughRect(220,15,80,80, RoughOptions(bowing = 6, stroke = 'green', strokeWidth = 3, fill = 'white'))
  )
)
also this code is example code with render - output paired function
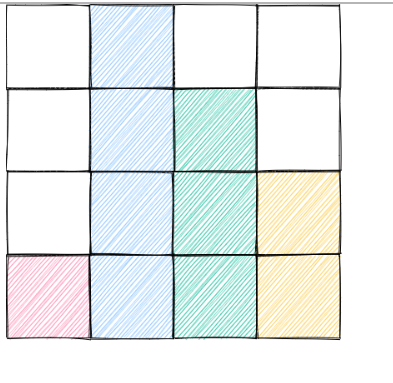
library(shiny)
library(shinyRoughJSbasic)
library(shinyjs)
ui <- fluidPage(
  shinyRoughJSbasicOutput(outputId = 'cv', height = '500px')
)

server <- function(input, output, session) {
  output$cv = renderRough(
    shinyRoughJSbasic(
      items = list(
        # x,y,w,h
        RoughRect(1,1,100,100, RoughOptions(fill='#FFFFFF')),
        RoughRect(101,1,100,100,RoughOptions(fill='#74b9ff')),
        RoughRect(201,1,100,100, RoughOptions(fill='#FFFFFF')),
        RoughRect(301,1,100,100, RoughOptions(fill='#FFFFFF')),

        RoughRect(1,101,100,100, RoughOptions(fill='#FFFFFF')),
        RoughRect(101,101,100,100,RoughOptions(fill='#74b9ff')),
        RoughRect(201,101,100,100, RoughOptions(fill = '#00b894')),
        RoughRect(301,101,100,100, RoughOptions(fill='#FFFFFF')),

        RoughRect(1,201,100,100, RoughOptions(fill='#FFFFFF')),
        RoughRect(101,201,100,100,RoughOptions(fill='#74b9ff')),
        RoughRect(201,201,100,100, RoughOptions(fill = '#00b894')),
        RoughRect(301,201,100,100, RoughOptions(fill ='#fbc531')),

        RoughRect(1,301,100,100,RoughOptions(fill='#fd79a8')),
        RoughRect(101,301,100,100,RoughOptions(fill='#74b9ff')),
        RoughRect(201,301,100,100, RoughOptions(fill = '#00b894')),
        RoughRect(301,301,100,100, RoughOptions(fill ='#fbc531'))

        )
    )
  )
}

shinyApp(ui, server)