
A lightweight, flexible particle system written in Python.
Here are some examples of simple particle effects with bubbles.
 |
 |
 |
 |
 |
 |
|---|---|---|---|---|---|
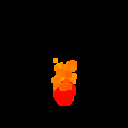
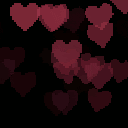
| bubbles.json | fireball.json | explosion.json | hearts.json | confetti.json | tornado.json |
You can find the .json for these in the examples folder.
The easiest way to create particle effects with bubbles, is by specifying all your settings in a python dict and passing it into ParticleEffect.load_from_dict(). More details on how to structure this and parameters you can specify are below. This is useful as you can store your effect settings in .json files, load them into python as a dict:
import json
with open("filename.json") as f:
   d = json.load(f)
...and straight into bubbles:
particle_effect = ParticleEffect.load_from_dict(d)You can then render a ParticleEffect using your own or one of the builtin EffectRenderer classes.
It is useful to note that when using load_from_dict() any parameters not specified in your dictionary will be remain as their default, meaning you need only specify parameters you want to change.
This will create a directory at ./out/<effect>/ with all of the frames of the particle effect that can be used to compile into a gif or video using something like imageio.
pip install pillowfrom PIL import Image, ImageDraw
from pathlib import Path
from bubbles.emitter import Emitter
from bubbles.particle import Particle
from bubbles.particle_effect import ParticleEffect
from bubbles.renderers.image_effect_renderer import ImageEffectRenderer
EXAMPLE_FILE = "tornado"
EXAMPLE_DIR = "examples"
IMG_DIR = f"out/{EXAMPLE_FILE}"
r = ImageEffectRenderer()
# load example json
with open(f"{EXAMPLE_DIR}/{EXAMPLE_FILE}.json") as f:
import json
pe = json.load(f)
particle_effect = ParticleEffect.load_from_dict(pe)
# align the effect in the frame
particle_effect.set_pos(60, 128)
r.register_effect(particle_effect)
Path(IMG_DIR).mkdir(parents=True, exist_ok=True)
for i in range(240):
particle_effect.update()
if i > 0:
image = Image.new("RGB", (128, 128), (0, 0, 0, 255))
r.render_effect(particle_effect, image)
image.save(f"{IMG_DIR}/{str(i)}.png")Particles are the small, individual parts that make up a collective effect. Emitter instances are used to spawn them. Particles have the following default attributes that can be set with a dict like so:
{
    # How many frames the particle lives for
    "lifetime": 30,

    # The interpolation function between points
    "interpolation": "linear",

    # The x position of the particle relative to the effect
    "x": 0,
    "x_speed": 0,
    "x_acceleration": 0,

    # The y position of the particle relative to the effect
    "y": 0,
    "y_speed": 0,
    "y_acceleration": 0,

    # A multiplier of the size of the particle's shape. Generally <= 1, >= 0
    "scale": 1,

    # How opaque the particle is
    "opacity": 1,

    # Rotation of the particle in degrees
    "rotation": 0,

    # The shape of the particle (renderer dependant). Can be a texture
    "shape": "square",  # The name of the shape (renderer dependent) or the path to your texture.

    # The RGB colour overlay of the particle
    "colourise": False,  # If the particle is a texture, whether the particle should be coloured or not
    "red": 255,
    "green": 255,
    "blue": 255
}
Often, you might want parameters to change over the lifetime of a Particle. You can do this by setting the parameter as a list. For example:
{
    "scale": [0, 1],
}
The particle will start its life will a scale of 0, and linearly grow to a scale of 1 by the end of its lifetime.
You can now do more than this, and change parameters any number of times over the lifetime of a particle:
{
    "scale": [0, 1, 0]
}
The particle will go from 0, to 1, to 0 in scale over its lifetime. You can apply this technique to the following parameters:
[
    "x_speed",
    "x_acceleration",

    "y_speed",
    "y_acceleration",

    "scale",

    "opacity",

    "rotation",

    "red",
    "green",
    "blue"
]
You can choose between "linear" and "cosine" interpolation between these points by changing the "interpolation" parameter.
To illustrate the difference between these types of interpolation, consider the following particle example:
{
    "lifetime": 60,
    "opacity": [0.25, 0.8, 0, 0.5, 0.1]
}
The following graphs show how the values will change over the particle's lifetime:
 |
 |
 |
|---|---|---|
| Linear | Cosine | Both |
Note, that if you use a list for a parameter, that you must similarly use a list of the same length if you want to specify variation for that parameter.
bubbles supports drawing of vector shapes, or using a texture instead. The default shape is square. The drawing of these shapes is renderer dependent however. All renderers should really have a square drawer as it is the default for particles. Refer to the ÈffectRenderer section to see renderers and whats shapes they can draw.
bubbles provides some sample textures which can be accessed using Particle.sample_texture_map[texture_name]. Have a look in bubbles/textures to see them.
You would want some form of variation between these particles, and to actually spawn them. Use emitters for this. You can have multiple emitters per effect and place wherever you like relative to the effect. The following values are set by default.
{
    # Position relative to the effect
    "x": 0,
    "y": 0,

    # The area in which particles can spawn, by default is a single point
    "width": 0,
    "height": 0,

    # How many spawn bursts the emitter performs, by default is infinite
    "spawns": -1,

    # How many particles are spawned with each spawn burst
    "spawn_amount": 10,

    # How many frames between each spawn burst
    "frames": 30,

    # The maximum number of particles spawned with this emitter that can live at once
    "max_particles": 1000,

    # What kind of particles to spawn
    "particle_settings": {},
    "particle_variation": {
        	# Only these parameters can be varied:
            "lifetime": 0,
            "x_speed": 0,
            "y_speed": 0,
            "x_acceleration": 0,
            "y_acceleration": 0,
            "scale": 0,
            "opacity": 0,
            "rotation": 0
            "red": 0,
            "green": 0,
            "blue": 0
        }
}
You want to tell the Emitter what kind of particles to spawn. You can set particle_settings as a dictionary with the particle attributes you want.
Particle variation specifies how varied you'd like the particles to be on a +- basis. For example, setting the lifetime in settings to 60 and the lifetime variation to 30 means that the lifetime of particles spawned by the emitter is between 30 and 90.
Particle effects handle Emitters and Particles. You can specify an effect's emitters and the following attributes, the default being:
{
    # Position of the entire effect relative to where it is drawn
    "x": 0,
    "y": 0,

    # Global speed of the effect, applies to particles and position of effect
    "x_speed": 0,
    "y_speed": 0,

    # How many loops of the effect until this effect is finished, by default is infinite
    "loops": -1,

    # The emitters that belong to the effect
    "emitters": []
}
This effect does nothing since there are no emitters and hence no particles to draw. The emitters array is here is a an array of emitter settings dictionaries.
To update a particle effect instance by one frame, call its update() method. You can optionally pass it the deltatime parameter for framerate independence:
particle_effect.update(deltatime=dt)
Where delta time is your target fps / actual fps.
You need to actually render your effects to see them of course. Use an EffectRenderer for this. It is an abstract class you can inherit from to draw your effects onto any kind of surface. Two builtin renderers come with bubbles at present, PygameEffectRenderer and ImageEffectRenderer.
You can use render_effect(particle_effect, surface) to render an entire particle effect onto a given surface. The type of surface is renderer dependent.
However you might want to write your own for a specific purpose. In this case make a class and inherit from EffectRenderer, then implement all required methods in your renderer. There is annotation in effect_renderer.py to help with this.
The base_size constructor parameter is used for vector shape drawing. It determines the size in pixels of a particle when a particle's scale is 1.
PygameEffectRenderer is a renderer built to render particle effects to pygame Surface objects for easy use with pygame.
If you want to use partial transparency with a texture you can do so by passing the optional parameter per_pixel_alpha=True in the constructor and using a pygame surface with the pygame.SRCALPHA flag. Note that this will make rendering somewhat slower though.
Something to note is any black (RGB=(0, 0, 0)) particles are transparent by default. If you want to use a texture that has black in it, change the colorkey using the optional parameter colorkey when constructing a PygameEffectRenderer. The built-in shapes and textures rely on the colorkey being black so only do this per your specific requirements.
PygameEffectRenderer requires the pygame module to be installed.
ImageEffectRenderer renders a particle effect onto a PIL (Python Imaging Library) Image object passed into render_effect.
Therefore, it requires PIL/Pillow to work. Pillow is a PIL fork that is regularly maintained and updated.
PygameEffectRenderer and ImageEffectRenderer both currently support "square" and "circle" as vector shape parameters, but it is important to note that supported shapes are renderer dependent.
For example, you may choose not to support any vector shape drawing in your own EffectRenderer, or support any number of shapes. You can do the latter by specifying the shape name, and its corresponding draw method in the EffectRenderer._shapes dictionary, in your renderer's constructor.
Example, PygameEffectRenderer and ImageEffectRenderer both have this dictionary in their constructors as they support these shapes:
self._shapes = {
            "square": self._render_square,
            "circle": self._render_circle
        }
Say you want to support these shapes as well as triangles in your own renderer. Your shapes dictionary would look like this:
self._shapes = {
            "square": self._render_square,
            "circle": self._render_circle,
            "triangle": self._render_triangle
        }
Then you write the implementation of the _render_triangle method in your renderer. This will then allow you to pass "triangle" as the shape parameter for a particle, and it be rendered by your renderer.