Building a low power hyperconverged Homelab on a tight budget.
- High availability for the following services:
- Basic network services
- NAT
- DHCP
- DNS
- Firewall
- Homeassistant
- TICK stack
- OpenVPN
- Docker
- Ansible AWX
- The Lounge (IRC client)
- Squid proxy
- Plex Media Server
- Basic network services
- Low power consumption (~50 watts)
- Optimize thermal design for a tiny 14" rack
- Low maintenance
- Reliable backups
Reduce and Reuse
- Buy the minimum required hardware
- Reuse existing hardware
Detailed description of hardware used in this project.
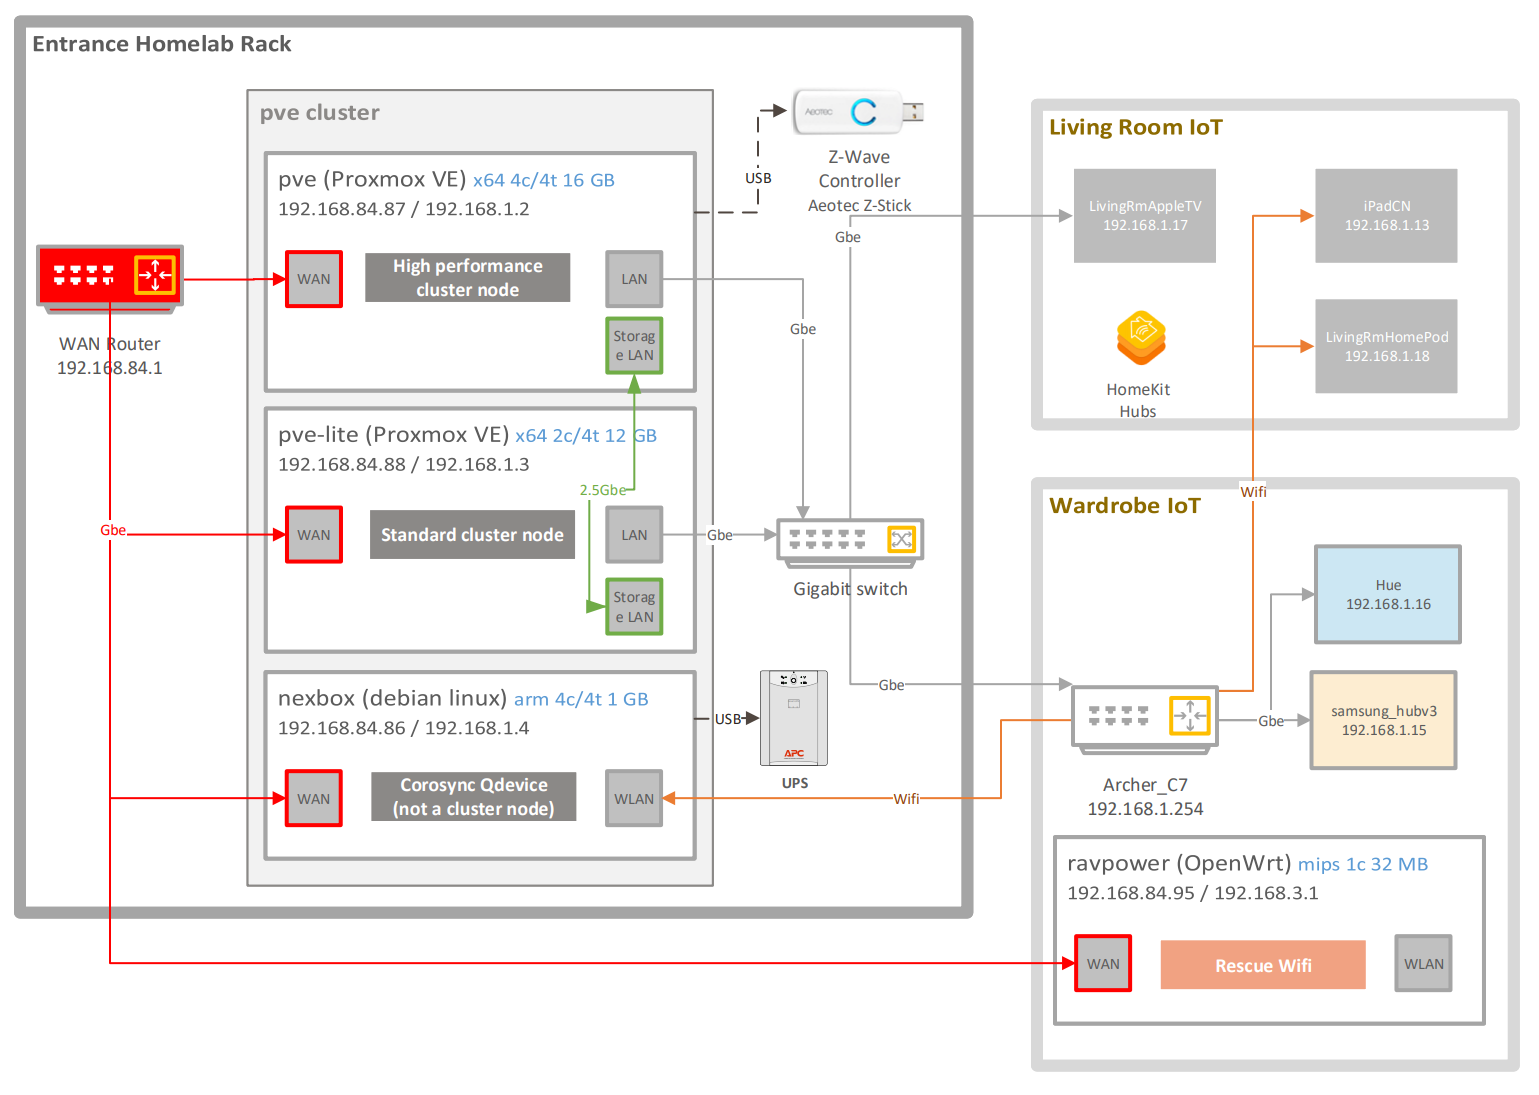
- pve: Intel i5-7500T, 16 GB DDR4 RAM, 16 GB mSATA SSD, 500 GB SATA SSD, 500 GB SATA HDD, 2x Gigabit LAN, 1x 2.5 Gigabit LAN
- USB Z-Wave Controller: Sigma Designs, Inc. Aeotec Z-Stick Gen5 (ZW090) - UZB
- pve-lite: Intel i5-4590T, 16 GB DDR3L RAM, 32 GB USB stick, 500 GB SATA SSD, 500 GB USB HDD, 2x Gigabit LAN, 1x 2.5 Gigabit LAN
- arbiter: Rokchip RK3328, 1 GB DDR4 RAM, 16 GB micro SD card, 4 TB USB HDD, 1x Gigabit LAN
- USB UPS: APC Back-UPS XS 700U
- ravpower: Ralink RT5350, 32 MB SDRAM, 8 MB SPI Flash, 8 GB micro SD card, 1x 100M LAN, 1x WIFI
- TP-Link TL-SG1008D unamanged 8 port Gigabit Switch
- Gbe LivingRmAppleTV: Apple TV 4th generation
- Archer_C7: TP-Link Archer C7 AC1750 used as an access point
- Gbe Hue: Philips Hue Bridge (v2)
- Gbe samsung_hubv3: Samsung SmartThings Hub (v3)
- Wifi iPadCN: Wall mounted iPad 5th generation
- Wifi LivingRmHomePod: Homepod 1st generation
Legrand 646230

Legrand's Linkeo 10" (646230) compact cabinet may provide just enough room to host up to 3-4 USFF PCs, a small UPS unit, and minimal networking equipment. It also provides minimal cooling and cable management capabilities. Cable entry cutouts can be found on the top, bottom, and rear. It also comes with a brush for cable entries.
Removing the uprights may provide more space in exchange of less separation between the installed devices.
Arctic F12 PWM Rev4

The top ventillation perforation can accommodate a 120mm fan. You can save some space if you install it on the outside of the box. Using a PWM fan may enable you to control the speed (=noise) levels. This will require one of your USFF PC's to be capable of controlling the fan. A cheap fan like the Arctic F12 PWM Rev4 may provide enough basic cooling facilities.
Additional cooling can be hacked on the cable entry cutouts. You may want to use smaller fans (e.g., less than 80mm).
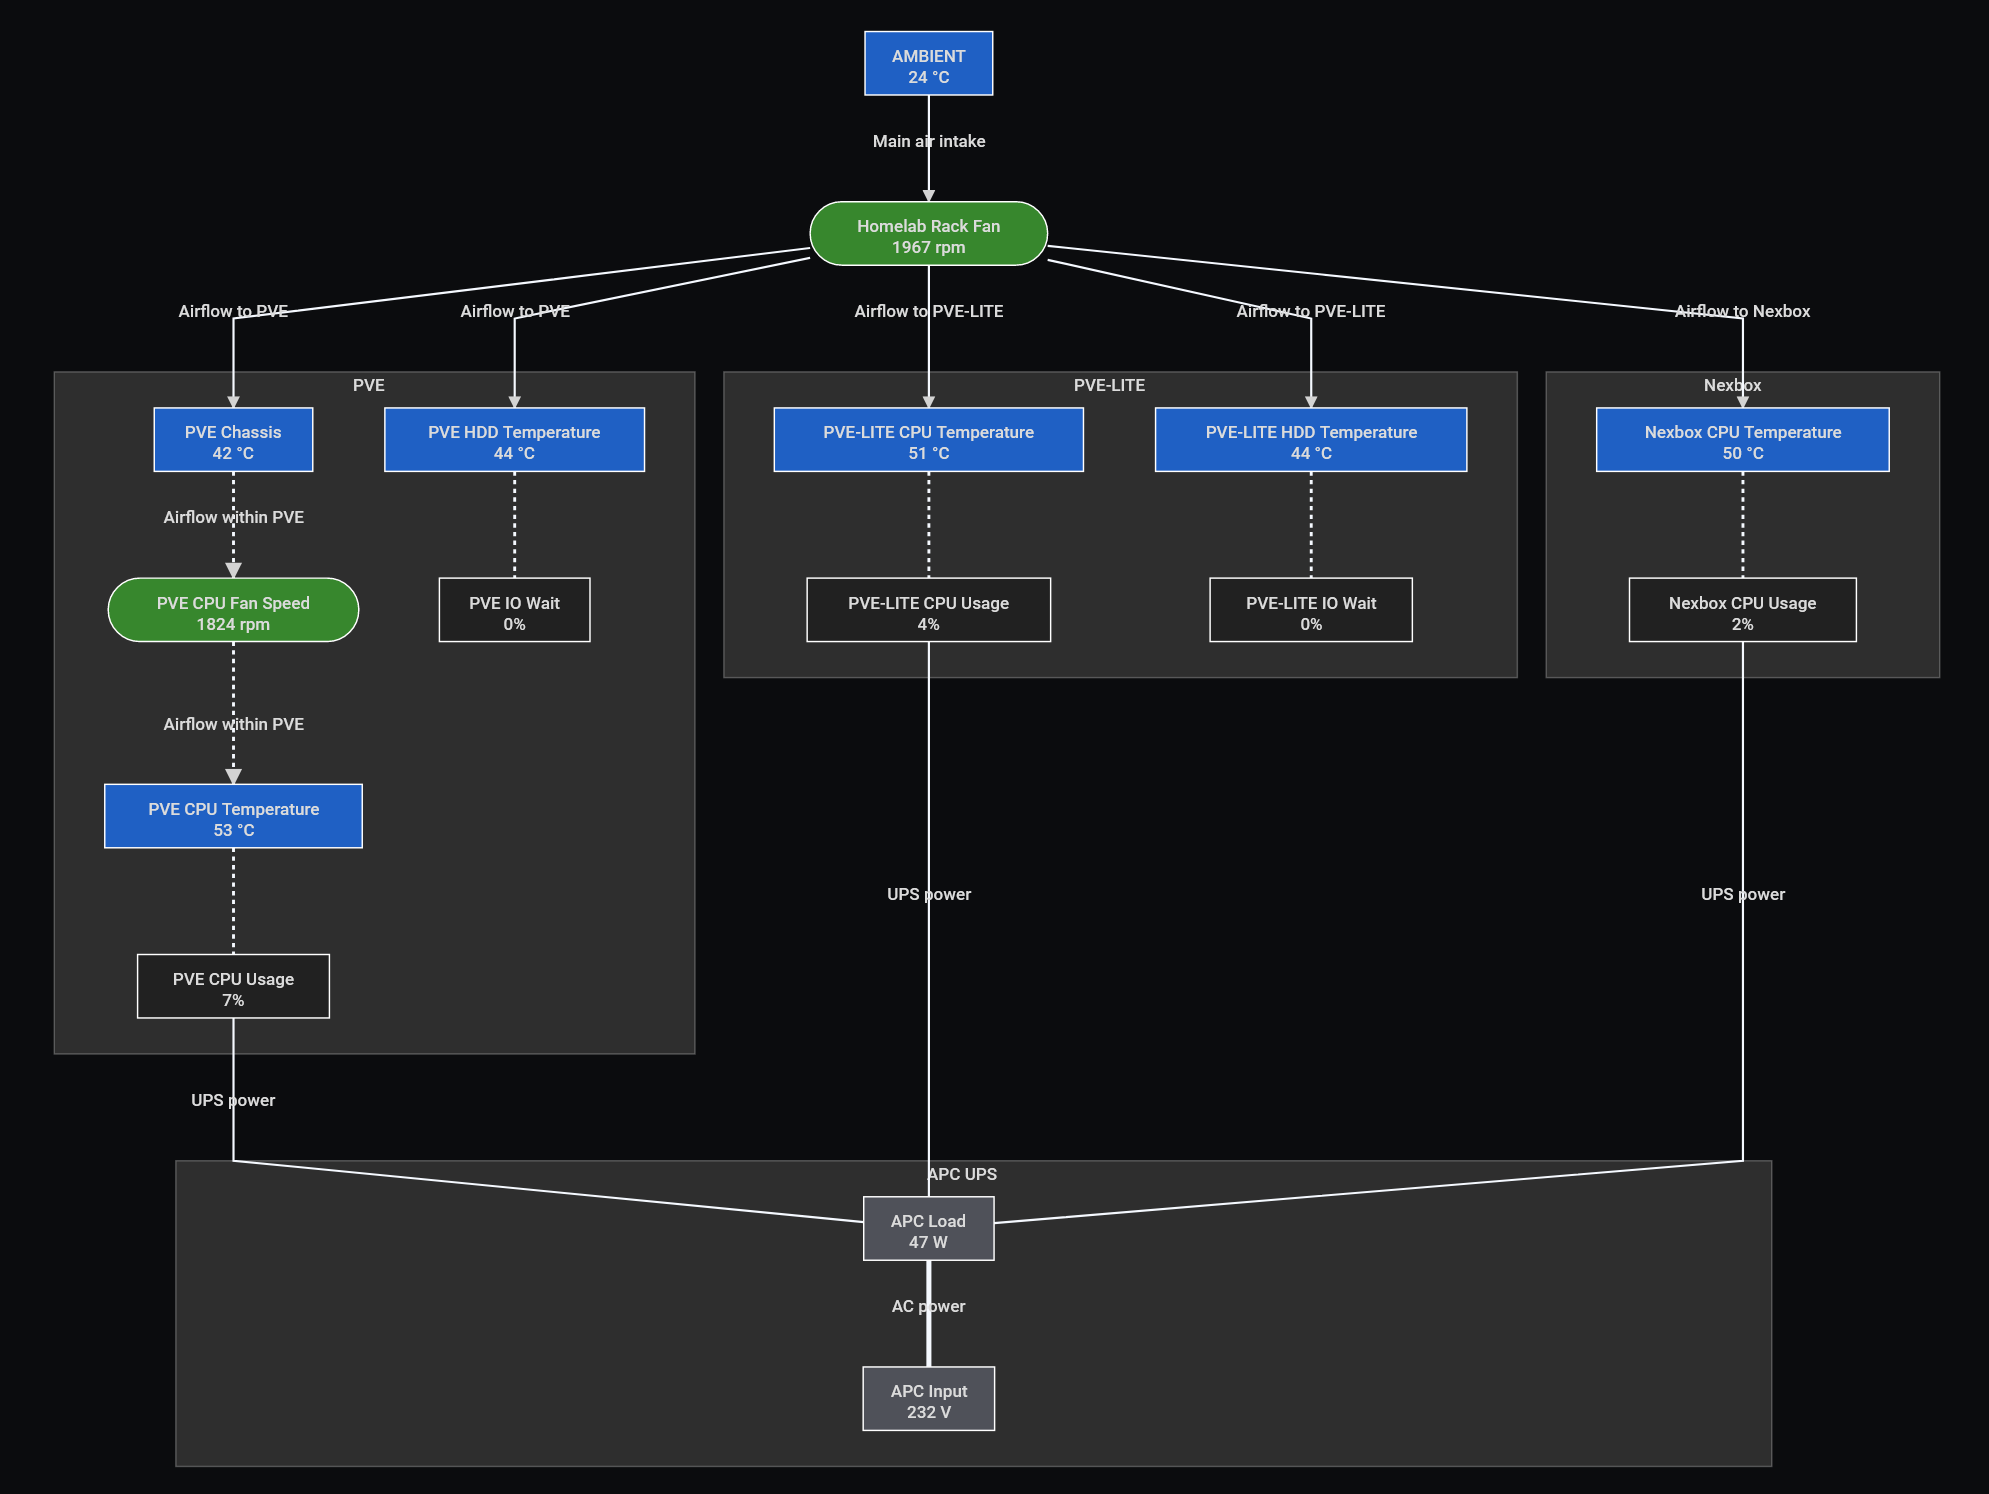
Homelab Rack Cooling & Power Diagram
APC Back UPS BX700U-GR

Installing a UPS into a compact cabinet can be tricky. The APC Back UPS BX700U-GR may fit the Legrand cabinet much better without the rack's uprights installed. Laying it on it's side, on the bottom of the cabinet may save some space.
Ensure that you have proper cooling in your rack before using the UPS unit. Failing to do this can lead to overheating, which may reduce the lifetime of the battery in the UPS.
This setup describes a low budget networking setup. No WLANs or network separation of any sorts.
Standard issue WAN ISP fiber router with 1 Gbe uplink and a handful of gigabit ethernet ports. For best results disable all services and Wi-Fi. Turn on automatic updates. Change all passwords. Use it as a basic modem and wired router. Check on it periodically to ensure that the latest firmware is installed and services and WiFi remained turned off.
TODO: automate this.
TP-Link TL-SG1008D switch - back
8.0-04_1499931192439k.jpg)
Almost any cheap unmanaged gigabit switch will do a fantastic job in this setup. As an example the TP-Link TL-SG1008D switch has eight gigabit ports, consumes almost no power and it requires no configuration. It is also super cheap.
You may want to use a device that can take advantage of the higher bandwidth. Wi-Fi 6 devices are broadly available as of 2021. Setting these up should be fairly straightforward:
- Set the device up in bridge mode (i.e. do not use routing/NAT)
- Turn off all services
- Use the highest available encryption
- Use long passphrases as passwords
- Keep the firmware up-to-date
This can be useful in case if your Proxmox cluster is unavailable. A Wi-Fi enabled single board computer or any router hardware with OpenWrt can be a good candidate for a second access point.
Here is a guide to get a Ravpower RP-WD02 setup: https://openwrt.org/toh/ravpower/rp-wd02
Ensure that the access points radio channels are not interfering.
These are some of the best options for homelab builds in 2021. STH produces amazing content on this. Check out Project TinyMiniMicro.
3rd/4th generation Intel Core CPUs are some of the best entry level options. 6th/7th gens are only recommended if you can find them for cheap. 8th gen and later are typically good value albeit slightly more expensive than the rest. Keep in mind that their higher core count can help to reduce the power consumption and heat produced (this can result in less cluster nodes).
Generic buying advice:
- Try to avoid CPUs with less than 4 threads.
- Aim for 35W or lower TDP. Unless you have a great game plan for cooling.
- The more memory slots, the better. Having only one may end up very limiting.
- USB 3 is a must. Depending on your storage and networking needs, you may need more than two.
- mSATA and M.2 slots are great ways to add more storage without adding more USB disks.
These are very similar to branded builds except for:
- More customization and expansion options (more network connectivity, storage, ram etc.)
- Slightly bigger form factor (unless you are willing to spend a whole lot more)
- Larger external power supply (depending on the brand)
- You have to build them :)
Limited performance compared to x64 machines, as of 2021. There is no easy way to run Proxmox on these. Their low power consumption makes them ideal arbiter devices though.
Mostly free and open source operating systems, ideal for homelab use.
Proxmox Virtual Environment is a server virtualization management platform. It is a Debian-based Linux distribution with a modified Ubuntu LTS kernel and allows deployment and management of virtual machines and containers. Download ISO images from here.
They also have great documentation. Clicking help in their UI actually works (even without internet). You can also download their admin guide as a pdf.
Use the official image. For best results, install root on a separate disk (a small SSD will do).
Note: LVM may perform better than ZFS.
After the installation, login to your new PVE host via ssh and update the apt sources:
vi /etc/apt/sources.listAdd:
deb http://download.proxmox.com/debian bullseye pve-no-subscriptionAre you on PVE 6? You have to update the repository to your Debian version (e.g.,
deb http://download.proxmox.com/debian buster pve-no-subscription").
Save and quit.
Comment out the only line in the following file
vi /etc/apt/sources.list.d/pve-enterprise.listUpdate repositories and upgrade:
apt-get update && apt-get dist-upgrade -yReboot if there was a new kernel installed.
Install further packages:
apt install apcupsd lm-sensors fancontrol glusterfs-server glusterfs-client nvme-cli sudo \
unattended-upgrades apt-listchanges libelf-dev build-essential pve-headers-`uname -r`
Many of these may be optional for you, the following descriptions may help:
- apcupsd: APC UPS management daemon. This can ensure that a controlled shutdown is executed in case if you have prolonged power outage. Additionally we can also pull some power related metrics that can help with alerting and monitoring.
- lm-sensors: read thermal metrics (e.g., temperature and fan speed).
- fancontrol: utility to manually control fan speeds.
- glusterfs-server glusterfs-client: clustered filesystem server and client packages. It's a must have if you plan to use glusterfs.
- unattended-upgrades: automatic installation of security upgrades.
- apt-listchanges: package change history notification tool
- libelf-dev build-essential pve-headers-`uname -r`: required to build new kernel modules. You can skip these if all your hardware is supported out of the box.
Install the prerequisite module:
apt install libsasl2-modules -yEdit the postfix configuration as follows:
vi /etc/postfix/main.cfUncomment the following lines:
mydestination = $myhostname, localhost.$mydomain, localhost
relayhost =
Add the following lines instead:
#GMAIL configuration
relayhost = smtp.gmail.com:587
smtp_use_tls = yes
smtp_sasl_auth_enable = yes
smtp_sasl_security_options =
smtp_sasl_password_maps = hash:/etc/postfix/sasl_passwd
smtp_tls_CAfile = /etc/ssl/certs/Entrust_Root_Certification_Authority.pem
Add your app specific password to this file:
vi /etc/postfix/sasl_passwdAdd this to the file:
smtp.gmail.com:587 <your email>:<your password>
Apply the configuration:
postmap hash:/etc/postfix/sasl_passwd
chmod 600 /etc/postfix/sasl_passwd
systemctl restart postfix
Test your configuration:
echo "Test email from Proxmox: $(hostname)" | /usr/bin/proxmox-mail-forwardSkip this step if you do not use this hardware.
If you are using anything other than r8156 (Vendor ID 0bda and Product ID 8156) please follow instructions from here.
Install packages required to build the kernel if you have not done so already in the previous step:
apt-get install libelf-dev build-essential pve-headers-`uname -r`Get the latest driver from Realtek.
wget --no-check-certificate https://rtitwww.realtek.com/rtdrivers/cn/nic1/r8152.53.56-2.15.0.tar.bz2
bunzip2 r8152.53.56-2.15.0.tar.bz2
tar xvf r8152.53.56-2.15.0.tar
cd r8152-2.15.0/
Note: version numbers may differ.
Build the kernel module:
make -j2Verify the new module:
modinfo ./r8152.koIf everything looks fine, install the module:
make installUpdate the kernel module dependency file:
depmod -aCreate a new file in modeprobe.d:
vi /etc/modprobe.d/rtl_usb.confAdd this line and save it:
alias usb:v0bdap8156d*dc*dsc*dp*ic*isc*ip*in* r8152
Vendor ID and Product ID may differ if using a different Realtek device.
Also add the udev rules file:
cp 50-usb-realtek-net.rules /etc/udev/rules.d/Update the kernel module dependency file:
depmod -aBlacklist the cdc_ether module by editing the following file:
vi /etc/modprobe.d/blacklist.confAnd adding this line:
blacklist cdc_ether
Disable USB autosuspend using Grub by editing the following file:
vi /etc/default/grubEnsure that the GRUB_CMDLINE_LINUX_DEFAULT value contains usbcore.autosuspend=-1. As an example:
GRUB_CMDLINE_LINUX_DEFAULT="usbcore.autosuspend=-1 quiet"
Update grub and initramfs and if everything went well, reboot the machine:
update-grub
update-initramfs -v -u
shutdown -r nowSkip these steps if you do not plan to use Grafana and the TICK stack.
You need an existing InfluxDB instance for this to work.
apt-get install gpg wget apt-transport-https
wget -q https://repos.influxdata.com/influxdata-archive_compat.key
echo '393e8779c89ac8d958f81f942f9ad7fb82a25e133faddaf92e15b16e6ac9ce4c influxdata-archive_compat.key' | sha256sum -c && cat influxdata-archive_compat.key | gpg --dearmor | tee /etc/apt/trusted.gpg.d/influxdata-archive_compat.gpg > /dev/null
echo 'deb [signed-by=/etc/apt/trusted.gpg.d/influxdata-archive_compat.gpg] https://repos.influxdata.com/debian stable main' | tee /etc/apt/sources.list.d/influxdata.list
apt-get updateapt-get install telegraf
systemctl enable telegrafEdit the telegraf configuration file:
vi /etc/telegraf/telegraf.confExample configuration:
[global_tags]
  host = "$HOSTNAME"
[agent]
  interval = "5m"
[[outputs.influxdb]]
# InfluxDB URL and port
  urls = ["http://192.168.1.6:8086"]
# InfluxDB database name
  database = "servermonitor"
# InfluxDB user name
  username = "telegraf"
# The user's password
  password = "<your secret password>"
# Use lm-sensors to obtain temperature readings.
[[inputs.temp]]
# Use smartctl to obtain smart metrics (e.g., HDD status, temperature)
[[inputs.smart]]
# You will need to update your sudoers file to make this work
  use_sudo = true
# Use ping to measure network latency
[[inputs.ping]]
# This example contains the network addresses of the other PVE host
  urls = ["pve-storage","pve","192.168.1.2"]
  count = 4
Edit the sudoers to enable the smart module
vi /etc/sudoersAdd the following lines:
Cmnd_Alias SMARTCTL = /usr/sbin/smartctl
telegraf  ALL=(ALL) NOPASSWD: SMARTCTL
Defaults!SMARTCTL !logfile, !syslog, !pam_session
Cmnd_Alias NVME = /usr/sbin/nvme
telegraf ALL=(ALL) NOPASSWD: NVME
Defaults!NVME !logfile, !syslog, !pam_session
systemctl restart telegraf You may want to verify if everything went well:
systemctl status telegrafSkip these steps if you do not plan to use InfluxDB.
You need an existing InfluxDB instance for this to work.
Login to a PVE cluster node (i.e. the PVE instance which you will use to create the cluster). Click on Datacenter on the left and then click Metric Server. Click Add and then select InfluxDB.
- Name: proxmox
- Server:
- Enabled: True
- Port: 8089
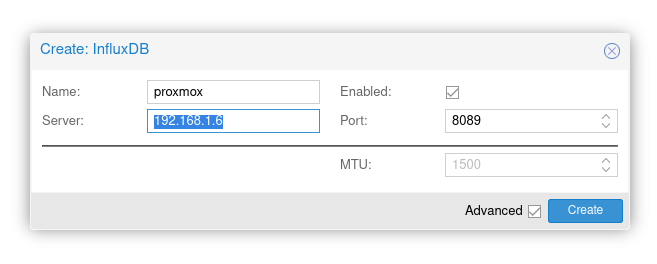
PVE InfluxDB Metric Server Setup
Armbian is a Debian and Ubuntu based computer operating system for ARM development boards. Check out the supported devices here and if you have one already, head over here.
This guide will use Armbian OS on the arbiter host.
A simple high availability setup for home use.
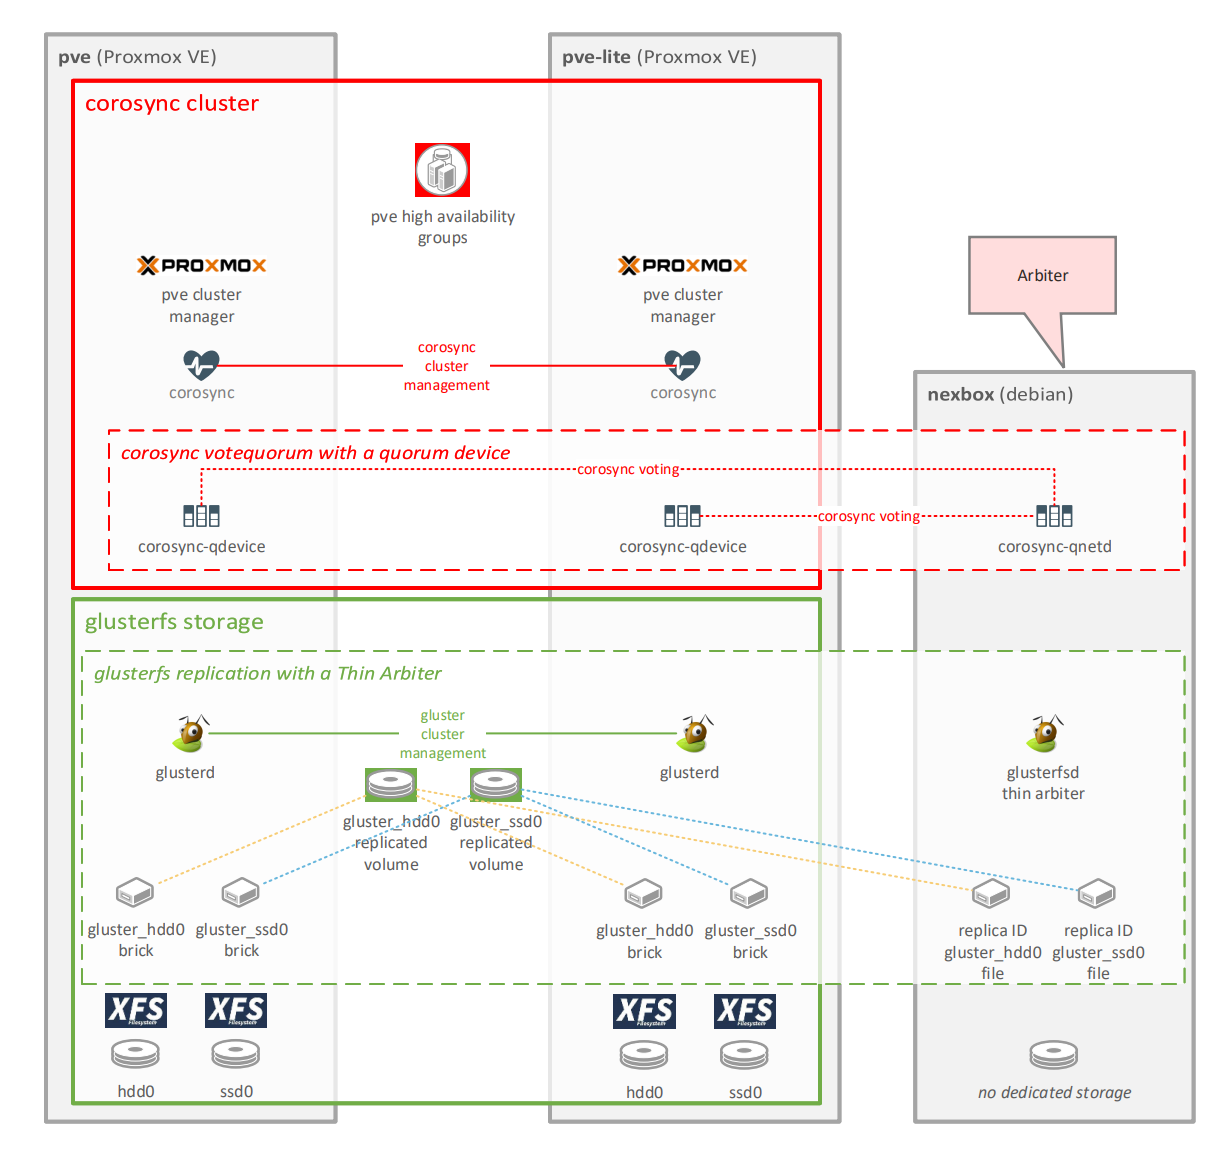
The Corosync Cluster Engine is a Group Communication System with additional features for implementing high availability within applications. Proxmox has a fairly straightforward implementation of this and to make life easier, it can be configured from the GUI.
Use one of the following URLs to create a two node cluster:
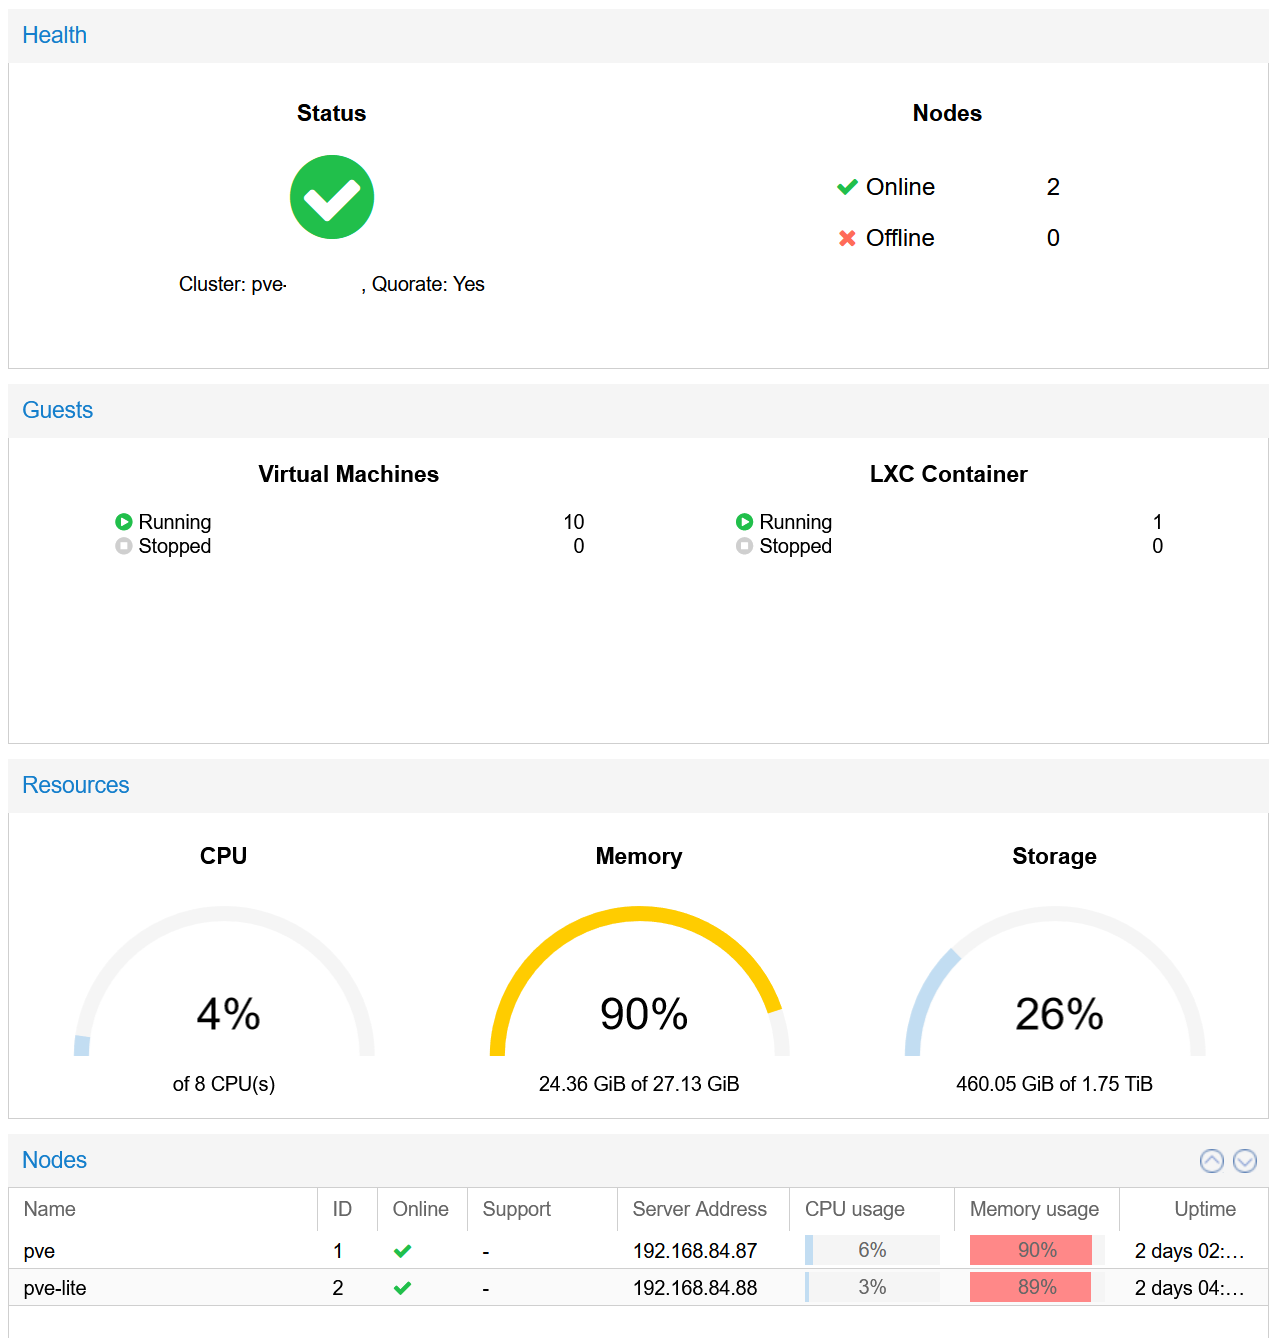
PVE Cluster Dashboard
A two node cluster is not highly available. Simple glitches could lead to losing quorum, a.k.a. a split brain situation. You want to have an uneven number of nodes. In case if you have an even nymber of nodes, a cost effective solution is to use a corosync quorum device.
Once your two node cluster is up and running, follow these instructions:
TLDR version:
Please note that reading the documentation and understanding the quorum device limitations can save you from a lot of headache.
On the Arbiter device:
apt install corosync-qnetdOn all cluster nodes:
apt install corosync-qdeviceOn one of the cluster nodes:
pvecm qdevice setup <QDEVICE IP ADDRESS>Setting up gluster for home use is very simple, as long as you understand the following limitations:
- Gigabit shared connections may compromise the performance of your cluster file system. Dedicated multigig netowrking is strongly recommended. To stay within the budget, this guide will use a 2.5GBe USB 3 connection. Using a USB network interface is generally not recommended. Having said that, this still provides acceptable performance for home use, peaking around 300 MB/s.
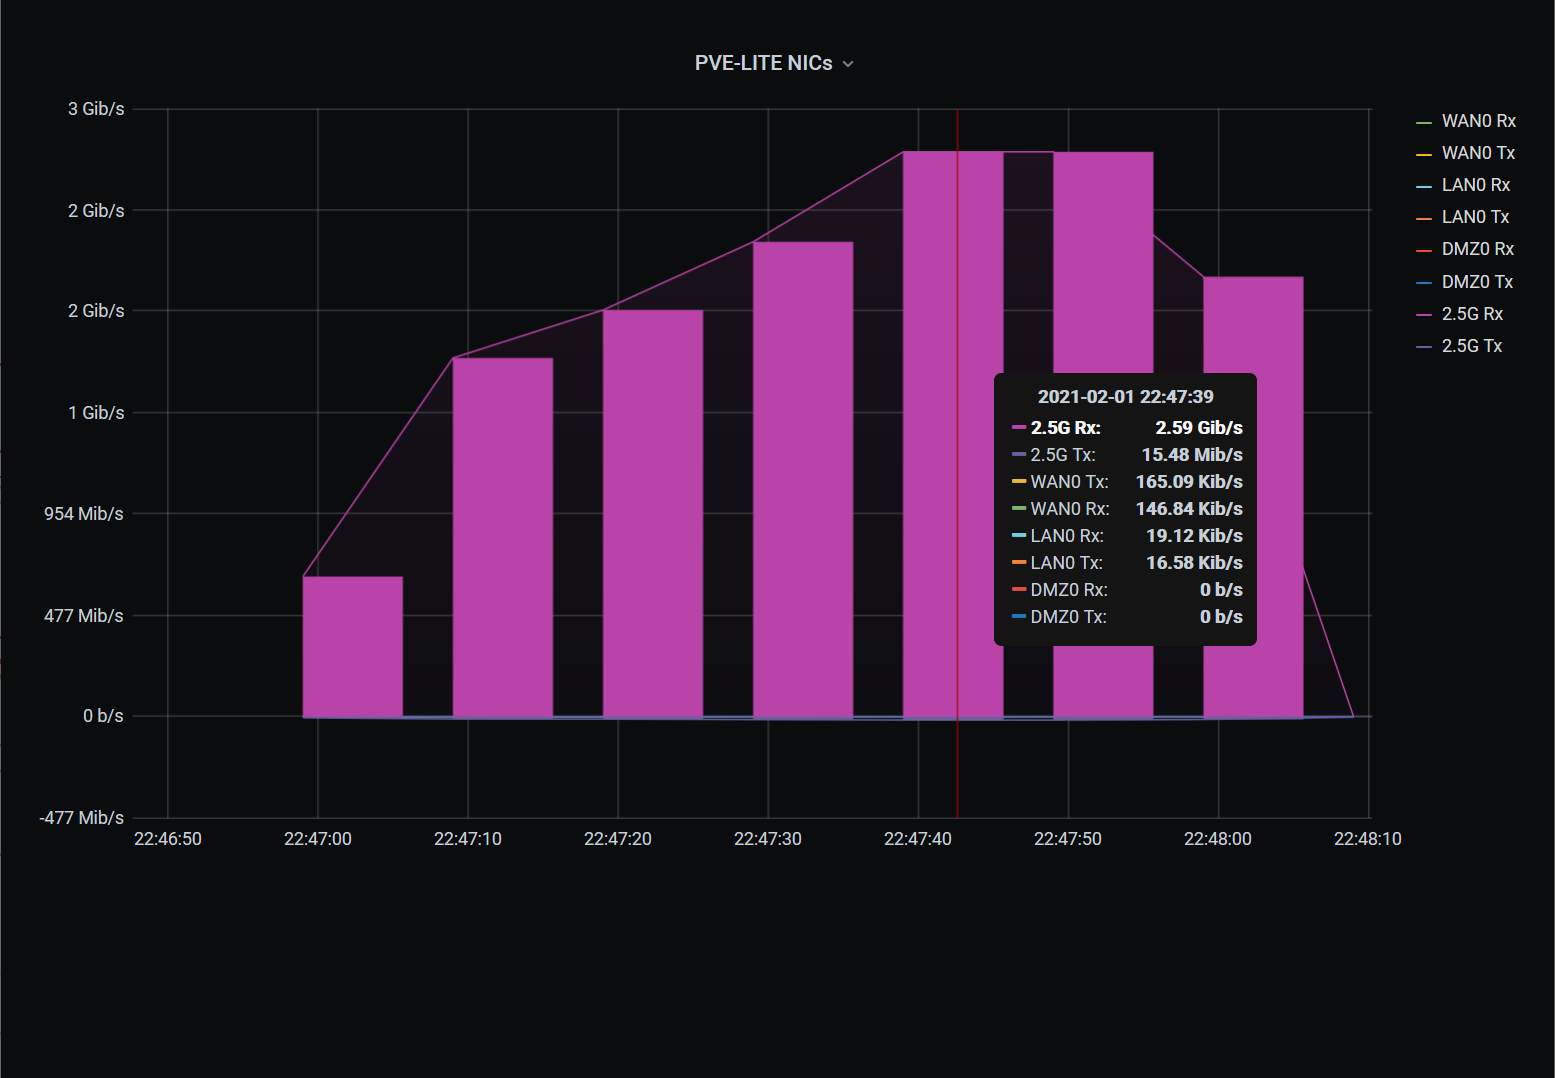
Peak bandwidth during VM disk migration to GlusterFS
- Self healing will take a long time, even if you use multiple threads (see instructions below).
- The instructions below will not setup any redundancy besides the replication in GlusterFS. In this configuration, two failing disks in the same volume will lead to data loss. You can tackle this by adding more disks or using RAID.
- Alternatively you can also add more cluster nodes (with more disks) to further improve availability and reduce the chance of data loss. Having three nodes also negates the need of an arbiter machine, thus making the setup more straightforward for both PVE and Gluster.
- These setups can be wildly different from the one described below. I strongly recommend you to read and understand the Setting up GlusterFS Volumes page.
Use fdisk -l to identify the right disk. This tutorial will use /dev/sda, you may need to change that.
fdisk -lFailing to select the right disk may lead to sad results.
Use fdisk to delete all partitions from the disk:
fdisk /dev/sdaEnter d until you get rid of all existing partitions and then enter w.
Alternatively, zero the first 40M of the disk for good measure:
dd if=/dev/zero of=/dev/sda bs=4M count=10Create a new partition on your disk:
fdisk /dev/sdaEnter g to create a GPT partion table. Enter n for new partion and accept the default values for size to use the entire disk. Enter w to writhe changes.
Example:
# fdisk /dev/sda

Welcome to fdisk (util-linux 2.34).
Changes will remain in memory only, until you decide to write them.
Be careful before using the write command.

Device does not contain a recognized partition table.
The size of this disk is 3.7 TiB (4000787030016 bytes). DOS partition table format cannot be used on drives for volumes larger than 2199023255040 bytes for 512-byte sectors. Use GUID partition table format (GPT).

Created a new DOS disklabel with disk identifier 0x6dad69de.

Command (m for help): gpt
Created a new GPT disklabel (GUID: 18443CD6-BB93-8943-A712-3FE35D21A6C8).

Command (m for help): n
Partition number (1-128, default 1):
First sector (2048-7814037134, default 2048):
Last sector, +/-sectors or +/-size{K,M,G,T,P} (2048-7814037134, default 7814037134):

Created a new partition 1 of type 'Linux filesystem' and of size 3.7 TiB.

Command (m for help): w
The partition table has been altered.
Calling ioctl() to re-read partition table.
If everything goes well fdisk -l /dev/sda should display something like this:
Disk /dev/sda: 447.1 GiB, 480103981056 bytes, 937703088 sectors
Disk model: SPCC Solid State
Units: sectors of 1 * 512 = 512 bytes
Sector size (logical/physical): 512 bytes / 512 bytes
I/O size (minimum/optimal): 512 bytes / 512 bytes
Disklabel type: gpt
Disk identifier: C79CBFF2-F76E-FF42-A06D-3D608F2E3A1F

Device     Start       End   Sectors   Size Type
/dev/sda1   2048 937703054 937701007 447.1G Linux filesystem
Once you have your new partition, use mkfs.xfs to create a new filesystem:
mkfs.xfs -f -i size=512 -L gluster_ssd0 /dev/sda1Now that you have your new filesystem, add a new entry to your fstab and get it mounted.
Get your partition's UUID:
blkid /dev/sda1The output will look something like this:
/dev/sda1: LABEL="gluster_ssd0" UUID="28b3506c-ebe4-4327-b1a4-61e76693cb9e" TYPE="xfs" PARTUUID="4e0fd8df-4f93-af4e-84a0-35e5159b0831"
Copy the UUID value and add a new line to your fstab:
vi /etc/fstab It should look similar to this:
UUID=28b3506c-ebe4-4327-b1a4-61e76693cb9e /gluster/ssd0 xfs defaults 0 2
Create a directory for your new mount point and then mount it:
mkdir -p /gluster/ssd0
mount /gluster/ssd0Add your storage network IP addresses with unique host names to your hosts file:
vi /etc/hostsExample:
# Proxmox VE storage IPs
192.168.99.1 pve-storage
192.168.99.2 pve-lite-storage
# Thin arbiter and Quorum device
# this host may not need to be on your storage network
192.168.84.86 nexbox
systemctl start glusterd
systemctl enable glusterdPlease note that I never got the thin arbiter working. Here is a solution from @polachz, also see issue 2. Further reading: A 'Thin Arbiter' for glusterfs replication by Ravishankar N.
Run peer probe:
gluster peer probe pve-lite-storage
gluster peer probe pve-storage
Make sure that you have your new filesystem mounted on both of the nodes and execute the following commands on one of them:
gluster volume create gluster_ssd0 transport tcp replica 2 pve-storage:/gluster/ssd0 pve-lite-storage:/gluster/ssd0 force
gluster volume start gluster_ssd0
gluster volume status
If everything went well, you will see something similar to this:
Status of volume: gluster_ssd0
Gluster process                             TCP Port  RDMA Port  Online  Pid
------------------------------------------------------------------------------
Brick pve-storage:/gluster/ssd0             49153     0          Y       1186
Brick pve-lite-storage:/gluster/ssd0        49153     0          Y       3217
Self-heal Daemon on localhost               N/A       N/A        Y       1206
Self-heal Daemon on 192.168.99.2            N/A       N/A        Y       3241

Task Status of Volume gluster_ssd0
------------------------------------------------------------------------------
There are no active volume tasks
You may also want to set the self healing daemon max threads to more than 1. Running self healing on a single thread may result in significant performance penalties. Here is an example for 4 threads:
gluster volume set gluster_ssd0 cluster.shd-max-threads 4If you need further tuning to speed up self healing, head over to: What is the best method to improve self heal performance on replicated or disperse volumes on Red Hat Gluster Storage?
Repeat these steps if you want to create further GlusterFS volumes: Create a GlusterFS volume
Login to a PVE cluster node. Click on Datacenter on the left. Select Storage under Datacenter. Click Add and select GlusterFS. Populate the following fields, then click Add:
- ID: gluster_ssd0 <-- this is how its going to be referenced under PVE storage, it does not have to match the volume name
- Server: pve-storage <-- one of the cluster node's storage hostname
- Second Server: pve-lite-storage <-- the other cluster node's storage hostname
- Volume name: gluster_ssd0 <-- GlusterFS volume name
- Content: select all relevant entries (select all if unsure)
- Nodes: All (no restrictions)
- Enable: Checked
Example:
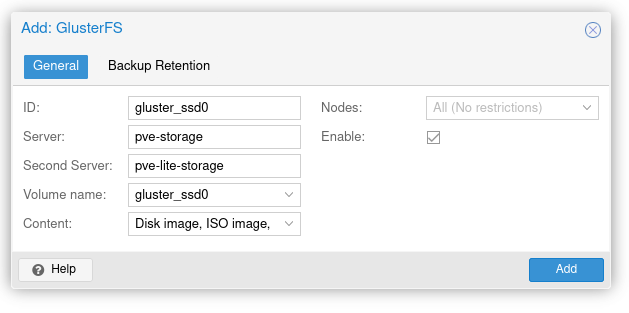
GlusterFS Volume Setup in PVE
Once completed, you should see your first GlusterFS volume added to your PVE cluster.
Creating a VM using GlusterFS is fairly straightforward, just select a GlusterFS volume during the initial VM creation wizard.
Migrating an existing VM to GlusterFS is very simple as well, select the disk under Hardware and click Move disk, then select your GlusterFS volume.
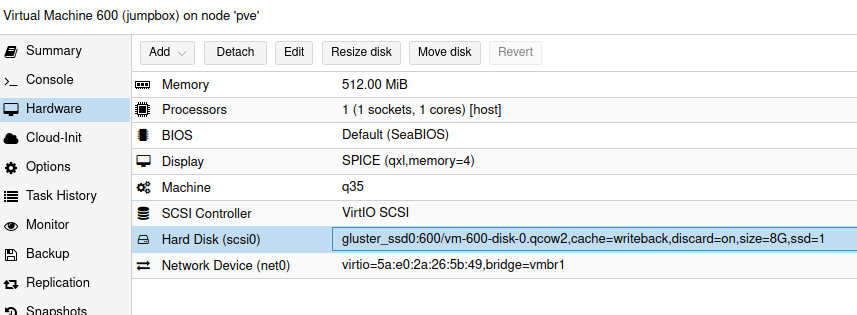
GlusterFS disk setup in a PVE VM
Login to a PVE cluster node. Click on Datacenter on the left. Expand HA and click on Groups. Click Create in Groups and then name your HA group in ID. You will need to select your PVE nodes (at least two).
Official description for the remaining options:
- nofailback: (default = 0
- The CRM tries to run services on the node with the highest priority. If a node with higher priority comes online, the CRM migrates the service to that node. Enabling nofailback prevents that behavior.
- restricted: (default = 0)
- Resources bound to restricted groups may only run on nodes defined by the group. The resource will be placed in the stopped state if no group node member is online. Resources on unrestricted groups may run on any cluster node if all group members are offline, but they will migrate back as soon as a group member comes online. One can implement a preferred node behavior using an unrestricted group with only one member.
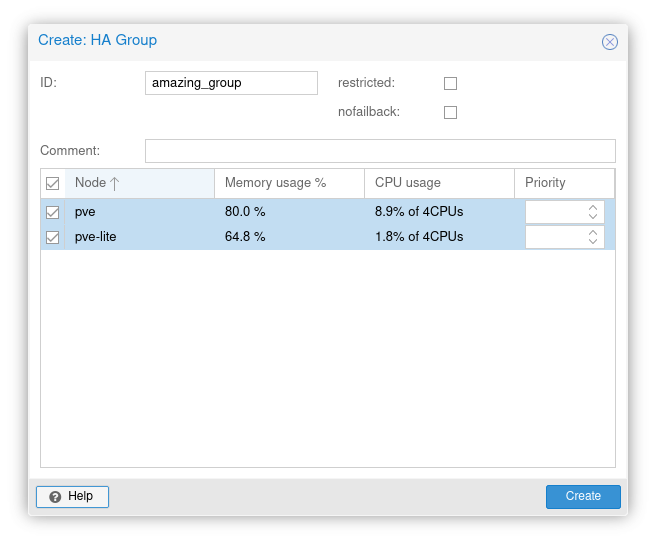
PVE High Availability Group Setup
Login to a PVE cluster node. Click on Datacenter on the left. Select HA and click Add under Resources.
- VM: <-- typically 3 digits (e.g., 100)
- Group: amazing_group <-- name of the HA group you just created
- Comments: <-- it's a good practice to add the hostname of your VM here, thank me later
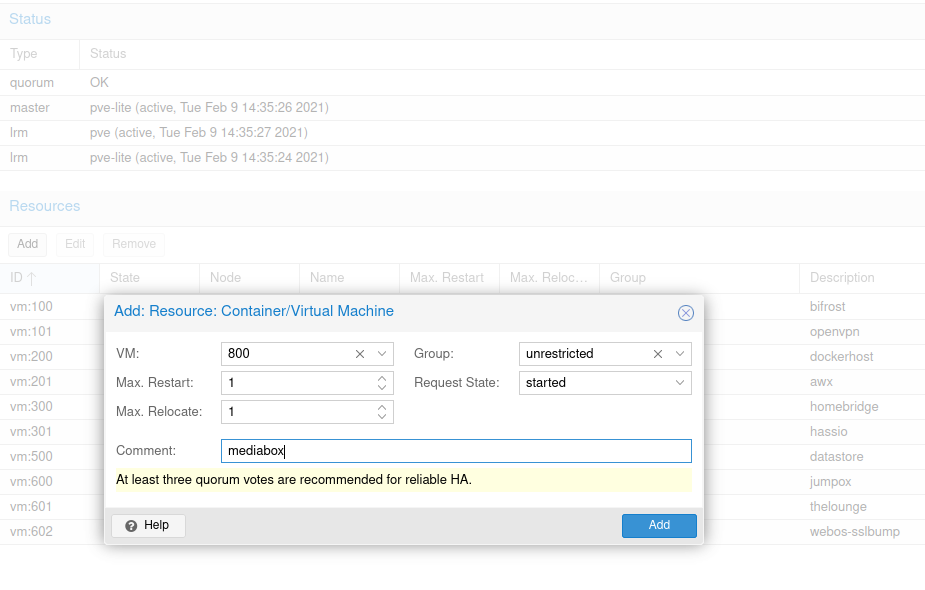
Adding a VM to a PVE High Availability Group
At this point you will want to learn more about the remainder of the options here.
Understanding the states will be important when operating your cluster:
- started
- The CRM tries to start the resource. Service state is set to started after successful start. On node failures, or when start fails, it tries to recover the resource. If everything fails, service state it set to error.
- stopped
- The CRM tries to keep the resource in stopped state, but it still tries to relocate the resources on node failures.
- disabled
- The CRM tries to put the resource in stopped state, but does not try to relocate the resources on node failures. The main purpose of this state is error recovery, because it is the only way to move a resource out of the error state.
- ignored
- The resource gets removed from the manager status and so the CRM and the LRM do not touch the resource anymore. All Proxmox VE API calls affecting this resource will be executed, directly bypassing the HA stack. CRM commands will be thrown away while there source is in this state. The resource will not get relocated on node failures.
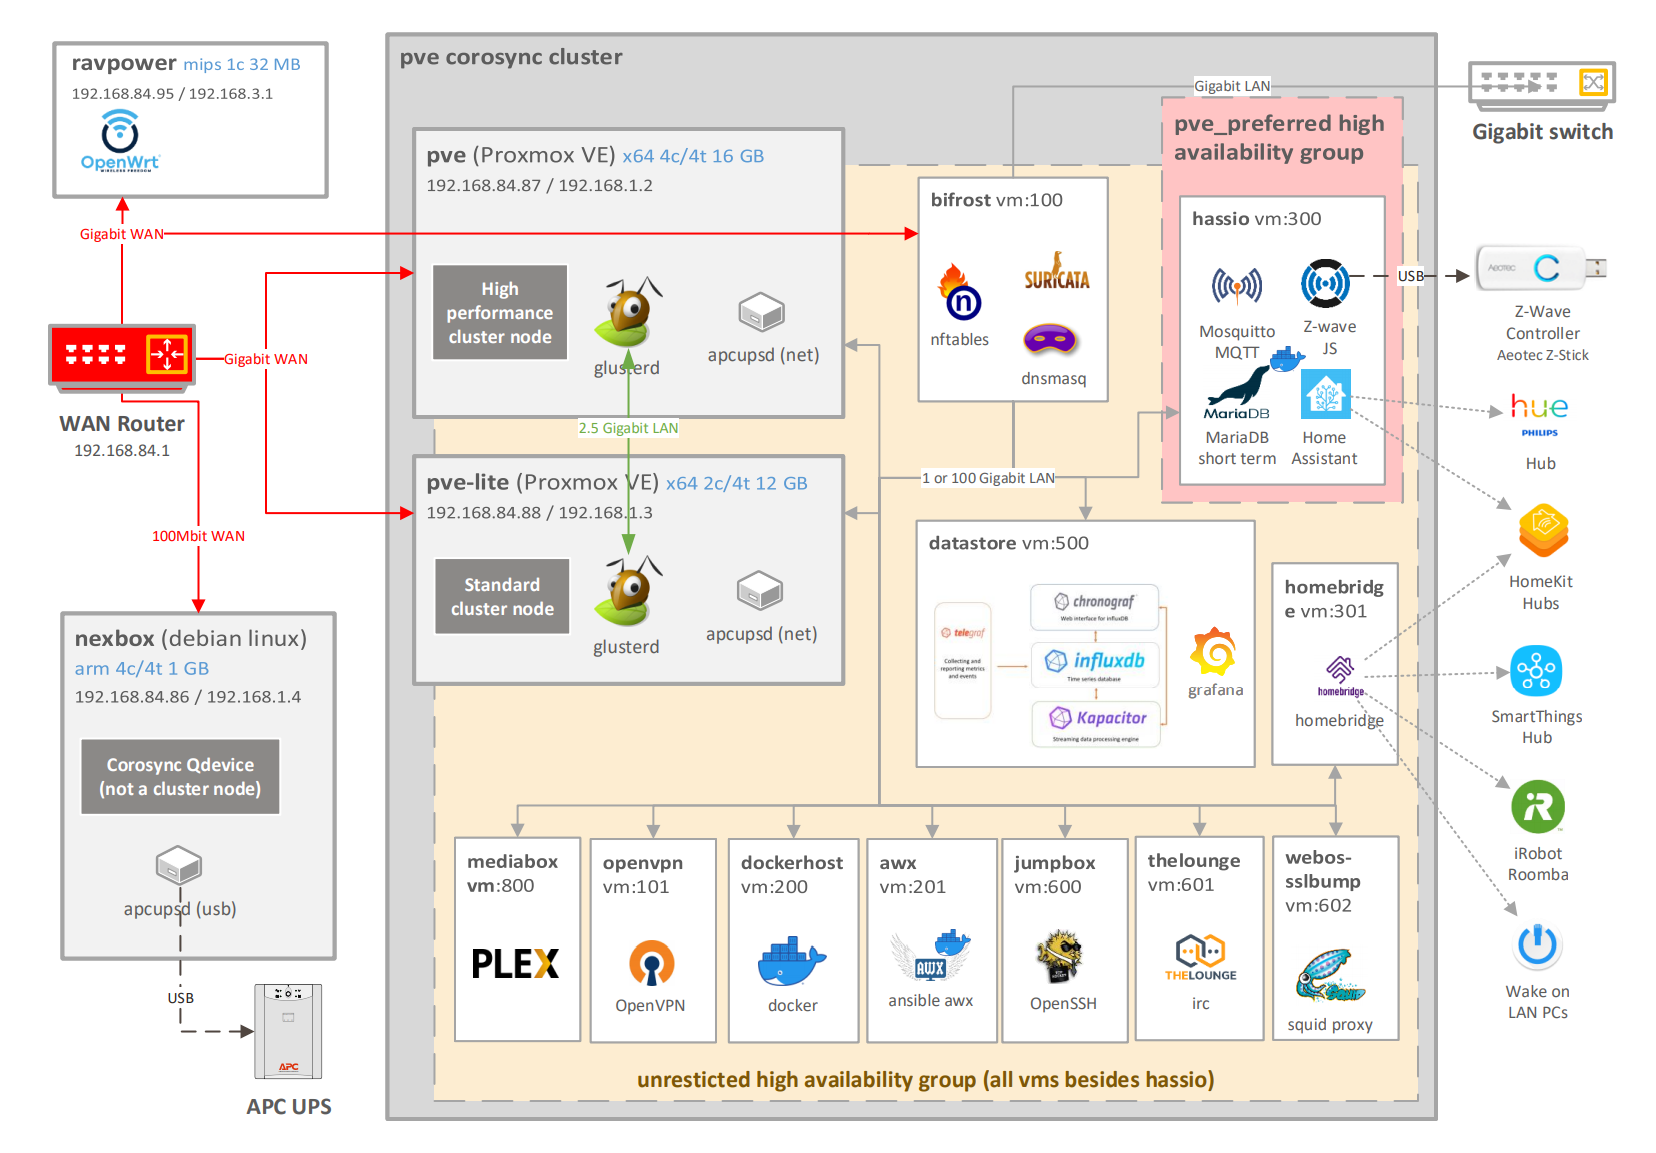
- ravpower: secondary OpenWrt wifi router directly connected to the WAN Router. To be used when bifrost is unavailable. It has it's independent battery backup
- nexbox: corosync external arbiter node
- apcupsd: service on nexbox managing the APC UPS unit via USB
- pve-cluster corosyc cluster: two node proxmox cluster with an external arbiter (nexbox)
- Cluster nodes:
- pve: high performance Proxmox VE cluster node
- glusterd: glusterfs service
- apcupsd: service on pve-lite connected to nexbox via the network
- pve-lite: standard Proxmox VE cluster node
- glusterd: glusterfs service
- apcupsd: service on pve-lite connected to nexbox via the network
- pve: high performance Proxmox VE cluster node
- High availability groups, with live migration
- pve_preferred: a Proxmox HA group with both of the nodes, pve with higher priority
- VM hassio: Home Assistant OS in a VM with the following major components:
- MariaDB for short term data storage
- Mosquitto MQTT
- Z-Wave JS to manage the Z-Wave mesh network using the Z-Wave Controller
- VM hassio: Home Assistant OS in a VM with the following major components:
- unrestricted: a Proxmox HA group with both of the nodes (no priority)
- VM bifrost: Debian Linux with nftables (firewall + NAT), Suricata (IDS/IPS), and dnsmasq (DNS, DHCP, Ad/Tracking Block)
- VM dockerhost: Debian Linux with docker containers
- VM awx: Debian Linux with Ansible AWX docker conatiners
- VM homebridge: Debian Linux with nginx, nodejs, and homebridge (incl. Smartthing, iRobot, and WOL plugins)
- VM datastore: Debian Linux with TICK stack and Grafana
- VM openvpn: Debian Linux with OpenVPN
- VM jumpbox: Debian Linux with OpenSSH
- VM thelounge: Debian Linux with thelounge and nginx
- VM webos-sslbump: Ubuntu 18.04 LTS with Squid to provide web access to classic WebOS devices
- VM mediabox: Debian Linux with a small Plex library
- pve_preferred: a Proxmox HA group with both of the nodes, pve with higher priority
- Cluster nodes:
In most cases it is easiest to provide this using a specialized OS like pfsense, OPNsense, or something as light as OpenWrt.
With that said, this setup uses Debian Linux with nftables and dnsmasq instead. This is done to keep the environment more homogenous, i.e. not to introduce BSD components. This help with upgrade cycles and the overall management of the entire stack.
As this setup predates Debian's nftables transition the following iptables specific files and commands were utilized.
Install and enable the netfilter-persistent package:
apt install netfilter-persistent
systemctl enable netfilter-persistent
Edit your rules:
vi /etc/iptables/rules.v4Example rules:
*raw
:PREROUTING ACCEPT [0:0]
:OUTPUT ACCEPT [0:0]
-A PREROUTING -p tcp -m tcp --tcp-flags FIN,SYN FIN,SYN -j DROP
-A PREROUTING -p tcp -m tcp --tcp-flags SYN,RST SYN,RST -j DROP
-A PREROUTING -p tcp -m tcp --tcp-flags FIN,SYN,RST,PSH,ACK,URG FIN,PSH,URG -j DROP
-A PREROUTING -p tcp -m tcp --tcp-flags FIN,SYN,RST,PSH,ACK,URG FIN -j DROP
-A PREROUTING -p tcp -m tcp --tcp-flags FIN,SYN,RST,PSH,ACK,URG NONE -j DROP
-A PREROUTING -p tcp -m tcp --tcp-flags FIN,SYN,RST,PSH,ACK,URG FIN,SYN,RST,PSH,ACK,URG -j DROP
COMMIT
*nat
:PREROUTING ACCEPT [0:0]
:INPUT ACCEPT [0:0]
:POSTROUTING ACCEPT [0:0]
:OUTPUT ACCEPT [0:0]
#
# Add your PREROUTING RULES HERE
#
-A POSTROUTING -o ens18 -j MASQUERADE
COMMIT
*filter
:INPUT ACCEPT [0:0]
:FORWARD ACCEPT [0:0]
:OUTPUT ACCEPT [0:0]
-A INPUT -i lo -j ACCEPT
#
# Add your INPUT RULES HERE
#
# Drop invalid
-A INPUT -m state --state INVALID -j DROP
-A INPUT -i ens18 -j DROP
-A FORWARD -i ens20 -o ens19 -m conntrack --ctstate RELATED,ESTABLISHED -j ACCEPT
-A FORWARD -i ens20 -o ens18 -m conntrack --ctstate RELATED,ESTABLISHED -j ACCEPT
#
# Add your FORWARD RULES HERE
#
-A FORWARD -i ens19 -m pkttype --pkt-type multicast -j ACCEPT
-A FORWARD -i ens20 -o ens19 -j DROP
-A FORWARD -m state --state INVALID -j DROP
-A OUTPUT -o lo -j ACCEPT
-A OUTPUT -o ens19 -m pkttype --pkt-type multicast -j ACCEPT
#
# Add your REJECT RULES HERE
#
-A OUTPUT -m state --state INVALID -j DROP
COMMIT
Once happy with your rules, commit your changes:
iptables-restore < /etc/iptables/rules.v4Looking for a more native nftables setup? Check out this wiki page.
dnsmasq is one of the easiest way to get your DHCP and DNS needs fulfilled.
Its installation is as easy as:
apt install dnsmasq
systemctl enable dnsmasq.service
The configuration can be done by editing /etc/dnsmasq.conf:
vi /etc/dnsmasq.confHere is an example configuration:
dhcp-authoritative
domain-needed
localise-queries
expand-hosts
bind-dynamic
local-service
# Update <YOURDOMAIN> below!
domain=<YOURDOMAIN>
server=/<YOURDOMAIN>/192.168.1.1
local=/<YOURDOMAIN>/
stop-dns-rebind
rebind-localhost-ok
dhcp-broadcast=tag:needs-broadcast
user=dnsmasq
group=nogroup
cache-size=10000
dns-forward-max=150

# ADD your fixed IP hosts below
dhcp-host=01:23:45:67:89:ab,192.168.1.99,client_hostname1
dhcp-host=01:23:45:67:89:ac,192.168.1.100,client_hostname2

# You can find great examples of this file online
dhcp-ignore-names=tag:dhcp_bogus_hostname
conf-file=/usr/share/dnsmasq/dhcpbogushostname.conf

resolv-file=/etc/resolv.dnsmasq
no-poll

# You can find great examples of this file online
bogus-priv
conf-file=/usr/share/dnsmasq/rfc6761.conf

# You can find great examples of this file online, you may want to automate its updates
conf-file=/etc/dnsmasq.blacklist.txt

log-queries

# Set DHCP range for two internal networks and disable it for WAN.
dhcp-range=set:ens19,192.168.1.100,192.168.1.200,255.255.255.0,12h
dhcp-option=ens19,6,192.168.1.1
dhcp-range=set:ens20,192.168.2.100,192.168.2.200,255.255.255.0,12h
dhcp-option=ens20,6,192.168.2.1
no-dhcp-interface=ens18
Restart dnsmasq to apply new configuration:
systemctl status dnsmasq.serviceThe TICK stack is a collection of associated technologies that consists of Telegraf, InfluxDB, Chronograf, and Kapacitor. In this guide the components are used as follows:
- Telegraf is a plugin-driven server agent for collecting and sending metrics and events. It is installed on every virtual and physical linux host.
- InfluxDB is a time series database that stores the events collected by Telegraf.
- Chronograf is a web application, it is used to setup access to InfluxDB and troubleshoot potential issues with Telegraf configuration.
- Kapacitor is a data processing framework that makes it easy to create alerts
While Chronograf and Kapacitor are great products, this guide uses Grafana for analytics & monitoring.
Installing on Debian or Ubuntu:
wget -qO- https://repos.influxdata.com/influxdb.key | sudo tee /etc/apt/trusted.gpg.d/influxdb.asc >/dev/null
source /etc/os-release
echo "deb https://repos.influxdata.com/${ID} ${VERSION_CODENAME} stable" | sudo tee /etc/apt/sources.list.d/influxdb.list
sudo apt-get update && sudo apt-get install telegraf
Running a different OS? Check the official documentation for instructions here.
Once the agent is installed you can edit the configuration file here: /etc/telegraf/telegraf.conf
Here is an example for a physical host:
[global_tags]
  host = "$HOSTNAME"
[agent]
  interval = "5m"
[[outputs.influxdb]]
  urls = ["http://<influxdb host or ip address>:8086"]
  database = "<influxdb db name>"
  username = "<telegraf user>"
  password = "<telegraf user password>"
# Collect temperatures from linux sensors (if installed and configured)
[[inputs.temp]]
# Collect SMART statistics (incl. drive temperatures), this configuration uses sudo which may require further sudoers configuration
[[inputs.smart]]
  use_sudo = true
# Collect fan speed information using a custom executable
[[inputs.exec]]
  commands = ["/bin/sh /usr/local/bin/telegraf_fanspeed.sh"]
  timeout = "5s"
  data_format = "influx"
# Collect ping statistics for a number of URLs
[[inputs.ping]]
  urls = ["pve-lite","pve-rick"]
  count = 4
Enable and start the telegraf agent when it is configured. See Debian 11 example below:
systemctl enable telegraf
systemctl restart telegraf
systemctl status telegrafUse these steps to install the latest pre 2.x version of InfluxDB.
Here is a short guide for Debian 11:
wget -qO- https://repos.influxdata.com/influxdb.key | gpg --dearmor > /etc/apt/trusted.gpg.d/influxdb.gpg
export DISTRIB_ID=$(lsb_release -si); export DISTRIB_CODENAME=$(lsb_release -sc)
echo "deb [signed-by=/etc/apt/trusted.gpg.d/influxdb.gpg] https://repos.influxdata.com/${DISTRIB_ID,,} ${DISTRIB_CODENAME} stable" > /etc/apt/sources.list.d/influxdb.list
sudo apt-get update && sudo apt-get install influxdb
sudo systemctl unmask influxdb.service
sudo systemctl start influxdb
You may also want to make the following changes to improve how your system handles UDP:
sysctl -w net.core.rmem_max=26214400
sysctl -w net.core.rmem_default=26214400
To make these changes permanent, also edit /etc/sysctl.conf and add the following lines:
# Influxdb udp settings
net.core.rmem_max=26214400
net.core.rmem_default=26214400
Once completed make sure that your /etc/influxdb/influxdb.conf contains the following Proxmox configuration lines:
[[udp]]
   enabled = true
   bind-address = "0.0.0.0:8089"
   database = "proxmox"
   batch-size = 1000
   batch-timeout = "1s"
You may need to uncomment this until the proxmox database is created.
Use the influx CLI to create your desired authorizations: https://docs.influxdata.com/influxdb/v1.8/administration/authentication_and_authorization/#authorization
This may include users for all intended use cases, like telegraf, chronograf, kapacitor, grafana etc.
influx -precision rfc3339Example
# Create a database called kapacitor
CREATE DATABASE kapacitor
# Create a user called kapacitor with all privileges
CREATE USER kapacitor WITH PASSWORD [REDACTED] WITH ALL PRIVILEGES
# An example list of databases
SHOW databases
name: databases
name
----
_internal
kapacitor
chronograf
homeassistant
proxmox
telegraf
servermonitor
# An example list of users
SHOW users
user          admin
----          -----
admin         true
kapacitor     true
chronograf    true
grafana       true
homeassistant true
telegraf      true
ntopng trueIf installing on the same machine as the InfluxDB, issue the following command:
apt install chronografAlternative installation methods are available here
- In a browser, navigate to :8888.
- Provide the following details:
- Connection String: InfluxDB hostname or IP, and port (default port is 8086).
- Connection Name: Connection name.
- Username and Password: If you’ve enabled InfluxDB authentication, provide your InfluxDB username and password. Otherwise, leave blank.
- Telegraf Database Name: (Optional) Telegraf database name. Default name is telegraf.
- Click Add Source.
If installing on the same machine as the InfluxDB, issue the following command:
apt install chronografOnline instructions are available here
Ensure that /etc/kapacitor/kapacitor.conf contains InfluxDB connection details:
[[influxdb]]
  # Connect to an InfluxDB cluster
  # Kapacitor can subscribe, query and write to this cluster.
  # Using InfluxDB is not required and can be disabled.
  enabled = true
  default = true
  name = "localhost"
# You may need to update the url if hosted on a separate host
  urls = ["http://localhost:8086"]
# Change this if a different user is used for Kapacitor in InfluxDB
  username = "kapacitor"
# Update this to match your password
  password = "[REDACTED]"
  timeout = 0
Install Grafana on Debian 11:
sudo apt-get install -y apt-transport-https
sudo apt-get install -y software-properties-common wget
wget -q -O - https://packages.grafana.com/gpg.key | sudo apt-key add -
echo "deb https://packages.grafana.com/oss/deb stable main" | sudo tee -a /etc/apt/sources.list.d/grafana.list
sudo apt-get update
sudo apt-get install grafana
sudo systemctl daemon-reload
sudo systemctl start grafana-server
sudo systemctl status grafana-server
Alternative instructions are available here
The initial configuration can be done using in /etc/grafana/grafana.ini. This is fairly well documented here.
When finished, restart the service and head over to http://:3000/.
Grafana allows you to build functional dashboards with relative ease. They maintain an excellent library here.
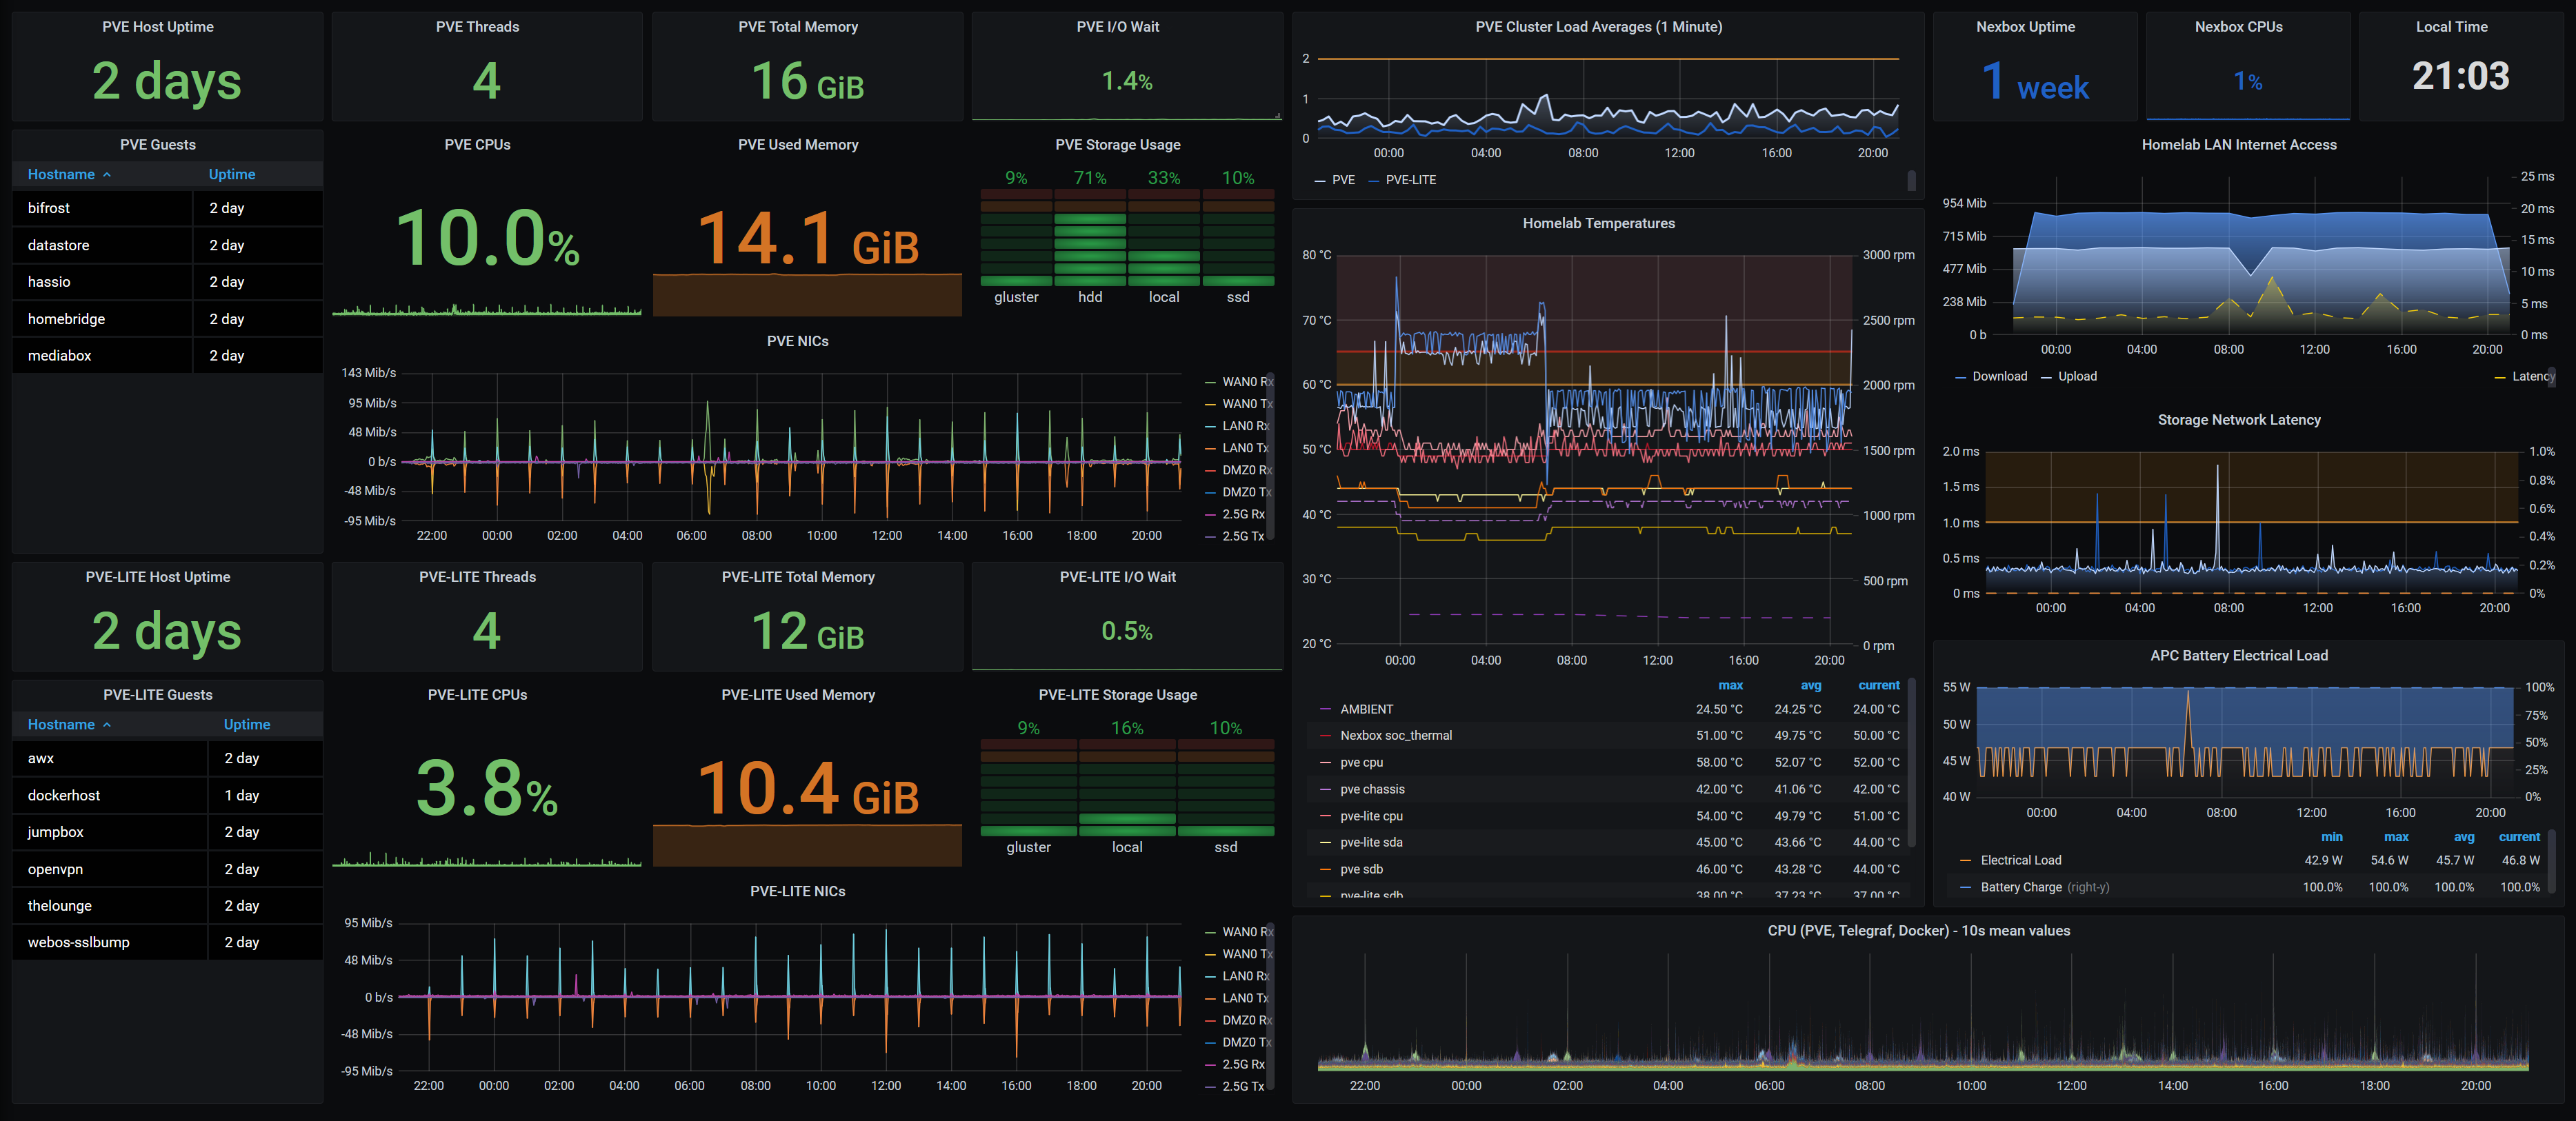
Homelab Overview Dashboard screenshot
You can find some example dashboards created for this tutorial here:
Home Assistant Operating System is one of the easiest way to get a very flexible home automation system up and running. Installing it on Proxmox is fairly simple:
- Download the latest version of of their KVM/Proxmox image from here to one of your PVE nodes or Gluster filesystems
- Unarchive the file
- Create a new VM in the Proxmox GUI (top right)
- Enter a name (e.g., homeassistant)
- Under the OS tab, select "Do not use any media"
- Under the System tab, select q35 as Machine, change the BIOS to OVMF (UEFI), and then select the storage (e.g., gluster)
- On the following screens adjust the default values as you see fit
- Don't know what to select? 2 cores of CPU and 2 GB of memory can be a good starting point
- Ensure that the VM is initialized but stopped
- Login to one of your PVE nodes and import the Proxmox image:
qm importdisk <vm_id_of_new_vm> </path/to/downloaded/image> <target_storage> --format qcow2- Here is an example:
qm importdisk 301 /root/haos_ova-7.1.qcow2 gluster_ssd0 --format qcow2 - Go back to your Proxmox GUI, delete the originally created disk from the VM (detach and remove)
- Double click your newly added Unused disk, adjust its size to at least 32 GB
- Go to Options and make sure that the new disk is the first in the boot order
TODO Screenshots
TODO Proxmox USB support