
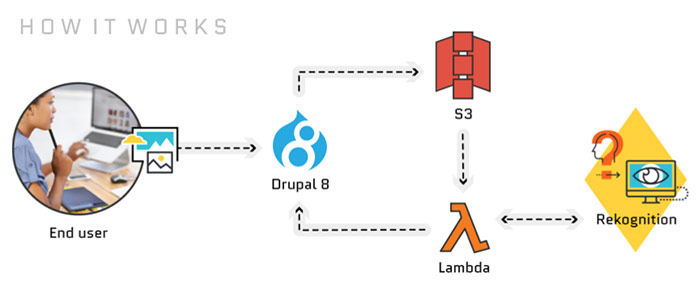
An intelligent photo gallery built with Drupal 8, Amazon S3, Lambda, and Rekognition.
- Rekognition API module.
- Drupal Photo Gallery project.
- Blog posts with background:
This site uses the Drupal VM Docker base image to build a local development environment. To use the Docker setup:
- Ensure you have Docker and Composer installed.
- Run
composer installin this directory. - Edit your hosts file and add:
192.168.88.23 local.d8pix.com - Run the command (if on Mac)
sudo ifconfig lo0 alias 192.168.88.23/24 - Run
docker-compose up -d - Either:
- Import the site's production MySQL database (if you're working from a live production site).
- Run the
drush site-installcommand below (to set it up locally without any live content). - If you need to see images from a live site, enable the Stage File Proxy module.
You can either start an interactive session inside the container with:
docker exec -it d8pix /bin/bash
Or you can run one-off commands:
docker exec d8pix bash -c "drush --root=/var/www/drupalvm/drupal/web --uri=local.d8pix.com cex -y"
Install a fresh instance of the Acquia Photo Gallery site with the following drush command (run it inside the Docker container using the docker exec -it... command in 'Running Drush commands'):
drush site-install minimal -y \
  --site-name="Drupal Photo Gallery" \
  --account-pass=admin \
  --config-dir=../config/sync \
  --db-url=mysql://drupal:drupal@localhost/drupal \
  --uri=local.d8pix.com
Then, log into the site using the credentials:
- Email:
admin - Password:
admin
Alternatively, you can provide your own
--account-name,--account-email, and--account-pass.
This site uses a full configuration export, and to update the site's configuration, you can run (from within the docroot):
drush --uri=local.d8pix.com cex -y
This should update the configuration as stored in config/default. Commit this new config, then test the configuration by reinstalling the site (to make sure the config works on a fresh install).
Since S3 is used as a file store for all media files in Drupal, you don't need to do anything special to get images working locally.
However, when you upload new images locally, they will trigger the Lambda function that eventually calls back to your live Drupal site's REST Rekognition endpoint—which won't help if you're trying to test something locally!
If you want to test the Rekognition data locally, you need to:
- Use
ngrokor some other service to expose your local site to the public Internet: 1. Downloadngrok1. Run./ngrok http local.d8pix.com:801. Copy out the 'Forwarding' URL. - Update the Lambda function's
DRUPAL_URLenvironment variable to point to your local environment URL (if usingngrok, the 'Forwarding' URL.
Alternatively, you could create a separate Lambda function for testing (so your live site can still work with the production Lambda function).
This project includes an Ansible playbook which creates a new DigitalOcean droplet, then installs everything on it to run the Drupal site at a publicly-accessible IP address (this is required for the Lambda function to be able to communicate back to the site with labels and faces).
Please see the README file inside scripts/ansible for a detailed guide for building the Drupal server on DigitalOcean using Ansible.
To allow AWS Lambda to call back to your Drupal site (so faces and labels can be integrated with your media entities), you must have Drupal running on a publicly-accessible URL. Therefore before any of the AWS integration for Rekognition can be tested, make sure you're running an installation of this site on a server with a publicly-accessible URL.
After that, make sure you create a Drupal user account with permission to create and update nodes and taxonomy terms, then store that account's credentials for use by the Rekognition AWS Lambda function.
After you have a Drupal site installed, and the API user created, do the following to prepare your local workstation and AWS account for the Rekognition resources:
- Install AWS CLI.
- Generate a 'programmatic access' AWS access key for an AWS IAM User with admin rights, and add the Key ID and Secret Access Key to your environment.
- Copy the Rekognition API's lambda function into an S3 bucket:
1. Create an S3 bucket:
aws s3 --profile default mb s3://drupal-lambda1. Compress theindex.jsfile insideweb/modules/contrib/rekognition_api/lambda/index.jsinto a .zip archive:zip -rj drupal-media-rekognition.zip web/modules/contrib/rekognition_api/lambda/index.js- If the
index.jsfile doesn't exist, you may have forgotten to runcomposer install; run that first. 1. Copy the archive into the bucket you created earlier:aws s3 --profile default cp drupal-media-rekognition.zip s3://drupal-lambda/1. Delete the file since it's no longer needed:rm -f drupal-media-rekognition.zip.
- If the
Now that you're workstation is ready, and the lambda code is in place, run the following command (replacing the DrupalUrl and DrupalPassword at least) to deploy the required AWS resources via AWS CloudFormation:
aws cloudformation deploy \
  --region us-east-1 \
  --profile default \
  --template-file web/modules/contrib/rekognition_api/lambda/DrupalMediaRekognition.yml \
  --stack-name drupal-media-rekognition \
  --capabilities CAPABILITY_NAMED_IAM \
  --parameter-overrides \
   DrupalUrl='www.example.com' \
   DrupalUsername='rekognition-api-user' \
   DrupalPassword='secure-password-here'
After this operation completes, you should see a message like:
Successfully created/updated stack - drupal-media-rekognition
If you don't see that message, take a look in the AWS Console in the CloudFormation section, or use the AWS CLI to view detailed error logs.
Finally, you need to manually create a Rekognition 'face collection' to store facial recognition data. Someday this will be automatically created with the CloudFormation template, but until that's possible, you need to use the AWS CLI to run the following command:
aws rekognition create-collection --region us-east-1 --profile default --collection-id drupal-media-rekognition
Be sure to use the same --region and --profile as you did when running the cloudformation deploy command earlier.