Space Station Tutorial
This tutorial is for VSDK Unity. For VSDK Unreal documentation, see the VSDK Unreal wiki.
VSDK can be used to rapidly prototype XR experiences, often with very little code. In this chapter we will create a Space Station Repair Trainer prototype in order to provide a tour of VSDK’s basic features and show how to build a simple virtual environment without code using the Reaction System.
Create a new Unity project named 'Space Station Simulator' and set up a new scene as described in First-Time Setup
Now that we have a simple scene setup with an XR camera and controllers, let’s start building the Space Station Repair Simulator! If you haven’t done so already, download the VSDK tutorial asset pack from the latest release on the VSDK GitHub.
In the Space Stations Repair Trainer, the user will be playing as an astronaut working on a small space station. Unfortunately, the air recycling system has stopped working due to a faulty CO2 Filter! The astronaut will need to repair the air recycling system by replacing the CO2 Filter and then welding a new panel on top of the CO2 Scrubber Box.
In VSDK, the basic building blocks of interactivity are Interactable Objects. Interactable Objects are objects that users can pick up, move around, and use in other ways. Interactable Objects can also interact with Interaction Areas, which represent spaces where the user can trigger events by manipulating objects in specific ways.
We have two Interactable Objects we need to create for this scene: (1) the CO2 Filter; and (2) the Welder. We’ll come back to the Welder in a later section as it is a little more advanced.
Let’s start with the filter:
- Find the model of the CO2 Filter in the “Tutorials/Prefabs/Space Station” folder and drag it into the scene view. Reset the position to 0, 0, 0.
![]()
To make the CO2 Scrubber interactive, we need to add two things: a collider, and a script that tells VSDK that this is an Interactable Object.
-
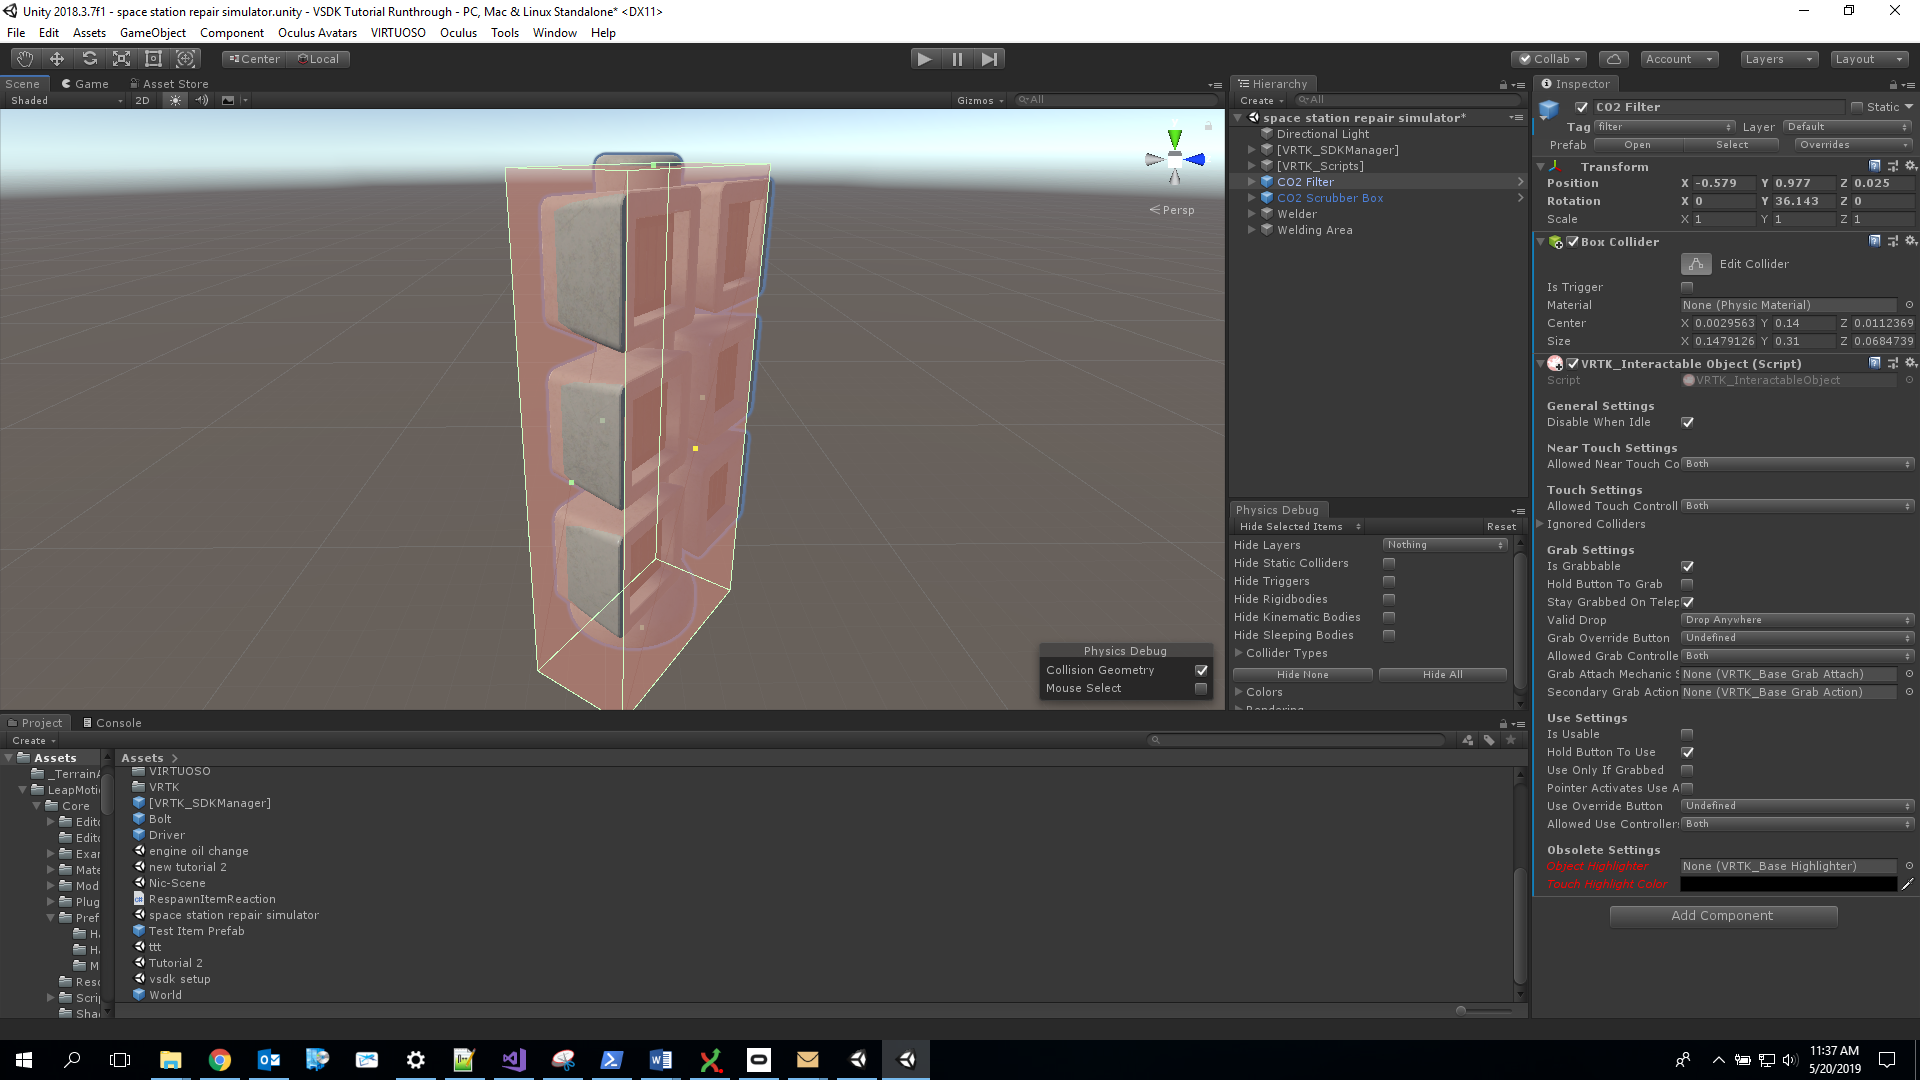
Since the filter is roughly box shaped, add a Box Collider by pressing ‘Add Component’ in the inspector tab and typing in ‘Box Collider’.
-
Then, press ‘Edit Collider’ on the Box Collider inspector and drag the edges of the box until the roughly align with the edges of the filter model (see below).
-
If you are having trouble seeing the edges of the Box Collider, open the Physics Debug menu > Analysis > Physics Debugger and check the ‘Collision Geometry’ box that appears in the scene view
-
-
Add a RigidBody component to the CO2 Filter in the same way as the box collider, by using the “Add Component” menu. This should be added on the same object, directly; uncheck ‘Use Gravity’ (we are in space, after all) and check ‘Is Kinematic’.
-
Next, click ‘Add Component’ again and start typing ‘VRTK_InteractableObject’ to add the required interactable object component.
-
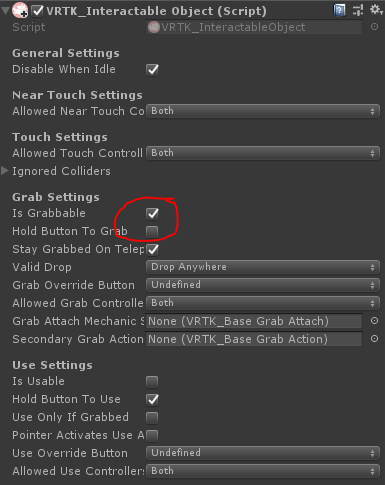
Under the ‘Grab Settings’ heading on the VRTK_InteractableObject, check the ‘Is Grabbable’ box and uncheck ‘Hold Button To Grab’. The component should now look like this:
Congratulations! You’ve made your first Interactable Object; if you enter play mode in Unity, you should now be able to reach out and grab the filter and move it around. To grab an object, place the controller within its collider, and press the controller’s grip button—the button on the side of the controller. Press the button again to release the object.
If the object is hard to reach, trying adjusting its position in the transform component until it is easily reachable in VR. A height (i.e., Y value) of about 1.2 is usually reachable for standing persons.
While moving around a single object in VR can be surprisingly fun, that alone does not make for an exciting experience. The astronaut needs to replace the CO2 Filter, so we’ll introduce an interaction area to allow the player to place the Filter into the CO2 Scrubber Box.
- Find the CO2 Scrubber Box prefab in the VSDK Tutorial Pack/Prefabs folder and drag it into the scene.
- Position the box so that it is easily reachable in the scene; setting the Y value of the transform to about 1.2 is typically a comfortable height. Adjust the X and Z values so that it is not colliding with the CO2 Filter.
To prepare the model as an interaction area, we will need to establish a collider on the object, and set it to a trigger. Next we will need an interaction area script, a reactor script, and a set of reaction scripts that combine to determine the object’s behavior.
-
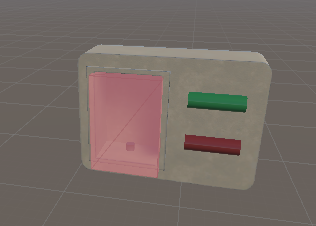
Place a Box Collider on the CO2 Scrubber Box object and tick the ‘Is Trigger’ box. Resize the box collider as before, but have it cover the empty space on the left side of the CO2 scrubber box instead of the whole object. This will indicate where the CO2 Filter will need to be placed, shown below in red.
-
Add an Interaction Area script by clicking ‘Add Component’ and typing in ‘Interaction Area’ until the script becomes visible in the list and click it to add it to the game object.
- Add an Interaction Area script by clicking ‘Add Component’ and typing in ‘Interaction Area’ until the script becomes visible in the list and click it to add it to the game object.
We’ll cover the inner workings of the Interaction Area script in later sections, but to summarize it generates events when the collider on the object interacts with Interactable Objects—e.g. when an Interactable Object enters, exits, or is used within the area.
We can make use of these events using what is called a Reactor, a script that maps events to Reactions. Reactions are scripts with a common interface that perform actions in the scene. For example, a Reaction might play a sound, change a material, play haptic feedback, or lock an object to a certain spot. We’ll start by creating the Reaction:
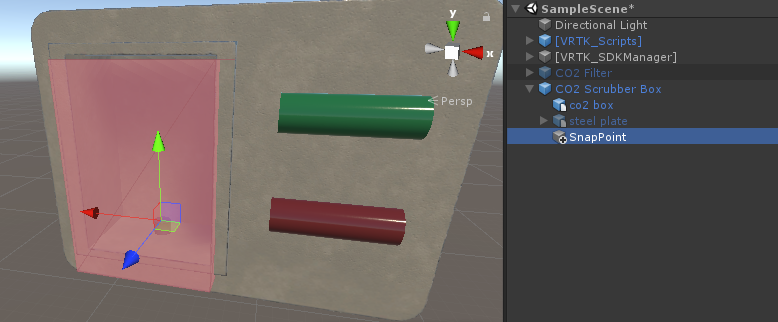
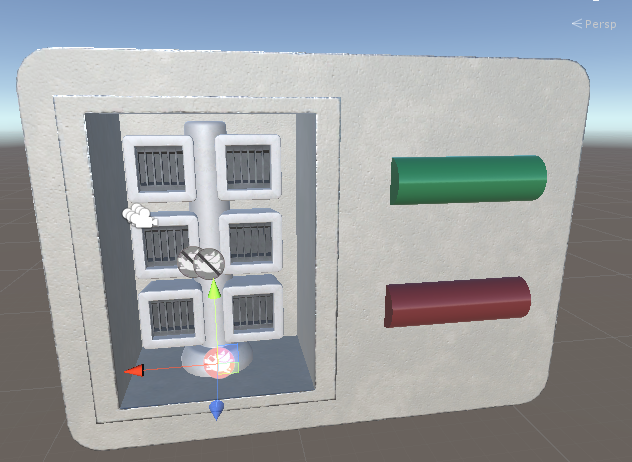
- Create an empty object under the CO2 Scrubber Box and rename it ‘Snap Point’. The origin of the filter object will snap to this point, so move it towards the bottom of the empty space (you should see a small cylinder representing a pipe). This is shown below.
-
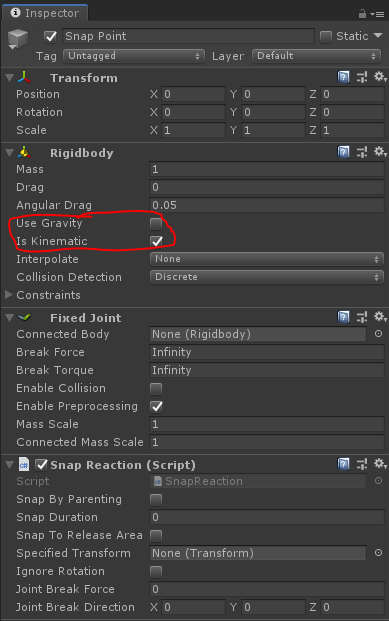
On the Snap Point object, add a RigidBody, a FixedJoint, and a Snap Reaction using the Add component button.
-
On the RigidBody component uncheck ‘Use Gravity’ and check ‘Is Kinematic’.
-
The resulting object will look like the image below:
The next step is to add a Reactor to the interaction area.
-
Click on the CO2 Scrubber Box object and use the Add Component button to add a Reactor.
-
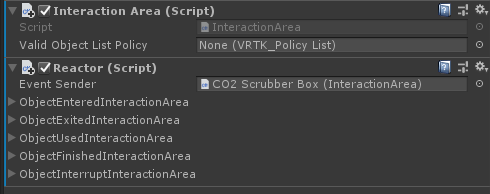
Click on the Interaction Area script attached to the same Scrubber Box and drag it into the Reactor’s Event Sender component field. This tells the Reactor what events to listen to. This is shown in its completed state below; each of the expandable areas represents an event sent by the Interaction Area that the Reactor can react to.
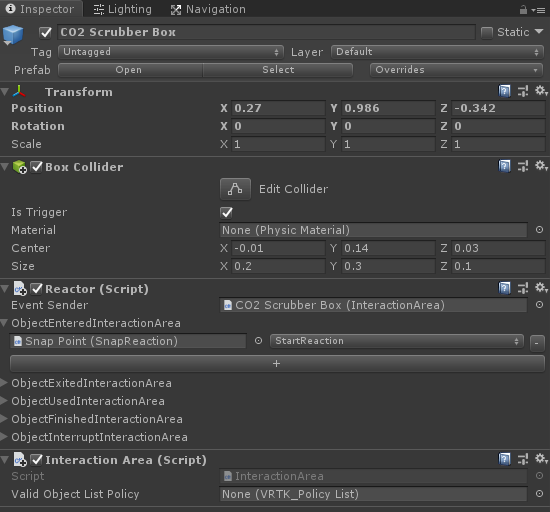
- Expand the ObjectEnteredInteractionArea event and press the plus sign to create a Reaction entry and tie it to the Snap Reaction by pressing the dot next to the field and finding the Snap Point in the scene object list. (Alternatively, you can drag the Snap Point directly from the hierarchy into the field)
The finished CO2 scrubber box object should look like this:
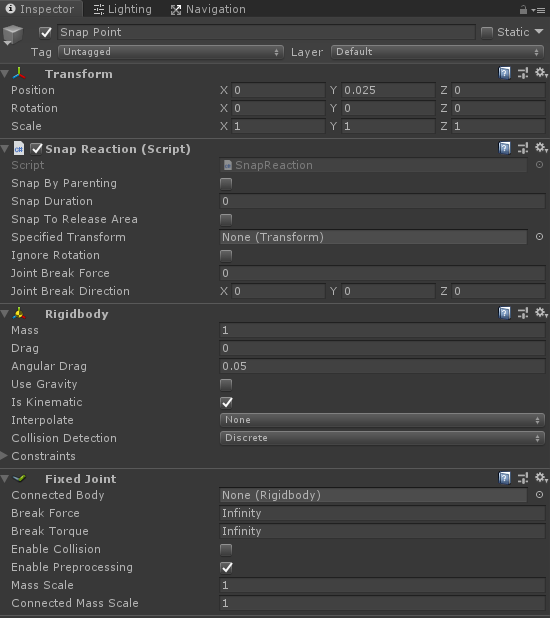
And the finished Snap Point object should look like this:
Go ahead and test. Now, when you grab and place the CO2 filter in the box, it should snap into place. You may want to adjust the snap point a bit until the filter looks like it fits naturally in the box (there should be no gap between the bottom of the filter and the box but a slight gap between the top of the filter and the box, see the image below for reference).
Congratulations on completeing your first interaction!
This shows that with just a few simple scripts, we can begin to prototype complex scenarios with ease. You would be surprised how many interactions consist of simply picking up an object and putting it in the right spot. In the next section, we will introduce some more complex behavior using more advanced interaction areas and reactions, including the Channel Interaction Area and the versatile Unity Event Reaction.
Now that our astronaut can finally breathe safely again, we will be adding a welding interaction that will allow the astronaut to put a panel over the CO2 Scrubber Box to protect the CO2 Filter from cosmic rays. (In real life, this is poor design. However, it illustrates some cool interactions.).
At this point, we are going to start moving more quickly. This section assumes you are familiar with adding components and scripts to Unity game objects; if you are not refer to previous sections or external tutorials. Let’s start by building the Welder itself.
-
Find the Welder prefab in the “VIRTUOSO Tutorial Assets/Prefabs/Space Station” folder and drag it into scene view.
-
To build a collider for the Welder, add 2 box colliders; one box collider should cover the handle and the other should cover the remainder of the welder. Make sure the collider extends all the way to the tip of the welder (see below).
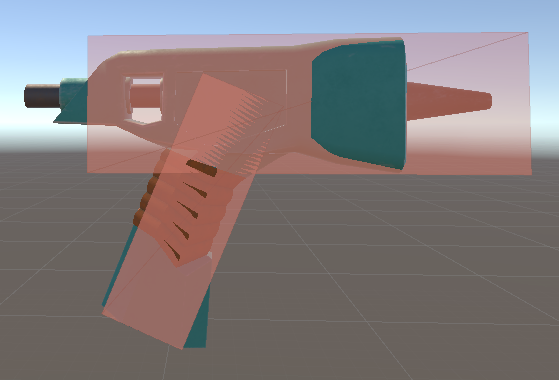
-
Add a VRTK_InteractableObject script as before. Check ‘Is Grabbable’, check ‘Is Usable’, and uncheck ‘Hold to Grab’ on the Interactable Object inspector.
-
Add a RigidBody, and uncheck ‘Use Gravity’ and check ‘Is Kinematic’.
If you try out the object in play mode as-is, you will notice that the grabbing angle can be awkward. We’ll fix this using a GrabAttach script.
GrabAttach scripts come in several forms and set up grab points on objects.
-
Add a VRTK_ChildOfControllerGrabAttach script to the welder. This script sets the Interactable Object as the child of the controller when grabbed with an offset based on the Grab Point’s position and rotation.
-
Create an empty child object under the welder and name it Grab Point.
-
Drag the Grab Point object into the Right Snap Handle field of the VRTK_ChildOfControllerGrabAttach script.
-
Now, by moving and rotating the Grab Point, you can manipulate where the welder will be held relative to the controller. In general, if an object has a handle, you want the handle to align with the controller. Modify the grab point until it feels like the object aligns well with your controller.
- A good starting point is rotating the GrabPoint -90 degrees about the Y axis. If your Welder was not rotated, this should produce a forward-grab effect.
Once you’ve adjusted the grab point so that it feels natural when you grab the welder, let’s add a few Reactions to make the welder feel more real. First, we will hide the controller when you pick up the welder since the two models will otherwise intersect and look awkward, which tends to break the immersion when interacting with the object. To accomplish this, we will use the Reactor system.
-
Add a ControllerAppearanceReaction to the welder
-
Add a Reactor to the welder.
-
Drag the VRTK_InteractableObject component into the Reactor component field.
-
In the Reactor component, expand both the InteractableObjectGrabbed and InteractableObjectUngrabbed events and use the plus sign to add the ControllerAppearanceReaction to both. For InteractableObjectUngrabbed, change the drop down to ‘StopReaction’.
Now when the player grabs the welder, the controller should disappear until they put it down.
At this point, you may have found a bug in our scene; if you put the welder into the CO2 Scrubber Box, it will snap to an odd angle! This is because the Interaction Area on our CO2 Scrubber Box will trigger the ObjectEntered event when any interactable object enters its collider. We can restrict which interactable objects trigger events by using Policy Lists. Policy Lists are lists of script names, tags, or layers that allow Interaction Areas to either ignore or include certain objects. We will now add a policy list that explicitly allows only the one CO2 Filter object to interact with the CO2 Scrubber Box.
-
Add a VRTK_PolicyList to the CO2 Scrubber Box and drag the newly added VRTK_PolicyList component into the corresponding field on the Interaction Area on the gameobject.
-
Change the policy list type to ‘include’, select the tag option and type ‘filter’ into the first available box.
-
Create the ‘filter’ tag; click ‘Edit > Project Settings’ and select the Tags and Layers section. Add a tag using the plus sign and name it ‘filter’.
-
Tag the CO2 Filter object as a filter by clicking on it in the hierarchy and choosing ‘filter’ from the tag dropdown. The tag section is shown below.
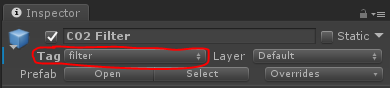
Now only the CO2 Filter can be snapped into the CO2 Scrubber Box. Go ahead and try it out—both to confirm that the CO2 Filter still snaps and that the welder does not.
Next, we are going to explore the Unity Event Reaction.
This is a very powerful reaction, as it allows you to access a large number of public methods on objects in the scene (most public methods on scripts that either have no parameters or a single common parameter can be invoked using this reaction). We are going to use the UnityEventReaction to start and stop a particle system in order to demonstrate one potential use case, but the Unity Event Reaction is highly flexible and suitable for many more use cases.
We have included a particle system in the tutorial pack that shoots out a small blue flame.
-
Find the particle system prefab in the VSDK Tutorial Pack/Prefabs/Space Station folder and drag it into the scene as a child of the Welder.
-
Move the particle system until it lines up with the tip of the welder.
-
Disable the particle system by clicking the check box at the top of the game object inspector.
-
Next, we will need to add two Unity Event Reactions to our welder—one to trigger events when the user pulls the trigger, and one for when they release it. Create two children game objects under the welder and name one ‘Welder On Unity Events’ and ‘Welder Off Unity Events’.
-
Add a ‘Unity Event Reaction’ component to each object
-
Add the Welder On Reaction to the InteractableObjectUse event in the Reactor on the Welder root object by clicking the + and dragging the object into the appropriate area under the target reaction type, and add the Welder Off Reaction to the InteractableObjectUnUse event.
-
Click on the Welder On Reaction object and click the plus sign under the Unity Event Reaction to add a new entry. Drag the particle system object into the object field, and use the dropdown to select ‘GameObject->SetActive’ and check the box to indicate that the Is Active parameter should be set to true.
-
Repeat the previous step on the Welder Off Reaction, but uncheck the box so that the game object will be disabled.
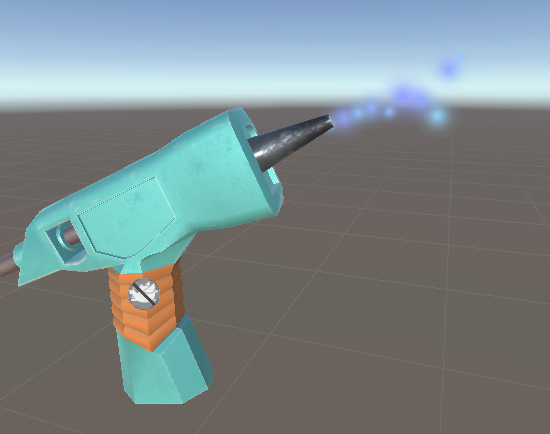
Now, when you pull the trigger on your controller, the welder should activate and start spewing out flame, sparks, and smoke, like this:
Before continuing, we should discuss a how Interaction Areas work in more detail. At their core, Interaction Areas are about translating area-specific object manipulations into discrete events: Interactable Object Entered, Exited, Used, Finished, and Interrupted. Enter, Exit, and Use are self-explanatory. Finished and Interrupted aren’t issued by the base Interaction Area but are used in extensions of the basic Interaction Area when a more complex condition is met. Some examples of advanced interaction areas include time-based interactions (Finish event sent if the object is left in the area for a specific amount of time), completely engulfing an object in an interaction area, and completing multiple smaller interaction areas in sequence.
We will be covering advanced interaction areas and coding custom interaction areas in later chapters. For now, we will be using the Channel Interaction Area, a specialized Multi Interaction Area that is designed for interactions where the user must trace or draw a line between two or more points. This interaction area is easy to set up and can lead to some powerful interactions. We will be using the Channel Interaction Area to simulate welding a metal plate over the top of the CO2 filter box.
A Channel Interaction Area works by monitoring several simpler interaction areas and ensuring that an object passes through the child areas one at a time in the correct order and that the tip or ‘point’ of the object stays along a straight line between the child areas.
- Start by creating an empty object and naming it ‘Welding Area’. Next, add the Channel Interaction Area component to the object. Check the box next to ‘Enforce Order’
- Add a tag to the welder called ‘welder’ and create a VRTK_PolicyList on the Welding Area object that includes only the welder tag so that the user cannot weld with the CO2 filter. Add the VRTK_PolicyList to the Channel Interaction Area.
- Next, we need to set up a Line Renderer Info object. These scriptable objects dictate how to draw a guide between points. We’ve already created one in the Tutorial Assets prefabs folder, so click on the pin next to the object field and select the ‘Welder Line Renderer Settings’.
- Next, set the Path Radius of the Channel to 0.25; this controls how far the player can deviate from the line between points.
Next, we need to place the child interaction areas which the Channel Interaction area uses to determine the path the user is supposed to trace.
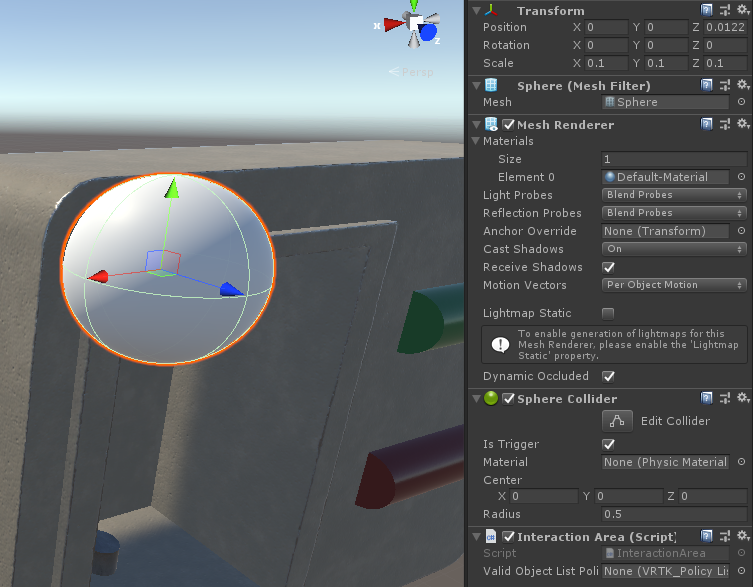
- Set up the first weld point by adding an sphere object as a child of the Welding Area, and scale each axis to 0.1.
- Set the sphere collider IsTrigger property to true.
- Add an Interaction Area component to the object.
- Move the object to the top left corner of the panel opening. This will be the first point the user needs to place the welder to start welding. The completed point is shown below.
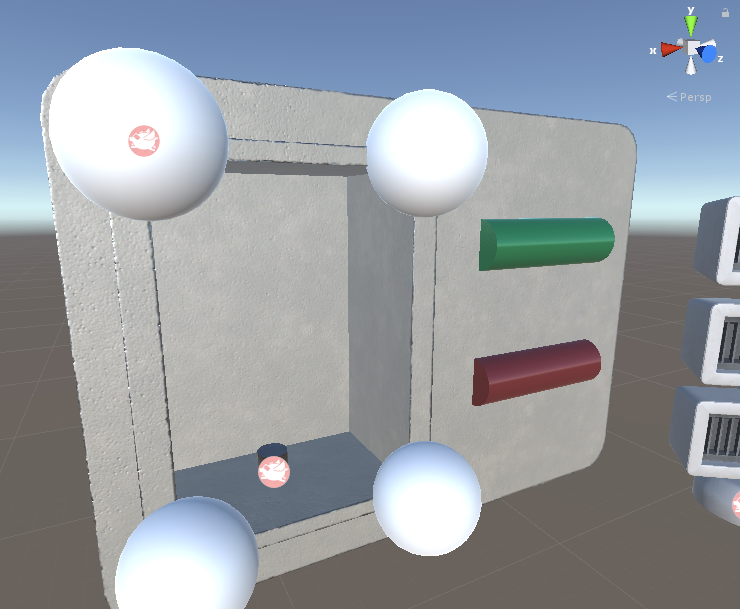
- Duplicate the object by clicking on it in the hierarchy and pressing Shift + D. Move the duplicate to the top right corner of the opening. Note. Ensure each sphere center is slightly outside of the Scrubber Box, or else the line renderer may be obstructed.
- Repeat this step two more times, once for the lower right corner and again for the bottom left.
All we have to do to finalize the interaction is set up a Reaction. The model for the CO2 Scrubber Box includes a steel panel that is deactivated by default. We will use a reaction to enable it.
- On the Welding Area object, add a Reactor and a Unity Event Reaction. Drag the Channel Interaction Area component into the component field of the Reactor.
- Expand the ObjectFinishedInteractionArea event field and add the new Unity Event Reaction.
- In the Unity Event Reaction, add a new event to the list, pick the ‘steel plate’ object from the scene with the object field of the entry, and then choose GameObject > SetActive from the drop down and check the box. This will enable the panel once the reaction is complete.
- To take the polish one step further, add a second entry to the Unity Event Reaction to disable the Channel Interaction Area once the welding is done: click the plus sign on the Unity Event Reaction, drag the Channel Interaction Area game object into the object field, and choose GameObject > SetActive.
Go ahead and try it out; pick up the welder and move it through each of the interaction areas as they appear. Once you’re comfortable with the setup of the weld points, you can hide the spheres by unchecking the mesh renderer on each one. At this point, you’ve made a few simple interactions that you should be able to use for your own prototyping needs!
- Whenever possible, separate the 3D model of an object from the code controlling it; what we typically do is create an empty object that controls object/interaction area logic with children for the 3D model and collider so that it is easy to switch out models
- In the Interaction Areas, Reactors, and Reactions section, we manually positioned a transform for snapping. If you are building your 3D models yourself, you can create an empty transform in your model at the exact point you want to snap to ahead of time which will make the positioning more accurate.
- Placing transform points and interaction areas in general can be tricky; we highly recommend using the Unity physics debugger menu to help; click on Window > Analysis > Physics Debugger, and check the ‘Collision Geometry’ box to have Unity render colliders in the scene view which makes them much easier to place accurately. This enables a visualization that is much more robust than the standard collider visualizations.
Here are some ideas & challenges if you want to explore the Space Station Repair Trainer a bit more:
- Currently, you do not actually need to have the welder turned on to weld the panel into place. Try using a Unity Event Reaction to enable/disable the Channel Interaction Area so you can only weld while the welder is on.
- Our CO2 Filter can still be placed even after the steel plate has been secured on the CO2 Scrubber Box. Find a way to prevent this from happening using Reactions.
- If you have a Leap Motion hand tracker, try adding Hand-based Interactions