Warning: This addon does not work well from Blender 3.2 upwards due to internal changes in vertex attributes in Blender. I have tried to fix the problems, but have not been able to yet. I may return to the addon in the future in order to fix the bugs or even rewrite it, but I can't make any guarantees due to other commitments. Apologies to anyone who uses the addon and is waiting for a fix.
An add-on for Blender that adds numerous features to assist working with vertex colors.
- Installation
- Usage
- Brush Settings
- Active Channels
- Data Transfer
- Misc Operations
- Pie Menus
- Planned / Possible Features
Note: This add-on requires Blender 2.80 or above. There is an older release compatible with Blender 2.79 available here.
- Download the latest release from GitHub here.
- In Blender, open the Preferences window (Edit>Preferences) and select the Add-ons tab.
- Press the 'Install...' button and select the .zip file you downloaded.
- Enable the add-on and save preferences if you want it to always be available.
This add-on is mostly designed for people who use vertex colors as extra non-color data, such as artists making models for games, where such data can be useful for creating interesting shader effects, or for storing baked light data. The tools provided by this add-on allow the user to fill, invert, posterize or remap individual color channels, as well as copy or swap channels between layers and exchange vertex weight and UV data to and from color channels.
One of the key features of the addon is its isolate workflow, which allows the user to isolate a single channel (R,G,B or A) of vertex color data and work on it using all the usual vertex paint tools. The data transfer features can then be used to pack different vertex color data into single channels, with the remap and posterize functions helping to ensure the data is in specific ranges.
The add-on will appear in the details panel (press 'n' to open) to the right of the 3D view when in vertex paint mode as shown in the following image.
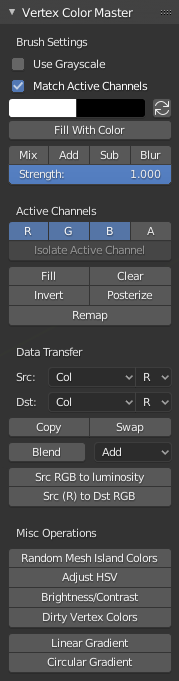
Brush settings contains a few of the most useful brush options so that the add-on can be open and useful without needing the full brush menu to be open. This way there is more space in the Tools panel, even on smaller displays.
-
Use Grayscale (Off) - Enable this if you would prefer to work with grayscale sliders instead of RGB color pickers. The grayscale sliders are automatically enabled when a channel is isolated.
-
Match Active Channels (On) - With this option enabled, changing the active channels will update the brush color to match the channels that are active, such that enabling only R will give red, R and G will give yellow and all RGB will give white etc. This is useful for painting with add or subtract blend modes. If this is undesirable, disable this option.
The primary and secondary brush colors are shown here. Press the button on the right to switch between them. Value sliders are shown when the 'Use Grayscale' option is enabled. Note that you can also press the 'X' key to switch between the primary and secondary colors.
This will ignore any selected active channels and fill the mesh with the current brush color. It can use the selection mask mode, so this is a handy shortcut for filling selected faces or vertices with a specific color instead of trying to set the value via channels or painting.
- Fill Color (White) - Color with which to fill the mesh or selection (if using selection mask).
The active channels section allows the user to enable or disable channels that the functions directly under the active channels will work on. For example, enabling only the R channel will mean that it is the only channel to be affected when the Invert button is pressed, etc. Different combinations of RGBA can be selected by holding the shift key while clicking on the channel buttons.
As channels are activated and deactivated, the brush color will update to match them. If the Add or Subtract brush blending modes are set, this enables the user to paint only on active channels quite easily.
Note: At the time of writing, Blender 2.80 does not support rendering or painting with vertex alpha, but the alpha values are stored in the vertex color data correctly. This will hopefully be improved in the future, but for now, alpha data can be edited or viewed by isolating the A channel.
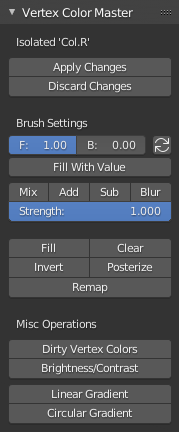
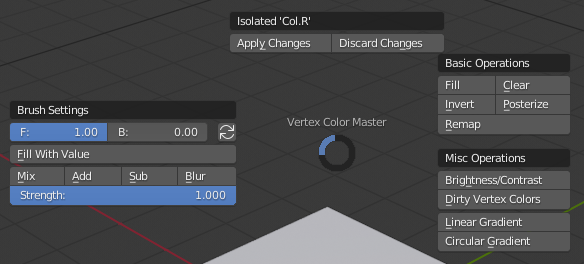
When a single channel is selected, the option to isolate it and work in grayscale mode becomes available. Simply press the 'Isolate Active Channel' button and the active channel will be isolated and the Vertex Color Master UI will change to reflect this. Once in isolate channel mode, the UI will change to reflect this and the color picker will change to grayscale value sliders. Once changes to the channel have been made, they can be applied by pressing the 'Apply Changes' button, or discarded by pressing 'Discard Changes' instead.
- Channel (R) - The channel that was isolated can be changed by selecting a different one.
Fill sets the value of the currently active channel(s) to 1, whereas Clear will set it to 0.
-
Value (1.0) - The value to fill the channel(s) with.
-
Fill With Color (Off) - Ignore active channels and fill the vertex color layer with 'Fill Color'.
-
Fill Color (White) - Color to use when 'Fill With Color' is enabled.
Inverts the value of the currently active channel(s).
Posterize the value of the currently active channel(s). Useful for cleaning up channels where the value should be 0 or 1, or otherwise snapping the value to increments determined by the number of steps.
- Steps (2) - The number of value steps to posterize to. For example, setting this to 5 would snap the values of the active channel(s) to 0, 0.25, 0.5, 0.75 and 1, whilst leaving the default setting of 2, would result in black and white.
Remap the value of the currently active channel(s). This function takes values in the active channel and scales them based on an input range and output range. It's somewhat similar to using levels in a 2d graphics package, so it can be used to adjust the minimum and maximum brightness, invert etc. If used on individual channels, it can be used to shift colors apart.
-
Input Range Min (0.0) - Minimum value of the input range.
-
Input Range Max (1.0) - Maximum value of the input range.
-
Output Range Min (0.0) - Minimum value of the output range.
-
Output Range Min (1.0) - Maximum value of the output range.
All separate parts of a mesh (islands), will be assigned random values per active channel based on various randomization parameters.
-
Active Channels (RGB) - Channels to randomize. Allows the channels to be randomized to be modified in the operator redo panel.
-
Merge Similar (off) - Random colors will be assigned to different mesh islands based on the number of faces of the island. The assigned colors will be random, but if two or more islands have the same face count, they will all share the same color. This is useful for creating an id map from vertex colors.
-
Seed (1) - The seed determines how the random colors are generated. This ensures the same 'random' colors will be generated each time. To change the colors, change the seed value.
-
Min (0.0) - Minimum value for the random values.
-
Max (1.0) - Maximum value for the random values.
This section allows quick transfer of data between different color layers, vertex groups and uv layers on the same object. Values can be transferred between 'Src' and 'Dst' layers. When using a vertex color layer, the RGBA channel will be selectable from the channel dropdown on the right. If a vertex group is selected (vertex groups are prefixed with 'W:', for weight), the channel dropdown will be disabled. If a UV layer is selected (UVs are prefixed with 'UV:'), channels will not be selectable at all.
Depending on the type of data selected in either 'Src' or 'Dst', a different operations will be available from the UI. If vertex groups or UVs are selected in either 'Src' or 'Dst', a different UI will be shown that enables only simple data transfer. Transfer between two vertex groups, uv layers or vertex groups and uv layer is currently unsupported.
Copy data from the 'Src' layer/channel to the 'Dst' layer/channel. Using swap will swap the data instead of copy.
-
Swap Channels (Off) - Swap 'Src' and 'Dst' channel data instead of just copying from 'Src' to 'Dst'.
-
All Channels (Off) - If swap is disabled, the data from the 'Src' channel will be copied to all channels of the 'Dst' layer.
Blends the 'Src' channel with the 'Dst' channel and puts the result in the 'Dst' channel by default.
-
Blend Mode (Add) - Set the blending mode to use.
-
Result Channel (R) - Set a different channel to put the resulting data of the blend if overwriting the 'Dst' channel is not desired.
This calculates the luminosity of the vertex color data in the 'Src' layer and puts the value into each of the RGB channels.
- All Channels (On) - Copy the luminosity value into each of the RGB channels. If disabled, the luminosity value will only be copied into the 'Dst' layer's selected channel.
Copy the value of the 'Src' channel into all channels of the 'Dst' layer.
Copy the weight value of the vertex group in the 'Src' layer to the 'Dst' channel.
Copy the value of the 'Src' channel to the vertex group in the 'Dst' layer.
Copy the weight value of the uv layer in the 'Src' layer to the 'Dst' channel.
Copy the value of the 'Src' channel to the uv layer in the 'Dst' layer.
Copy the object space normals to the 'Dst' color layer (XYZ > RGB).
Copy the 'Src' color layer to the custom mesh normals (Requires object space normals, RGB > XYZ).
The 'Misc Operations' section contains features unrelated to the main features of the addon.
Blurs the values of all the vertices in the mesh to smooth them out. It uses the smooth weights function available in weight paint mode, but allows it to be used interactively on vertex color channel data. Note: This feature is currently only available when a channel has been isolated.
-
Factor (0.5) - The amount of blur to apply.
-
Iterations (1) - The number of times to apply the blur. Increasing this will result in a smoother blur.
-
Expand/Contract (0.0) - Use this to adjust the balance of dark/light values as the blur is applied. It is similar to brightness/contrast adjustment, or the remap operator.
All separate parts of a mesh (islands), will be assigned random colors based on various randomization parameters.
-
Randomize Hue (on, 0) - Enable randomization of the hue parameter of generated colors. When disabled, the value to the right will be used instead of being random.
-
Randomize Saturation (off, 1) - Enable randomization of the saturation parameter of generated colors. When disabled, the value to the right will be used instead of being random.
-
Randomize Value (off, 1) - Enable randomization of the value parameter of generated colors. When disabled, the value to the right will be used instead of being random.
-
Seed (1) - The seed determines how the random colors are generated. This ensures the same 'random' colors will be generated each time. To change the colors, change the seed value.
-
Merge Similar (off) - Random colors will be assigned to different mesh islands based on the number of faces of the island. The assigned colors will be random, but if two or more islands have the same face count, they will all share the same color. This is useful for creating an id map from vertex colors.
-
Order Based (off) - Instead of using actual random colors, set the colors based on the number of parts. This will result in the best possible separation of colors, as the default random setting can sometimes give different parts very similar shades.
Enables modification of the Hue, Saturation and Value of vertex color data using Blender's built-in HSV adjust function.
-
Hue (0.5) - Adjust the hue of vertex colors.
-
Saturation (1.0) - Adjust the saturation of vertex colors.
-
Value (1.0) - Adjust the value of vertex colors.
Enables adjusting the brightness and contrast of the vertex colors using Blender's built-in Brightness/Contrast function.
-
Brightness (0.0) - Adjust the brightness of vertex colors.
-
Contrast (0.0) - Adjust the contrast of vertex colors.
Uses Blender's built-in Dirty Vertex Color function to darken the vertex colors based on the curvature of the mesh. This is useful for generating fake ambient occlusion, and can be adjusted using either Brightness/Contrast or Remap to create a more pleasing result. Note that the vertex colors should be set to white before applying this effect, as it is applied over the top of existing colors.
-
Blur Strength (1.0) - Strength of the blur applied to the dirt effect.
-
Blur Iterations (1) - Number of times the dirt is blurred.
-
Highlight Angle (180) - Angle of the highlight given to convex angles.
-
Dirt Angle (0) - Angle of the dirt given to concave angles.
-
Dirt Only (Off) - Do not add highlight and only darken the vertex colors.
When enabled, the gradient tool allows you to draw a line representing the start and end of a gradient in the 3D view. Once the line has been drawn, a gradient will be painted onto the mesh. The brush primary and secondary colors are used to set the gradient colors.
-
Start Color - Start color of the gradient.
-
End Color - End color of the gradient.
-
Circular Gradient (off) - Switch between circle and linear gradient.
-
Use Hue Blend (off) - Blend using all the colours in between start and end, instead of a linear blend.
The circular gradient tool is similar to the gradient tool, but draws a radial gradient, with the center at the first position clicked, and edge at the second.
Note: Circular gradient uses the same underlying operator as the Linear gradient, and so has the same options.
Most of the features of the addon can also be accessed from a pie menu that is bound to the 'V' key. The pie menu appears as shown in the image below.

When in isolate mode, the pie menu is slightly different, as shown in the following image.
- Add function to set UV islands to random colors.
- Tools to aid with non-destructive blending of layers.
- Improvements to pie menus.
- Optimisations to improve speed of masked operations.
- Optimisations to improve speed in dense mesh.