ScriptableObject architecture with a small, easy-to-expand codebase, and simple UI.

Another take on ScriptableObject architecture from Ryan Hipple's 2017 Unite talk
Main differences from ScriptableObject-Architecture and unity-atoms:
- Small code base. With help of generic classes, there is only one class for a variable, one class for a scriptable event, etc. It allows to implement extensions of the plugin easily and modify it to your liking.
- Intuitive, easy-to-learn interface, allowing you to use all the advantages of ScriptableObject Architecture without cluttering UI with unnecessary buttons and fields.
- Integrations with other plugins. You can subscribe to events and variables using UniRx. You can use them as signals in Timeline. The way you can work with scriptable events and variables is versatile and integrated into Editor, so you can use them the way you like.
ScriptableObject architecture allows to write less code and do more design work in the editor. You can design components and prefabs that are highly decoupled and are driven by data. Where they receive the data from doesn't matter which alllows to arrange components and prefabs in multiple ways, so you don't have to rewrite code when you need to change a gameplay mechanic or even add a new mechanic.
In ScriptableObject architecture, variables and events are scriptable objects. They are stored as separate files which can seem redundant at first. But think about it - you put a variable once in the file system, and can change it or react to the change from everwhere: from a game object in a scene, from a prefab, from different scenes at once, even from other scriptable objects. At the same time, two prefabs don't need to know about each other to pass the information between them. They pass the information to a variable/event and don't care, who receives it or how many objects are listening for this change.
Have you ever heard of advantages of ECS? That data-driven architecture is good for games and allows for better decoupling of systems and managing mechanics? ScriptableObject architecture provides just that. It doesn't provide the efficiency benefit of ECS, but doesn't require you to change the GameObject-Component workflow you are used to. So it's very easy to pick up and integrate only where you need it. Of course, not every variable should be a scriptable object. You declare variables as scriptable objects only when you need to interact with the 'outside world', be it another prefab or scene.
- Unity 2020.2 or higher
- .NET 4.x ❗ (when using Unity 2021.1 or lower)
❗ Before installing the package, please disable the Assembly Version Validation option in Player Settings.
Once you have the OpenUPM cli, run the following command:
openupm install com.solidalloy.generic-scriptable-architecture
Or if you don't have it, add the scoped registry to manifest.json with the desired dependency semantic version:
  "scopedRegistries": [
    {
      "name": "package.openupm.com",
      "url": "https://package.openupm.com",
      "scopes": [
        "com.solidalloy",
        "com.openupm",
        "org.nuget"
      ]
    }
  ],
  "dependencies": {
    "com.solidalloy.generic-scriptable-architecture": "1.3.3"
  },
Project supports Unity Package Manager. To install the project as a Git package do the following:
- In Unity, open Project Settings -> Package Manager.
- Add a new scoped registry with the following details:
- Name: package.openupm.com
- URL: https://package.openupm.com
- Scope(s):
- com.openupm
- com.solidalloy
- org.nuget
- Hit Apply.
- Go to Window -> Package Manager.
- Press the + button, Add package from git URL.
- Enter com.solidalloy.generic-scriptable-architecture, press Add.
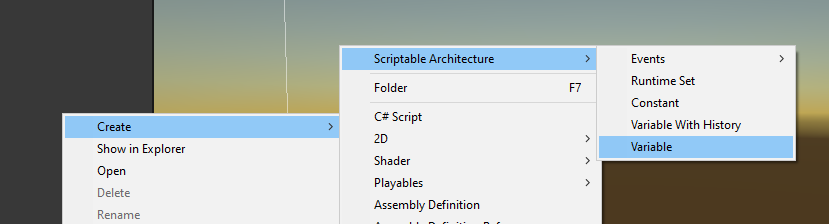
-
Go to the Create context menu, choose Variable
-
Choose a type of the variable you would like to use. Here, we will choose
float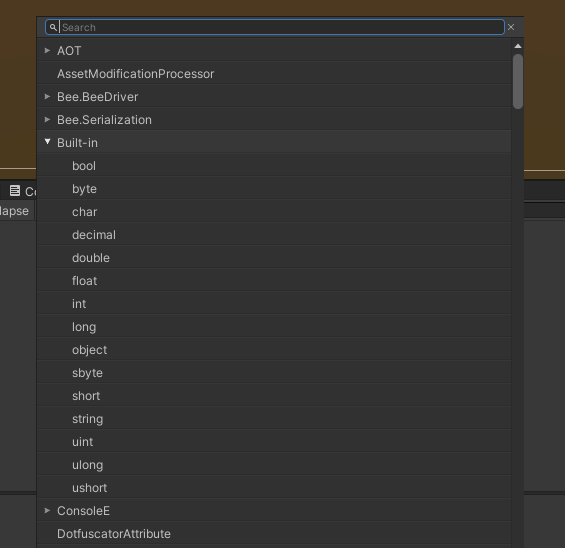
-
Enter a name for the variable, and it will be created

-
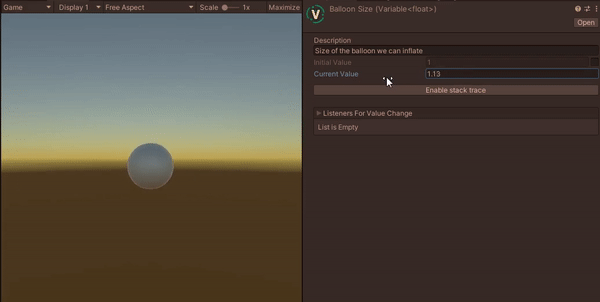
You can create a description for the variable, choose its initial value. Notice how the variable is a generic class, so you can create variables of any type with the same steps, without having to write any additional classes. We will cover the "Enable stack trace" in the Stack trace section.

-
Let's now use the variable. We have one class that will increment the counter:
using GenericScriptableArchitecture;
using UnityEngine;

public class AirPump : MonoBehaviour
{
    [SerializeField] private Variable<float> _balloonSize;
    [SerializeField] private float _force = 0.001f;

    private void Update()
    {
        _balloonSize.Value += _force;
    }
}
Another class will react to the change:
using GenericScriptableArchitecture;
using UnityEngine;

public class Balloon : MonoBehaviour
{
    [SerializeField] private Variable<float> _size;

    private void Update()
    {
        transform.localScale = new Vector3(_size, _size, _size);
    }
}
-
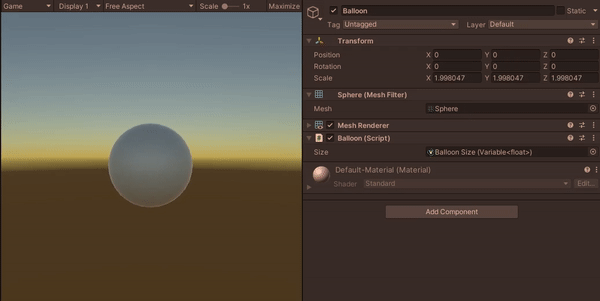
Now, if we assign the created variable to the fields and create the Balloon game object as a 3D sphere, it will start inflating in play mode:
Of course, variables don't always change every frame. If you want to listen for a variable change instead of getting it in
Update(), check out the section on Variables. -
We can also change the balloon size in inspector, and the balloon will react. Don't forget to disable AirPump component so that it stops inflating the balloon.
-
We can create a scriptable event with the same Create context menu
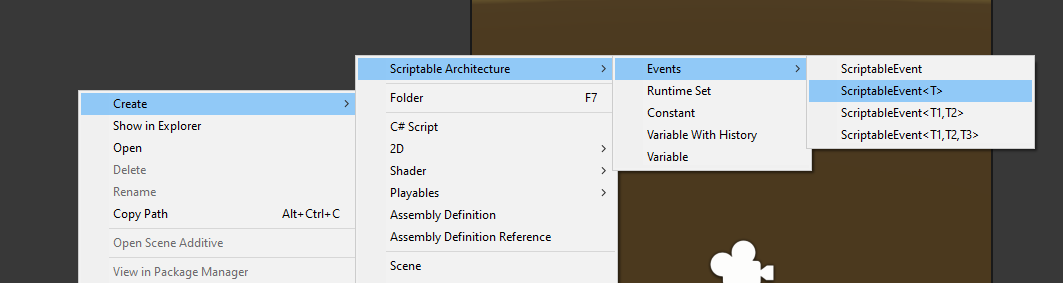
-
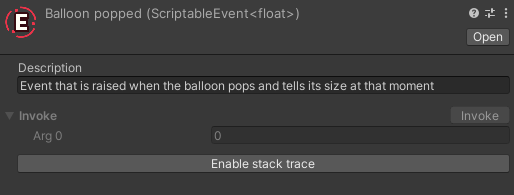
Let's choose an event with one generic argument which will also be float, and name it "Balloon popped"
-
We can also create a description for the event. The invoke button is grayed out, but we will be able to invoke it in play mode. Stack trace is covered in a separate section
-
Let's create a needle that will pop a balloon:
using EasyButtons;
using GenericScriptableArchitecture;
using UnityEngine;

public class Needle : MonoBehaviour
{
    [SerializeField] private Variable<float> _balloonSize;
    [SerializeField] private ScriptableEvent<float> _balloonPopped;

    [Button]
    public void PopBalloon()
    {
        _balloonPopped.Invoke(_balloonSize);
    }
}
I'm using the EasyButtons package here to create a button in the inspector.
-
We will also need the balloon and air pump to react to the popping balloon:
using GenericScriptableArchitecture;
using UnityEngine;

public class Balloon : MonoBehaviour
{
    [SerializeField] private Variable<float> _size;

    private bool _popped;

    private void Update()
    {
        if (!_popped)
            transform.localScale = new Vector3(_size, _size, _size);
    }

    public void Pop()
    {
        _popped = true;
        transform.localScale = Vector3.zero;
    }
}
using GenericScriptableArchitecture;
using UnityEngine;

public class AirPump : MonoBehaviour
{
    [SerializeField] private Variable<float> _balloonSize;
    [SerializeField] private float _force = 0.001f;

    private bool _balloonPopped;

    private void Update()
    {
        if (!_balloonPopped)
            _balloonSize.Value += _force;
    }

    public void OnBalloonPopped(float size)
    {
        _balloonPopped = true;
        Debug.Log($"Balloon popped at size {size}. The air pump stops working.");
    }
}
-
In this example, we will connect methods through the
ScriptableEventListenercomponent. Let's add one to the balloon, and one to the air pump. You can findScriptableEventListenerin the Add Component menu
-
Once you assign a scriptable event to it, it will show a response of the appropriate type automatically. Choose the
Balloon.Pop()method inside.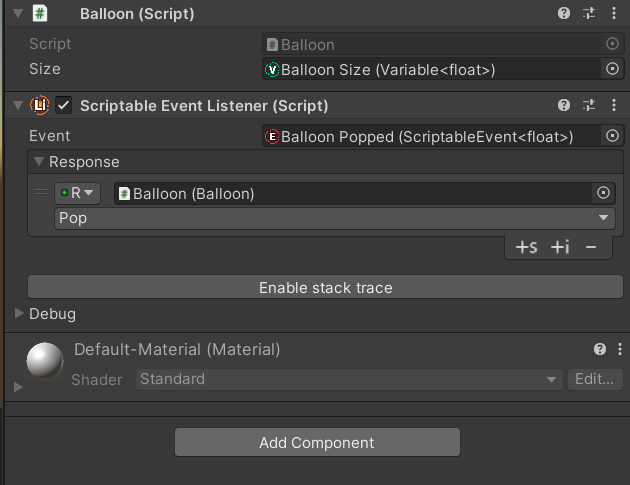
Do the same with Air Pump and choose
OnBalloonPoppedmethod. -
Let's test it in play mode. Let the balloon inflate, then pop it
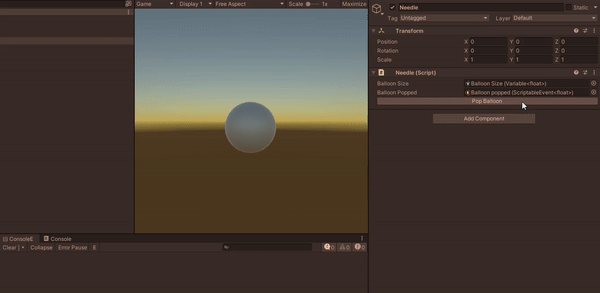
As you can see, it works well. The balloon pops, and the pump stops working and knows the size at which the balloon popped.
-
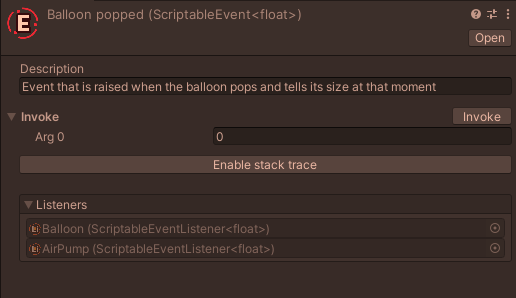
The cool thing is we can also invoke events directly if we don't have an easily reachable button or command to do it.

Notice how we can see all the listeners of the event.
This is one of the multiple ways to listen for an event. GenericScriptableArchitecture has much more than shown in the Ryan Hipple's talk.
Generic ScriptableObject Architecture operates on the following data structures:
The most basic and used component in ScriptableObject Architecture, on par with Variable. Events can have from 0 to 3 parameters passed. An event class that has more parameters can easily be added but would be a bad practice in my opinion.
You can invoke such an event only in play mode. When you need to test its invokation, you can fill the parameters in respective Arg0-Arg2 fields.
Once you enter play mode, you will see a list of listeners of the event. You can click on each listener to go to the respective game object.
ScriptableEvents can be subscribed to in multiple ways:
-
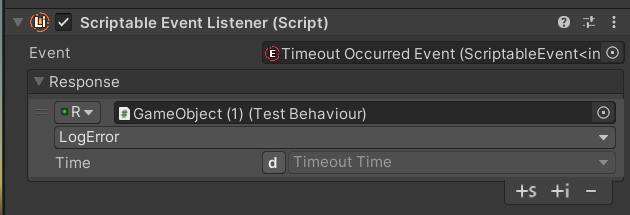
Through ScriptableEventListener component This way is the most non-invasive for code. You can start listening for an event by just having a public method that takes in matching parameters. Add a ScriptableEventListener component, reference the component and its public method, and the component will start receiving the event.
-
Subscribe with callback This way is similar to ScriptableEventListener but doesn't require adding a separate component and allows for manual managing, when to subscribe and unsubscribe to callback. It is implemented like this:
public class TestBehaviour : MonoBehaviour
{
    [SerializeField] private ScriptableEvent<int> _countChanged;

    private void OnEnable()
    {
        _countChanged += OnCountChanged;

        // The same code without syntactic sugar
        // _countChanged.AddResponse(OnCountChanged);
    }

    private void OnDisable()
    {
        _countChanged -= OnCountChanged;

        // The same code without syntactic sugar
        // _countChanged.RemoveResponse(OnCountChanged);
    }

    private void OnCountChanged(int newCount)
    {
        Debug.Log($"new count {newCount}");
    }
}
It uses C# events instead of Unity ones, which can be beneficial in some cases.
-
Implement the IEventListener interface This is the most performant way because it does not involve any garbage allocation. You just inherit the class from the interface with the necessary arguments and implement the
OnEventInvokedmethod. You can then subscribe to the event passingthisinstance into it, thus avoiding allocations:public class TestBehaviour : MonoBehaviour, IEventListener<int> { [SerializeField] private ScriptableEvent<int> _countChanged; private void OnEnable() { _countChanged += this; // Alternatively // _countChanged.AddListener(this); } private void OnDisable() { _countChanged -= this; // Alternatively // _countChanged.RemoveListener(this); } public void OnEventInvoked(int newCount) { Debug.Log($"Count changed. New count: {newCount}"); } }
In case you don't want others to use
OnEventInvoked(), you can declare it as an explicit implementation of the interface:void IEventListener<int>.OnEventInvoked(int newCount) { Debug.Log($"Count changed. New count: {newCount}"); }
-
Implement the IMultipleEventsListener interface In case you need to listen for multiple events of the same type and still want to avoid allocations, you can use the
IMultipleEventsListenerinterface. This interface passes the event that was invoked along with the arguments, so you can check which event was triggered and react to it accordingly.public class TestBehaviour : MonoBehaviour, IMultipleEventsListener<int> { [SerializeField] private ScriptableEvent<int> _countChanged; [SerializeField] private ScriptableEvent<int> _timeoutOccurred; private void OnEnable() { _countChanged += this; _timeoutOccurred += this; // Alternatively // _countChanged.AddListener(this); } private void OnDisable() { _countChanged -= this; _timeoutOccurred -= this; // Alternatively // _countChanged.RemoveListener(this); } public void OnEventInvoked(IEvent<int> invokedEvent, int argument) { if (ReferenceEquals(invokedEvent, _countChanged)) { int newCount = argument; Debug.Log($"Count changed. New count: {newCount}"); } else if (invokedEvent == _timeoutOccurred) { int timeout = argument; Debug.Log($"Timeout occurred. The length of timeout: {timeout}"); } } }
-
Subscribe using UniRx Finally, you can subscribe to an event using UniRx and dispose of the subscription when you don't need it:
public class TestBehaviour : MonoBehaviour
{
    [SerializeField] private ScriptableEvent<int> _countChanged;

    private IDisposable _subscription;

    private void OnEnable()
    {
        _subscription = _countChanged.Subscribe(newCount => Debug.Log($"Count changed. New count: {newCount}"));
    }

    private void OnDisable()
    {
        _subscription.Dispose();
    }
}
The cool thing about UniRx is that you don't have to create a separate method that perfectly matches the passed arguments to be able to subscribe to events. You can pass a lambda method and use only part of the arguments passed, but you will still be able to unsubscribe from the event.
You can name the arguments of a scriptable event:
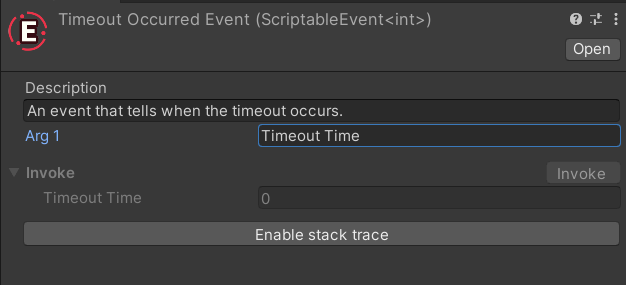
It not only changes the label of the argument in the Invoke section of the event inspector, but also simplifies the event usage with ScriptableEventListeners.
In this example, we can see which argument is passed by the event to the response method. If there were multiple arguments of the same type, we could choose between them based on their names.
Variable is another common component of ScriptableObject Architecture. The most common case of using it is the following:
- Declare a Variable field where a simple type would've been. This can be a property or characteristics of the class that others might need to know.
- Set the Variable's value inside the class.
- Other classes also reference the variable and get its value directly when needed or subscribe to the changes of the variable and act accordingly.
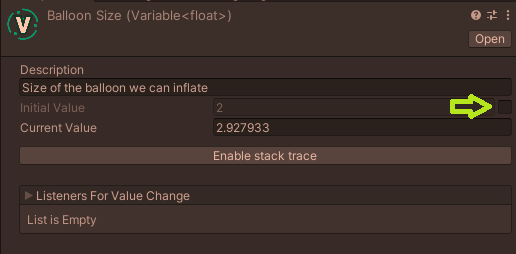
In Edit Mode, you can set the initial value of the variable. In Play Mode, the initial value is not editable by default to avoid accident changes. However, when you see it should be changed but don't want exit Play Mode at the moment, you make it editable by pressing the checkbox on the right.
You can subscribe to variable like to a scriptable event, using all the methods described in the previous section. +=, AddListener, Subscribe - all these methods are declared in the Variable class too.
The difference is that you can also get the current value of the variable immediately on subscribe by passing an additional notifyCurrentValue parameter:
_balloonSize.AddListener(size => transform.localScale = Vector3.one * size, true);

// Alternatively
_balloonSize += (OnSizeChange, true);
When you subscribe to a variable using UniRx, the current value is received immediately, since the variable implements IReactiveProperty<T>. You can skip the current value by using SkipLatestValueOnSubscribe(). For more information on UniRx, read its ReadMe and ReactiveX documentation.
When comparing two variables, they act as structs in that only their values matter. They can reference different assets, but as long as their values are equal, they are considered equal too:
[SerializeField] private Variable<int> _firstVariable;
[SerializeField] private Variable<int> _secondVariable;

private void Start()
{
    _firstVariable.Value = 10;
    _secondVariable.Value = 10;

    // true
    Debug.Log(_firstVariable == _secondVariable);
}
A variable can be implicitly converted to the type of value it contains:
[SerializeField] private Variable<int> _variable;

private void Start()
{
    // No compilation errors here, the variable is converted to int.
    Debug.Log(_variable + 10);
}
You can subscribe to a variable with ScriptableEventListener. Just drag-and-drop a variable onto a ScriptableEventListener event field, and you'll be able to set up a response to the variable value change:
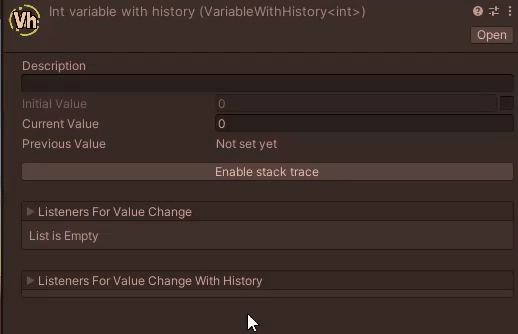
Sometimes you need to receive both the previous and the current state of the variable to compare them. You can use VariableWithHistory for that. When subscribing to it, you need to provide a response that takes two arguments in:
public class TestBehaviour : MonoBehaviour, IEventListener<int, int>
{
    [SerializeField] private VariableWithHistory<int> _variable;

    private IDisposable _subscription;

    private void OnEnable()
    {
        _variable.AddListener(OnValueChanged);
        _variable.AddListener(this);
        _subscription = _variable.Subscribe((previous, current) => Debug.Log($"previous: {previous}, current: {current}"));
    }

    private void OnDisable()
    {
        _variable.RemoveListener(OnValueChanged);
        _variable.RemoveListener(this);
        _subscription.Dispose();
    }

    private void OnValueChanged(int previousValue, int currentValue)
    {
        Debug.Log($"previous: {previousValue}, current: {currentValue}");
    }

    public void OnEventInvoked(int previousValue, int currentValue)
    {
        Debug.Log($"previous: {previousValue}, current: {currentValue}");
    }
}
You can subscribe to a variable with history using ScriptableEventListener:

You can also ask to fire the current value immediately on subscribe, like with the regular variable. However, note that the previous value might not be set at the moment of subscribe. In this case, the response will not be triggered immediately even if you set notifyCurrentValue to true. It will be triggered only once a new value is passed to the variable so that it is able to provide both previous and current values to subscribers.
Variable With History inherits the regular Variable interface, so you can subscribe to the current value change only:
_variableWithHistory.AddListener(value => Debug.Log($"new current value: {value}"));The previous value can be seen in the variable inspector:
Constant is a variable that can't be changed at runtime. It is set in Edit Mode, but no script can change it. It can't be subscribed to because it doesn't change. Use it when you need a constant value in the game but want the game designers to tweak it to their need. I left the value field editable in Play Mode, so you don't have to exit to Edit Mode every time you need to adjust it.
The main purpose of RuntimeSet is to keep a collection of items grouped by some rule. If the set contains an item, it means it has some property e.g. it is one of enemies. It is a replacement for tags, but an item can have multiple tags because it can add itself to multiple runtime sets. The basic use of RuntimeSet is the following one:
-
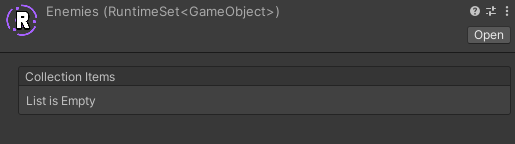
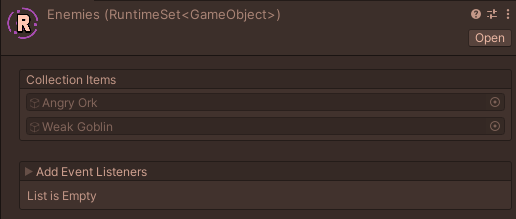
There's a runtime set of game objects called Enemies:
-
Each enemy keeps themselves in the set while they are active:
public class Enemy : MonoBehaviour
{
    [SerializeField] private RuntimeSet<GameObject> _enemiesSet;

    private void OnEnable()
    {
        _enemiesSet.Add(this);
    }

    private void OnDisable()
    {
        _enemiesSet.Remove(this);
    }
}
-
The player can decide if they are interacting with the enemy by checking if the game object is in the enemies set:
public class Player : MonoBehaviour
{
    [SerializeField] private RuntimeSet<GameObject> _enemiesSet;
	[SerializeField] private RuntimeSet<GameObject> _friendsSet;

    public void OnPersonInteraction(GameObject person)
    {
    	if (_enemiesSet.Contains(person))
    	{
    		Fight();
    	}
    	else if (_friendsSet.Contains(person))
    	{
    		SayHi();
    	}
    }
}
You can see all the current active enemies in the set:
You will use runtime sets of GameObjects most frequently, but you can always put another type of MonoBehaviour or even ScriptableObject there. Sometimes, you not only need to check if the object is in the runtime set, but also get some of its values. In order to not call GetComponent<T>() every time for that, you can optimize it by creating RuntimeSet<Transform> or RuntimeSet<Collider>.
There are many other ways to use runtime sets. They are basically a collection of items put in a ScriptableObject. You can replace, move, insert items in there. You can subscribe to different actions on the set, so you can react to it:
public class Sentinel : MonoBehaviour
{
    [SerializeField] private RuntimeSet<GameObject> _enemies;

    private void OnEnable()
    {
        _enemies.AddEvent.AddListener(OnEnemyAdded);
    }

    private void OnDisable()
    {
        _enemies.AddEvent.RemoveListener(OnEnemyAdded);
    }

    private void OnEnemyAdded((int Index, GameObject Enemy) addEvent)
    {
        Debug.Log("One more enemy on our territory, my lord.");
    }
}
There are others events you can subscribe to: RemoveEvent, ReplaceEvent, etc. One particular event differs from them: CountChangeEvent. It acts as a variable, so you can choose whether to receive the current count immediately on subscribe:
public class Sentinel : MonoBehaviour
{
    [SerializeField] private RuntimeSet<GameObject> _enemies;

    private void OnEnable()
    {
        _enemies.CountChangeEvent.AddListener(OnEnemiesCountChange, true);
    }

    private void OnDisable()
    {
        _enemies.AddEvent.RemoveListener(OnEnemiesCountChange);
    }

    private void OnEnemiesCountChange(int enemiesCount)
    {
        Debug.Log($"There are currently {enemiesCount} enemies on our territory, my lord.");
    }
}
As with variables and events, you can see all the current listeners to different runtime set events in the inspector.
Variable Instancer is a MonoBehaviour that has all the same properties as a scriptable-object variable: value, subscription methods, etc. Use it instead of Variable in prefabs so that each prefab instance has its own variable. Variable Instancer requires a reference to a variable asset and takes the initial value from it, but each variable instancer has its own current value. Using it with Reference allows for writing highly decoupled and flexible components that can be used with scriptable-object Variables in single game objects (such as Player or Camera), as well as prefabs (Enemy, Tree).
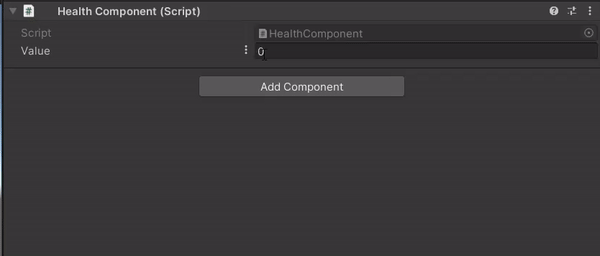
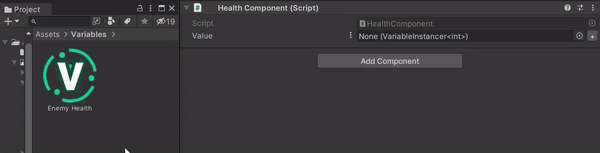
For instance, you can create the following component:
public class HealthComponent : MonoBehaviour
{
    public Reference<int> Value;

    // ...
}
Then the Health component in the Player game object will use a "Player Health" variable, but the same component on the Enemy prefab will reference a VariableInstancer component. The VariableInstancer component will be based on the Enemy Health variable meaning that it will receive its initial value, but each enemy game object will have its own current health value.
Instancers have very convenient interactions:
-
You can press the + button next to an instancer to add a component of the corresponding type to the game object.
-
You can drag and drop a variable asset to the instancer field, and an instancer component will be automatically added to the game object with the dropped variable automatically assigned to it.
It's the same as Variable Instancer but with history, so you can track the previous value of a variable, just like with VariableWithHistory. To start working with it, you only need a simple Variable asset because VariableInstancerWithHistory needs to know only the initial value to set at the start. Like with VariableInstancer, you can drag and drop a variable asset into its object field to create a VariableInstancerWithHistory component automatically.
Event Instancer is a MonoBehaviour component that acts just like ScriptableEvent but each prefab instance with EventInstancer component on it can be subscribed to individually. Use it through EventReference, and your component will more flexible, and you'll be able to use them with ScriptableEvents and EventInstancers alike. Like with VariableInstancer, you can drag and drop a ScriptableEvent asset into the object field, and an EventInstancer component will be automatically created with the dropped ScriptableEvent assigned.
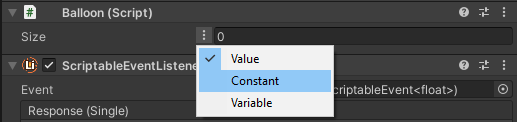
Use Reference when you are not sure if the field is going to be Variable, Constant, Variable Instancer, or just a regular value. You can decide what variable type it represents in the inspector:
public class Balloon : MonoBehaviour
{
    [SerializeField] private Reference<float> _size;
}
Use EventReference if you want to use both ScriptableEvents and EventInstancers with your component. You can choose which type of event to use through the dropdown.
When a variable or event is used in lots of places, it can sometimes be hard to find what changed its value or why someone hasn't received the event. To debug such issues, you can enable stack traces on events, variables, and scriptable event listeners. Gathering stack traces from thousands of calls can be very taxing on the editor performance, so it is advised to enable it only on the variables/events you need to debug at the moment. Press the Enable Stack Trace button to start debugging an event:

Once you are in Play Mode, you will see stack traces for all the invocations of the event and where they were made from.
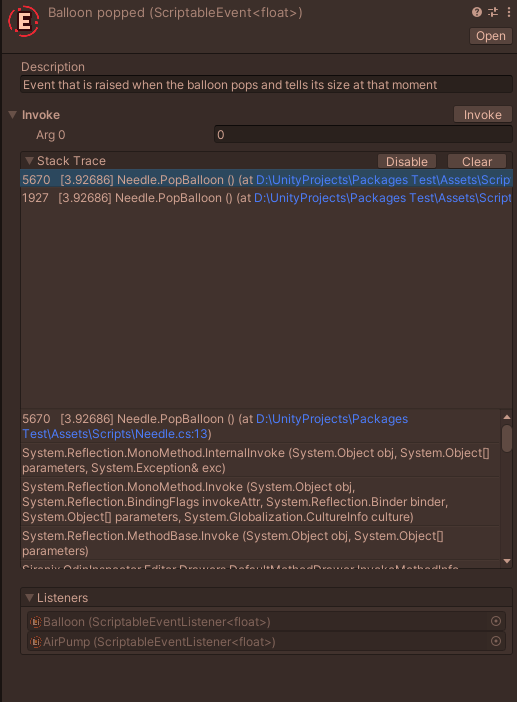
For each invocation, you can see a frame since startup, in which the event was invoked, the parameters that were passed to the event, and the detailed stack trace. The links in the stack trace are clickable, and you can go to the specific line where the event was called.
There can be a situation, when you need to debug multiple events and variables, and it's tedious to toggle stack traces in all of them. In such case, you can enable stack traces for all the assets in the project. Don't forget to disable them when debugging is finished.
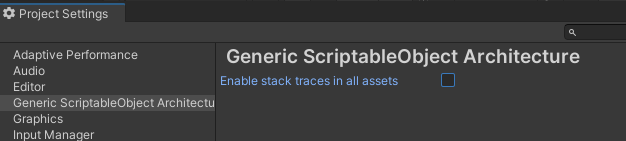
The stack trace system is completely stripped from game builds, so you won't see any impact on performance even if you forgot to disable stack traces from a couple of assets.
I haven't implemented a visual debug system like in ScriptableObject-Architecture because I don't see much value in it. When you use ScriptableObject architecture extensively in your project, there may be hundreds of calls per frame from multiple sources, and visual debug system will become a mess of messages flying all across the screen. If you have a use case where a visual debug system would help, I am open to suggestions and ready to implement it once I see it will be useful for users. Create an issue and describe how you would like such a system to look.
Since the system is built on generics, it doesn't have a fancy custom inspector for each type of generic argument. You can't enable a slider on Variable<int>, for example. However, I see it as a good thing. If you need to limit the variable's value, why not limit it in the code, so no one can set the value outside of limit through a script? For this reason, I have ClampedInt and ClampedFloat structs included in the plugin. A variable with such a value looks like this:
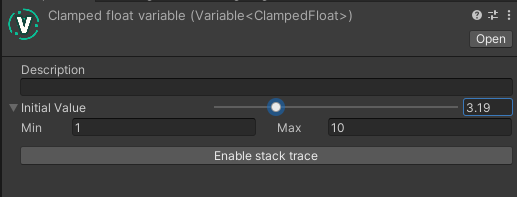
The cool thing about this is that the value is also clamped when it is set through code, so you won't have a situation when you clamped the variable in the inspector between 1 and 10, but someone has set it to 15 in a script.
If you need to have a custom inspector for the variable of your type, just implement a custom property drawer for the type, and it will be drawn in the variable inspector.
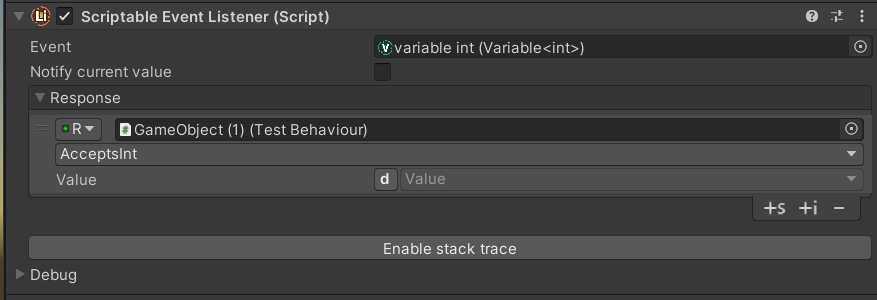
ExtEvents, used in ScriptableEventListeners, support implicit type conversions, so you can subscribe to Variable<ClampedInt> and respond with a method that takes in int argument:
public class TestImplicitConversion : MonoBehaviour
{
    [SerializeField] Variable<ClampedInt> _clampedIntVariable;

    public void AcceptsInt(int value) => Debug.Log(value);
}
I might support some decorator attributes on variables and events. Leave your suggestions in the issues.
You can use scriptable events as markers in Timeline. To add an event, right-click on a track, go to ScriptableEvents => Add Event Emitter
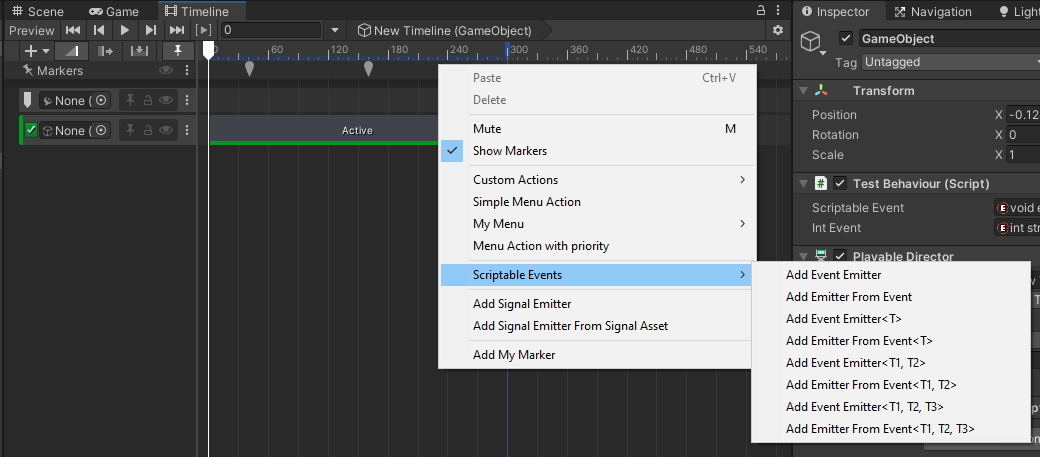
"Add Event Emitter" adds an empty emitter which you can assign an event to.
"Add Event From Emitter" requires you to assign an event of matching type immediately, like the "Add Signal Emitter From Signal Asset" menu.
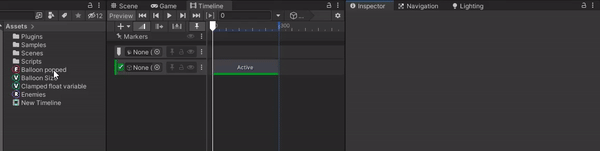
They work just like regular Signal Emitters - they fire the event when their time comes in the timeline. However, you can subscribe to them like to all other Scriptable Events. Also, you can raise those events from scripts, so they are more versatile.
You can also drag-n-drop an event asset to the timeline, and a respective emitter will be created automatically:
❗ Important ❗ Add a component called Scriptable Signal Relayer next to Playable Director for events to be invoked from timeline:
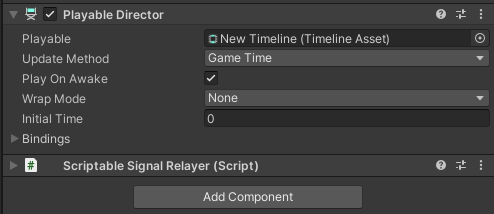
If an event emitter is created on a specific track instead of the Markers header, ScriptableSignalRelayer must be added to the game object assigned to the track.
When an object subscribes to an event or variable, it is usually shown in the list of listeners:
The limitation of the list is that it can only show listeners that inherit from UnityEngine.Object (MonoBehaviour and ScriptableObject). Also, if you subscribe with an action or through UniRx and provide a static method, there is no way to find the original target of the action, so it will not appear in the list:
private void OnEnable()
{
    // If you subscribe with an instance method, the object will show up in the listeners list.
    _size.AddListener(OnSizeChanged);

    // If you subscribe with a static method, it will not show up.
    _size.AddListener(ReportSize);

    // If the lambda method does not capture any instance fields or methods, it is considered static too, so the object will not show up in the listeners list.
    _size.Subscribe(size => Debug.Log($"New size is {size}"));
}

private void OnSizeChanged(float size)
{
    transform.localScale = Vector3.one * size;
}

private static void ReportSize(float size)
{
    Debug.Log($"The new size is {size}");
}- Thanks to UnityAtoms for their icons, some of which were used in this package under the MIT license.
- Thanks to Daniel Everland. Its stack trace implementation was used as inspiration for the feature in this package.
- The project is using madsbangh's EasyButtons to draw buttons in scriptable event inspectors.