4. Creating Profiles
Welcome to your new company! They're a great company because they are publicly advertising your greatness. Let's get started building your profile using SSW.People. You're going to learn about forking a repository, but you're essentially copying someone else's profile and modifying it with your details.

Figure: The picture, quote and profile content
TODO: the video needs to be updated or removed
This video will give you an idea of what's going on under the hood when you create your profile. Be aware that the process has changed since the video was recorded, so you'll need to come back and follow the steps below after you watch it.
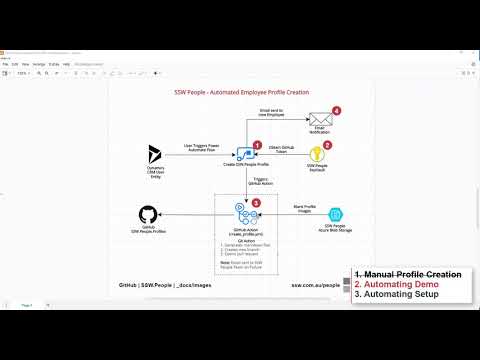
Figure: SSW.People - Profile Creation
-
Log in to GitHub, or create an account if you haven't already.
-
Navigate to SSW.People.Profiles
-
Fork it!

Figure: Fork this repo!Forking makes a duplicate of the People repository (i.e. SSWConsulting/SSW.People.Profiles to SSWSophieBelle/SSW.People.Profiles). As SSWConsulting/SSW.People.Profiles is a public repository, you do not have permission to write to it directly. This is for security reasons.
-
Fork it under your own GitHub account:

Figure: You'll need to create a GitHub account if you haven't. You should also be prepared for some hilarious directions to "Fork People" -
You should end up with your own forked repository:

Figure: Check that it has YourAccountName/SSW.People.Profiles on the left
We will create a new profile by copying an existing profile and modifying the contents.
Note: Good practice is to clone the whole repository, make your changes, and then push those changes to git. As the only changes we'll be making will be to upload your completed folder, it's not strictly necessary to clone the whole repo, but those instructions are at the end of this section. They are worth understanding, and also act as a fallback in case other methods fail.
GitHub cannot directly download folders, but there are a few third-party tools that do the trick. For this tutorial, the tool we will use is called DownGit.
-
Find the folder named Bob-Northwind and copy its URL
(Hint: click it to open it, then copy what's in your browser's URL bar)

Figure: Bob-Northwind folder -
Navigate to downgit.github.io and enter the url for Mr. Northwind's folder

Figure: Download a copy of the folder using DownGit -
Find the folder, unzip it and rename it to YourFirstname-YourLastname

Figure: Unzip your folder
Figure: Rename your folder. YourFirstName-YourLastName must be identical to CRM to sync your skills -
Open your renamed folder, and change Bob-Northwind.md to your Firstname-Lastname.md

Figure: Change profile file's name from "Bob-Northwind" to "Firstname-Lastname"
-
Navigate to your Forked Repository and clone it:

Figure: Select Code | Download ZIP - This clones the repository and allows you to edit the files
Most people select Download ZIP, but you can use the command line or an editor like VS Code if you prefer -
Once downloaded, navigate to it (you do not have to unzip it). Inside the .zip, find the Bob Northwind folder and copy it somewhere else.

-
Rename the copied folder to your FirstName-LastName

-
Open your renamed folder, and change Bob-Northwind.md to your Firstname-Lastname.md
Figure: Change profile file's name from "Bob-Northwind" to "Firstname-Lastname"

Figure: The Picture and Audio widget is Highlighted in the above image (we won't worry about the audio widget just yet)
-
Inside the Images folder, delete Bob's images and replace them with your photos. Read Get and use your official SSW profile photo.

Figure: There should be two images and the Bio folder -
Your photos need to have the correct naming and size of 172px wide by 242px high:
- Firstname-Lastname-Profile.jpg – Colour rectangular portrait
- Firstname-Lastname-Sketch.jpg – Black and White rectangular portrait
NOTE: Casing matters! Firstname-Lastname-profile.jpg will not work, it must be Firstname-Lastname-Profile.jpg
-
The Bio folder is used for any images you want to include in your profile. Replace them with your photos, or remove the folder completely.

Figure: Replace or delete the images in the Bio folder -
Navigate to your forked repository and click "Upload Files":

Figure: Upload the files and then use the GitHub editor which will give you change history -
Now we're going to upload our renamed folder:

Figure: Copying the files is a simple drag and drop experience -
When you’ve finished uploading, add a meaningful check-in description and select “Commit Changes”:

Figure: You can commit directly to the main branch, because this repo has already been forked -
When it’s finished uploading, you should be able to see your committed changes:

Figure: GitHub indicates there is a new change (Because you uploaded a file) -
Now navigate to your new folder and open your markdown file.

Figure: Open the FirstName-LastName.md to edit the profile -
Your .md file looks something like this:

Figure: This is your profile in MarkdownThis is a breakdown of the default profile.
- Green bar (Lines 1-8) - These entries define your profile data. replace the items in the yellow boxes with your data from CRM. Everything after that is example markdown and can be safely replaced.
- Red marker (Line 2) - Your id needs to match your record id in Dynamics CRM.

Figure: This is your id in Dynamics CRM - Yellow boxes (From Line 12) - You can change everything else! The rest of this file is just sample markdown, which you'll replace with your bio.
-
Now, write your bio :)
If you'd like some inspiration, look at some of the other profiles on SSW.People, or talk to your induction manager. Don't forget to add your favourite quote!
---
id: "456ebf0e-fb42-ea11-967a-00155d012cc0"

qualifications: "Sample"

quote: "Working together to provide solutions to problems every day"
quoteAuthor: "Anonymous"
---

[Editing profiles]: https://github.com/SSWConsulting/SSW.People.Profiles/wiki/5.-Editing-profiles

A lot of text!