![]()
scos-sensor is a work-in-progress reference implementation of the IEEE 802.15.22.3
Spectrum Characterization and Occupancy Sensing (SCOS) sensor developed by
NTIA/ITS. scos-sensor defines a RESTful application programming interface (API),
that allows authorized users to discover capabilities, schedule actions, and acquire
resultant data.
- Introduction
- Glossary
- Architecture
- Overview of scos-sensor Repo Structure
- Quickstart
- Configuration
- Security
- Actions and Hardware Support
- Development
- References
- License
- Contact
scos-sensor was designed by NTIA/ITS with the following goals in mind:
- Easy-to-use sensor control and data retrieval via IP network
- Low-cost, open-source development resources
- Design flexibility to allow developers to evolve sensor technologies and metrics
- Hardware agnostic
- Discoverable sensor capabilities
- Task scheduling using start/stop times, interval, and/or priority
- Standardized metadata/data format that supports cooperative sensing and open data initiatives
- Security controls that prevent unauthorized users from accessing internal sensor functionality
- Easy-to-deploy with provisioned and configured OS
- Quality assurance of software via automated testing prior to release
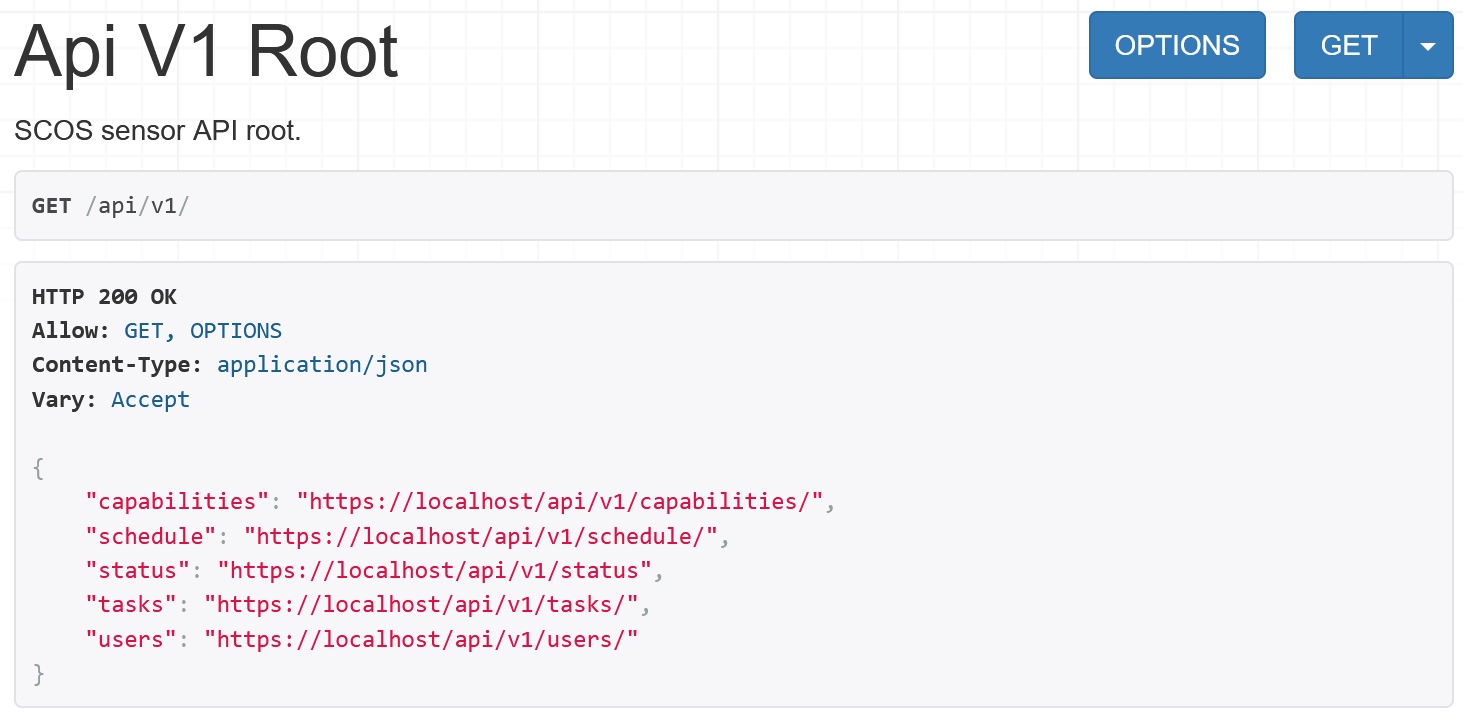
Sensor control is accomplished through a RESTful API. The API is designed to be rich enough that multiple heterogeneous sensors can be automated effectively while being simple enough to still be useful for single-sensor deployments. For example, by advertising capabilities and location, an owner of multiple sensors can easily filter by frequency range, available actions, or geographic location. Yet, since each sensor hosts its own Browsable API, controlling small deployments is as easy as clicking around a website.
Opening the URL to your sensor (localhost if you followed the Quickstart) in a browser, you will see a frontend to the API that allows you to do anything the JSON API allows. Relationships in the API are represented by URLs which you can click to navigate from endpoint to endpoint. The full API is discoverable simply by following these links:
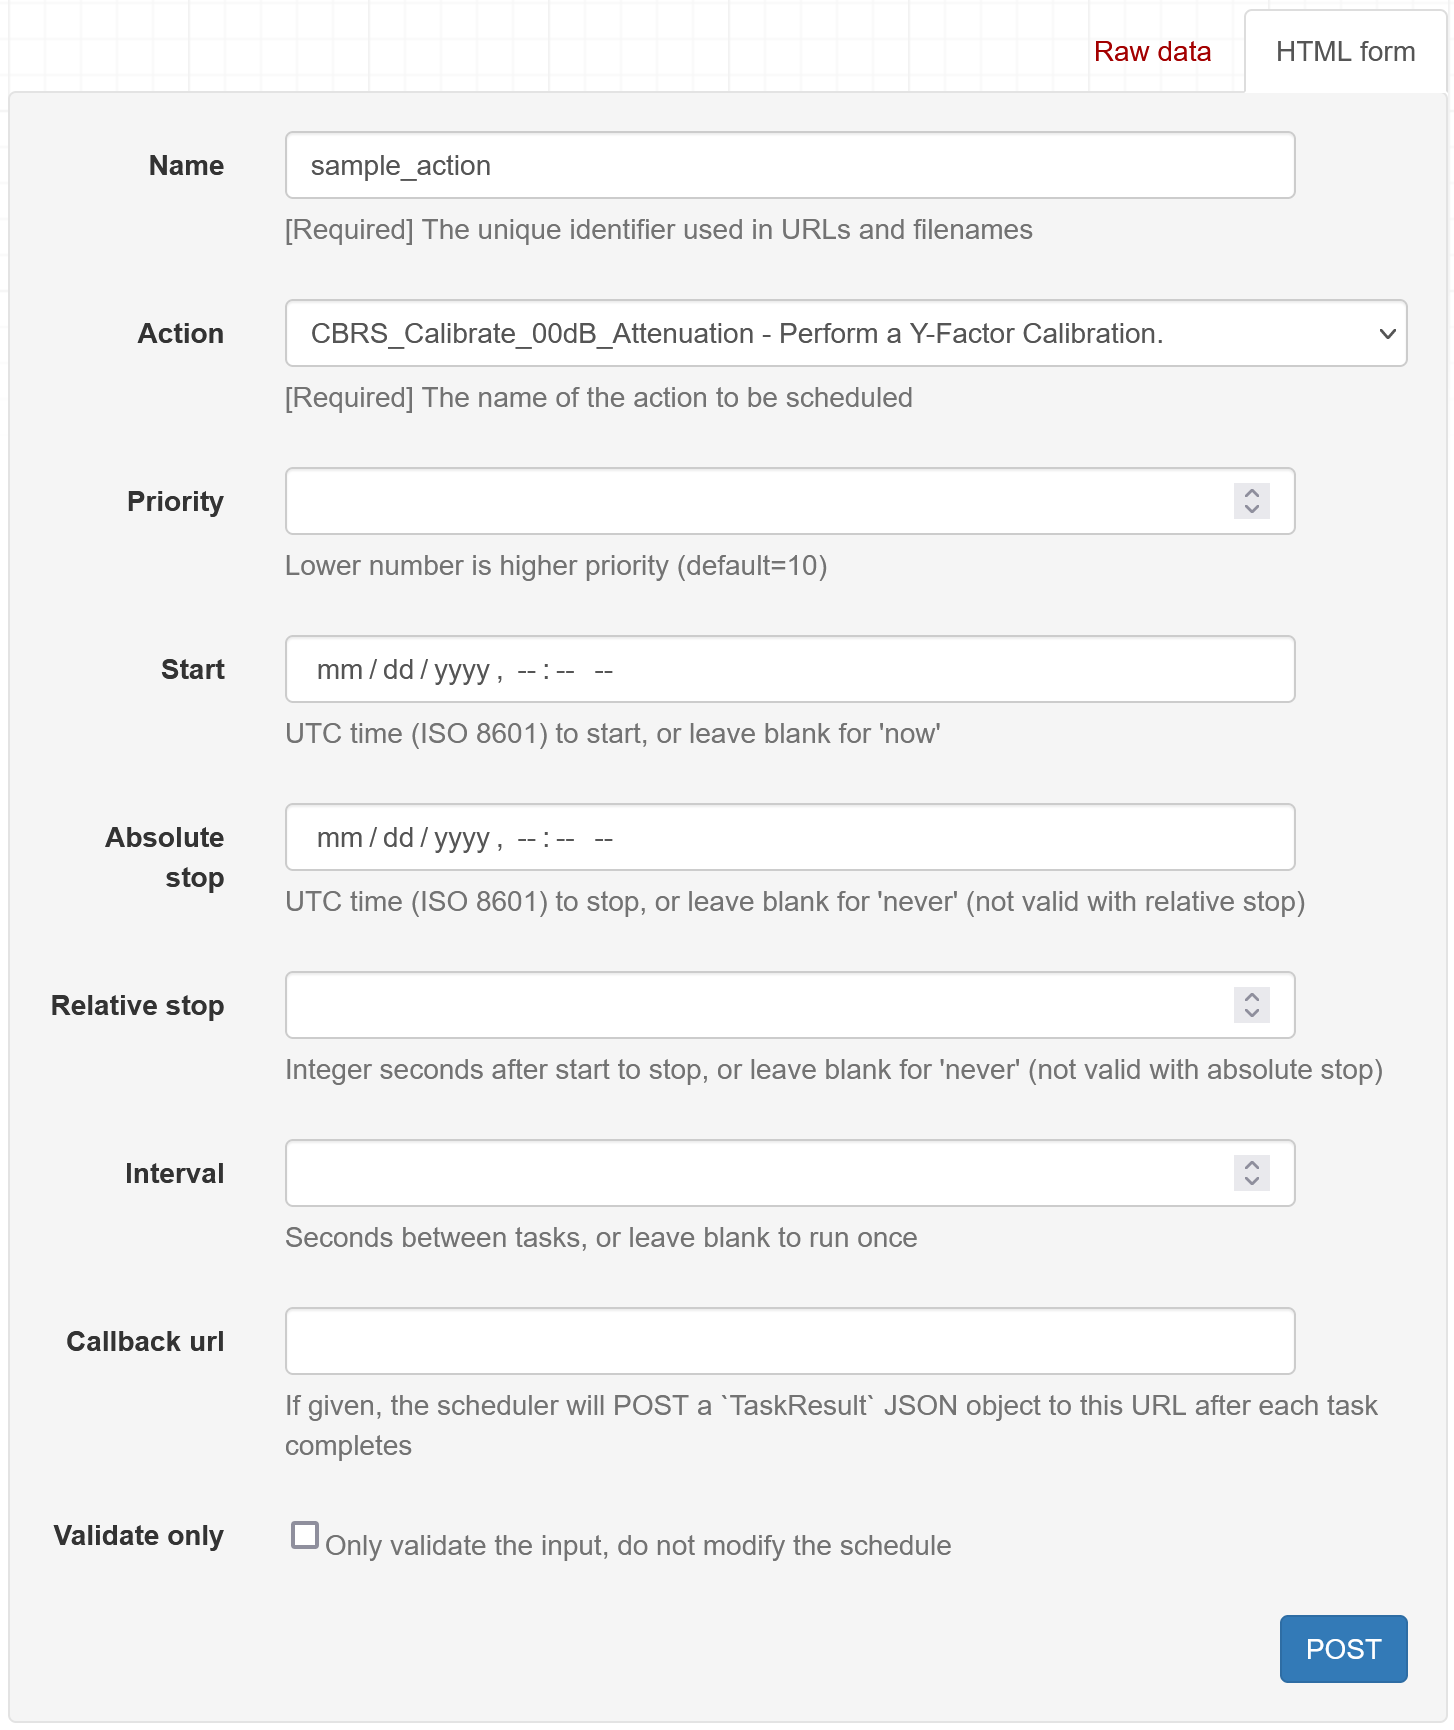
Scheduling an action is as simple as filling out a short form on /schedule:
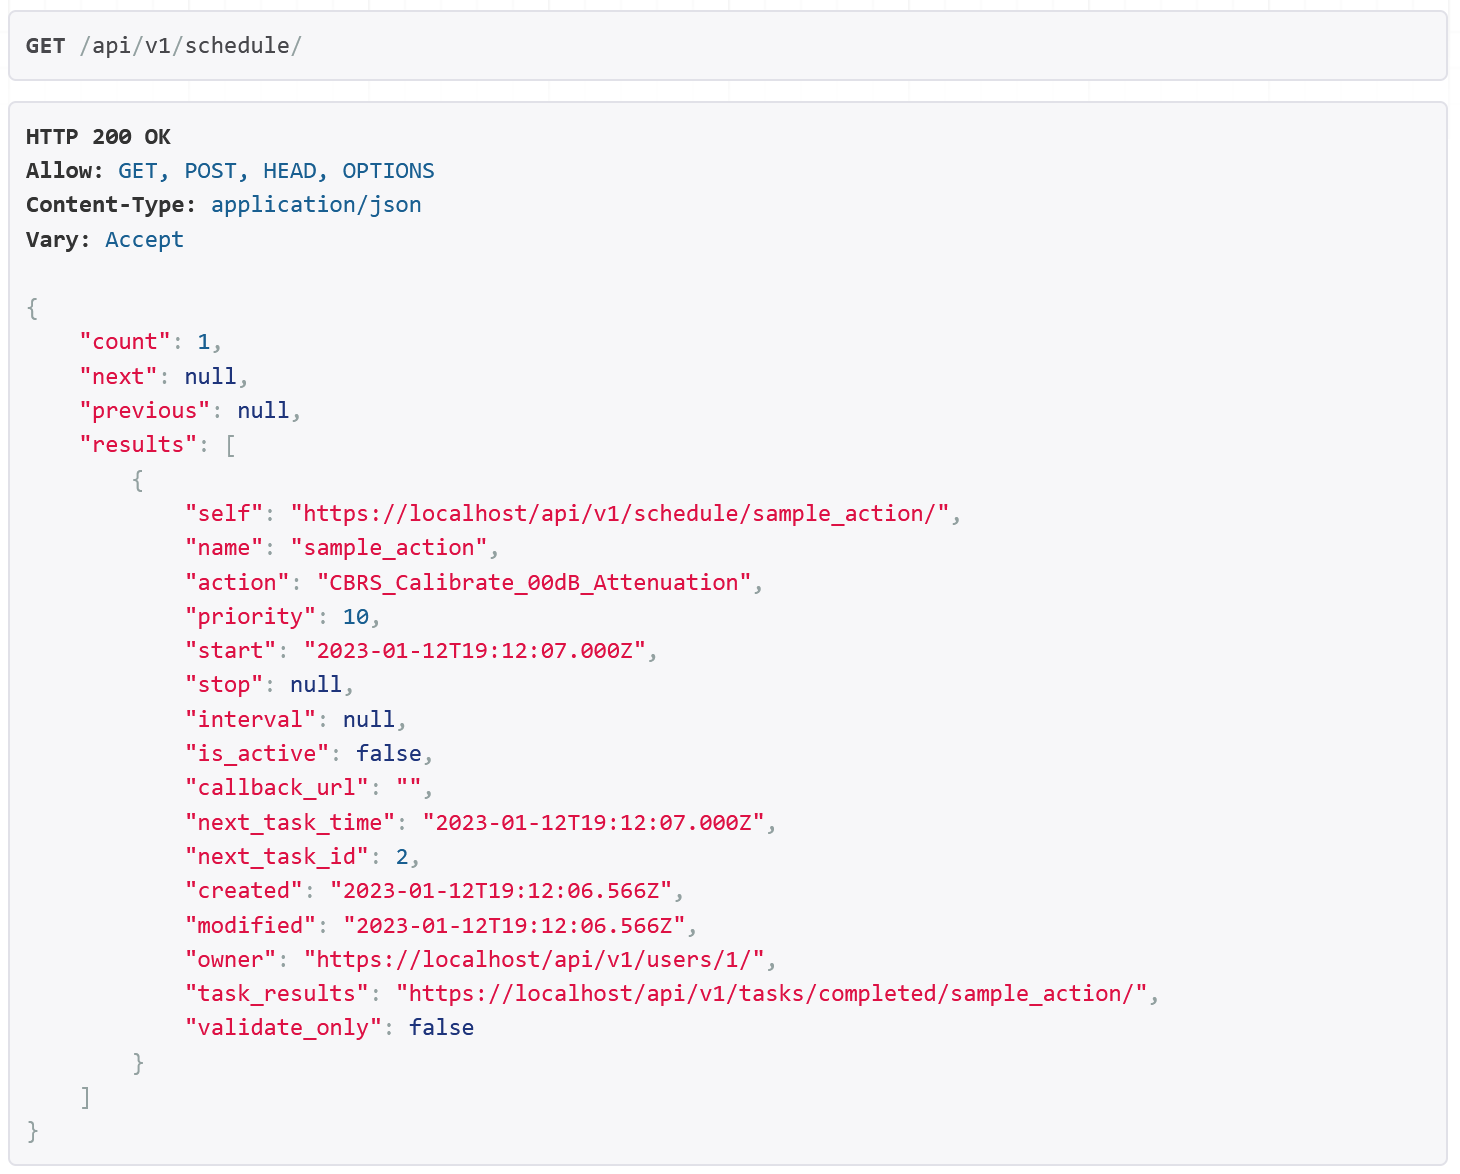
Actions that have been scheduled show up in the schedule entry list:
We have tried to remove the most common hurdles to remotely deploying a sensor while maintaining flexibility in two key areas. First, the API itself is hardware agnostic, and the implementation assumes different hardware will be used depending on sensing requirements. Second, we introduce the high-level concept of "actions" which gives the sensor owner control over what the sensor can be tasked to do. For more information see Actions and Hardware Support.
This section provides an overview of high-level concepts used by scos-sensor.
-
action: A function that the sensor owner implements and exposes to the API. Actions are the things that the sensor owner wants the sensor to be able to do. Since actions block the scheduler while they run, they have exclusive access to the sensor's resources (like the signal analyzer). Currently, there are several logical groupings of actions, such as those that create acquisitions, or admin-only actions that handle administrative tasks. However, actions can theoretically do anything a sensor owner can implement. Some less common (but perfectly acceptable) ideas for actions might be to rotate an antenna, or start streaming data over a socket and only return when the recipient closes the connection.
-
acquisition: The combination of data and metadata created by an action (though an action does not have to create an acquisition). Metadata is accessible directly though the API, while data is retrievable in an easy-to-use archive format with its associated metadata.
-
admin: A user account that has full control over the sensor and can create schedule entries and view, modify, or delete any other user's schedule entries or acquisitions.
-
capability: Available actions, installation specifications (e.g., mobile or stationary), and operational ranges of hardware components (e.g., frequency range of signal analyzer). These values are generally hard-coded by the sensor owner and rarely change.
-
plugin: A Python package with actions designed to be integrated into scos-sensor.
-
schedule: The collection of all schedule entries (active and inactive) on the sensor.
-
scheduler: A thread responsible for executing the schedule. The scheduler reads the schedule at most once a second and consumes all past and present times for each active schedule entry until the schedule is exhausted. The latest task per schedule entry is then added to a priority queue, and the scheduler executes the associated actions and stores/POSTs task results. The scheduler operates in a simple blocking fashion, which significantly simplifies resource deconfliction. When executing the task queue, the scheduler makes a best effort to run each task at its designated time, but the scheduler will not cancel a running task to start another task, even one of higher priority.
-
schedule entry: Describes a range of scheduler tasks. A schedule entry is at minimum a human readable name and an associated action. Combining different values of start, stop, interval, and priority allows for flexible task scheduling. If no start time is given, the first task is scheduled as soon as possible. If no stop time is given, tasks continue to be scheduled until the schedule entry is manually deactivated. Leaving the interval undefined results in a "one-shot" entry, where the scheduler deactivates the entry after a single task is scheduled. One-shot entries can be used with a future start time. If two tasks are scheduled to run at the same time, they will be run in order of priority. If two tasks are scheduled to run at the same time and have the same priority, execution order is implementation-dependent (undefined).
-
signals: Django event driven programming framework. Actions use signals to send results to scos-sensor. These signals are handled by scos-sensor so that the results can be processed (such as storing measurement data and metadata).
-
task: A representation of an action to be run at a specific time. When a task acquires data, that data is stored on disk, and a significant amount of metadata is stored in a local database. The full metadata can be read directly through the self-hosted website or retrieved in plain text via a single API call. Our metadata and data format is an extension of, and compatible with, the SigMF specification - see sigmf-ns-ntia.
-
task result: A record of the outcome of a task. A result is recorded for each task after the action function returns, and includes metadata such as when the task started, when it finished, its duration, the result (
successorfailure), and a freeform detail string. ATaskResultJSON object is also POSTed to a schedule entry'scallback_url, if provided.
When deploying equipment remotely, the robustness and security of software is a prime
concern. scos-sensor sits on top of a popular open-source framework,
which provides out-of-the-box protection against cross site scripting (XSS), cross site
request forgery (CSRF), SQL injection, and clickjacking attacks, and also enforces
SSL/HTTPS (traffic encryption), host header validation, and user session security.
scos-sensor uses a open source software stack that should be comfortable for
developers familiar with Python.
- Persistent metadata is stored on disk in a relational database, and measurement data is stored in files on disk.
- A scheduler thread running in a Gunicorn worker process periodically reads the schedule from the database and performs the associated actions.
- A website and JSON RESTful API using Django REST framework is served over HTTPS via NGINX, a high-performance web server. These provide easy administration over the sensor.
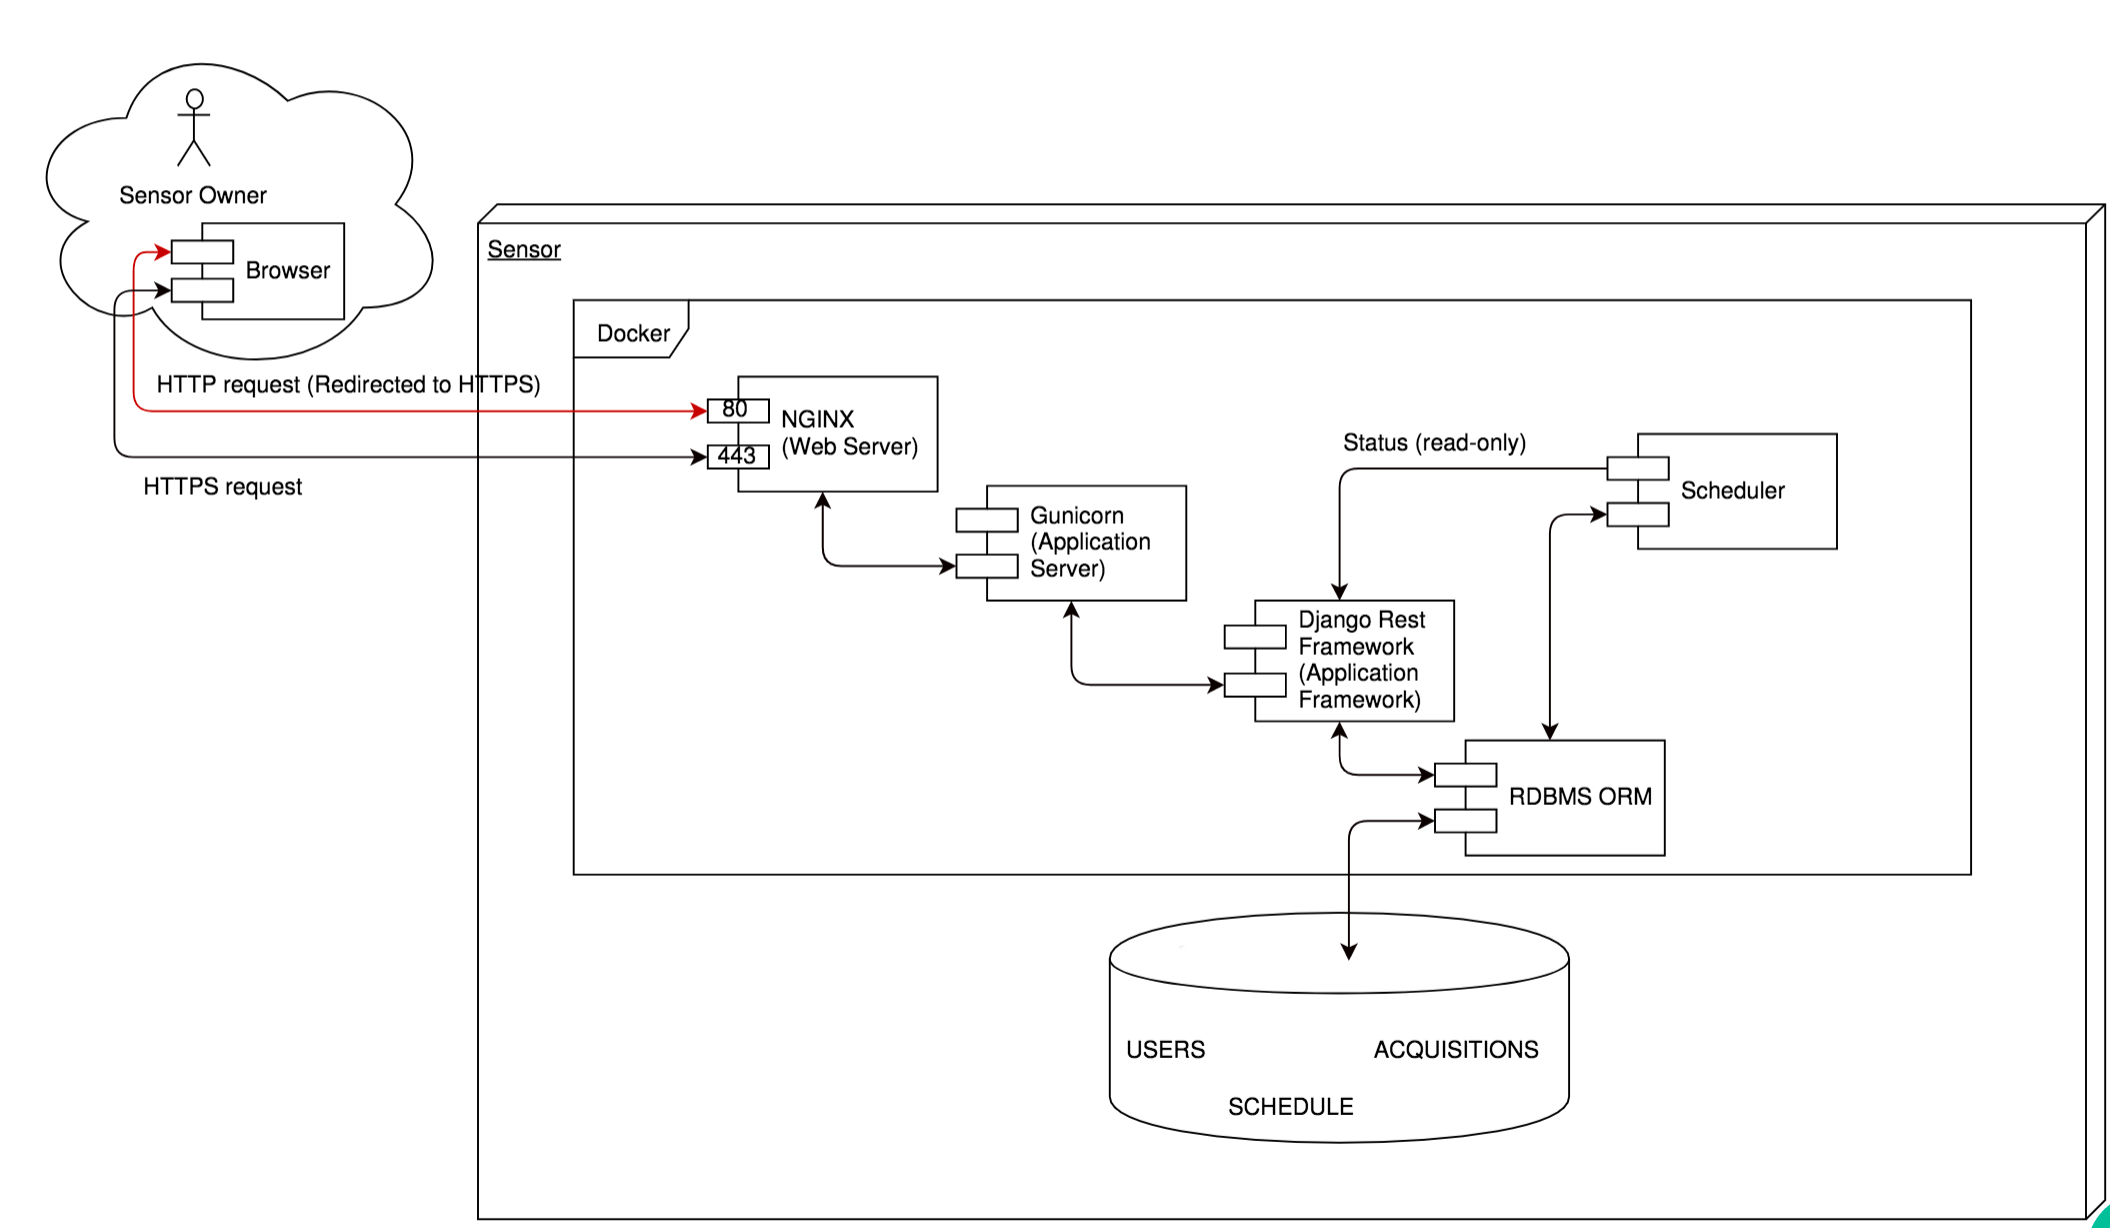
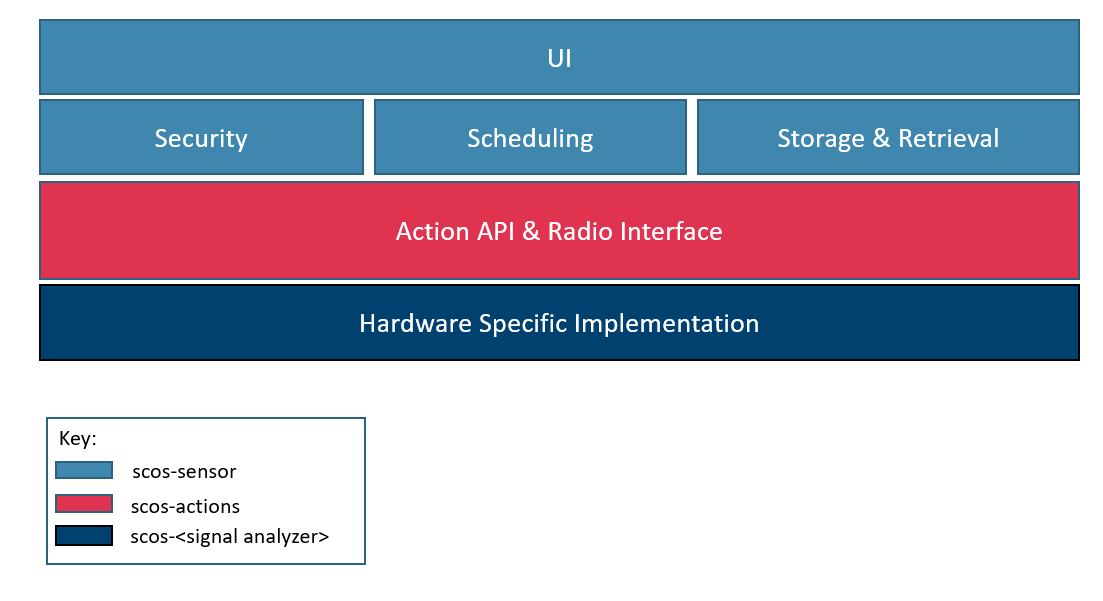
A functioning scos-sensor utilizes software from at least three different GitHub
repositories. As shown below, the scos-sensor repository integrates everything together
as a functioning scos-sensor and provides the code for the user interface, scheduling,
and the storage and retrieval of schedules and acquisitions. The scos-actions
repository provides the core actions API,
defines the signal analyzer interface that provides an abstraction for all signal
analyzers, and provides basic actions. Finally, using a real signal analyzer within
scos-sensor requires a third scos-<signal analyzer> repository that provides the
signal analyzer specific implementation of the signal analyzer interface where
<signal analyzer> is replaced with the name of the signal analyzer, e.g. a USRP
scos-sensor utilizes the scos-usrp repository. The
signal analyzer specific implementation of the signal analyzer interface may expose
additional properties of the signal analyzer to support signal analyzer specific
capabilities and the repository may also provide additional signal analyzer specific
actions.
- configs: This folder is used to store the sensor_definition.json file.
- certs: CA, server, and client certificates.
- docker: Contains the docker files used by scos-sensor.
- docs: Documentation including the documentation hosted on GitHub pages generated from the OpenAPI specification.
- drivers: Driver files for signal anaylzers.
- entrypoints: Docker entrypoint scripts which are executed when starting a container.
- files: Folder where task results are stored.
- gunicorn: Gunicorn configuration file.
- nginx: Nginx configuration template and SSL certificates.
- scripts: Various utility scripts.
- src: Contains the scos-sensor source code.
- actions: Code to discover actions in plugins and to perform a simple logger action.
- authentication: Code related to user authentication.
- capabilities: Code used to generate capabilities endpoint.
- constants: Constants shared by the other source code folders.
- handlers: Code to handle signals received from actions.
- schedule: Schedule API endpoint for scheduling actions.
- scheduler: Scheduler responsible for executing actions.
- sensor: Core app which contains the settings, generates the API root endpoint.
- static: Django will collect static files (JavaScript, CSS, …) from all apps to this location.
- status: Status endpoint.
- tasks: Tasks endpoint used to display upcoming and completed tasks.
- templates: HTML templates used by the browsable API.
- test_utils: Utility code used in tests.
- utils: Utility code shared by the other source code folders.
- conftest.py: Used to configure pytest fixtures.
- manage.py: Django’s command line tool for administrative tasks.
- requirements.in and requirements-dev.in: Direct Python dependencies.
- requirements.txt and requirements-dev.txt: Python dependencies including transitive dependencies.
- tox.ini: Used to configure tox.
- docker-compose.yml: Used by Docker Compose to create services from containers. This is needed to run scos-sensor.
- env.template: Template file for setting environment variables used to configure scos-sensor.
This section describes how to spin up a production-grade sensor in just a few commands.
We currently support Ettus USRP B2xx signal analyzers out of the box, and any Intel-based host computer should work.
-
Install
git, Docker, and Docker Compose. -
Clone the repository.
git clone https://github.com/NTIA/scos-sensor.git cd scos-sensor -
Copy the environment template file and modify the copy if necessary, then source it. The settings in this file are set for running in a development environment on your local system. For running in a production environment, many of the settings will need to be modified. Some of the values, including the ENCRYPTION_KEY, POSTGRES_PASSWORD, and the Django SECRET_KEY are randomly generated in this file. Therefore, if the source command is run a second time, the old values will be lost. Make sure to hardcode and backup these environment variables to enable scos-sensor to decrypt the data files stored in scos-sensor and access the database. See Configuration section. Also, you are strongly encouraged to change the default
ADMIN_EMAILandADMIN_PASSWORDbefore running scos-sensor. Finally, source the file before running scos-sensor to load the settings into your environment.cp env.template env source ./env -
Create sensor certificate. Running the script in the below command will create a certificate authority and localhost SSL certificate for the sensor. The certificate authority and the sensor certificate will have dummy values for the subject and password. To create a certificate specific to your host and organization, see the security section. The sensor certificate created by 'create_localhost_cert.sh' should only be used for testing purposes when connecting to scos-sensor website from the same computer as where it is hosted.
cd scripts/ ./create_localhost_cert.sh -
Run a Dockerized stack.
docker-compose up -d --build  # start in background
docker-compose logs --follow api  # reattach terminal
When running in a production environment or on a remote system, various settings will need to be configured.
This section details configuration which takes place in compose.yaml:
- shm_size: This setting is overriding the default setting of 64 mb. If using scos-sensor on a computer with lower memory, this may need to be decreased. This is currently only used by the NasctnSeaDataProduct action.
As explained in the Quickstart section, before running scos-sensor, an environment (env) file is created from the env.template file. These settings can either be set in the environment file or set directly in docker-compose.yml. Here are the settings in the environment file:
- ADDITIONAL_USER_NAMES: Comma separated list of additional admin usernames.
- ADDITIONAL_USER_PASSWORD: Password for additional admin users.
- ADMIN_EMAIL: Email used to generate admin user. Change in production.
- ADMIN_NAME: Username for the admin user.
- ADMIN_PASSWORD: Password used to generate admin user. Change in production.
- AUTHENTICATION: Authentication method used for scos-sensor. Supports
TOKENorCERT. - BASE_IMAGE: Base docker image used to build the API container. These docker
images, combined with any drivers found in the signal analyzer repos, are
responsible for providing the operating system suitable for the chosen signal
analyzer. Note, this should be updated when switching signal analyzers.
By default, this is configured to
use a version of
ghcr.io/ntia/scos-tekrsa/tekrsa_usbto use a Tektronix signal analyzer. - CALIBRATION_EXPIRATION_LIMIT: Number of seconds elapsed for a calibration result to become expired. On startup, if existing calibration is expired, the action defined by STARTUP_CALIBRATION_ACTION will be run to generate new calibration data.
- CALLBACK_AUTHENTICATION: Sets how to authenticate to the callback URL. Supports
TOKENorCERT. - CALLBACK_SSL_VERIFICATION: Set to “true” in production environment. If false, the SSL certificate validation will be ignored when posting results to the callback URL.
- CALLBACK_TIMEOUT: The timeout for the posts sent to the callback URL when a scheduled action is completed.
- DEBUG: Django debug mode. Set to False in production.
- DEVICE_MODEL: Optional setting indicating the model of the signal analyzer. The TekRSASigan class will use this value to determine which action configs to load. See scos-tekrsa for additional details.
- DOCKER_TAG: Always set to “latest” to install newest version of docker containers.
- DOMAINS: A space separated list of domain names. Used to generate ALLOWED_HOSTS.
- ENCRYPT_DATA_FILES: If set to true, sigmf-data files will be encrypted when stored in the api container by scos-sensor.
- ENCRYPTION_KEY: Encryption key to encrypt sigmf-data files if ENCRYPT_DATA_FILES is set to true. The env.template file sets to a randomly generated value.
- GIT_BRANCH: Current branch of scos-sensor being used.
- GUNICORN_LOG_LEVEL: Log level for Gunicorn log messages.
- IPS: A space separated list of IP addresses. Used to generate ALLOWED_HOSTS.
- FQDN: The server’s fully qualified domain name.
- MAX_DISK_USAGE: The maximum disk usage percentage allowed before overwriting old
results. Defaults to 85%. This disk usage detected by scos-sensor (using the Python
shutil.disk_usagefunction) may not match the usage reported by the Linuxdfcommand. - PATH_TO_CLIENT_CERT: Path to file containing certificate and private key used as
client certificate when CALLBACK_AUTHENTICATION is
CERT. - PATH_TO_VERIFY_CERT: Trusted CA certificate to verify callback URL server certificate.
- POSTGRES_PASSWORD: Sets password for the Postgres database for the “postgres” user. Change in production. The env.template file sets to a randomly generated value.
- RAY_INIT: If set to true, SCOS Sensor will ensure initializaiton of the Ray library.
- REPO_ROOT: Root folder of the repository. Should be correctly set by default.
- SCOS_SENSOR_GIT_TAG: The scos-sensor branch name. This value may be used in action metadata to capture the version of the software that produced the sigmf archive.
- SECRET_KEY: Used by Django to provide cryptographic signing. Change to a unique, unpredictable value. See https://docs.djangoproject.com/en/3.0/ref/settings/#secret-key. The env.template file sets to a randomly generated value.
- SIGAN_CLASS: The name of the signal analyzer class to use. By default, this is
set to
TekRSASiganto use a Tektronix signal analyzer. This must be changed to switch to a different signal analyzer. - SIGAN_MODULE: The name of the python module that provides the signal analyzer
implementation. This defaults to
scos_tekrsa.hardware.tekrsa_siganfor the Tektronix signal analyzers. This must be changed to switch to a different signal analyzer. - SIGAN_POWER_CYCLE_STATES: Optional setting to provide the name of the control_state in the SIGAN_POWER_SWITCH that will power cycle the signal analyzer.
- SIGAN_POWER_SWITCH: Optional setting used to indicate the name of a WebRelay that may be used to power cycle the signal analyzer if necessary. Note: specifics of power cycling behavior are implemented within the signal analyzer implementations or actions.
- SSL_CA_PATH: Path to a CA certificate used to verify scos-sensor client certificate(s) when authentication is set to CERT.
- SSL_CERT_PATH: Path to server SSL certificate. Replace the certificate in the scos-sensor repository with a valid certificate in production.
- SSL_KEY_PATH: Path to server SSL private key. Use the private key for your valid certificate in production.
- STARTUP_CALIBRATION_ACTION: The name of an available action which will run on startup if no unexpired calibration data is already present.
- USB_DEVICE: Optional string used to search for available USB devices. By default, this is set to Tektronix to see if the Tektronix signal analyzer is available. If the specified value is not found in the output of lsusb, scos-sensor will attempt to restart the api container. If switching to a different signal analyzer, this setting should be updated or removed.
This file contains information on the sensor and components being used. It is used in the SigMF metadata to identify the hardware used for the measurement. It should follow the sigmf-ns-ntia Sensor Object format. See an example below. Overwrite the example file in scos-sensor/configs with the information specific to the sensor you are using.
{
    "sensor_spec": {
        "id": "",
        "model": "greyhound"
    },
    "antenna": {
        "antenna_spec": {
            "id": "",
            "model": "L-com HG3512UP-NF"
        }
    },
    "signal_analyzer": {
        "sigan_spec": {
            "id": "",
            "model": "Ettus USRP B210"
        }
    },
    "computer_spec": {
        "id": "",
        "model": "Intel NUC"
    }
}
Calibration files allow SCOS Sensor to scale data based on a laboratory and/or in-field calibration of the sensor, and may also contain other useful metadata that characterizes the sensor performance. Two primary types of calibration files are used: sensor calibration files and differential calibration files.
Sensor calibration files may be provided upon sensor deployment or generated by onboard
calibration actions. If both exist, onboard calibration data takes priority. The
sensor will first attempt to load configs/onboard_sensor_calibration.json, and fall
back to configs/sensor_calibration.json if the first option fails. Next, SCOS determines
whether the loaded calibration data is expired, based on the threshold set by the
CALIBRATION_EXPIRATION_LIMIT threshold. If calibration data is expired, the sensor will
attempt to run the calibration action defined by STARTUP_CALIBRATION_ACTION.
SCOS Sensor also supports an additional calibration file, called a differential calibration. The differential calibration is used to provide additional scaling factors to shift the reference point of data from the onboard calibration terminal to elsewhere in the signal path. For instance, a differential calibration file can be provided with scaling factors to shift the data reference point from the onboard calibration terminal to the antenna port. The differential calibration is loaded separately, and used in addition to, either the onboard or lab-provided sensor calibration file.
In sensor calibration files, the unit of calibration data is defined by the
NTIA-Sensor SigMF Calibration Object.
In differential calibration files, the only key in the calibration data is loss.
The calibration_parameters key lists the parameters that will be used to obtain
the calibration data. In the case of onboard calibration being generated from scratch,
the startup calibration action's signal analyzer settings are used as the calibration_parameters.
The calibration data is found directly within the calibration_data element and by
default SCOS Sensor will not apply any additional gain. Typically, a sensor would be
calibrated at particular sensing parameters. The calibration data for specific parameters
should be listed within the calibration_data object and accessed by the values of the
settings listed in the calibration_parameters element. For example, the sensor
calibration below provides an example of a sensor calibrated at a sample rate of
140000000 samples per second at several frequencies with a signal analyzer reference
level setting of -25.
{
  "last_calibration_datetime": "2023-10-23T14:39:13.682Z",
  "calibration_parameters": [
    "sample_rate",
    "frequency",
    "reference_level"
  ],
  "clock_rate_lookup_by_sample_rate": [],
  "calibration_data": {
    "14000000.0": {
      "3545000000.0": {
        "-25": {
          "datetime": "2023-10-23T14:38:02.882Z",
          "gain": 30.09194805857024,
          "noise_figure": 4.741521295220736,
          "temperature": 15.6
        }
      },
      "3555000000.0": {
        "-25": {
          "datetime": "2023-10-23T14:38:08.022Z",
          "gain": 30.401008416406599,
          "noise_figure": 4.394893979804061,
          "temperature": 15.6
        }
      },
      "3565000000.0": {
        "-25": {
          "datetime": "2023-10-23T14:38:11.922Z",
          "gain": 30.848049817892105,
          "noise_figure": 4.0751785215495819,
          "temperature": 15.6
        }
      }
    }
  }
}
When an action is run with the above calibration, SCOS will expect the action to have a sample_rate, frequency, and reference_level specified in the action config. The values specified for these parameters will then be used to retrieve the calibration data entry.
This section covers authentication, permissions, and certificates used to access the sensor, and the authentication available for the callback URL. Two different types of authentication are available for authenticating against the sensor and for authenticating when using a callback URL.
The sensor can be configured to authenticate using mutual TLS with client certificates or using Django Rest Framework Token Authentication.
This is the default authentication method. To enable Django Rest Framework token and
session authentication, make sure AUTHENTICATION is set to TOKEN in the environment
file (this will be enabled if AUTHENTICATION set to anything other than CERT).
A token is automatically created for each user. Django Rest Framework Token Authentication will check that the token in the Authorization header ("Token " + token) matches a user's token. Login session authentication with username and password is used for the browsable API.
To enable Certificate Authentication, make sure AUTHENTICATION is set to CERT in
the environment file. To authenticate, the client will need to send a trusted client
certificate. The Common Name must match the username of a user in the database.
Use this section to create self-signed certificates with customized organizational and host information. This section includes instructions for creating a self-signed root CA, SSL server certificates for the sensor, and optional client certificates.
As described below, a self-signed CA can be created for testing. For production, make sure to use certificates from a trusted CA.
Below instructions adapted from here.
This is the SSL certificate used for the scos-sensor web server and is always required.
To be able to sign server-side and client-side certificates in this example, we need to create our own self-signed root CA certificate first. The command will prompt you to enter a password and the values for the CA subject.
openssl req -x509 -sha512 -days 365 -newkey rsa:4096 -keyout scostestca.key -out scostestca.pemGenerate a host certificate signing request. Replace the values in square brackets in the subject for the server certificate.
openssl req -new -newkey rsa:4096 -keyout sensor01.key -out sensor01.csr -subj "/C=[2 letter country code]/ST=[state or province]/L=[locality]/O=[organization]/OU=[organizational unit]/CN=[common name]"Before we proceed with openssl, we need to create a configuration file -- sensor01.ext. It'll store some additional parameters needed when signing the certificate. Adjust the settings, especially DNS names, in the below example for your sensor. For more information and to customize your certificate, see the X.509 standard here.
authorityKeyIdentifier=keyid
basicConstraints=CA:FALSE
subjectAltName = @alt_names
subjectKeyIdentifier = hash
keyUsage = critical, digitalSignature, keyEncipherment
extendedKeyUsage = serverAuth, # add , clientAuth to use as client SSL cert (2-way SSL)
[alt_names]
DNS.1 = localhost
# Add additional DNS names as needed, e.g. DNS.2, DNS.3, etc
Sign the host certificate.
openssl x509 -req -CA scostestca.pem -CAkey scostestca.key -in sensor01.csr -out sensor01.pem -days 365 -sha256 -CAcreateserial -extfile sensor01.extIf the sensor private key is encrypted, decrypt it using the following command:
openssl rsa -in sensor01.key -out sensor01_decrypted.keyCombine the sensor certificate and private key into one file:
cat sensor01_decrypted.key sensor01.pem > sensor01_combined.pemThis certificate is required for using the sensor with mutual TLS certificate authentication (2 way SSL, AUTHENTICATION=CERT). This example uses the same self-signed CA used for creating the example scos-sensor server certificate.
Replace the brackets with the information specific to your user and organization.
openssl req -new -newkey rsa:4096 -keyout client.key -out client.csr -subj "/C=[2 letter country code]/ST=[state or province]/L=[locality]/O=[organization]/OU=[organizational unit]/CN=[common name]"Create client.ext with the following:
basicConstraints = CA:FALSE
subjectKeyIdentifier = hash
authorityKeyIdentifier = keyid
keyUsage = critical, digitalSignature
extendedKeyUsage = clientAuth
Sign the client certificate.
openssl x509 -req -CA scostestca.pem -CAkey scostestca.key -in client.csr -out client.pem -days 365 -sha256 -CAcreateserial -extfile client.extConvert pem to pkcs12:
openssl pkcs12 -export -out client.pfx -inkey client.key -in client.pem -certfile scostestca.pemImport client.pfx into web browser for use with the browsable API or use the client.pem or client.pfx when communicating with the API programmatically.
The Nginx web server is not configured by default to require client certificates (mutual TLS). To require client certificates, uncomment out the following in nginx/conf.template:
ssl_client_certificate /etc/ssl/certs/ca.crt;
ssl_verify_client on;
Note that additional configuration may be needed for Nginx to
use OCSP validation and/or check certificate revocation lists (CRL). Adjust the other
Nginx parameters, such as ssl_verify_depth, as desired. See the
Nginx documentation for more
information about configuring Nginx SSL settings. The ssl_verify_client setting can
also be set to optional or optional_no_ca, but if a client certificate is not
provided, scos-sensor AUTHENTICATION setting must be set to TOKEN which requires a
token for the API or a username and password for the browsable API.
To disable client certificate authentication, comment out the following in nginx/conf.template:
# ssl_client_certificate /etc/ssl/certs/ca.crt;
# ssl_verify_client on;
Copy the server certificate and server private key (sensor01_combined.pem) to
scos-sensor/configs/certs. Then set SSL_CERT_PATH and SSL_KEY_PATH (in the
environment file) to the path of the sensor01_combined.pem relative to configs/certs
(for file at scos-sensor/configs/certs/sensor01_combined.pem, set
SSL_CERT_PATH=sensor01_combined.pem and SSL_KEY_PATH=sensor01_combined.pem). For
mutual TLS, also copy the CA certificate to the same directory. Then, set
SSL_CA_PATH to the path of the CA certificate relative to configs/certs.
If you are using client certificates, use client.pfx to connect to the browsable API by importing this certificate into your browser.
The API requires the user to be a superuser. New users created using the API initially do not have superuser access. However, an admin can mark a user as a superuser in the Sensor Configuration Portal.
When scos-sensor starts, an admin user is created using the ADMIN_NAME, ADMIN_EMAIL and ADMIN_PASSWORD environment variables. The ADMIN_NAME is the username for the admin user. Additional admin users can be created using the ADDITIONAL_USER_NAMES and ADDITIONAL_USER_PASSWORD environment variables. ADDITIONAL_USER_NAMES is a comma separated list. ADDITIONAL_USER_PASSWORD is a single password used for each additional admin user. If ADDITIONAL_USER_PASSWORD is not specified, the additional users will be created with an unusable password, which is sufficient if only using certificates or tokens to authenticate. However, a password is required to access the Sensor Configuration Portal.
Certificate and token authentication are supported for authenticating against the
server pointed to by the callback URL. Callback SSL verification can be enabled or
disabled using CALLBACK_SSL_VERIFICATION in the environment file.
A simple form of token authentication is supported for the callback URL. The sensor
will send the user's (user who created the schedule) token in the authorization header
("Token " + token) when posting results to callback URL. The server can then verify
the token against what it originally sent to the sensor when creating the schedule.
This method of authentication for the callback URL is enabled by default. To verify it
is enabled, set CALLBACK_AUTHENTICATION to TOKEN in the environment file (this will
be enabled if CALLBACK_AUTHENTICATION set to anything other than CERT).
PATH_TO_VERIFY_CERT, in the environment file, can used to set a CA certificate to
verify the callback URL server SSL certificate. If this is unset and
CALLBACK_SSL_VERIFICATION is set to true, standard trusted CAs will be
used.
Certificate authentication (mutual TLS) is supported for callback URL authentication. The following settings in the environment file are used to configure certificate authentication for the callback URL.
CALLBACK_AUTHENTICATION- set toCERT.PATH_TO_CLIENT_CERT- client certificate used to authenticate against the callback URL server.PATH_TO_VERIFY_CERT- CA certificate to verify the callback URL server SSL certificate. If this is unset andCALLBACK_SSL_VERIFICATIONis set to true, standard trusted CAs will be used.
Set PATH_TO_CLIENT_CERT and PATH_TO_VERIFY_CERT relative to configs/certs.
Depending on the configuration of the callback URL server, the scos-sensor server
certificate could be used as a client certificate (if created with clientAuth extended
key usage) by setting PATH_TO_CLIENT_CERT to the same value as SSL_CERT_PATH
if the private key is bundled with the certificate. Also
the CA used to verify the scos-sensor client certificate(s) could potentially be used
to verify the callback URL server certificate by setting PATH_TO_VERIFY_CERT to the
same file as used for SSL_CA_PATH. This would require the callback URL server
certificate to be issued by the same CA as the scos-sensor client certficate(s) or have
the callback URL server's CA cert bundled with the scos-sensor client CA cert. Make
sure to consider the security implications of these configurations and settings,
especially using the same files for multiple settings.
The data files are encrypted on disk by default using Cryptography Fernet module. The
Fernet encryption module may not be suitable for large data files. According to the
Cryptography documentation for Fernet encryption,
the entire message contents must fit in memory. Note that the SigMF metadata is
currently not encrypted. The SCOS_TMP setting controls where data will be written
when decrypting the file and creating the SigMF archive. Defaults to /scos_tmp docker
tmpfs mount. Set the ENCRYPTION_KEY environment variable to control the encryption
key used for encryption. The env.template file will generate a random encryption key
for testing. When used in production, it is recommended to store the encryption key
in a safe location to prevent data loss and to prevent data from being compromised.
Use the ENCRYPT_DATA_FILES setting in the env.template file to disable encryption.
The SCOS_TMP location is used to create the SigMF archive regardless of whether
encryption is enabled.
"Actions" are one of the main concepts used by scos-sensor. At a high level, they are
the things that the sensor owner wants the sensor to be able to do. At a lower level,
they are simply Python classes with a special method __call__. Actions are designed
to be discovered programmatically in installed plugins. Plugins are Python packages
that are designed to be integrated into scos-sensor. The reason for using plugins to
install actions is that different actions can be offered depending on the hardware
being used. Rather than requiring a modification to scos-sensor repository, plugins
allow anyone to add additional hardware support to scos-sensor by offering new or
existing actions that use the new hardware.
Common action classes can still be re-used by plugins through the scos-actions
repository. The scos-actions repository is intended to be a dependency for every plugin
as it contains the actions base class and signals needed to interface with scos-sensor.
These actions use a common but flexible signal analyzer interface that can be
implemented for new types of hardware. This allows for action re-use by passing the
measurement parameters to the constructor of these actions and supplying the
Sensor instance (including the signal analyzer) to the __call__ method.
Alternatively, custom actions that support unique hardware functionality can be
added to the plugin.
Scos-sensor uses the following convention to discover actions offered by plugins: if
any Python package begins with "scos_", and contains a dictionary of actions at the
Python path package_name.discover.actions, these actions will automatically be
available for scheduling. Similarly, plugins may offer new action types by including
a dictionary of action classes at the Python path package_name.discover.action_classes.
Scos-sensor will load all plugin actions and action classes prior to creating actions
defined in yaml files in configs/actions directory. In this manner, a plugin may add new
action types to scos-sensor and those new types may be instantiated/parameterized with yaml
config files.
The scos-usrp plugin adds support for the Ettus B2xx line of signal analyzers and scos-tekrsa adss support for Tektronix RSA306, RSA306B, RSA503A, RSA507A, RSA513A, RSA518A, RSA603A, and RSA607A real-time spectrum analyzers. These repositories may also be used as examples of plugins which provide new hardware support and re-use the common actions in scos-actions.
For more information on adding actions and hardware support, see scos-actions.
Scos-sensor currently supports Ettus B2xx signal analyzers through
the scos-usrp plugin and
Tektronix RSA306, RSA306B, RSA503A, RSA507A, RSA513A,
RSA518A, RSA603A, and RSA607A real-time spectrum analyzers through
the scos-tekrsa plugin. To
configure scos-sensor for the desired signal analyzer review the
instructions in the plugin repository. Generally,
switching signal analyzers involves updating the BASE_IMAGE
setting, updating the requirements, and updating the SIGAN_MODULE,
SIGAN_CLASS, and USB_DEVICE settings. To identify the
BASE_IMAGE, go to the preferred plugin repository and find
the latest docker image. For example, see
scos-tekrsa base images
or
scos-usrp base images.
Update the BASE_IMAGE setting in env file to the desired base image.
Then update the SIGAN_MODULE and SIGAN_CLASS settings with
the appropriate Python module and class that provide
an implementation of the SignalAnalyzerInterface
(you will have to look in the plugin repo to identify the correct module and class). Finally,
update the requirements with the selected plugin repo.
See Requirements and Configuration
and Using pip-tools
for additional information. Be sure to re-source the environment file, update the
requirements files, and prune any existing containers
before rebuilding scos-sensor.
Scos-sensor can be configured to support preselectors. By default, scos-sensor will look in the configs directory for a file named preselector_config.json. This location/name can be changed by setting PRESELECTOR_CONFIG in docker-compose.yaml. By default, scos-sensor will use a WebRelayPreselector. This can be changed by setting PRESELECTOR_MODULE in docker-compose.yaml to the python module that contains the preselector implementation you specify in PRESELECTOR_CLASS in docker-compose.yaml.
Scos-sensor can be configured with zero or more network controlled relays. The default relay configuration directory is configs/switches. Relay support is provided by the its_preselector package. Any relay configs placed in the relay configuration directory will be used to create an instance of a ControlByWebWebRelay and added into a switches dictionary in scos-actions.hardware. In addition, each relay is registered to provide status through the scos-sensor status endpoint as specified in the relay config file (see its_preselector for additional details).
The following techniques can be used to make local modifications. Sections are in order, so "Running Tests" assumes you've done the setup steps in “Requirements and Configuration”.
It is highly recommended that you first initialize a virtual development environment using a tool such a conda or venv. The following commands create a virtual environment using venv and install the required dependencies for development and testing.
python3 -m venv ./venv
source venv/bin/activate
python3 -m pip install --upgrade pip # upgrade to pip>=18.1
python3 -m pip install -r src/requirements-dev.txtIt is recommended to keep direct dependencies in a separate file. The direct dependencies are in the requirements.in and requirements-dev.in files. Then pip-tools can be used to generate files with all the dependencies and transitive dependencies (sub-dependencies). The files containing all the dependencies are in requirements.txt and requirements-dev.txt. Run the following in the virtual environment to install pip-tools.
python -m pip install pip-toolsTo update requirements.txt after modifying requirements.in:
pip-compile requirements.inTo update requirements-dev.txt after modifying requirements.in or requirements-dev.in:
pip-compile requirements-dev.inUse pip-sync to match virtual environment to requirements-dev.txt:
pip-sync requirements.txt requirements-dev.txtFor more information about pip-tools, see https://pip-tools.readthedocs.io/en/latest/#
Ideally, you should add a test that covers any new feature that you add. If you've done that, then running the included test suite is the easiest way to check that everything is working. In any case, all tests should be run after making any local modifications to ensure that you haven't caused a regression.
scos-sensor uses pytest
and pytest-django for testing.
Tests are organized by
application
, so tests related to the scheduler are in ./src/scheduler/tests. tox is a tool that can run all available
tests in a virtual environment against all supported versions of Python.
Running pytest directly is faster, but running tox is a more thorough
test.
The following commands install the sensor's development requirements. We highly
recommend you initialize a virtual development environment using a tool such a conda
or venv first.
cd src
pytest          # faster, but less thorough
tox             # tests code in clean virtualenv
tox --recreate  # if you change `requirements.txt`
tox -e coverage # check where test coverage lacksThe docker-compose file and application code look for information
from the environment when run, so it's necessary to source the
following file in each shell that you intend
to launch the sensor from.
(HINT: it can be useful to add the source command to a
post-activate file in whatever virtual environment you're using).
cp env.template env     # modify if necessary, defaults are okay for testing
source ./env
Then, build the API docker image locally, which will satisfy the smsntia/scos-sensor
and smsntia/autoheal images in the Docker compose file and bring up the sensor.
docker-compose down
docker-compose build
docker-compose up -d
docker-compose logs --follow api
Running the sensor API outside of Docker is possible but not recommended, since Django is being asked to run without several security features it expects. See Common Issues for some hints when running the sensor in this way. The following steps assume you've already set up some kind of virtual environment and installed python dev requirements from Requirements and Configuration.
docker-compose up -d db
cd src
export MOCK_SIGAN=1 MOCK_SIGAN_RANDOM=1 # if running without signal analyzer attached
./manage.py makemigrations
./manage.py migrate
./manage.py createsuperuser
./manage.py runserver- The development server serves on localhost:8000, not :80
- If you get a Forbidden (403) error, close any tabs and clear any cache and cookies related to SCOS Sensor and try again
- If you're using a virtual environment and your signal analyzer driver is installed
outside of it, you may need to allow access to system sitepackages. For example, if
you're using a virtualenv called
scos-sensor, you can remove the following text file:rm -f ~/.virtualenvs/scos-sensor/lib/python3.7/no-global-site-packages.txt, and thereafter use the ignore-installed flag to pip:pip install -I -r requirements.txt.This should let the devserver fall back to system sitepackages for the signal analyzer driver only.
Besides running the test suite and ensuring that all tests are passed, we also expect all Python code that's checked in to have been run through an auto-formatter.
This project uses a Python auto-formatter called Black. You probably won't like every decision it makes, but our continuous integration test-runner will reject your commit if it's not properly formatted.
Additionally, import statement sorting is handled by isort.
The continuous integration test-runner verifies the code is auto-formatted by checking that neither isort nor Black would recommend any changes to the code. Occasionally, this can fail if these two autoformatters disagree. The only time I've seen this happen is with a commented-out import statement, which isort parses, and Black treats as a comment. Solution: don't leave commented-out import statements in the code.
There are several ways to autoformat your code before committing. First, IDE
integration with on-save hooks is very useful. Second, there is a script,
scripts/autoformat_python.sh, that will run both isort and Black over the codebase.
Lastly, if you've already pip-installed the dev requirements from the section above,
you already have a utility called pre-commit installed that will automate setting up
this project's git pre-commit hooks. Simply type the following once, and each time
you make a commit, it will be appropriately autoformatted.
pre-commit installYou can manually run the pre-commit hooks using the following command.
pre-commit run --all-filesSee LICENSE.
For technical questions about scos-sensor, contact Justin Haze, jhaze@ntia.gov