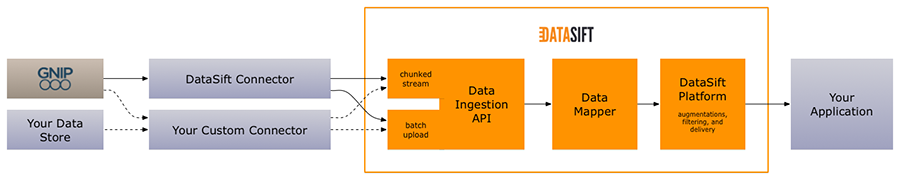
The DataSift Connector is a set of components that enable you to retrieve data from third-party APIs and storage systems, and to pass that data into the DataSift platform for processing.
Note that the current implementation only has built-in support for Gnip as a data source, but more sources will be coming soon. Note that you cannot upload arbitrary data - the platform requires support for the data format to be present. If you require further details on the potential for sending other data to DataSift please contact your account executive.
To deploy the Connector or to work with it locally, you'll first need to clone the repo:
git clone https://github.com/datasift/datasift-connector.gitcd datasift-connectorgit checkout tags/x.y.z-1where x.y.z is the tag of the release required.
Please note that the Connector has been developed and tested within CentOS 6.5. The source AMI in use by our ami.json packer configuration is ami-c2a818aa. The Connector is not guaranteed to operate correctly when deployed using alternative source images.
The Packer configuration file by default uses the US East region of AWS. If another region is required then the configuration file (eg. ami.json) must be changed. First change the property "region" in the configuration file to your required region code (see table below). The "source_ami" property must also be changed to the corresponding source AMI according to the table below.
| Region Name | Region Code | Source AMI |
|---|---|---|
| US East (N. Virginia) | us-east-1 | ami-c2a818aa |
| US West (Oregon) | us-west-2 | ami-81d092b1 |
| US West (N. California) | us-west-1 | ami-57cfc412 |
| EU (Frankfurt) | eu-west-1 | ami-46c4f65b |
| EU (Ireland) | eu-central-1 | ami-30ff5c47 |
| Asia Pacific (Singapore) | ap-southeast-1 | ami-b4a582e6 |
| Asia Pacific (Sydney) | ap-southeast-1 | ami-b3523089 |
| Asia Pacific (Tokyo) | ap-northeast-1 | ami-13614b12 |
| South America (Sao Paulo) | sa-east-1 | ami-9b952086 |
Last updated 4th September 2015. See here for latest AWS regions.
The CentOS 6 source AMI used by the Connector is a free product. The EC2 instance type used by default to build the Connector AMI is t2.small, as a t2.micro type may encounter Chef memory limitations. This is NOT a "Free Tier Eligible" instance type, and will incur charges each time a Connector AMI is built. These charges should be minimal. Existing customers can view estimated costs for various tiers by logging-in to AWS, visiting the AMI product page and clicking the "Continue" button.
If a default VPC has not been set on EC2, it will be necessary to change this value to an EC2-Classic compatible instance type, such as m3.medium. All new AWS accounts have a default VPC created automatically. Please note that bumping the instance size up will incur higher charges. Differences can be compared on the product page above.
Once the Connector AMI has been built using Packer, a lower tier instance can be used to run the Connector, as memory usage is lower during operation than during the provisioning process.
To run an instance of the Connector on EC2:
- Ensure Packer is installed.
- Ensure Chef DK has been installed.
cd packervi ami.json- Edit the
regionJSON value to reflect your EC2 region of choice. The default is us-east-1. - Edit the
instance_typeJSON value if needed, based on the advice above in the Pricing section. ./build.sh [AWS_ACCESS_KEY] [AWS_SECRET_KEY]- During deployment, a license agreement may be presented. Accepting this is required for use of the source AMI.
- Once the Packer build has finished log on to your AWS dashboard, select the EC2 service and then click
AMIs. - Launch an instance of the built AMI using the standard EC2 mechanism, using your instance type of choice. Read our wiki article for information about why we recommend launching a new EC2 instance, rather than using an existing one.
After launching an instance, you'll next need to configure it:
- SSH into the instance.
ssh -i [PEM] root@[EC2-INSTANCE] sudo vi /etc/datasift/gnip-reader/reader.jsonand add your Gnip credentials.sudo vi /etc/datasift/datasift-writer/writer.jsonand add your DataSift credentials.sudo vi /etc/datasift/historics-reader/reader.jsonand add your Gnip account name.sudo supervisorctl restart gnip-readersudo supervisorctl restart datasift-writerexit- Open your browser to port 3000 of the launched EC2 machine. User
admin, passwordadmin. Click on the dashboard to see relevant metrics.
You will now be ingesting your Gnip data into DataSift.
To run a local instance of the Connector do the following:
- Ensure Vagrant and relevant plug-ins are installed.
- Ensure a stable version of VirtualBox is installed.
vagrant up- If prompted, choose to bridge to a network adapter with internet access.
Once the provisioning process has completed chef should report success, printing a log message similar to:
INFO: Chef Run complete in 100.00 seconds
If errors are encountered during provisioning, you may find a solution in troubleshooting
After launching an instance, you'll next need to configure it:
- SSH into the instance. eg.
vagrant ssh sudo vi /etc/datasift/gnip-reader/reader.jsonand add your Gnip credentials.sudo vi /etc/datasift/datasift-writer/writer.jsonand add your DataSift credentials.sudo vi /etc/datasift/historics-reader/reader.jsonand add your Gnip account name.sudo supervisorctl restart gnip-readersudo supervisorctl restart datasift-writerexit- Browse to
http://localhost:3000. Useradmin, passwordadmin. Click on the dashboard to see relevant metrics.
You will now be ingesting your Gnip data into DataSift.
We recommend that you deploy the Connector using our Packer configuration. We supply configuration examples for building an EC2 AMI and also a Docker image. For local testing you can use Vagrant to create a local virtual machine. The Vagrantfile we supply will create a VirtualBox image, but this is easily modified for other targets.
We've used Chef to ensure a repeatable build for development, testing and deployment. This uses Berkshelf to manage dependencies and Test Kitchen to perform integration tests, both are from the Chef Development Kit.
We use Vagrant for development and testing, and it can also be used for deployment. We recommend using the latest version, 1.7.0+ is required. We use a few plugins to make life easier:
- vagrant-omnibus
- vagrant-berkshelf (also make sure you've installed ChefDK as mentioned above)
To get started run vagrant up from the root directory. If chef fails the first time try berks update, vagrant destroy then vagrant up.
To give some context, the first diagram below shows where this Connector fits into the DataSift Data Ingestion API. The second diagram shows the design of this Connector.
### Data Ingestion API
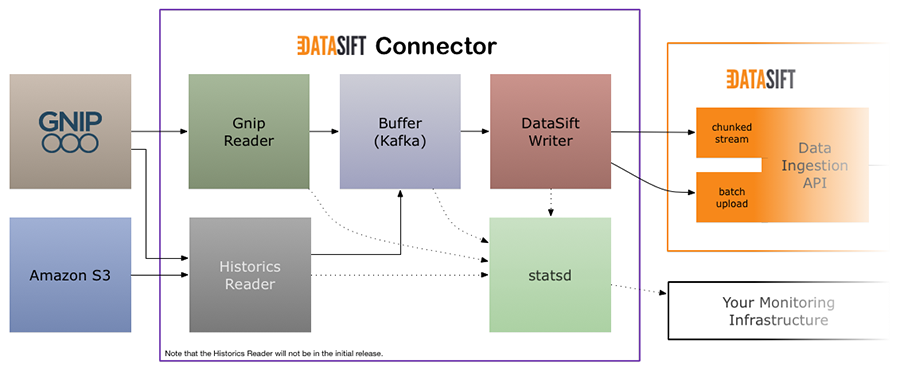
The Connector contains three main parts: a reader, a buffer, and a writer:
- The Gnip Reader or Twitter API Reader will connect to the Gnip/Twitter streaming API and pass the data received in to the buffer.
- The buffer is there to prevent data loss should there be an issue with the connection to the DataSift Data Ingestion API. One item in the queue is expected to be a single piece of data, i.e. a tweet, retweet, delete, etc.
- The DataSift Writer handles connecting to the DataSift Data Ingestion API and will send the data it pulls out of the buffer up to the DataSift platform.
All components log metrics to statsd so you can easily integrate it into your monitoring infrastructure. We also provide a default Grafana dashboard for monitoring the Connector which can be found at http://[connector-machine]:3000, or http://localhost:3000 if using the provided Vagrant file. The default login for Grafana is set to admin / admin.
Processing of Historical PowerTrack sourced gzip archive files is supported. The Connector's historics-api component manages a database of historics jobs details. The historics-reader service runs by default every five minutes. This service updates submitted job details, downloads any complete historics job archives and sends the interactions contained within to Kafka for processing.
Historical PowerTrack output format must be set to Activity Streams. "Original" format is not supported.
The job ID submitted to the Connector must exist under your Historical PowerTrack product for the results to be detected and processed. An Historics API server runs by default at http://[connector-machine]:8888. Details on how to interact with the API can be found on the historics-api page.
To have the Historics Reader component monitor and forward any interactions generated by Historical PowerTrack, simply perform a POST request to http://[connector-machine]:8888/api/v1/historics, with a JSON body as follows:
{ "job_id": "gnip_job_id" }
Progress on completion may be monitored via GET requests as specified in the above historics-api README.md. Metrics and web frontend are currently being implemented and will be included within the next release.
### Gnip Reader
The Gnip Reader configuration file is located at /etc/datasift/gnip-reader/reader.json when deployed using the included Chef recipe.
Example:
{
  "gnip": {
    "account": "ACCOUNT",
    "label": "LABEL",
    "product": "PRODUCT",
    "username": "USER",
    "password": "PASSWORD",
    "host": "https://stream.gnip.com"
  },
  "hosebird": {
    "retries": 10,
    "buffer_size": 10000,
    "buffer_timeout": 500
  },
  "kafka": {
    "topic": "twitter",
    "servers": "localhost:6667",
    "retry-backoff": 1000,
    "reconnect-backoff": 1000
  },
  "metrics": {
    "host": "localhost",
    "port": 8125,
    "prefix": "hosebird.reader",
    "reporting-time": 1
  }
}
The important part is the gnip section. This is where you specify your Gnip API credentials that will enable the reader to connect to Gnip and receive data.
The Twitter API configuration file is located at /etc/datasift/twitterapi-reader/reader.json when deployed using the included chef recipe.
Example:
{
    "twitterapi": {
        "consumer_key": "KEY",
        "consumer_secret": "SECRET",
        "access_token": "TOKEN",
        "access_secret": "SECRET",
        "keywords": [
            "datasift"
        ],
        "user_ids": [
            155505157
        ]
    },
    "hosebird": {
        "retries": 10,
        "buffer_size": 10000,
        "buffer_timeout": 500
    },
    "kafka": {
        "topic": "twitter",
        "servers": "localhost:6667",
        "retry-backoff": 1000,
        "reconnect-backoff": 1000
    },
    "metrics": {
        "host": "localhost",
        "port": 8125,
        "prefix": "hosebird.reader",
        "reporting-time": 1
    }
}
At least one of either keywords or user_ids must be used.
The DataSift Writer configuration file is located at /etc/datasift/datasift-writer/writer.json when deployed using the included Chef recipe.
Example:
{
  "zookeeper": {
    "socket": "localhost:2181"
  },
  "kafka": {
    "topic": "twitter",
    "broker": "localhost",
    "port": 9092
  },
  "datasift": {
    "base_url": "https://in.datasift.com/",
    "port": 443,
    "username": "username",
    "api_key": "apikey",
    "source_id": "sourceid",
    "bulk_size": 100000,
    "bulk_items": 1000,
    "bulk_interval": 1000
  },
  "metrics": {
    "host": "localhost",
    "port": 8125,
    "prefix": "datasift.writer",
    "reporting-time": 1
  }
}The Historics Reader configuration file is located at /etc/datasift/historics-reader/reader.json when deployed using the included Chef recipe.
Example:
{
  "database": {
    "filepath": "/usr/lib/datasift/historics-api/db.sqlite"
  },
  "gnip": {
    "base_url": "https://historical.gnip.com",
    "port": 443,
    "account_name": "gnip-account"
  },
  "kafka": {
    "topic": "twitter",
    "servers": "localhost:6667",
    "retry-backoff": 1000,
    "reconnect-backoff": 1000
  },
  "metrics": {
    "host": "localhost",
    "port": 8125,
    "prefix": "historics.reader",
    "reporting-time": 1
  }
}The majority of relevant log files can be found in /var/log/supervisor. The default log level for the datasift-writer & gnip-reader services is INFO. For debugging purposes this can be altered on line 2 of log4j.properties, found under /etc/datasift/datasift-writer & /etc/datasift/gnip-reader. A restart using sudo supervisor restart service-name is required for a change of level to take effect. Note that switching to DEBUG or further levels may cause storage issues.
Logs may be tailed directly via Supervisor: sudo supervisorctl tail -f datasift-writer
- Deploying the Connector AMI to EC2 on top of a Debian based OS will likely cause issues with multiple components within the Connector instance. As noted in 'Quick Start - Deployment to EC2', the Connector has been developed and tested within a pre-built CentOS 6.5 environment, and we strongly advise that packer be run using the included packer/build.sh script.
- Memory allocation errors can occur during the Packer provisioning process. Please follow the advice in the Pricing section and EC2 Quick Deployment steps regarding instance types, to ensure the AMI building instance and Connector instance are suitable.
It may be that whilst executing Packer or provisioning a local VM with Vagrant, errors will be encountered. Project maintainers will refrain from merging any unstable Chef changes into master for releases, so errors will usually be caused by a dependency or a localised issue.
Network issues are a common cause. Errors pertaining to reset connections or domain name resolution indicate that:
- VirtualBox bridged to the incorrect network adapter when executing
vagrant up - A more reliable internet connection is required.
If the error is Berkshelf/Chef based, it's usually a good idea to clear your local Berkshelf cache, and re-construct your vagrant machine. Inside your datasift-connector directory:
rm -rf ~/.berkshelf/*
vagrant destroy
vagrant up
It's also possible for certain dependencies, RPMs, templates and other files to become inaccessible. External web-servers experiencing downtime, or being reconfigured can cause fatal chef errors, which will cause provisioning to fail. In these cases, it's worth ensuring your repository has checked out the latest release tag, and re-provisioning after a short time:
git checkout tags/x.y.z-1where x.y.z is the tag of the release required.vagrant uporvagrant provision, depending on whether the VM has been halted, or is still running respectively.
We are always thrilled to receive pull requests, and do our best to process them as fast as possible. To create a pull request:
- Fork on GitHub.
- Create a feature branch.
- Commit your changes with tests.
- New feature? Send a pull request against the
developbranch. - Bug fix? Send a pull request against the
masterbranch.
Not sure if that typo is worth a pull request? Do it! We, and all other users, will appreciate it.
Found a bug but you're not a developer? Please create an issue in GitHub and we'll get right on it!
The DataSift Connector is MIT-licensed. See the LICENSE file for more info.