
Estimated completion time: 20 - 30 minutes
This set of instructions is intended for beginners and those inexperienced with Python.
- Prerequisites
- Objectives
- Getting Started
- What You Need to Know to Build a Game
- Putting it All Together
- Closing
- Thank you!
- Licenses & Links
- References
- A computer and a reasonable level of comfort with how to use it.
- Learn the basics of Python.
- Become familiar with key programming terminology.
- Make a simple text-based adventure game.
What are we doing and why?
Code does not have to be hard.
Learning to code is an incredibly daunting task if you have never done it before. Taking those first few steps can be very trying and nerve wracking. This is especially true if you start following a tutorial or book that throws you into the deep end with little explanation of how to turn code into working software. However, it does not have to be that way. Whether you are an adult looking to pick up a new skill, a hobbyist, or a student wanting to learn more about technology, learning to code does not have to be a scary experience. Code can be a fun and exciting thing to learn! To help aid in this process and introduce the basics of programming, we will be making a text-based adventure game that you will be able to play when we are done!
Why are we making a text-based adventure game?
Computers have always been in some capacity intrinsically tied to games. For almost as long as there have been computers, there have been computer games ((“Video Game History - Timeline & Facts - HISTORY,” n.d.). Thus, it is no surprise that for many programmers their first introductions into programming was through creating a game. From Facebook's Mark Zuckerberg to Microsoft's Bill Gates, many technology company CEOs got their start by programming games (Gebel, 2019).
One of the most accessible and oldest forms of video games is that of text-based adventure games. Inspired by the Choose Your Own Adventure gamebooks from Bantam Books in the late 70s, text-based adventure games are conceptually intuitive: The reader assumes the role of the protagonist and makes choices that determine the plot's outcome (Kraft, 1981).
Thus, the story structure of a text-based adventure game might look something like the following:
Figure 1: A flow chart of what a text-based adventure game.
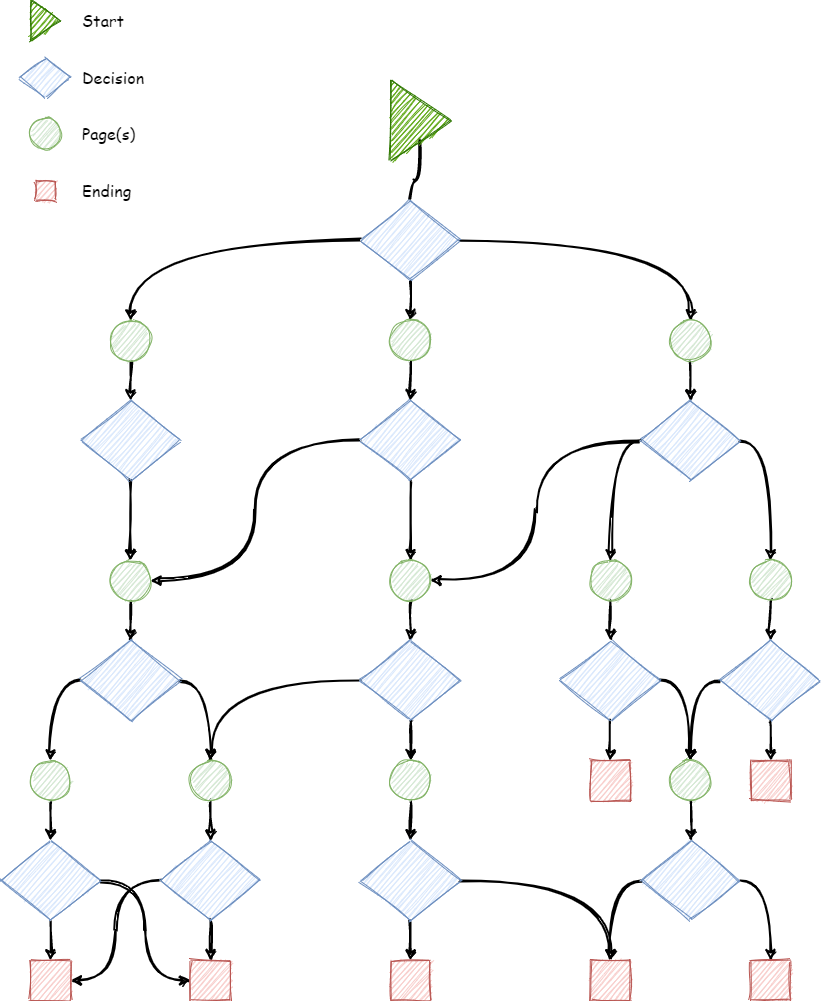
Though this might seem complex, it is actually rather intuitive. You can think of a text-based adventure like a book. After reading a page, or a couple pages, you are faced with a few choices that each lead to other options in the form of page numbers that you should turn to next. Eventually, you will reach one of the one or more endings. It is important to note that there is no set number of choices and there is no set number of endings.
If you have never played a text-based adventure game before, it is highly encouraged that you play one before beginning this set of instructions. Here are a few good text-based adventure games to try if you are interested that will be similar in format to what we will be making.
What is Python?
Python is a popular programming language originally released in 1991 (Venners, 2003) and what we will be using to create our text-based adventure game. Whether you have experience with programming or not, Python is a very simple programming language that allows everyone from beginners to experts the ability to create applications of all levels of complexity.
Before we start writing Python code, it is important that we setup an environment where we can write and run Python code. Like how we often use software like Microsoft Word or Libre Writer to create files like PDFs, we need a piece of software to create and run Python code. Though there are a plethora of tools out there, we will be using an online tool called Repl.it to create and run our Python code. Repl.it is an online code development tool that allows users to write and run code in their web browser (Lardinois, 2018). Thus, you do not have to worry about downloading and setting up software on your own computer.
To ease you into using Python and Repl.it, I have provided a starter project to simplify the process of creating a text-adventure game.
To get started, visit the following link in a new tab: https://repl.it/github/Kyle-L/Text-Adventure-Tutorial
Once that web pages loads, you will see the starting project that looks like the following screenshot:
Figure 2: Starting screen of Repl.it.
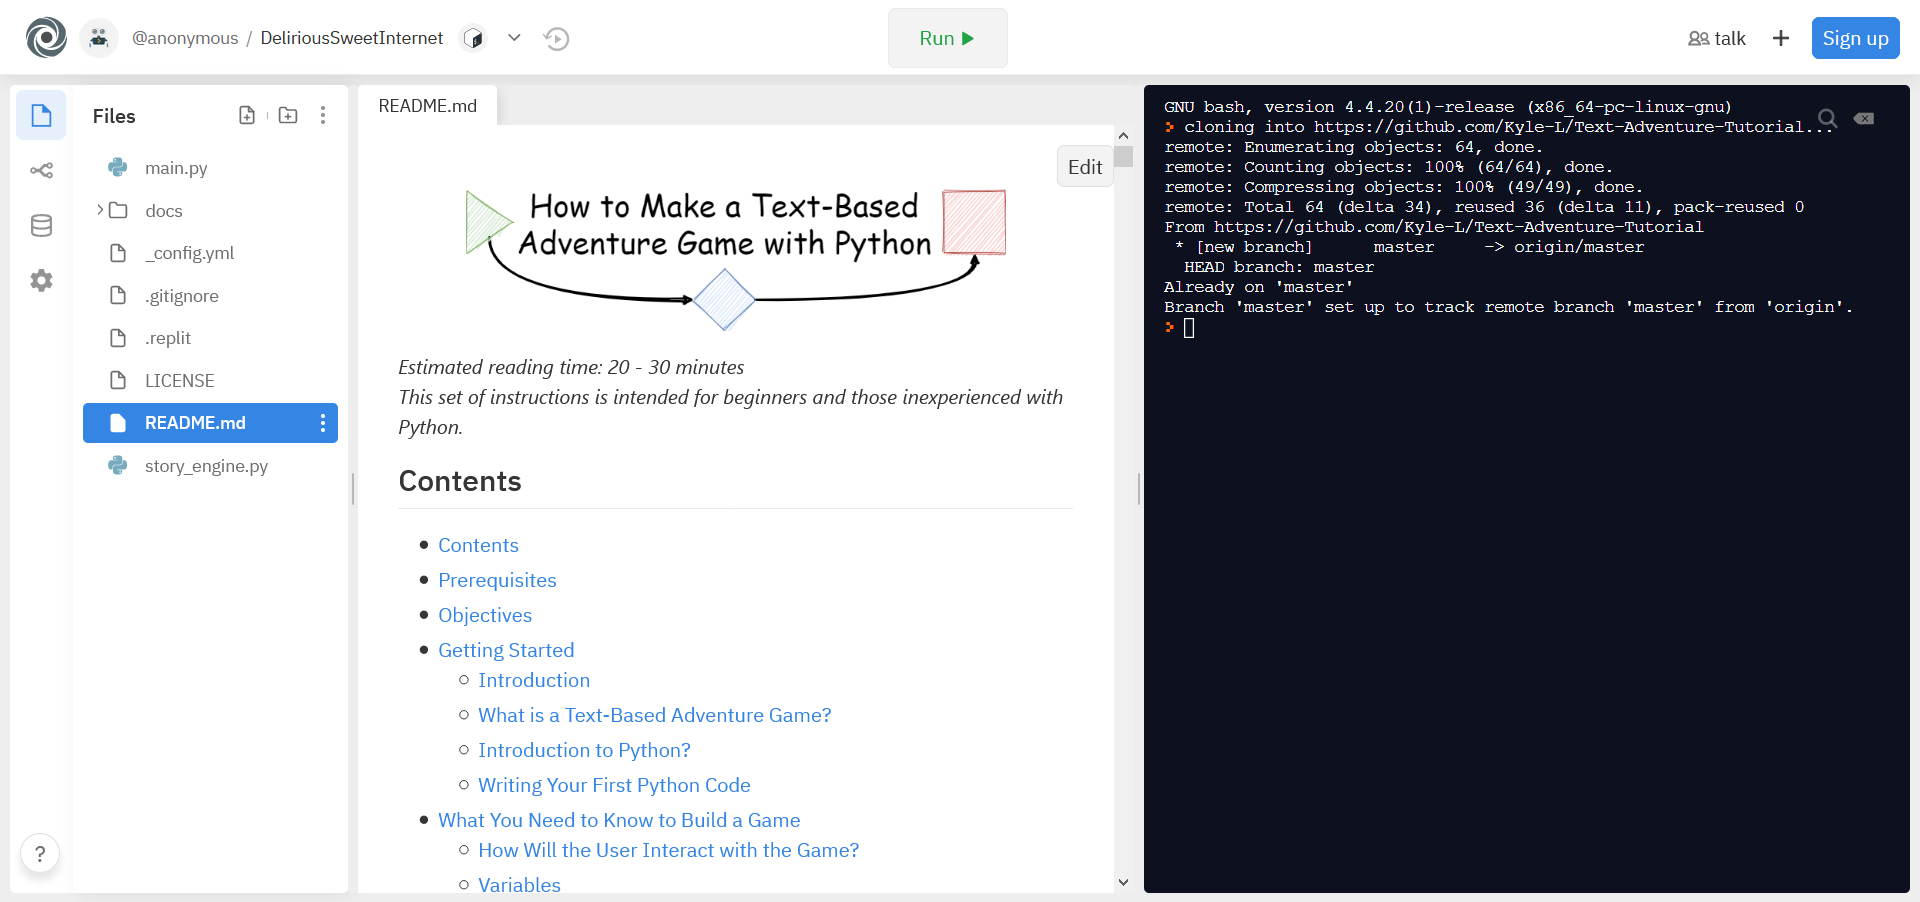
There might be a lot of buttons and tabs that you are unfamiliar with. For this project we need to only concern ourselves with the following tabs and options:
- Files - Shows all the files in our project. We will only be working with
main.pyandREADME.md. - Run - Once we have written our code and when we want to see if it works, we will hit the
Runbutton to execute it. - Terminal - Also known as the console, this is the right most window and where our code will be executed when we run it.
It is time to write some code!
Before we jump into making an adventure game, it is important that you have a very basic understanding of how to run Python code. So, it is now officially time to start writing some Python code!
- Note: If you have written Python code before, feel free to skip to What You Need to Know to Build a Game.
Hit the Run button at the top-center of your screen. You will see the terminal display the following:
> python3 main.py
>
The first line simply indicates that we would like to run the code that is present in the file main.py with Python. If this line is a bit confusing, do not worry about it.
The second line is the result of running our code. Since we have not written any code yet, there is nothing here yet.
Open main.py under the Files tab. main.py is where we will be writing all our code.
- Note: you can select the three dots to open the file in a new tab if you want switch back and forth between
main.pyandREADME.md.
Type type(“Hello world!”) below #### TYPE YOUR CODE BELOW HERE ####
Your code should now look like the following:
from story_engine import *

#### TYPE YOUR CODE BELOW HERE ####

type("Hello world!")Now, click Run!
Your terminal will now display the following:
> python3 main.py
Hello world!>
Congratulations! You have written your first line of Python code! You are now almost ready to start making our own text-based adventure game!
Before we start making a game, what do you need to know first?
What series of steps should a user expect when playing?
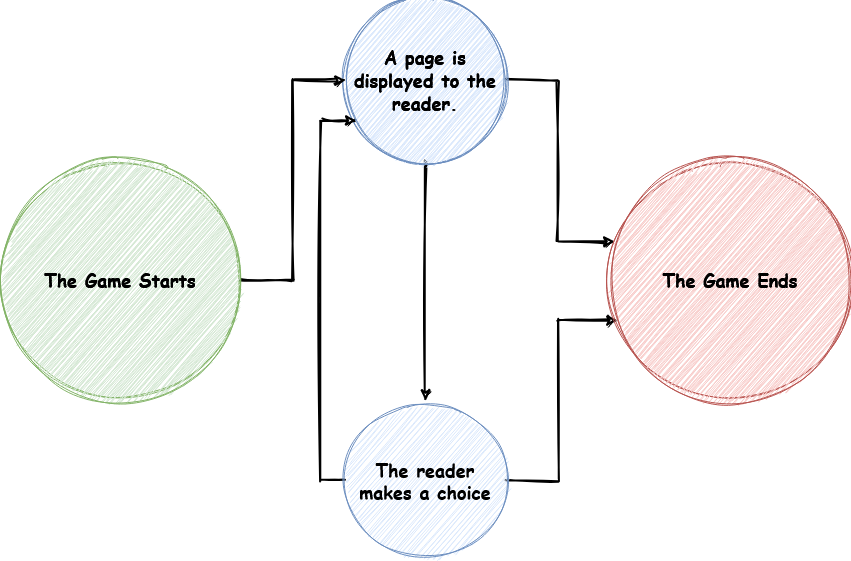
Before we dive into coding our adventure game, we need to take a moment to think about how a user will interact with our game. In the spirit of the classic Choose Your Own Adventure books, we will follow the exact same set of steps that a reader would experience with a physical Choose Your Own Adventure book:
- The reader starts at page 1.
- The reader will read the page.
- At the end of the page, they are faced with a choice.
- Based on the choice, they navigate to a new page number corresponding with the choice.
- Repeat steps 2 through 4 until they reach the end of the adventure.
This process can be visualized below in the flow chart (Figure c):
Figure 3: Flow chart representing user interactions.
Since we have an idea of how the game will flow, how do we actually build this?
What is a variable and why do we need it?
To build our game, we need to cover a few core concepts. One core concept we need to make our game is a variable. If you have ever taken a math class, you might already have an idea of what a variable is. For instance, in algebra you might recall seeing something like x = 6 and 2 + x = ??. From this, we can see that 2 + x = ?? evaluates to 2 + 6 = 8 by replacing the x in 2 + x = ?? with 6.
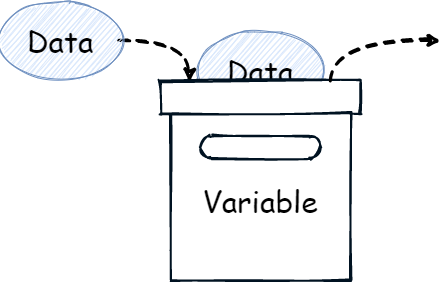
Variables in programming are very similar to this. A variable is a thing that you can use to store information and retrieve it to use later. You can essentially think of them as boxes that you can put data into and take data out of later.
Figure 4: Variables are kind of like storage boxes in programming.
To demonstrate this further, we will modify the code we wrote in Writing Your First Python Code.
Insert the line sentence = "This is a groovy sentence!" above type("Hello world").
This line is indicating that we would like to store "This is a groovy sentence!" in the variable sentence.
Replace "Hello world!" with sentence.
Your code should look like the following:
from story_engine import *

#### TYPE YOUR CODE BELOW HERE ####

sentence = "This is a groovy sentence!"

type(sentence)Click Run!
Your terminal will now display the following:
> python3 main.py
This is a groovy sentence!>
Congratulations, you have now learned how to use a variable!
What is a function and why do we need it?
Another core concept within programming we need to discuss is the concept of a function. At its core, a function is a set of instructions. Think of this kind of like a recipe. It a step-by-step instruction that a programmer gives to a computer. Functions typically look like [function name]([input]) where [function name] is some name to indentify the function and [input] is a value we can give the function to do something with (This can be a variable). For instance, say we were writing a function to tell a computer to add flour to a recipe, it might look like add(flour).
Thus, you can think of a function as something that takes an input and responds with an output.
Figure 5: A function takes an input and responds with an output.
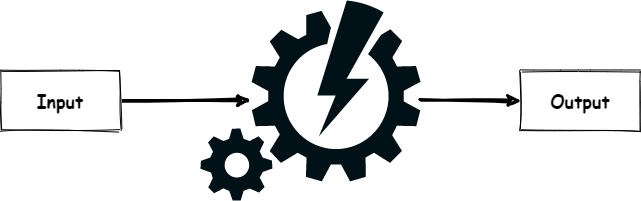
An example of a function you already know is type(text). As you can probably guess, type(text) tells the computer to type text into the terminal.
For our game, you will not need to create any functions of your own. I have already provided some that will make creating a game easier.
- Note: If you are curious, you can look at all of those functions in the
story_engine.pyfile.
Though we will not be making any functions, we will be using one primary function to make our adventure game which is story_flow(story). story_flow(story) is a function that will take an adventure game's story as input and go through the exact same steps described in How Will the User Interact with the Game?.
- It will start the user at page 1.
- The user will read the page.
- At the end of the page, they are faced with a choice.
- Based on the choice, they navigate to a new page number corresponding with the choice.
- Repeat steps 2 through 4 until they reach the end of the adventure.
However, how exactly will we format all these pages and choices in code?
How can we represent the story of an adventure game in code?
To give story_flow(story) a story, we need a way to format our adventure's story in code. To do that we will create a variable called story that will be used to store our entire adventure's story in.
The story variable's template will look somewhat like the following:
story = {
    #### START YOUR STORY HERE ####
    [page number]: {
        'Text': [
            "[line of text]",
            "[line of text]",
            "[line of text]",
        ],
        'Options': [
            ("[option]", [option page number]),
            ("[option]", [option page number]),
            ("[option]", [option page number]),
        ]
    },
    .
    .
    .
    #### END YOUR STORY HERE ####
}
At first glance, this might look complex, but if we take a moment to break everything down you will see how it is like how a Choose Your Own Adventure book is formatted. Everything surround by brackets [ ] is a value you need to fill in to create a story.
- [page number]
- This represents the page of the book as an integer value such as 1, 2, or 3.
- There can be as many pages as you want.
- [line of text]
- Represents a single line of text on a page.
- There can be as many lines of text as you want.
- Note: Should be surrounded by quotation marks.
- [option]
- Represents a decision that can be made.
- There can be as many decisions as you want.
- Note: Should be surrounded by quotation marks.
- [option page number]
- Represents the page that will be switched to when this decision is chosen.
- Note: the three vertical dots just represent more pages.
After we fill in all those values, our story will look something like the following:
- Note: only pages 1 and 10 are displayed. All the other pages will follow the same format
story = {
    #### START YOUR STORY HERE ####
    1: {
        'Text': [
            "This text will display before the user can make a choice.",
            "You can have as many lines of text as you want.",
            "Once it is finished typing, the user can then make a choice."
        ],
        'Options': [
            ("This is the first choice. It will take the user to page 2.", 2),
            ("This is the second choice. It will take the user to page 3.", 3),
        ]
    },
    .
    .
    .
    10: {
        'Text': [
            "This is the last page of the story.",
            "There is no decision that can be made from here.",
        ],
        'Options': [

        ]
    },
    #### END YOUR STORY HERE ####
}
In this example, the reader will start on page 1 where there are three lines of text. So, when a reader starts, they will first see those three lines on their screen like:
This text will display before the user can make a choice.
You can have as many lines of text as you want.
Once it is finished typing, the user can then make a choice.
Once those three lines are displayed, they will be followed by the two options. A reader can decide what option they would like to go with by typing in a number that corresponds to the options. A reader's screen at this point will look like the following:
This text will display before the user can make a choice.
You can have as many lines of text as you want.
Once it is finished typing, the user can then make a choice.

0.) This is the first choice. It will take the user to page 2.
1.) This is the second choice. It will take the user to page 3.

Please choose an option:
From there, depending on what choice the reader makes, they will go to either page 2 or 3. This process will continue until eventually the reader ends up on page 10.
On page 10, there are no decisions that can be made as there a no option lines. Thus, the story ends after the two lines of text are displayed.
If you do not 100% understand how this works, do not worry as we will be coming back to this concept in the next section.
Time to make a text-based adventure game!
We now have all the knowledge that we need to get started building our very own text-based adventure game!
Before diving into code, map out the story you want to make.
You might find it beneficial to map out your story first before turning it into code.
For the following set of instructions, I have gone ahead and created a flow chart that will represent the story of a simple adventure game in which a person wakes up and goes back to bed.
Figure 6: A flow chart of the game we will be making.
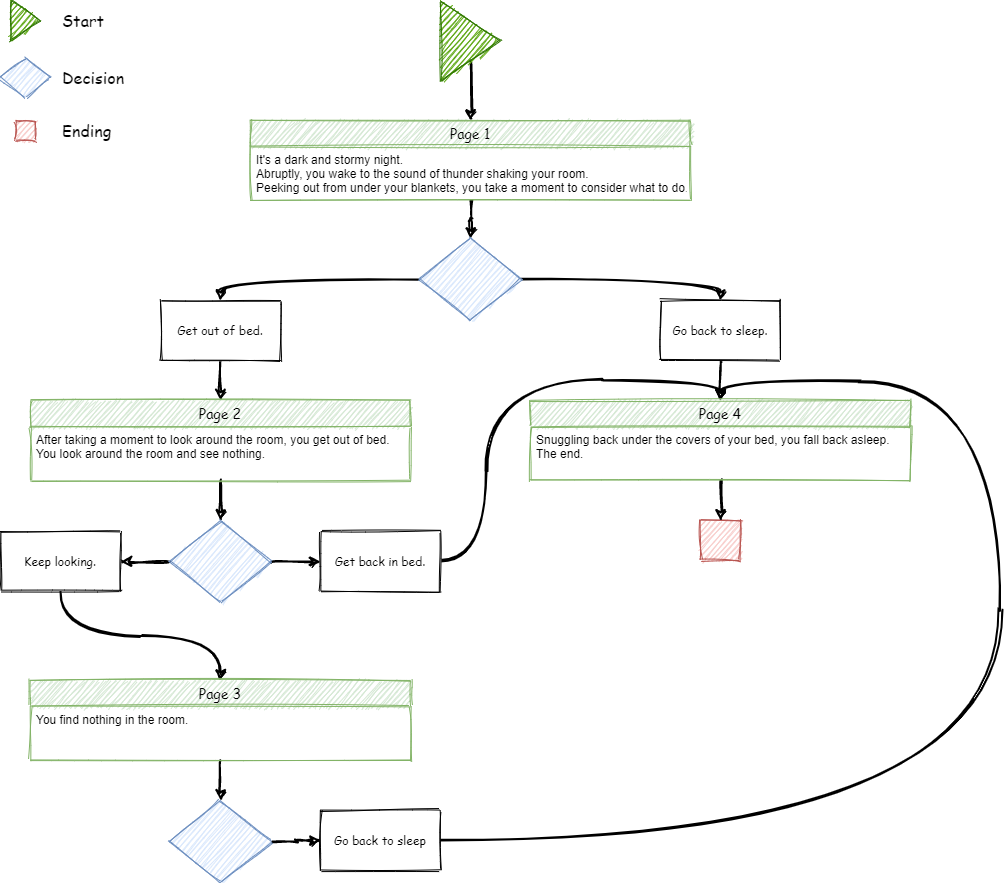
To get the hang of things, follow along and make this story in code; then, once you are comfortable making a story, you can come back, draw out your own story, and follow steps 1 through 8 below again with your own story.
Delete all code below #### TYPE YOUR CODE BELOW HERE ####
Copy the template from How do you Format an Adventure Game? to start creating our own story so that our code looks like the following:
from story_engine import *

#### TYPE YOUR CODE BELOW HERE ####

story = {
    #### START YOUR STORY HERE ####
    [page number]: {
        'Text': [
            "[line of text]",
            "[line of text]",
            "[line of text]",
        ],
        'Options': [
            ("[option]", [option page number]),
            ("[option]", [option page number]),
            ("[option]", [option page number]),
        ]
    },
    #### END YOUR STORY HERE ####
}Using the template, write your first page by replacing everything surrounded by brackets [ ] with the appriopriate information from our story's first page.
from story_engine import *

#### TYPE YOUR CODE BELOW HERE ####

story = {
    #### START YOUR STORY HERE ####
    1: {
        'Text': [
            "It's a dark and stormy night.",
            "Abruptly, you wake to the sound of thunder shaking your room.",
            "Peeking out from under your blankets, you take a moment to consider what to do.",
        ],
        'Options': [
            ("Get out of bed.", 2),
            ("Go back to sleep.", 4),
        ]
    },
    #### END YOUR STORY HERE ####
}Now that we have our first page, we can start adding more pages to our story.
To add more pages, we can simply insert a new line above #### END YOUR STORY HERE #### and copy and paste the following code from the template from above.
[page number]: {
    'Text': [
        "[line of text]",
        "[line of text]",
        "[line of text]",
    ],
    'Options': [
        ("[option]", [option page number]),
        ("[option]", [option page number]),
        ("[option]", [option page number]),
    ]
},
Thus, our code should look similar to the following:
from story_engine import *

#### TYPE YOUR CODE BELOW HERE ####

story = {
    #### START YOUR STORY HERE ####
    1: {
        'Text': [
            "It's a dark and stormy night.",
            "Abruptly, you wake to the sound of thunder shaking your room.",
            "Peeking out from under your blankets, you take a moment to consider what to do.",
        ],
        'Options': [
            ("Get out of bed.", 2),
            ("Go back to sleep.", 4),
        ]
    },
    [page number]: {
        'Text': [
            "[line of text]",
            "[line of text]",
            "[line of text]",
        ],
        'Options': [
            ("[option]", [option page number]),
            ("[option]", [option page number]),
            ("[option]", [option page number]),
        ]
    },
    #### END YOUR STORY HERE ####
}Fill in the information for page 2 so that our code looks like:
from story_engine import *

#### TYPE YOUR CODE BELOW HERE ####

story = {
    #### START YOUR STORY HERE ####
    1: {
        'Text': [
            "It's a dark and stormy night.",
            "Abruptly, you wake to the sound of thunder shaking your room.",
            "Peeking out from under your blankets, you take a moment to consider what to do.",
        ],
        'Options': [
            ("Get out of bed.", 2),
            ("Go back to sleep.", 4),
        ]
    },
    2: {
        'Text': [
            "After taking a moment to look around the room, you get out of bed.",
            "You look around the room and see nothing.",
        ],
        'Options': [
            ("Get back in bed.", 4),
            ("Keep looking.", 3),
        ]
    },
    #### END YOUR STORY HERE ####
}Repeat Step 4 and Step 5 but fill in the information with page 3 rather than page 2.
You code should now look like the following:
from story_engine import *

#### TYPE YOUR CODE BELOW HERE ####

story = {
    #### START YOUR STORY HERE ####
    1: {
        'Text': [
            "It's a dark and stormy night.",
            "Abruptly, you wake to the sound of thunder shaking your room.",
            "Peeking out from under your blankets, you take a moment to consider what to do.",
        ],
        'Options': [
            ("Get out of bed.", 2),
            ("Go back to sleep.", 4),
        ]
    },
    2: {
        'Text': [
            "After taking a moment to look around the room, you get out of bed.",
            "You look around the room and see nothing.",
        ],
        'Options': [
            ("Get back in bed.", 4),
            ("Keep looking.", 3),
        ]
    },
    3: {
        'Text': [
            "You find nothing in the room."
        ],
        'Options': [
            ("Get back in bed.", 4),
        ]
    },
    4: {
        'Text': [
            "Snuggling back under the covers of your bed, you fall back asleep."
            "The end.",
        ],
        'Options': [
        ]
    },
    #### END YOUR STORY HERE ####
}When you want your story to end, all you need to do is remove all options to go to other pages such that a page will look similar to this:
[page number]: {
    'Text': [
        "[line of text]",
        "[line of text]",
        "[line of text]",
    ],
    'Options': [

    ]
},
Thus, we will repeat Step 4 and Step 5 and fill in the appriopriate information for page 4. However, page 4 will not have any options.
Once you are finished filling page 4, you code should look like the following:
from story_engine import *

#### TYPE YOUR CODE BELOW HERE ####

story = {
    #### START YOUR STORY HERE ####
    1: {
        'Text': [
            "It's a dark and stormy night.",
            "Abruptly, you wake to the sound of thunder shaking your room.",
            "Peeking out from under your blankets, you take a moment to consider what to do.",
        ],
        'Options': [
            ("Get out of bed.", 2),
            ("Go back to sleep.", 4),
        ]
    },
    2: {
        'Text': [
            "After taking a moment to look around the room, you get out of bed.",
            "You look around the room and see nothing.",
        ],
        'Options': [
            ("Get back in bed.", 4),
            ("Keep looking.", 3),
        ]
    },
    3: {
        'Text': [
            "You find nothing in the room."
        ],
        'Options': [
            ("Get back in bed.", 4),
        ]
    },
    4: {
        'Text': [
            "Snuggling back under the covers of your bed, you fall back asleep."
            "The end.",
        ],
        'Options': [
        ]
    },
    #### END YOUR STORY HERE ####
}Finally, all we need to do to complete our text-based adventure game is add story_flow(story) after the end of the story variable.
Thus, your code should look like the following:
from story_engine import *

#### TYPE YOUR CODE BELOW HERE ####

story = {
    #### START YOUR STORY HERE ####
    1: {
        'Text': [
            "It's a dark and stormy night.",
            "Abruptly, you wake to the sound of thunder shaking your room.",
            "Peeking out from under your blankets, you take a moment to consider what to do.",
        ],
        'Options': [
            ("Get out of bed.", 2),
            ("Go back to sleep.", 4),
        ]
    },
    2: {
        'Text': [
            "After taking a moment to look around the room, you get out of bed.",
            "You look around the room and see nothing.",
        ],
        'Options': [
            ("Get back in bed.", 4),
            ("Keep looking.", 3),
        ]
    },
    3: {
        'Text': [
            "You find nothing in the room."
        ],
        'Options': [
            ("Get back in bed.", 4),
        ]
    },
    4: {
        'Text': [
            "Snuggling back under the covers of your bed, you fall back asleep."
            "The end.",
        ],
        'Options': [
        ]
    },
    #### END YOUR STORY HERE ####
}

story_flow(story)
Now it is time to run and test your adventure game!
Time to run your adventure game and make fixes.
Click Run!
Your terminal will now start the game from the flow chart above in Map Your Adventure Game's Story Out.
If you game does not run correctly, continue to the following step.
Otherwise, congratulations! You have made your own text-based adventure game!
If by chance you made an error in your code, it is important that you learn the basics of troubleshooting some simple errors that might arise.
Below are a few possible fixes to errors that might arise:
- Syntax Error
- You have forgotten to put quotations marks around lines of text and options.
- You have a different number of open and close brackets.
- Indentation Error
- You have used a mixture of tabs and spaces.
- You have not indented all lines in a block equally.
- Page Number Error
- If you game does not go to the correct page, check to make sure an option goes to the page it is supposed to.
Additionally, ensure that your code is exactly the same in format as the code provided above.
We have covered an exceptional number of concepts; we should take a moment to review what we have learned.
- You have learned what Python is.
- You have learned how to run code in a terminal.
- You have learned what a function is.
- You have learned what a variable is.
- You have learned how to format a story for text-based adventure.
- You have learned how to put all these concepts together.
Congratulations, you have learned a lot!
If you want to learn more about Python there are hundreds of great tutorials online. Below I have provided a few links to some great resources
- LearnPython.org (Interactive Python Tutorials)
- Coursera.org (Guided Python tutorials)
- CodeAcademy.com (Interactive Python Tutorials)
If you want to learn more about how everything works, feel free to look at story_engine.py. Though it looks rather complicated, it is actually quite simple.
Just take a moment to read through it line-by-line and try to understand exactly what is going. Even try modifying some of the code on your own to see what happen.
A big portion of learning how to code is experimentation and research. Try modifying the code and Googling code that might seem confusing.
Thank you for taking time to read this set of instructions! I hope that everything here helped you learn more about how to code and was a fun experience that you can take the skills learned forward.
Writing code is a valuable skill and will only become more valuable moving into the future. There is an exceptional amount of potential to use code to help positively impact the world. Though we only made a simple text-based adventure game, the skill learned can be used to create incredibly cool applications.
For instance, you could create an interactive application to teach someone a complex topic.
However, remember it is your reasonability to code ethically. Code can be turned malicious incredibly easily; thus, it is your responsibility to make sure you understand the consequences of your code before you share it with the world.
This set of instructions and graphics used are licensed under a CC BY-NC 4.0 License.
The source code is licensed under a MIT License.
Additionally, this project can be run on Repl.it.
Gebel, M. (2019, August). Video games and software famous tech CEOs made when they were young . Retrieved September 27, 2020, from Business Insider website: https://www.businessinsider.com/tech-ceos-software-young-zuckerberg-musk-gates-2019-8
Kraft, S. (1981, October 10). He Chose His Own Adventure. The Day. Retrieved from https://news.google.com/newspapers?id=_nUfAAAAIBAJ&sjid=XXUFAAAAIBAJ&pg=1663,2191360&dq=choose-your-own-adventure&hl=en
Lardinois, F. (2018, March 15). Repl.it lets you program in your browser. Retrieved September 27, 2020, from Tech Crunch website: https://techcrunch.com/2018/03/15/repl-it-lets-you-program-in-your-browser/
Venners, B. (2003, January 13). The Making of Python. Retrieved September 27, 2020, from artima website: https://www.artima.com/intv/python.html
Video Game History - Timeline & Facts - HISTORY. (n.d.). Retrieved September 27, 2020, from https://www.history.com/topics/inventions/history-of-video-games