This project contains several tools for creating image and video processing applications in Java. It combines FFMpeg, OpenCv, Python and TensorFlow into an interoperable Java system.
- What is this project?
- Introduction to the Project
- Prerequisites
- Jumping Right In
- Project Overview
- Image Processing
- Video Processing
- Building
- History
An introduction and overview of the project was presented to the Philly Java Users Group on Feb 22, 2023. It starts off at a very basic level so it should be easy for anyone that already knows Java to follow.
All of the code (and then some) walked through in the presentation can be found in the sister project pilecv4j-tutorials. The code for this presentation is in the subdirectory of the project at philly-jug-examples
Most dependencies will be picked up automatically from maven central but there are several to take note of.
- FFMpeg which probably needs no introduction if you're on this page.
- Python. In this case you'll need the development libraries installed for Python3 and also numpy installed into the python environment you'll be building in.
Note: You shouldn't need OpenCV installed since there is a pre-built OpenCV bundled in a jar file that will be automatically picked up as a dependency.
For the full code of this example, see: Pilecv4j Tutorial 0 Simple Example code
Here is a simple example to get started. We'll write java code that plays a video. To use the video processing include the following in your project (or the gradle equivalent).
    <dependency>
      <groupId>ai.kognition.pilecv4j</groupId>
      <artifactId>lib-ffmpeg</artifactId>
      <version>1.0</version>
    </dependency>
You'll also need the platform specific native libraries. For linux you can use:
    <dependency>
      <groupId>ai.kognition.pilecv4j</groupId>
      <artifactId>native-ffmpeg-${platform}</artifactId>
      <classifier>bin</classifier>
      <version>1.0</version>
    </dependency>
The currently supported platform values include: linux-x86_64 , windows-x86_64 and aarch64
You will need a video file to work with, or you can use a live stream from an RTSP camera or even your webcam (see the Note below the example).
The following is a simple example that will play display the video to a window (note, there is no audio processing in the library).
For the purposes of this example we'll assume there's a video file at /tmp/test-video.mp4 and TEST_VIDEO is set to that string.
        // Most components are java resources (AutoCloseables)
        try(

            // We will create an ImageDisplay in order to show the frames from the video
            ImageDisplay window = new ImageDisplay.Builder()
                .windowName("Tutorial 1")
                .build();

            // create a StreamContext using Ffmpeg2. StreamContexts represent
            // a source of media data and a set of processing to be done on that data.
            final MediaContext sctx = Ffmpeg.createMediaContext(TEST_VIDEO)

                // Tell the decoding that, if you need to convert the color anyway,
                // you might as well convert it to BGR rather than RGB.
                .preferBgr()

                // We are simply going to pick the first video stream from the file.
                .selectFirstVideoStream()

                // Then we can add a processor. In this case we want the system to call us
                // with each subsequent frame as an OpenCV Mat.
                .processVideoFrames(videoFrame -> {

                    // we want to display each frame. PileCV4J extends the OpenCV Mat functionality
                    // for better native resource/memory management. So we can use a try-with-resource.
                    try(CvMat mat = videoFrame.bgr(false);) { // Note, we want to make sure the Mat is BGR
                        // Display the image.
                        window.update(mat);
                    }

                })
                // play the media stream.
                .play();

        ) {}
Note: to use a webcam on Linux you can instantiate the MediaContext using Ffmpeg.createMediaContext("v4l2", "/dev/video0") or whatever device your webcam is.
1. lib-image
lib-image contains the main image processing routines and OpenCv functionality. It contains some decent general purpose classes but also some more esoteric implementations that might be hard to find in other places. When using the Java API for OpenCv with video you are very likely to run into memory problems. This is because the management of OpenCv's native, off-heap (off of the Java heap management), memory is done using Java's finalizers. Garbage collection in Java doesn't track off-heap memory and so when processing video you quickly run out of system memory. This library, among many other things, augments OpenCv's Java API to use Java AutoCloseables.
2. lib-ffmpeg
lib-ffmpeg contains video processing capability. A short list of capabilities include:
1. Connecting to streaming as well as file based video sources.
2. Decoding video frames and receiving them in your Java code as OpenCv Mat's.
3. Remuxing any input to any output.
4. Encoding raw frames back to both streaming and file endpoints
3. lib-python
Because many deep learning systems use Python (e.g. PyTorch), lib-python allows you to use these frameworks from your Java code.
4. lib-ipc
This is an extension of system IPC functionality for "shared memory" for use from Java and specifically geared toward passing Mats between processes. It has three different implementations:
1. Posix Shared Memory - this is the default on Linux
2. System V Shared Memory - optionally, this can be selected on Linux platforms
3. Windows - this is the only implementation available on Windows since Windows doesn't support Posix or System V.
5. lib-tf
lib-tf is a small and lightweight simple wrapper for Google's Tensorflow that ties it into the remaining libraries here so you can easily use Tensorflow with images from lib-image and (therefore) video frames from lib-ffmpeg.
6. lib-nr
lib-nr is an implementation of Powell's method. As a simple example of how to use this library, you pass a function to be minimized to a Minimizer. Suppose I wanted to minimize the simple polynomial (x-2)^2 - 3. In this case, it's obvious the minimum is at [2, -3] but if we wanted to use the Minimizer to determine that we would pass the function to the minimizer and kick it off with an initial value as follows (Note: The spelling error in getFinalPostion is in version 1.0 but will be deprecated and fixed going forward.):
        final Minimizer m = new Minimizer(x -> ((x[0] - 2.0) * (x[0] - 2.0)) - 3.0);

        final double minVal = m.minimize(new double[] { -45.0 });
        final double minParam = m.getFinalPostion()[0];

        assertEquals(-3.0, minVal, 0.0001);
        assertEquals(2.0, minParam, 0.0001);
Powell's method is actually implemented using the algorithm from Numerical Recipes in C and called using JNA. It currently isn't thread safe but from Java there's a global lock to prevent multiple simultaneous entries. Contributions welcome.
7. lib-util
You probably don't need to worry about lib-util. lib-util is a library with some utilities used by the other projects here that are primarily helpers for managing access to native code bases.
8. lib-tracker
This is a bit of an oddity but it's basically an abstraction for object tracking in video with several OpenCv implementations.
In OpenCV's C/C++ API, the developer is responsible for managing the resources. The Mat class in C++ references the underlying memory resources for the image data. When a C++ Mat is deleted, memory is freed (that is, as long as other Mat's aren't referring to the same image data memory, in which case when the last one is deleted, the memory is freed). This gives the developer using the C++ API fine grained control over the compute resources.
OpenCv's Java Mat's manage native resource and rely on the class' finalizer and therefore the garbage collector, to eventually clean up those resources. This includes the raw image data. The problem with doing this is that the Java VM and it's garbage collector can't see the image memory referred to by the Mat. This memory is "off-heap" from the perspective of the Java VM.
lib-image is an augmentation for OpenCv's Java API. It's primary purpose is to allow the user to handle OpenCv Mats as Java resources (that is AutoCloseables).
Here is an example of loading an image from disk using OpenCV's api but handling the results as a Java resource.:
// A CvMat is an OpenCV Mat.
try(final CvMat mat = CvMat.move(Imgcodecs.imread(IMAGE_FILE_NAME, Imgcodecs.IMREAD_UNCHANGED));) {
    // Do something with the loaded mat. For example, flip it around the X axis:
    Core.flip(mat, mat, 0);
} // <- At this point all of the mat resources will be freed.
  // It wont wait for the garbage collector and finalizer.
A CvMat is a Pilecv4j class that inherits from OpenCv's Mat so it can be used directly in any OpenCv API method.
The CvMat.move() method conceptually follows the C++ move semantics. In short this mean DO NOT try to use the instance that was passed to CvMat.move() after the call.
What if I want to return a CvMat from inside of a try-with-resource block? You can use the CvMat.returnMe() method. This method should ONLY be used on the very line you're actually returning the CvMat.
public CvMat getFlippedMat(final String filename) {
    try(final CvMat mat = CvMat.move(Imgcodecs.imread(IMAGE_FILE_NAME, Imgcodecs.IMREAD_UNCHANGED));) {
        // Do something with the loaded mat. For example, flip it around the X axis:
        Core.flip(mat, mat, 0);
        return mat.returnMe();
    } // <- At this point all of the mat resources will be freed.
      // It wont wait for the garbage collector and finalizer.
}
There are some helper methods that allow you to easily make shallow or deep copies of Mats.
public CvMat copyMe(Mat src, boolean deepCopy) {
    try (CvMat ret = deepCopy ? CvMat.deepCopy(src) : CvMat.shallowCopy(src);) {
        return ret.returnMe();
    }
} Pilecv4j also provides a means of accessing a Mat's pixel data directly as a Java ByteBuffer. You do this with the CvMat.bulkAccess* call.
Note: doing pixel operations from Java is not efficient. You should look to apply OpenCv operations to your data instead.
Here's an example:
    Mat mat = ....;
    CvMat.bulkAccess(mat, (ByteBuffer pixelData) -> {
        // do something with/to the pixel data
        ...
    });
If you want to return a value from your lambda you can use CvMat.bulkAccessOp.
    Mat mat = ....;

    var result = CvMat.bulkAccessOp(mat, (ByteBuffer pixelData) -> {
        // do something with/to the pixel data
        ...
        return something;
    });
Note, you can return the actual ByteBuffer (e.g. ByteBuffer result = CvMat.bulkAccessOp(mat, bb -> bb);) but you'll be responsible for making sure the data survives your use.
As seen in the example and quick start, there's a handy ImageDisplay.
    try (ImageDisplay display = new ImageDisplay.Builder().build();) {
        display.update(mat);
    }
ImageDisplay is very basic and not really meant for developing sophisticated Java based GUIs, but it does support some rudimentary event handling. You can set a callback for:
- select when someone clicks in the display. The callback should return a
booleantelling the display whether or not toclose. Returningtruewill close the display.
    builder.selectCallback((Point pointClicked) -> {
        ...
        return shouldIClose;
    });
Note: This callback is ignored when using OpenCV's HighGUI implementation which is the default.
- key press when someone types while in the display. Again, returning
truewill cause the window to close.
    builder.keyPressHandler((int key) -> {
        ...
        return shouldIClose;
});- close you can set this callback to be notified when the window closes. It's just a Java
Runnable
builder.closeCallback(() -> {...});The default implementation of the ImageDisplay is OpenCV's HighGUI but there's also two flavor's of Eclipse SWT. A resizable window which will stretch the image to fit the window when it changes or a scrollable window which will add scroll bars when the image is larger than the display area.
    try (ImageDisplay display = new ImageDisplay.Builder()
        .implementation(Implementation.SWT)
        .build();) {
            ...
    }
The implementation can be:
- HIGHGUI - This is the default
- SWT_SCROLLABLE - A display with scrollbars when the image is larger than the display area
- SWT_RESIZABLE - A display that rescales the image to fit the display area
- SWT - this defaults to
SWT_SCROLLABLE
If you're going to use the SWT implementation you need to explicitly add the dependency to your project.
  <dependency> <!-- Used for the SwtImageDisplay -->
    <groupId>${swtgroup}</groupId>
    <artifactId>${swtartifact}</artifactId>
    <version></version>
  </dependency>

  <repositories>
    <repository>
      <id>maven-eclipse-repo</id>
      <url>http://maven-eclipse.github.io/maven</url>
    </repository>
  </repositories>
Newer versions of SWT need to be manually installed into your maven repository after being downloaded from https://download.eclipse.org/eclipse/downloads/
swtartifact and swtgroup is platform specific. For 64-bit Linux swtartifact is org.eclipse.swt.gtk.linux.x86_64. For 64-bit Windows it's org.eclipse.swt.win32.win32.x86_64 and for Aarch64 it's org.eclipse.swt.gtk.linux.aarch64. For swtgroup it's org.eclipse.swt for all supported platforms except Aarch64 where it's org.eclipse.platform.
The Utils class has several methods for translating back and forth between Java's BufferedImages and OpenCV Mats. There is an attempt to preserve as much information as possible from the source images. For example, if the source image of a translation from a BufferedImage to a Mat has 5 16-bit channels, then the resulting Mat will have 5 16-bit channels.
Note: Currently translating color images from Mat to BufferedImage only works with Mats of 8-bit depth.
Pilecv4j can read a wider range of images than OpenCV can directly. It can often preserve more of the source information in the resulting Mat. If you use Pilecv4j's ImageFile to read images from disk into a CvMat (see ImageFile.readMatFromFile), it will go through a series of fallbacks in the case that OpenCV's Imgcodecs.imread fails to read the file. The main fallback is to attempt to read the image using javax.imageio with an ordered set of third party (followed by built-in) ImageReaders.
There's a custom MJPEGWriter which can take a series of JPG images and dump them into a playable .avi file.
Note: MJPEGWriter is based on jpegtoavi.c which carries a different license than the rest of Pilecv4j
- Generalized Hough Transform - The package
ai.kognition.pilecv4j.image.houghspacecontains code for a Generalized Hough Transform - 3D Gradient Calculation -
Operations.gradientwill calculate the gradient of a 1 channel image. The results will include 3 images. The gradient magnitude in the x-axis direction in a 16-bit signed image, the gradient magnitude in the y-axis direction in a 16-bit signed image, and an 8-bit unsigned image that represents the gradient direction, with 0 being up and 127 being down.
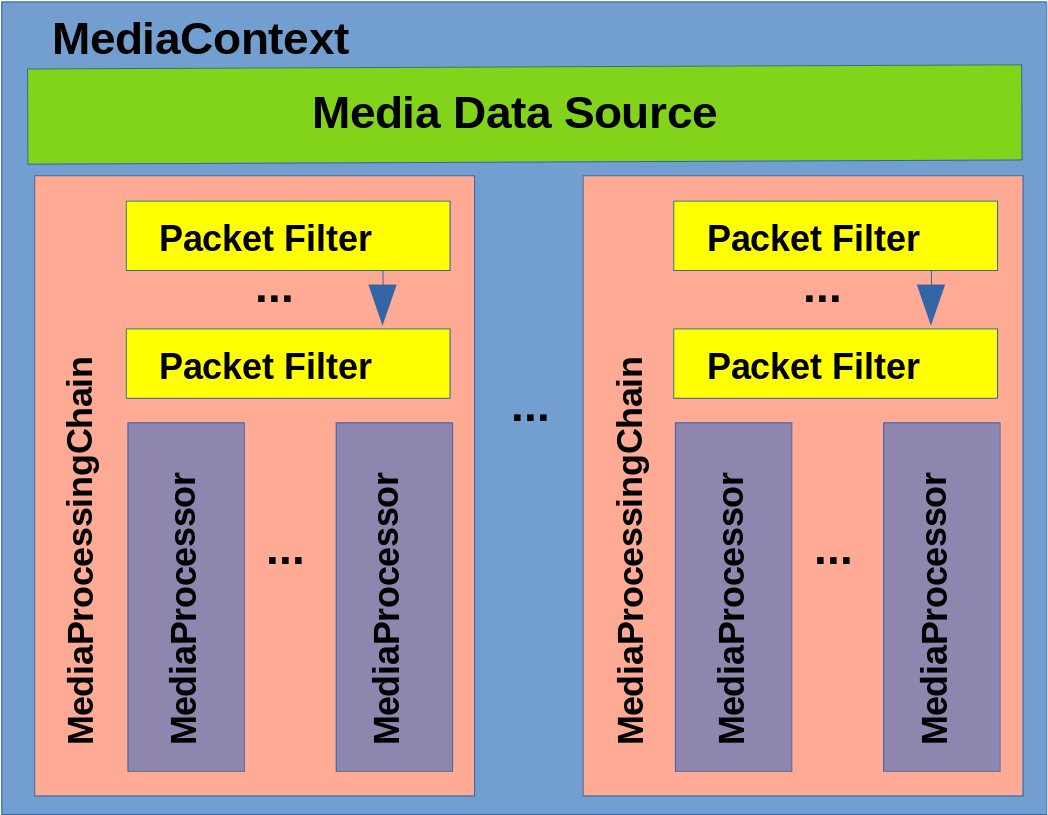
To process a source of media data you construct a MediaContext, declare the source of media data, and define a set of processing chains to process the media.
A MediaContext represents the coupling of an input source to a set of processing on the media streams in that source. It's also a builder for declaring the media source and that processing to be done.
Fig 1.
A MediaContext is a Java resource so we should manage it using a try-with-resource
    try (final MediaContext mctx = Ffmpeg.createMediaContext()
...A MediaContext needs exactly one source of media data. There are two supported types of media data sources.
The first is a simple URI based data source which is defined through MediaContext.source(String). This is the same as the -i option passed to the ffmpeg command line.
    try (final MediaContext sctx = Ffmpeg.createMediaContext()
        .source("[media uri]")
        ...
Note, in the simple example, there is a convenience method that will allow this to be done in one step, but under the covers you're creating MediaContext and adding a media source.
    try (final MediaContext sctx = Ffmpeg.createMediaContext("[media uri]")
        ...
The second type of media data source is a custom data source, where you can supply raw media stream data dynamically. Using this source of media data you could, for example, play an MP4 file out of system memory.
You do this by supplying a MediaDataSupplier callback and optionally a MediaDataSeek callback. These will be called by the system in order to fetch more data or, when a MediaDataSeek is supplied, move around the current position in the stream.
    try (final MediaContext sctx = Ffmpeg.createMediaContext()
        .source( (ByteBuffer buf, int numBytes) -> {
            // you need to respond to this callback by filling the byte buffer with *up to*
            // the `numBytes` requested
            ...
            buf.put(/* put data in the byte buffer */...);
            return numOfBytesAddedToBuffer;
        })
        ...
Again, there is a convenience method that allows you to pass these directly to MediaContext.createMediaContext(...).
If the underlying source of data is seekable, you can also supply an implementation of MediaDataSeek.
    try (final StreamContext sctx = Ffmpeg.createStreamContext()
        .createMediaDataSource(
            // MediaDataSupplier
            (ByteBuffer buf, int numBytes) -> {...},

            //MediaDataSeek
            (final long offset, final int whence)) -> {
                /* move the current position in the data stream */
                /*    to the location implied in the parameters */
                ...
            })
        ...
The values for whence that will be passed to the callback will be either Ffmpeg.SEEK_SET, Ffmpeg.SEEK_CUR, or Ffmpeg.SEEK_END. These values are synonymous with the C language stdio parameters to the function fseek(). From the man page:
The [...] function sets the [...] position indicator for the stream [...]. The new position, measured in bytes, is obtained by adding offset bytes to the position specified by whence. If whence is set to SEEK_SET, SEEK_CUR, or SEEK_END, the offset is relative to the start of the file, the current position indicator, or end-of-file, respectively.
To process media data you need to add at least one MediaProcessingChain using the chain(String) on the MediaContext.
    try (final MediaContext sctx = Ffmpeg.createMediaContext()
        .source("[media uri]")
        .chain("default")
        ...
The string passed to chain can be anything you want and is simply for disambiguation later on. You can re-open any given chain by passing the same string to the chain call again.
A MediaProcessingChain contains zero or more PacketFilters and one or more MediaProcessors.
Since sources for media data, for example, an MP4 file, contain multiple streams (video streams, audio streams, subtitle streams, data streams). A series of PacketFilters determines which packets from which streams are going to be processed in this MediaProcessingChain.
The simplest packet filter currently available is one that will simply take the first decodable video stream in the source and pass all of those packets. To use this selector in your chain you call selectFirstVideoStream() on an open chain:
    try (final MediaContext sctx = Ffmpeg.createMediaContext()
        .source("[media uri]")
        .chain("default")
        .selectFirstVideoStream()
        ...
You can supply a more sophisticated packet filtering criteria by supplying a callback that will be passed the details of each stream and needs to return true if the stream is to be processed; false otherwise.
    try (final MediaContext sctx = Ffmpeg.createMediaContext()
        .source("[media uri]")
        .chain("default")
        .selectStreams((StreamDetails[] details, boolean[] selection) -> {
           // use the stream details and fill out the selection array with `true`
           // where you want to process the coresponding stream
        })
        ...
If you don't supply a PacketFilter then all packets from all streams in the media source will be passed on to the processors.
Finally we need to decide what we want to do with the media data that's been selected in this chain. We do that by adding a set of (at least one) MediaProcessors to the chain. There are currently two different processor types that can be added to a chain.
The first is a remuxer that will remux the selected input stream to a given output destination.
    try (final MediaContext sctx = Ffmpeg.createMediaContext()
        .source("[media uri]")
        .chain("default")
        .selectFirstVideoStream()
        .remux(Muxer.create(DESTINATION_URI))
        ...
where the DESTINATION_URI is a string pointing to any output supported by ffmpeg including a file or a stream. When pointing to a stream you can explicitly define the format to use. For example:
       ...
       .remux(Muxer.create("flv", "rtmp://myhost:1935/live..."))
       ...
The second type of MediaProcessor provides access to video frames from the selected video feeds. You supply a callback that will be given VideoFrames.
    try (final MediaContext sctx = Ffmpeg.createMediaContext()
        .source("[media uri]")
        .chain("default")
        .selectFirstVideoStream()
        .processVideoFrames((VideoFrame frame) -> {
           // do something with the video frame
        })
        ...
A VideoFrame is a CvMat and so is also an OpenCV Mat and therefore can be used in any OpenCV Java API that supports Mat's. It's also coupled with a flag that tells if the color format of the data in the Mat is BGR, which is the OpenCV standard, or RGB, which is pretty much everyone else's standard. The underlying media source does the least amount of conversion necessary but will prefer RGB over BGR because most non-OpenCV (most deep learning models for example) prefer that format. However, there are a few convenience methods for handling this:
    ...
    .processVideoFrames((VideoFrame frame) -> {
        try (CvMat bgrMat = frame.bgr(false);) {
            // do something with the BGR mat
        }
    })
    ...
Once the chain is defined with at most one MediaContext and at least one MediaProcessor, you need to return the original StreamContext which effectively closes the chain's setup.
    try (final MediaContext sctx = Ffmpeg2.createMediaContext()
        .source("[media uri]")
        .chain("default")
        .selectFirstVideoStream()
        .processVideoFrames((VideoFrame frame) -> { ... })
        .mediaContext()
        ....); {
    }
You can define additional chains if you want.
Ultimately you'll need to start the processing by calling play() on the configured MediaContext. The Short Example puts it all together.
You can also you the library to encode videos and video streams. The first thing you need to do is define an EncodingContext. As with the MediaContext the EncodingContext is a Java resource and therefore should be managed with a try-with-resource
    try (final EncodingContext ectx = Ffmpeg.createEncoder()
    ...
First you need to define where the media data is going. You do this using the muxer method.
    try (final EncodingContext ectx = Ffmpeg.createEncoder()
        .muxer(Muxer.create(OUTPUT_FILE_OR_STREAM_URI))
        ...
You can also explicitly define the format. This is often necessary for streaming output like sending the encoded data to an rtmp server. As an example:
    try (final EncodingContext ectx = Ffmpeg2.createEncoder()
        .muxer(Muxer.create("flv", "rtmp://myhost:1935/live..."))
...You need to select at least one encoder to add to the context. You can do that with the method openVideoEncoder as follows:
    try (final EncodingContext ectx = Ffmpeg2.createEncoder()
        .muxer(Muxer.create(OUTPUT_FILE_OR_STREAM_URI))
        .videoEncoder("libx264", "my encoder")
        ...
The first parameter is the name of an FFMpeg support encoder. The second parameter is an arbitrary name to distinguish multiple encoders. There's a convenience method that takes just one parameter and set the name and codec to the same value.
        ...
        .videoEncoder("libx264")
        ...
You can fine tune the parameters for the codec using addCodecOption. You can add as many options as you want. These options are often codec specific and documented in the Ffmpeg documentation.
    try (final EncodingContext ectx = Ffmpeg2.createEncoder()
        .muxer(OUTPUT_FILE_OR_STREAM_URI)
        .videoEncoder("libx264")
        .addCodecOptions("preset","slow")
        .addCodecOptions("crf", "40")
        ...
You should set the encoder's frame rate explicitly using setFps. If you don't it will default to 30.
    try (final EncodingContext ectx = Ffmpeg2.createEncoder()
        .muxer(OUTPUT_FILE_OR_STREAM_URI)
        .videoEncoder("libx264")
        .setFps(10)
        ...
You need to initialize (enable) the encoder with the appropriate details of what the encoder will see and should produce. This should be done AFTER all of the addCodecOptions are applied. Once the encoder is "enabled" it will fail if you try to add more options.
Enabling the encoder applies the options and sets up the transform necessary to convert the input to the output. The main enable call takes the following:
enable(final boolean isRgb, final int inputImageWidth,
       final int inputImageHeight, final int inputImageStride,
final int destWidth, final int destHeight)- isRgb - this should be true if the input
Mats will be RGB. If BGR, it should be false., - inputImageWidth - the width of the input images
- inputImageHeight - the height of the input images
- inputImageStride - the stride (the number of bytes in a row including the padding) of the input images.
- destWidth - the width of the encoded video's frames
- destHeight - the height of the encoded video's frames
There are several convenience methods that take a Mat and will assume the input and output dimensions are the same. The enable with the shortest signature is:
enable(final Mat mat, final boolean isRgb)This call will assume the mat is a frame from the input and use those dimensions. It will also assume that the input and the output are the same. There are several other overloaded enable methods. See the javadocs for more details.
Once each of the VideoEncoders are enabled, the EncodingContext can be told using the ready() method.
After that you can start sending frames to the encoder using the encode() method.
    Mat firstFrame = ...;
    try (final EncodingContext ectx = Ffmpeg.createEncoder()
        .muxer(OUTPUT_FILE_OR_STREAM_URI)
        .videoEncoder("libx264", "my encoder")
        .addCodecOptions("preset","slow")
        .addCodecOptions("crf", "40")
        .setFps(10)
        .enable(firstFrame, false);)
    {
        ectx.ready();

        VideoEncoder encoder = ectx.getVideoEncoder("my encoder");
        for (int i = 0; i < numberOfFrames; i++) {
            Mat frameToEncode = getImageToEncode(i);
            encoder.encode(frameToEncode);
        }
}See Prerequisites and make sure they're all installed.
To build this you will need to have built OpenCV using pilecv4j-opencv-packaging. The directory where pilecv4j-opencv-packaging installed the build should contain, in a subdirectory somewhere, the CMake configuration file, OpenCVModules.cmake. The exact location of this file will depend on what version of OpenCV you're building. For example, for OpenCV 4.0.0, the file is at [install-location]/x64/vc15/staticlib on Windows and [install-location]/lib/cmake/opencv4 on Linux. You need to supply this location to the build via the OpenCV_DIR environment variable. See the example below.
On Windows, under MSYS, an example of the command line to build this looks like
OpenCV_DIR=/c/utils/opencv4.0.1/x64/vc15/staticlib mvn -Dgenerator="Visual Studio 15 2017" clean install
It grew out of an old project from 2004. Details of that old project can be found at S8 and the still working image processing code can be found in the separate github repository s8.
In brief the original project was my attempt to convert my parents library of legacy super-8 mm film to DVD. I have actually got this working and have scanned several 400 foot rolls of film. See the above link for details.