A tutorial to automate your monthly Dollar-Cost Averaging. Code write-up can be found here https://medium.com/@joash.k/how-to-automate-your-dca-investment-strategy-using-python-b9c1abb432ea.
Table of contents generated with markdown-toc
This application is mainly a tutorial to automate your MONTHLY Dollar-Cost Averaging tasks. This program is written in Python.
I have included the basic code to showcase how to place order with mainly these 4 brokers: TD Ameritrade, Interactive Brokers, Tiger Brokers and MooMoo.
Dollar-cost averaging (DCA) is an investment strategy in which an investor divides up the total amount to be invested across periodic purchases of a target asset in an effort to reduce the impact of volatility on the overall purchase. The purchases occur regardless of the asset's price and at regular intervals. (From Investopedia)
Auto-DCA
├── logs/                    # Orders placed will be logged in this folder
├── .gitignore               # Specify private files to not push onto GitHub
├── app.py                   # Main entry point of the application
├── broker.py                # Abstract Class Broker
├── config.py                # Private configurations used to control the application
├── config_template.py       # Template for config.py
├── ibkr.py                  # Subclass of Broker - Implementation for interacting with Interactive Brokers
├── moomoo.py                # Subclass of Broker - Implementation for interacting with MooMoo
├── td.py                    # Subclass of Broker - Implementation for interacting with TD Ameritrade
├── tiger.py                 # Subclass of Broker - Implementation for interacting with Tiger Brokers
├── requirements.txt         # Specify libraries that the application uses
├── rsa_private_key.pem      # Private Key for Tiger Brokers
├── rsa_public_key.pem       # Public Key for Tiger Brokers
├── LICENSE
└── README.md
This is written and tested with Python3.
- Set-up your respective broker, refer below Broker Specifc Set-Up.
- Clone the repo
git clone https://github.com/Joash-JW/Auto-DCA.git - Install the necessary python libraries, but feel free to leave out libraries that you do not need.
Optional libraries:
pip install -r requirements.txtfutu-api # for MooMoo tigeropen # for Tiger brokers
First ensure that you have filled in your configurations in config.py, then run the following:
python app.py
❗ Note: TD Ameritrade does not allow paper trading via their API, paper trading is only allowed in thinkorswim.
Most of the steps are similar to https://www.reddit.com/r/algotrading/comments/c81vzq/td_ameritrade_api_access_2019_guide/ as I referenced it when developing this application.
-
Register an account here https://developer.tdameritrade.com/
-
Create an application in My Apps page

-
Fill in the app details, but use http://localhost for the Callback URL
-
Once completed, note down the Consumer Key of your app as it goes into
config['TD_CONSUMER_KEY'] -
The next few steps are to obtain your Authorization Code as shown in https://developer.tdameritrade.com/content/simple-auth-local-apps
-
Replace the following part of the URL in { brackets } with your Consumer Key
-
Hit Enter after placing in your Consumer Key in the URL shown in Step 6 and it will redirect you to this page

-
Log In to your TD Ameritrade Account (NOT your TD Ameritrade Developer Account) and click Allow
-
After the above step, you will see a "This site can’t be reached" and this is EXPECTED
-
Copy the code parameter of the URL on this page,
https://localhost/?code=<COPY THIS> -
Do a URL Decode of the above step, and this will be your
config['TD_CODE'] -
Go to this site https://developer.tdameritrade.com/authentication/apis/post/token-0, fill in the Body Parameters and hit Send.
grant_type: authorization_code (type in exactly authorization_code) refresh_token: (leave this blank) access_type: offline (type in exactly offline) code: (fill in your decoded code from Step 11) client_id: {CONSUMER_KEY}@AMER.OAUTHAP (replace {CONSUMER_KEY} with your Consumer Key) redirect_uri: http://localhost -
You will see "HTTP/1.1 200 OK" response if successful, and it will contain access_token and refresh_token. These goes into
config['TD_ACCESS_TOKEN']andconfig['TD_REFRESH_TOKEN']respectively -
Set-up complete!

Refer to their official guide on creating a paper account https://www.interactivebrokers.com/en/software/ptgstl/topics/papertrader.htm
- Download TWS API from here https://interactivebrokers.github.io/
- You will also need to download TWS or IB Gateway which can be found here https://www.interactivebrokers.com/en/trading/ib-api.php
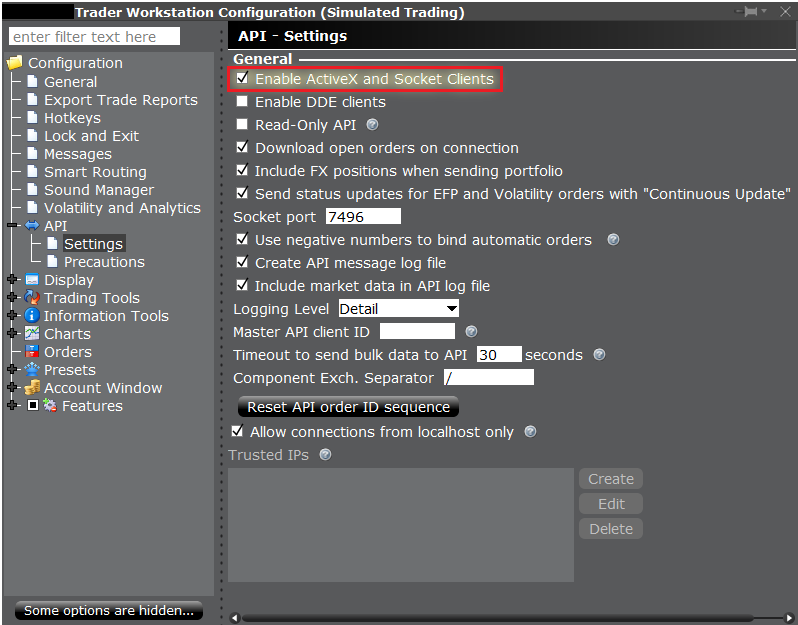
- Configure the settings as follows (from Interactive Brokers official documentation)
- Note down the Port number, default is 7496 for live (TWS), 7497 for paper (TWS), 4001 for live (IB Gateway) and 4002 for paper (IB Gateway). This number also goes into
config['IBKR_PORT'] - Fill in your choice of Master API client ID. This number goes into
config[IBKR_ID] - Navigate to your TWS API (for me, it is
C:\TWS API\source\pythonclient) and runpython setup.py install - Set-up complete! Make sure TWS or IB Gateway is running before running the application.
-
Generate your private and public key. ❗ Note: generated key needs to be in 1024 bits
Command to generate private key:
openssl genrsa -out rsa_private_key.pem 1024Command to generate public key:
openssl rsa -in rsa_private_key.pem -pubout -out rsa_public_key.pemTo install OpenSSL, for MacOS users:
brew install openssl, Linux users:sudo apt-get install openssl, and for Windows users, the least hassle way I found is to use git bash. -
Go to https://quant.tigerfintech.com/?locale=en-us#developer
Verification code: (enter the code being sent to you after clicking 'Get verification code')
IP whitelist: (leave this blank)
Public key: (Paste your public key here, you can open the public key file using Notepad)
Callback URL: (leave this blank)
-
Once completed you should see the page below. tiger_ID goes to
config['TIGER_ID'], and Account ID/Paper account goes toconfig['TIGER_ACCOUNT']
-
Set-up complete!
-
Download FutuOpenD from https://www.moomoo.com/download/ > OpenAPI > FutuOpenD
-
Install FutuOpenD, you can choose between the command line or the GUI version but for this tutorial I chose the GUI version
-
Launch FutuOpenD and you will see the page below. Ensure the IP and Port corresponds to
config['MOOMOO_IP']andconfig['MOOMOO_PORT']respectively. -
Log In to your moomoo account.
-
Set-up complete! Make sure FutuOpenD is running before running the application.

- https://developer.tdameritrade.com/content/getting-started
- https://www.reddit.com/r/algotrading/comments/c81vzq/td_ameritrade_api_access_2019_guide/
- https://medium.com/@fotiosdotcom/interactive-brokers-api-setup-ba87c73e7b6c
- https://interactivebrokers.github.io/tws-api/
- https://quant.itiger.com/openapi/zh/python/quickStart/prepare.html
- https://openapi.moomoo.com/futu-api-doc/en/quick/opend-base.html