This repository contains information about basics of Kubernetes and the resources definition files of the most common Kubernetes resources.
- Containers are completely isolated environments that can have their own processes, services, Network Interfaces and mounts just like VM's except that they share the same OS kernel
- Containers are an executable unit of software in which application code is packaged, along with its libraries and dependencies, in common ways so that it can be run anywhere, whether it be on desktop, traditional IT, or the cloud.
- To do this, containers take advantage of a form of operating system (OS) virtualization in which features of the OS (in the case of the Linux kernel, namely the namespaces and cgroups primitives) are leveraged to both isolate processes and control the amount of CPU, memory, and disk that those processes have access to.
Containerzation Explained → Click Here
- The major drawback of Virtual machines is that the Guest OS bloats up the VM requiring extra resources.
- There is no concept of Guest on Containers as all the containers share the same OS kernel
- Vm's are larger in size in GB. Whereas the Containers are in MB.
- VM's take a lot of time to load up due to their Guest OS. Containers boot up instantaneously.
- The resource utilization of VM's is higher than compared to Containers.

- Containers are running instances of the Container Images
- Images are a complete package/template of the application that you wish to containerize.
- Images are immutable (unchangeable) whereas Containers are mutable
-
The process of automatically deploying and managing containers in the environments is called as Container Orchestration
-
Container Orchestration provides High Availability as there are multiple instances of our application running on different nodes.
-
The application becomes Highly Scalable as and when the traffic on the application increases/decreases.
-
It can help you to deploy the same application across different environments without needing to redesign it
-
Container orchestration can be used to automate and manage tasks such as:
- Provisioning and deployment
- Configuration and scheduling
- Resource allocation
- Container availability
- Scaling or removing containers based on balancing workloads across your infrastructure
- Load balancing and traffic routing
- Monitoring container health
- Configuring applications based on the container in which they will run
- Keeping interactions between containers secure
-
Node (minion) - A machine (Physical or Virtual) on which kubernetes is installed. It is a worker machine where Kubernetes launches its containers.
-
Cluster - A set of nodes grouped together (for fault tolerant and sharing load).
-
Master - It's another node which has kubernetes installed on it and is configured as the master. The master watches over the nodes on the cluster and is responsible for the orchestration of the work on the nodes.
-
Installing Kubernetes installed the following components:
- API Server
- Etcd service
- Kubelet service
- Container Runtime
- Controller
- Scheduler
API Server - Acts as the front-end for the kubernetes service. Users, management devices, CLI all talk to the API server to communicate with the Kubernetes Cluster.
Etcd service - It is a distributed key-value store which stores information that is required by Kubernetes to manage the cluster.
Scheduler - It is responsible for distributing work on the containers across multiple nodes. It looks for new containers and assigns them to nodes.
Controller - It is the brain of the kubernetes technology which is responsible for noticing and responding when a node, container or an endpoint goes down. The controller makes decisions to bring up new containers in such cases.
Container Runtime - It is the underlying software that is used to run containers (e.g. Docker)
Kubelet - The agent that runs on each node in the cluster. The kubelet is responsible for making sure that the containers are running on the nodes as expected.
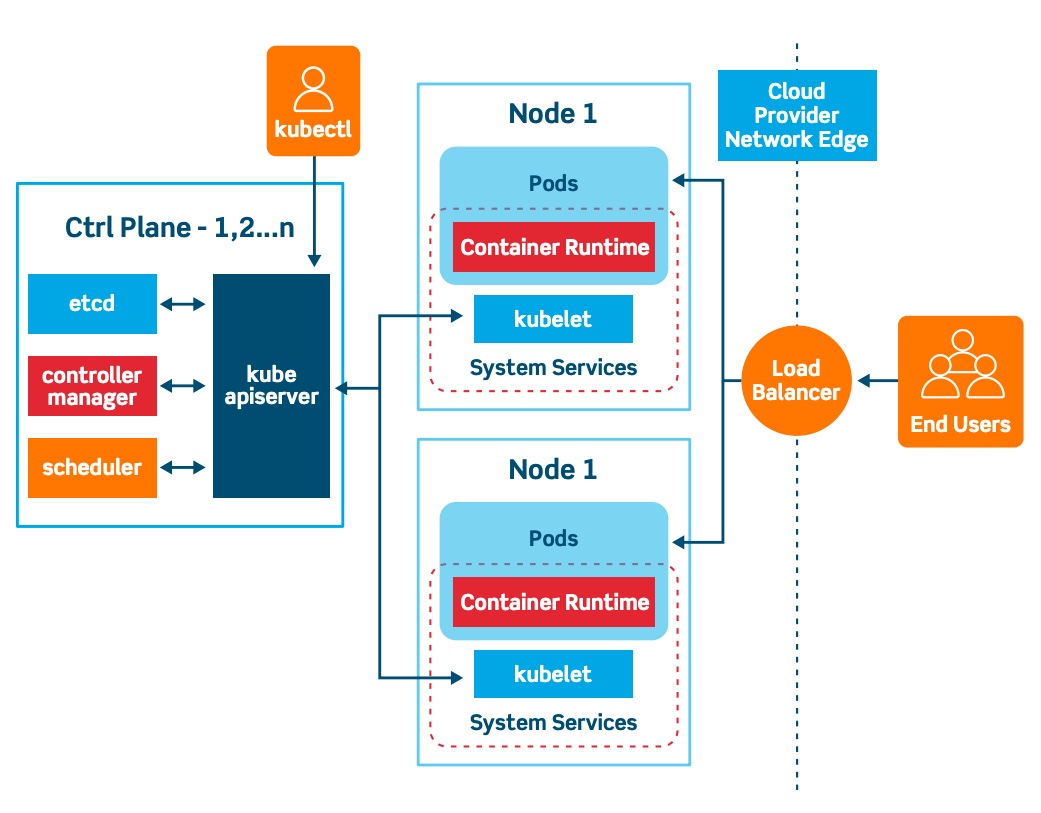
- Kubernetes follows a Client-Server Architecture and it is possible to have a multi-master setup, but by default there is only a single master setup.
- The master node consists of the following Kubernetes components:
- kube-apiserver
- etcd storage
- kube-controller-manager
- cloud-controller-manger (Cloud Architecture)
- kube-scheduler
- DNS server
- The worker nodes consists of the following Kubernetes components:
- kubelet
- kube-proxy
K8s Master-Worker Architecture → Click Here
K8s Architecture explained in Detail → Click Here
What is ETCD?
- It is a distributed reliable key-value store that is Simple, Secure and Fast.
- ETCD is fully replicated, which means all the nodes in the ETCD cluster has access to the full data store.
- ETCD is fully consistent, which means that all the data reads is going to return the most recent data write.
- ETCD is highly available, which means there is no single point of failure.
ETCD Explained → Click Here
ETCD Backup → Click Here
- The kube-api server validates and configures data for the apiobject
- When an end-user uses the
kubectltool, they are actually making an API request to the kube-api for the requested information. - It is not mandatory to have the
kubectltool installed to communicate with theapi-server. You can also communicate usingcurlrequest to the API server directly. - The
kube-schedulermonitors the API server if any object has been created
kube api-server Explained → Click Here
- A controller manager is a process that continuously monitors the state of various objects within the cluster and works towards bringing them to the desired state.
- Some of the different types of controllers that are availble are:
- Node Controller
- Replication Controller
- Deployment Controller
- Endpoint Controller
- Namespace Controller
- Job Controller
- All of the above mentioned controllers are binded together into a single pod within the cluster as the
kube-controller-mangerpod.
The video for
kube-controlleris the same link as the one forkube-schedulershared below.
- The
kube-scheduleris responsible for scheduling the pods/nodes onto the cluster. - The
scheduleronly decides which pod goes on which node. But, it is the duty of thekubeletto create the pod on the decided node. - The pods are scheduled on the nodes based on different criterias such as the resource requirements and limits, taints and tolerations, Node selectors and Node Affinity.
kube-controller and kube-scheduler explained --> Click Here
- The
kubeletis responsible provisioning and deleting pods from the node as described by the scheduler. - The kubelet constantly sends notifications to the
kube-apiabout the current status of the pods and the health of the nodes. - Only the
kubeletcannot be installed as a pod on the cluster. It has to be manually installed on all the nodes using the kubernetes releases binary.
- Inside a K8s cluster, each pod can communicate with every other pod through the
Pod Network - The
Pod Networkis a virtual network which spans across all the nodes in the cluster to which all the pods connect to. - The
kube-proxyis responsible for looking out for new services, and every time a new service has been created it creates the appropriate rules to forward the traffic to these services and then to the backend pods.
- Namespaces are way to organize clusters into virtual sub-clusters. They can be helpful when different teams or projects share the same Kubernetes cluster.
- Namespaces cannot be nested within each other
- Kubernetes comes with three namespaces out of the box
Default- This is where all the k8s objects are created by default for every kubernetes command executed.kube-system- This is used by the Kubernetes components and you should avoid creating any objects inside this namespacekube-public- Used by public resources and it is not recommended to to be used by the users
- Each namespace can be assigned a resource limit so that it can be guaranteed that the namespace doesn't use more than this limit specified.
- A service in one namespace can communicate with a service in another namespace simply by providing their namespace name
db-service.dev.svc.cluster.localcluster.local--> Domainsvc--> sub-domaindev--> namespacedb-service--> service
- The
kubectl config set-context --current --namespace=devcommand can be used to set the current namespace todevpermanently.
kubectl get namespaces --> get the list of all namespaces in the cluster.
kubectl config set-context --curent --namespace=dev --> Set the current namespace to dev
kubectl get pods --all-namespaces --> get list of pods from all namespaces.
- A Pod is a single instance of an application. And it is also the smallest object that you can create in Kubernetes.
- To scale up/down your application you add new pods (instances) to your worker nodes and not add new containers on an existing pod.
- A pod can have multiple containers inside them, but usually they are not containers of the same kind (e.g. Node.js, nginx, redis)
- Containers within the same pod share the same network and communicate with each other over
localhostand the same volume. - Every object defintion YAML file in kubernetes will/must contain these 4 field:
apiVersion--> depends on thekindof the object definition file.kind--> It is most commonly Pod, ReplicaSet, Service or Deploymentmetadata--> Contains data about the objects like name and labelsspec--> This is where additional information pertaining to the object is defined.
   kubectl get pods → gets the list of pods running in the current namespace
   kubectl describe pod <pod_name> → gives a detailed description about the pods.
   kubectl apply -f <file_name> --> Creates the object in the cluster with the object defintion from the file
Pod Overview → Click Here
- The replication controller helps by running multiple instances of the application in a cluster, thus providing
High Availability - The replication controller makes sure that the specified number of pods are always running in the cluster.
- Another advantage of replication controllers is that it helps in
Load BalancingandScaling. - The replication controller can span across multiple nodes in a cluster.
Replication ControllerandReplica Setboth provide the same functionalities, but both are not the same- If the entire node fails, the Replication Controller re-spawns all the pods of that node on some different node.
- The scope of the replication controller is decided by the
label-selector - Whichever pod matches this label will be managed by the replication controller.
- The difference between
Replication ControllerandReplica Setis that theReplica Setcan manage pods that were not created as part of theReplica Setand this is managed by thematchLabelsfield under thespecsection
kubectl get rc/replicationcontroller --> Gets the list of rc running in the current namespace
kubectl describe rc <rc_name> --> gives a detailed description about the rc.
kubectl scale rc <rc_name> --replicas=5 --> To scale up the replicas.
kubectl delete rc <rc_name> --> Delete the replication Controller
Difference between Replication Controller and Replica Set --> Click Here
- Deployments are the objects that have the highest hierarchy amongst all K8s objects.
- Creating a deployment creates a replicaset which creates a replicaset automatically based on the spec which in turn creates the pods with the number of replicas specified in the definition file.
- Deployment ensures that only a certain number of pods are down while they are updated. This is decided by the
maxUnavailablefield, which defaults to 25% - Deployment also ensures that only a certain number of pods are created above the desired number of pods. This is decided by the
maxSurgefield, which defaults to 25% - All of the deployment's rollout history is kept in the system so that you can rollback anytime you want.
- Everytime a deployment happens, it creates a rollout and the rollout creates a deployment revision.
- There are two deployment strategies that are available with Kubernetes and they are
recreateandrolling-update - The problem with the
recreatedeployment strategy is that when the depolyment upgrades to a newer revision the application becomes in-accessible because the entire pods are brought down at the same time. - In the
rolling-updatestrategy the pods are brought down and upgraded in a rolling fashion, thus there are still few pods pods that are serving the application. And this is the default strategy followed by Kubernetes.

kubectl get deployments --> Get the list of all deployments running in the current namespace
kubectl rollout status deployment <deploy_name> --> Shows the rollout status of the deployment
kubectl rollout history deployment <deploy_name> --> Shows the history of the revision of deployments
kubectl rollout history deployment <deploy_name> --revision=2 --> See the details of each revision
kubectl rollout undo deployment <deploy_name> --> rollback to the previous revision
kubectl rollout undo deployment <deploy_name> --to-revision=2 --> rollback to a specific revision
kubectl scale deployment <deploy_name> --replicas 10 --> Scaling a Deployment
kubectl delete deployment <deploy_name> --> Delete the deployment
kubectl describe deployment <deploy_name> --> gives a detailed description about the deployment
kubectl edit deployment <deploy_name> --> Edit/Update the specifications of the deployment
Deployments in Kubernetes --> Click Here
Article from medium.com on Deployments --> Click Here
Checkout advanced K8s Deployment strategies --> Click Here
- In kubernetes, all the pods inside a node are assigned a unique IP address. Unlike Docker where the IP address is assigned to the container
- When kubernetes is installed, a internal private network is automatically created and all the pods get the IP addressed from the subnet of this private network.
- All the pods are attached to this private network and the pods receive their IP's within this series.
- There are five essential things to understand about networking in Kubernetes
- Communication between containers in the same pod
- Communication between pods on the same node
- Communication between pods on different nodes
- Communication between pods and services
- How does DNS work? How do we discover IP addresses?
Networking in K8s --> Click Here
Networking explained simple --> Click Here
- Services allow communication within the objects in the cluster and also outside the cluster.
- In simple terms, a Service enables network access to a set of pods.
- Services select the pods based on their labels and when a request is made to the service, it selects all pods in the cluster matching the service selector label.
- They allow us to connect one application service with other application service or Users.
- There are 3 different types of Services that are available:
NodePort--> Allows the services to be accessible by the outside world by forwarding the internal IP and exposing it.ClusterIP--> Creates a virtual internal IP for the pods to communicate with each otherLoadBalancer--> provisions a load balancer within the cluster.
- NodePort:
- A
NodePortport can only be within a valid range of 30000 - 32767 targetPort- Port on the Application itself where the app is published.Port- Port on the Service object which is attached to the ClusterIPNodePort- Port on which the app is exposed to the outside world
- A
- ClusterIP:
- ClusterIP will create one common IP for all the related pods which are grouped together by the Service selector label.
- All the pods that need to communicate with these different services can communicate with the ClusterIP instead of individual IP of the pods as the IP of pods can change after they are restarted or deleted.
- LoadBalancer:
- Provides a Load Balancing service for all the hosted applications on the cluster, out of the box.
- The endpoints from the pods are automatically configured to point to the load balancer based on the service selector label.
kubectl get svc --> get the list of services running in the current namespace.
kubectl describe svc <svc_name> --> gives a detailed description about the service.
kubectl delete svc <svc_name> --> Delete the service with the name specified
Services Explained --> Click Here
- If there is no
schedulerin the cluster to schedule the pods, then the pods will be in apendingstatus. In this case, we can go ahead and manually schedule the pods. - We can manually schedule the pods on a node by using the
nodeNamefield in the pod definition file under thespecsection.
NodeName Explained --> Click Here
- Labels are key-value pairs that are attached to the k8s objects such and pods, etc.
- Each key must be unique for a given object
- Labels can be used for querying and watching the objects
- Labels support maximum
63 Characters - Selectors are used by objects in k8s to identify other objects that needs to be connected/monitored
kubectl get pods --selector env=dev
kubectl label pods <pod-name> key=value --> Labels the pod with the values
kubectl get pods --show-labels
Selectors and Labels Explained --> Click Here
- Taints and Tolerations are available in K8s to decide what pods can be scheduled on a node.
Taintsare set onnodes.Tolerationsare set onpods.- Command to apply taint to a node
kubectl taint nodes node-name key=value:taint-effecttaint-effectdecides what happens to the pods that do not tolerate this taint. And there are three taint-effects availableNoSchedule--> No new pods will be scheduled on this nodePreferNoSchedule--> The scheulder will try not to schedule pods on this node, but is not guaranteed.NoExecute--> No new pods will scheduled on this node and all the existing pods on it will be evicted if it doesn't tolerate the taint.
Tolerationsneed to be applied in the pod definition file under thespecsection.- Taints and Tolerations do no guarantee that a pod will be placed on the node, it only guarantees that it accepts the pods that has the toleration for it. (Pods that have toleration may very well be placed on other nodes that has no taints)
tolerations:
  - key: "app"
    operator: "Equal"
    value: "blue"
    effect: "NoSchedule"
Taints and Tolerations --> Click Here
nodeSelectorscan be added to thespecsection of the pod defintion file.- It makes sure that the pod get scheduled on the node that matches this selection
- You cannot pass conditions like
orandnotinnodeSelectors
nodeSelector:
  size: Large
nodeAffinityis similar tonodeSelectorsexcept that you can pass complex expressions likeIn,notIn,Existsetc.- There are 2 types of nodeAffinity currently available in k8s:
requiredDuringSchedulingIngoredDuringExecutionpreferredDuringSchedulingIngoredDuringExecutionrequiredDuringSchedulingRequiredDuringExecution(Planned)
affinity:
    nodeAffinity:
      requiredDuringSchedulingIgnoredDuringExecution:
        nodeSelectorTerms:
        - matchExpressions:
          - key: disktype
            operator: In
            values:
            - ssd
Node Affinity Explained --> Click Here
requestsunder thespec.resourcessection of the pod definition file determines how much resources is required by the pod to start up- By default the minimum CPU that is requested by a container is
0.5and the minimum memory that is requested is256 MiB. limitsunder thespec.resourcessection of the pod defintion file determins how much resources can be consumed by the pod in total.- By default the maximum CPU that can be requested is
1 vCPUand the maximum memory that can be requested is512 MiB.
- Daemon sets are responsible for making sure that atleast one instance of the pod is running in all the nodes in the cluster.
- The object definition file for a daemon set is similar to a replicaset except that the
kind: DaemonSet - The Daemonset definition file should not contain any field called
replicasin thespecsection.
Daemon set Explained --> Click Here
- Pods that are not managed by the
kube-apiserver but are managed by thekubeletdirectly are called as Static pods. - The
kube-apiserver doesnt monitor these pods, thus the creation/deletion are managed by the kubelet itself. - The directory for the manifest files that can be used by the kubelets are found under
/etc/kubernetes/manifests - You can create only pods in this way and no other objects like the replicaset, deployments or services can be created.
Static pods Explained --> Click Here
- You can add multiple custom schedulers to the K8s cluster by creating them as pods in the
kube-systemnamespace. - Just copy the manifest file for the default scheduler from
/etc/kubernetes/manifestsand rename the scheduler fields to your custom requirement - Apply the definition file using the
kubectl applycommand and let the pod be created. - Then add the
schedulerNamefield in thespecsection of the pod defintion file so that the pod can be scheduled by this particular scheduler.
How scheduling works in K8s explained --> Click Here
- You can install a
metric-serverinside the cluster to monitor the pods and the nodes by cloning the release from the following git repository:git clone https://github.com/kodekloudhub/kubernetes-metrics-server.git - There can be only one
metric-serverinstalled per cluster. - If you are using a
minikubecluster, execute the following command:minikube addons enable metrics-server - All the logs required by the
metric-serverare got from thecAdvisorinside the kubelet.
- You can add commands that needs to be executed by your K8s container by adding the
commandfield under thespec.containerssection in the pod definition file. Note that this corresponds to theENTRYPOINTfield incase you were to write a Dockerfile. - Any arguments that needs to be passed to this command can be passed via the
argsfield under thespec.containerssection. Note that this corresponds to theCMDfield incase you were to write a Dockerfile - Inside the K8s definition file, the
commandand theargsfield should be passed in a JSON Array format.
- You can add environment variable to your pod definition file using the
envfield under thespec.containerssection. - The
envfiled accepts fields in an array in anameandvalueformat. configMapsare used in kubernetes to pass configuration data to a pod in a key-value pair.- You can create configMaps in the imperative way using the following command:
kubectl create configmap <config-name> --from-literal=<key>=<value>orkubectl create configmap <config-name> --from-file=<file_name> - You can also create configmaps using a configMap definition file and then execute the
kubectl applycommand to create the configMap.
Configmaps Explained --> Click Here
kubectl create configmap <config-name> --from-literal=<key>=<value>
kubectl create configmap <config-name> --from-file=<file_name>
kubectl get configmaps
kubectl describe confimaps <config-name>
Secretsare similar toconfigMapsexcept that configmaps are used to store plain text, while the secrets can be used to store confidential data.- You can create secrets in the imperative way using the following command:
kubectl create secret generic <secret-name> --from-literal=<key>=<value>orkubectl create secret generic <secret-name> --from-file=<file-name> - The object definition file of secrets is similar to configMaps except that the kind is
Secretand the values to the key need to be encoded tobase64before adding them to the definition fileecho -n <value> | base64
- When a node ungergoes a failure, the pods on that node will also be deleted along with it.
- Kubernetes waits for
5 minsuntil the node comes up, if not all the pods scheduled on this node will be considered dead and will be deleted. - This can affect the applications that are not part of a replicaset to go under downtime.
- If the pods are part of a replicaset, the pods will be re-scheduled on another available node.
- The time which the kubelet waits for the pod come up again is managed by the
pod-eviction-timeoutwhich is found underkube-controller-manager. - If a OS upgrade is planned on a specific node, it is always better to
drainthe nodes before the upgrade. - Draining the node is the process by which the pods on a node are gracefully shut down and re-scheduled on other availble nodes within the cluster.
- The node can be drained using the following command:
kubectl drain <node-name> - Then the node can be
cordonedpurposefully so that no new pods will be scheduled on this node until the maintenance is over.kubectl cordon <node-name> - The node must be manually
uncordonedfor pods to be scheduled on it.kubectl uncordon <node-name>
kubectl drain <node-name> --> Drains the pods from the node and cordons the node
kubectl cordon <node-name> --> Marks the node as un-schedulable
kubectl uncordon <node-name> --> Enables the node to be schedulable again
- When ever a cluster needs to be taken for an upgrade, the master node components must be upgraded first.
- When the master node is under maintenance, the kubernetes management components like the kube-api, scheduler and other components do not work
- But this doesn't mean that the worker nodes will also stop functioning. Its only the features like automatic pod creation, scheduling and other features will not be available during this upgrade.
- Steps to Upgrade the Cluster using kubeadm:
- Determine the OS release on which the cluster is hosted.
- Upgrade the library packages for your OS release and then execute
kubeadm upgrade planwhich will show the available versions to which you can upgrade your cluster. unholdkubeadm, upgrade the version of kubeadm and thenholdkubeadm back again.- Choose a version to upgrade to and run the command:
kubeadm upgrade apply <upgrade-version> - To upgrade the
kubeletand thekubectlcomponents you need to drain the nodes first:kubectl drain <node-name> --ignore-daemonsets - Similar to kubeadm unhold, upgrade and hold the kubelet and kubectl versions again.
- restart the kubelet service: systemctl daemon-reload systemctl restart kubelet
- Bring back the node online by marking it as schedulable:
kubectl uncordon <node-name>
K8s Documentation for Cluster upgrade --> Click Here
Live Cluster Upgrade --> Click Here
How to create a DR ready Ckuster --> Click Here
kubectl get pods → get the list of pods running in the current namespace
kubectl cluster-info → get the details about the current cluster
kubectl run nginx --image nginx → deploys a nginx application on the cluster by pulling the nginx image from docker hub
kubectl describe pod <pod_name> → gives a detailed description about the pod