Associate Android Developer Study Guide
https://developers.google.com/training/certification/associate-android-developer/study-guide/
- Android updates
- Material design
- Localisation
- Device compatibility
- Lifecycle
- App components
- Working in the background
- Notification
- Accessibility Features
- Day/Night Mode
- Styles
- Jetpack
- Architecture
- Debugging
- Test
- Kotlin
https://developer.android.com/preview?hl=en
SYSTEM_ALERT_WINDOWno longer works on Android GO devices- Bubbles:
Notification.BubbleMetadata.Builder()
- Bubbles:
- Dark theme
- (option1) use theme:
xxx.DayNight, code - (option2)
android:forceDarkAllowed="true",view.setForceDarkAllowed(false) - (option3) DIY
- (option1) use theme:
- New share sheet
- Notification actions
- WebView: Detect hung renderer if you like
- Be easier to set accessibility
- Text
Magnifier- TLS 1.3 enabled by default
- Improved biometric dialog
PowerManagerandroidx.preference- Architecture components:
- WorkManager
- Navigation
- savedState for ViewModel
- Benchmarking
- Lifecycle, Lifedata, Room
- CameraX library
- Jetpack Compose (New generation UI toolkit)
- UI
- ViewPager2 (like ViewPager, but better)
- ViewBindings (
SearchItemBinding, no morefindViewById())
- Graph
- Blend Mode
- RenderNode (to display properties such as alpha, shadows)
- HardwareRender
- Wrap Bitmap with
HardwareBuffer
- Vulkan
- ANGEL
- Audio playback capture
- External storage (targetSDK = Q)
- sandboxed by default
- Media files: Storage permission + MediaStore
- Photo metadata: Storage + MediaLocation permission
- All files: Manifest tags
- Location permission (allows only while the app is in use)
Add the material dependency in build.gradle
implementation 'com.google.android.material:material:1.0.0'ToastvsSnackbar
| Toast | Snackbar | |
|---|---|---|
| Overview | A toast provides simple feedback about an operation in a small popup | Snackbars provide lightweight feedback about an operation |
| Interaction | Toasts automatically disappear after a timeout | Snackbar could either automatically disappear after a timeout, or be manually closed |
| More info | 1. Having a CoordinatorLayout in your view hierarchy enable certain features in Snackbar 2. Snackbars can contain an action such as "undo" | |
| Sample code | BaseActivity | BaseActivity |
Read more - Toasts
Read more - Snackbar
- AppBarLayout -> [Any activity in this app
- BottomSheet -> ContentProviderFragment
- Chip -> NotificationActivity
- ConstraintLayout -> rv_album_item
- FloatingActionButton -> MainActivity
- MaterialButton -> BackgroundServiceFragment
- MaterialCardView -> BackgroundActivity
- NavigationView -> MainActivity
- RadioGroup -> BackgroundActivity
- Seekbar (sliders) -> BackgroundActivity
- TabLayout -> AppComponentsActivity
- TextInputLayout, TextInputEditText -> NotificationActivity
- RecyclerView (grid) -> ArtistsFragment
- RecyclerView (linear) -> AlbumsFragment
- RecyclerView (drag + swipe) -> PlaylistFragment, PlaylistAdapter
- RecyclerView (SelectionTracker) -> ArtistsFragment, ArtistAdapter, ArtistItemKeyProvider, ArtistItemDetailsLookup
SelectionTrackeris another to dosetOnClickListener, which is more powerful while multiple items need selecting - RecyclerView + PagedListAdapter -> AlbumsFragment
- Preference ->
- BottomNavigationView -> UIComponentsActivity
- TabLayout + ViewPager -> MusicFragment, UIComponentsActivity
- SearchView -> SearchSongsActivity, AndroidManifest
Believe if or not, a SearchView could be far more complicated than you've expected.
Before youget started, take a look at some features of SearchView:
- Search Interface
- Query suggestion (either recent searches or custom suggestions)
- Query history
- Searchable configuration (E.g. voice search)
First thing first, you need to create either Search Dialog (a SearchView inside NavigationView) or Search Widget (your custom search view, which could be an EditText placed anywhere in your layout).
Secondly, think about how you handle the search view. You could start a new activity to search or just search in the current view.
- Start the
SearchSongsActivity - User types something in
SearchViewand press enter - Start the
SearchSongsActivityagain - Handle searches in
onNewIntent()
You need the following:
- Add tags to your result activity in AndroidManifest.xml
<activity
    android:name=".activities.SearchSongsActivity"
    android:launchMode="singleTop">

    <!-- this is the searchable activity, it performs searches -->
    <intent-filter>
        <action android:name="android.intent.action.SEARCH" />
        <category android:name="android.intent.category.DEFAULT" />
        <category android:name="android.intent.category.BROWSABLE" />
    </intent-filter>

    <!-- implement Voice Search -->
    <intent-filter>
        <action android:name="com.google.android.gms.actions.SEARCH_ACTION" />
        <category android:name="android.intent.category.DEFAULT" />
        <category android:name="android.intent.category.BROWSABLE" />
    </intent-filter>

    <!-- searchable configuration -->
    <meta-data
        android:name="android.app.searchable"
        android:resource="@xml/searchable" />
</activity>- In xml/searchable.xml
<?xml version="1.0" encoding="utf-8"?>
<searchable xmlns:android="http://schemas.android.com/apk/res/android"
    android:hint="@string/search_hint"
    android:label="@string/app_name"
    android:searchSuggestAuthority="com.catherine.materialdesignapp.providers.SearchSuggestionProvider"
    android:searchSuggestSelection=" ?"
    android:voiceSearchMode="showVoiceSearchButton|launchRecognizer" />
android:searchSuggestAuthority": (Optional) Refer to your search content provider
android:searchSuggestSelection": (Optional) Pop up search suggestions, " ?" means query
android:voiceSearchMode": (Optional) To enable voice search
Read more search configuration here: https://developer.android.com/guide/topics/search/searchable-config
(Optional) Create your search suggestion content provider
public class SearchSuggestionProvider extends SearchRecentSuggestionsProvider {
    public final static String AUTHORITY = "com.catherine.materialdesignapp.providers.SearchSuggestionProvider";
    public final static int MODE = DATABASE_MODE_QUERIES | DATABASE_MODE_2LINES;

    public SearchSuggestionProvider() {
        setupSuggestions(AUTHORITY, MODE);
    }
}
And register your content provider in AndroidManifest.xml
<provider
    android:name=".providers.SearchSuggestionProvider"
android:authorities="com.catherine.materialdesignapp.providers.SearchSuggestionProvider" />- Handle intents and create a search icon in your activity
public class SearchSongsActivity extends AppCompatActivity implements SearchView.OnQueryTextListener {
    private final static String TAG = SearchSongsActivity.class.getSimpleName();
    private SearchManager searchManager;
    private SearchView searchView;

  /**
     * In this case, this onNewIntent will be called while
     * user finishes searching, this activity will be relaunch.
     * <p>
     * Because
     * 1. this activity launches in single top/task/instance mode
     * 2. ACTION_SEARCH is defined in intent-filter
     *
     * @param intent
     */
    @Override
    protected void onNewIntent(Intent intent) {
        handleIntent(intent);
    }

    private void handleIntent(Intent intent) {
        if (intent == null)
            return;
        if (Intent.ACTION_SEARCH.equals(intent.getAction())) {
            String query = intent.getStringExtra(SearchManager.QUERY);

            // Handle the scenario that user submitted searches:
            // 1. Fill in what user just typed in SearchView automatically
            // 2. Dismiss search suggestions
            // 3. Query
            // 4. Save queries
            searchView.setQuery(query, false);
            searchView.clearFocus();
            query(query);
            saveQueries(query);
        }
    }

    @Override
    public boolean onCreateOptionsMenu(Menu menu) {
        // Inflate the menu; this adds items to the app bar if it is present.
        getMenuInflater().inflate(R.menu.searchable_menu, menu);

        searchManager = (SearchManager) getSystemService(Context.SEARCH_SERVICE);
        searchView = (SearchView) menu.findItem(R.id.action_search).getActionView();
        searchView.setSearchableInfo(searchManager.getSearchableInfo(getComponentName()));
        return true;
    }

    @Override
    public boolean onOptionsItemSelected(MenuItem item) {
        switch (item.getItemId()) {
            case R.id.action_clear:

                // clear query history
                SearchRecentSuggestions suggestions = new SearchRecentSuggestions(this,
                        SearchSuggestionProvider.AUTHORITY, SearchSuggestionProvider.MODE);
                suggestions.clearHistory();
                return true;
            default:
                return super.onOptionsItemSelected(item);
        }
    }

    private void query(String text) {
        // do something
    }

    // save queries while you've defined a search content provider.
    private void saveQueries(String text) {
        SearchRecentSuggestions suggestions = new SearchRecentSuggestions(this,
                SearchSuggestionProvider.AUTHORITY, SearchSuggestionProvider.MODE);
        suggestions.saveRecentQuery(text, null);
    }
}- In menu/searchable_menu.xml
<?xml version="1.0" encoding="utf-8"?>
<menu xmlns:android="http://schemas.android.com/apk/res/android"
    xmlns:app="http://schemas.android.com/apk/res-auto">
    <item
        android:id="@+id/action_search"
        android:actionLayout="@layout/searchview_layout"
        android:icon="@drawable/ic_search_black_24dp"
        android:title="@string/action_search"
        app:actionViewClass="androidx.appcompat.widget.SearchView"
        app:showAsAction="ifRoom|collapseActionView" />

    <item
        android:id="@+id/action_clear"
        android:icon="@drawable/ic_delete_black_24dp"
        android:orderInCategory="100"
        android:title="@string/action_clear_history"
        app:showAsAction="ifRoom" />
</menu>
app:showAsAction="collapseActionView": Click the search icon and stretch the view
setIconified(false): Always show the search field
Another workflow is to search in Fragments:
- Set the search menu
menu/ui_components_menu.xml
<?xml version="1.0" encoding="utf-8"?>
<menu xmlns:android="http://schemas.android.com/apk/res/android"
    xmlns:app="http://schemas.android.com/apk/res-auto">
    <item
        android:id="@+id/action_search"
        android:actionLayout="@layout/searchview_layout"
        android:icon="@drawable/ic_search_black_24dp"
        android:title="@string/action_search"
        app:actionViewClass="androidx.appcompat.widget.SearchView"
        app:showAsAction="ifRoom|collapseActionView" />
</menu>@Override
public boolean onCreateOptionsMenu(Menu menu) {
// Inflate the menu; this adds items to the app bar if it is present.
getMenuInflater().inflate(R.menu.ui_components_menu, menu);
SearchManager searchManager = (SearchManager) getSystemService(Context.SEARCH_SERVICE);
SearchView searchView = (SearchView) menu.findItem(R.id.action_search).getActionView();
searchView.setSearchableInfo(searchManager.getSearchableInfo(getComponentName()));
searchView.setOnQueryTextListener(new SearchView.OnQueryTextListener() {
@Override
public boolean onQueryTextSubmit(String query) {
if (onSearchViewListener != null)
onSearchViewListener.onQueryTextSubmit(query);
return false;
}
@Override
public boolean onQueryTextChange(String newText) {
if (onSearchViewListener != null)
onSearchViewListener.onQueryTextChange(newText);
return false;
}
});
return true;
}- Fragment triggers search result from Activity via interface
public interface UIComponentsListener {
    void setOnSearchListener(OnSearchViewListener listener);
}
public interface OnSearchViewListener {
boolean onQueryTextSubmit(String query);
boolean onQueryTextChange(String newText);
}public class UIComponentsActivity extends BaseActivity implements UIComponentsListener {
private OnSearchViewListener onSearchViewListener;
@Override
public void setOnSearchListener(OnSearchViewListener listener) {
onSearchViewListener = listener;
}
}public class ArtistsFragment extends Fragment implements OnSearchViewListener {
@Override
public void onViewCreated(@NonNull View view, @Nullable Bundle savedInstanceState) {
super.onViewCreated(view, savedInstanceState);
listener = (UIComponentsListener) getActivity();
// special case, this fragment will be called at first lunch, which means onFragmentShow() won't be triggered
listener.setOnSearchListener(this);
}
@Override
public boolean onQueryTextSubmit(String query) {
return false;
}
@Override
public boolean onQueryTextChange(String newText) {
// handle search here
artistViewModel.search(newText);
return false;
}
}- Use Android Architecture components to build your app
Code: ArtistsFragment, ArtistAdapter, ArtistViewModelFactory, ArtistViewModel, ArtistRepository, ArtistRoomDatabase, ArtistDao, Artist
Build a custom view from scratch:
List all resource directories you should take care of:
- animator/
- anim/
- color/
- drawable/
- mipmap/
- layout/
- menu/
- raw/
- values/
- xml/
- font/
E.g.
Language and region: en, en-rUS
Layout Direction: ldrtl, ldltr
HDR: highdr, lowdr
Screen Orientation: port, land
UI mode: car, television, watch...
Nigh mode: night, notnight
DPI: ldpi, mdpi...
Platform version: v21, v26...
...
Go to https://developer.android.com/guide/topics/resources/providing-resources.html#AlternativeResources and check table 2
- Create alternative UI resources such as layouts, drawables and mipmaps
- Set layout files with the following rules:
- Avoid hard-coded layout sizes by using
wrap_content,match_parentandlayout_weight, etc - Prefer
ConstraintLayout - Redraw views when window configuration changes (multi-window mode or screen rotation)
- Avoid hard-coded layout sizes by using
- Define alternative layouts for specific screen sizes. E.g.
layout-w600dpandlayout-w600dp-landfor 7” tablets and 7” tablets in landscape representative - Create stretchable nine-patch bitmaps
- Build a dynamic UI with fragments
- Test on all screen sizes
Pixel density is how many pixels within a physical area of the screen, dpi is the basic unit.
dpi: Dots per inch
resolution: The total number of pixels on a screen
dp or dip: Instead of px (pixel), measure UI with dp (density-independent pixels) on mobile devices
| ldpi | mdpi | hdpi | xhdpi | xxhdpi | xxxhdpi | |
|---|---|---|---|---|---|---|
| Scaling ratio | 0.75x | 1x | 1.5x | 2x | 3x | 4x |
| Dpi | ~120dpi | ~160dpi | ~240dpi | 320dpi | 480dpi | 640dpi |
| App icon size | 36x36 px | 48x48 px | 72x72 px | 96x96 px | 144x144 px | 192x192 px |
nodpi: bitmaps in nodpi drawables look larger in xhdpi devices whereas it seems smaller on mdpi devices.
anydpi: These bitmaps in anydpi have priority when no bitmaps are found in other drawable directories. For Example, youhavedrawable-hdpi/banner.9.pnganddrawable-anydpi/banner.xml,banner.9.pngwill be used on hdpi devices andbanner.xmlwill be seen on other devices.
To see more details by automatically importing icons with Android Studio Image Asset tools and have a look at Grid and keyline shapes
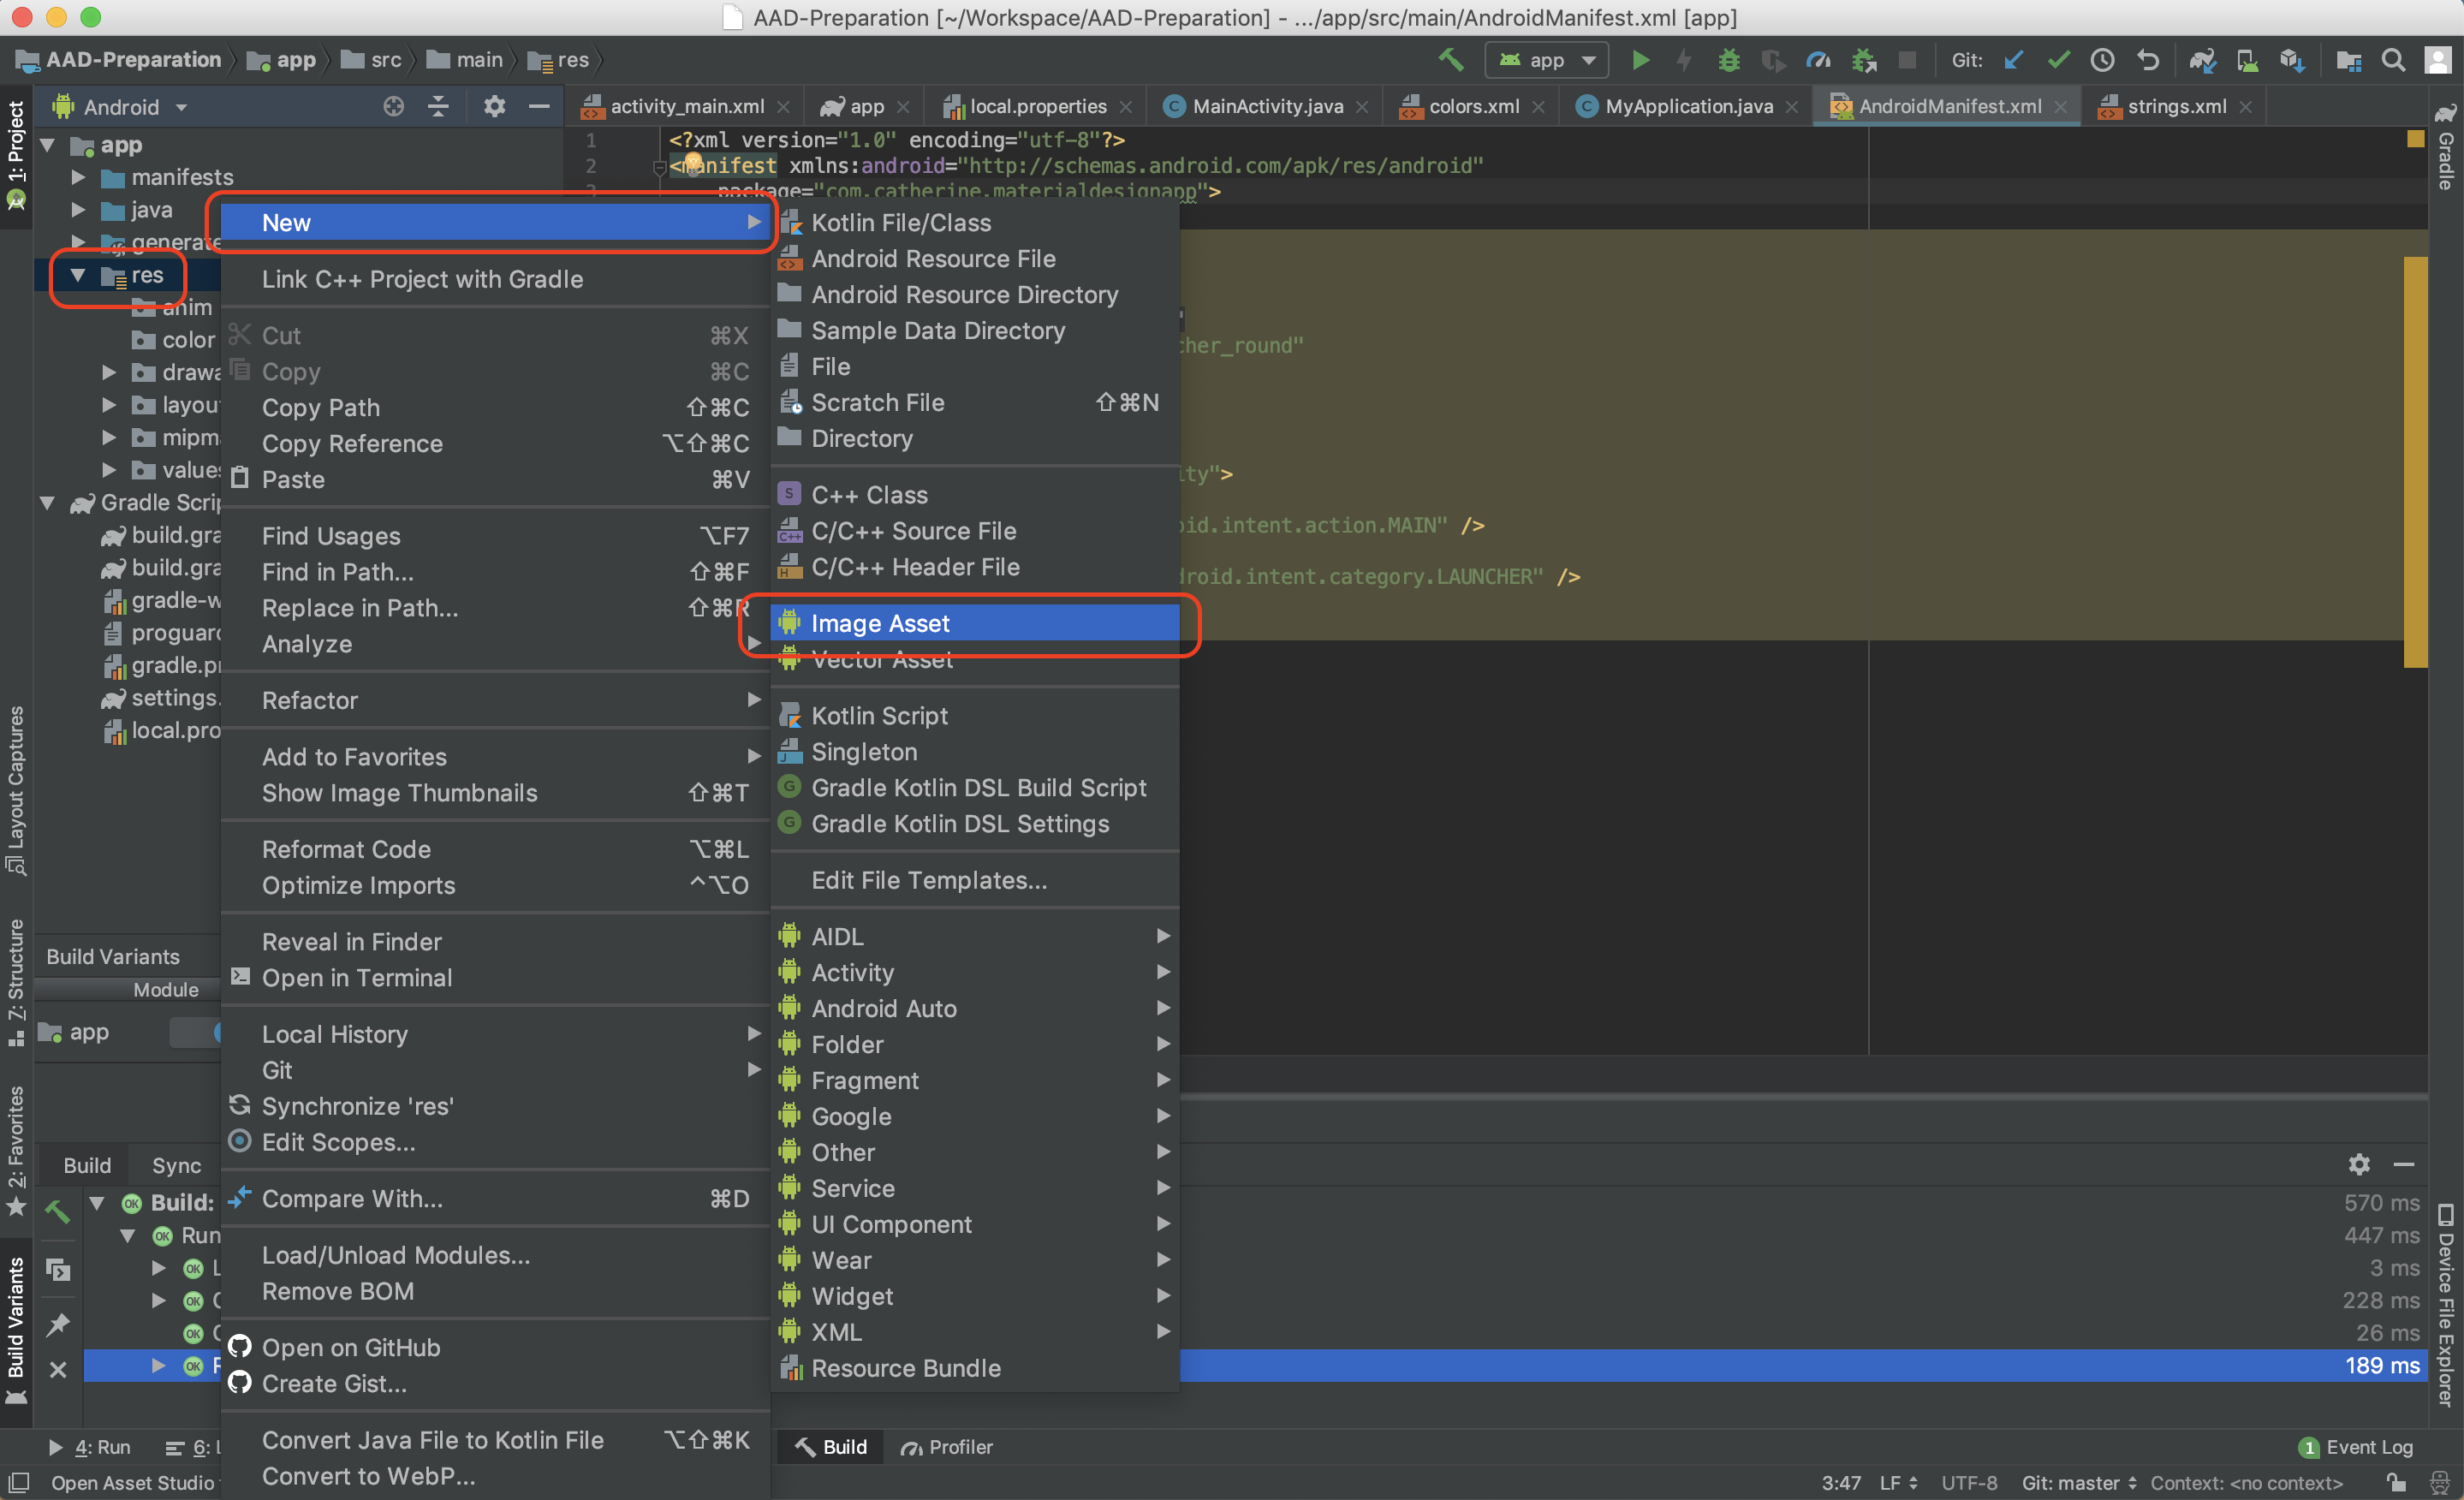
res directory example: res
- Target API 17 or higher
- In Manifest,
<application
    android:supportsRtl="true">
</application>ViewModelonSaveInstanceState()
To testsavedInstanceState, haveDo not keep activitiesselected on system Settings page to testonSaveInstanceStateandonRestoreInstanceState
Code: LifecycleActivity- Persistent in local storage for complex or large data
-
Implement
LifecycleObserver
Code: LifecycleActivity, LifecycleObserverImpl -
Associate with Jetpack
- Enable activities to handle configuration changes like screen rotation and keyboard availability change
<activity android:name=".MyActivity"
          android:configChanges="orientation|keyboardHidden"
android:label="@string/app_name">- In activities
 @Override
    public void onConfigurationChanged(Configuration newConfig) {
        super.onConfigurationChanged(newConfig);
        // do something

        if (newConfig.orientation == Configuration.ORIENTATION_LANDSCAPE) {
            Log.d(TAG, "landscape");
        } else if (newConfig.orientation == Configuration.ORIENTATION_PORTRAIT) {
            Log.d(TAG, "portrait");
        }
    }
Code: [BaseActivity]read more
Picture in picture mode is a special case of multi-window mode.
There are four different types of app components:
- Activity
- Services
- Broadcast receivers
- Content providers
<activity
    android:name=".SingleTaskActivity"
    android:launchMode="singleTask">
Assume you have 4 activities: A, B, C and D
- standard
- Default mode, it pushes new activities on the top of the stack.
- Example (how activities work in the stack): (bottom) A-B-B-D-A-C-C (top)
- singleTop
- No duplicate activities on the top, but there could be same activities in the stack.
- Example (how activities work in the stack): (bottom) A-B-A-C-D-C (top)
- Assume C is the top activity, and you try to launch C again. Then this C won't be created, instead,
onNewIntent()will be called in existed C.
- singleTask
- No duplicate activities in the stack.
- Example (how activities work in the stack): (bottom) A-B-C-D (top)
- Assume C is in the stack, and you try to launch C again. Then this C won't be created, instead,
onNewIntent()will be called in existed C. - Don't forget to set taskAffinity (
android:taskAffinity="your packageName") to map the activity to app.
- singleInstance
singleTask+taskAffinityis more recommended.- No duplicate activities in the system, which means if there is A running in App1, then you lunch A in App2, this running A in App1 will be removed.
- Example (how activities work in the stack): (bottom) A-B-C-D (top)
- Assume C is in the stack, and you try to launch C again. Then this C won't be created, instead,
onNewIntent()will be called in existed C. - You could set taskAffinity (
android:taskAffinity="your packageName") as well
NOTICE: You might need to handle both onCreate() and onNewIntent() lifecycle events in singleTop
- To build a multi-pane UI
- To reuse fragments in multiple activities.
- A fragment must always be hosted in an activity and the fragment's lifecycle is directly affected by the host activity's lifecycle.
Code (Activity + Fragment): UIComponentsActivity
Code (ViewPager + Fragment): [MusicFragment]read more
- Two services in Android - background service and foreground service
- Background services are no longer working since Android Oreo, you are suppose to use
JobSchedulerinstead. - Foreground services and JobScheduler are alternatives to run app in the background, but
notificationis required while running a foreground service. JobScheduleris only available on devices running API 21+. Fore devices running API 14+ including devices without Google Play services,WorkManagerlet you schedule background tasks that need guaranteed completion, whether or not the app process is running.
| Android API level | background service | foreground service | job scheduler |
|---|---|---|---|
| ≤ 25 | O | X | X |
| ≥ 26 | X | O | O |
- Because setting this property is not compatible with persisted jobs, doing so will throw an IllegalArgumentException when
JobInfo.Builder.build()is called. jobScheduler.cancel(JOB_ID)orjobScheduler.cancelAll()only works while jobs haven't started. For example, a job is scheduled to start in 5 seconds (setMinimumLatency(5000)),cancel()works right before the job actually runs.- Don't forget to finish jobs if the task is done. (
jobFinished(jobParameters, false))
Code: BackgroundServiceFragment, MusicPlayerService, MusicPlayerJobScheduler, [AndroidManifest]read more
You could either register receivers by dynamically extending BroadcastReceiver or statically declaring an implementation with the <receiver> tag in the AndroidManifest.xml.
NOTICE, since Android 8.0 (API level 26), some receivers cannot be defined in Manifest, check the list here
In most cases, you should follow the stops:
- Check available receivers here
- Create your own receivers
Code: ScreenOnReceiver, AirplaneModeChangedReceiver - Let services or jobs to filter system intents
Code: AirplaneModeService, AirplaneModeJobScheduler, ScreenOnOffService, ScreenOnOffJobScheduler - Ask for permission if needed
- Register services or schedule jobs (Android 5.0+)
Code: [SystemBroadcastReceiverFragment]read more
Create your own content providers to share data with other applications or access existing content providers in another applications.
To get the uri path, we are going to have a look at android source code.
- Go to https://android.googlesource.com/platform/packages/providers/ContactsProvider/+/master/ and pick out needed providers
- Search
<provider>tag in AndroidManifest, e.g.
<provider
    android:name="CallLogProvider"
    android:authorities="call_log"
    android:syncable="false" android:multiprocess="false"
    android:exported="true"
    android:readPermission="android.permission.READ_CALL_LOG"
    android:writePermission="android.permission.WRITE_CALL_LOG">
</provider>
To read call logs, ask for READ_CALL_LOG permission.
- Now we have the host name (
android:authorities), then go to CallLogProvider, which refers toandroid:name, and get the table name - Search
UriMatcherin CallLogProvider, you will find a bunch ofsURIMatcher.addURI().
static {
    sURIMatcher.addURI(CallLog.AUTHORITY, "calls", CALLS);
    sURIMatcher.addURI(CallLog.AUTHORITY, "calls/#", CALLS_ID);
    sURIMatcher.addURI(CallLog.AUTHORITY, "calls/filter/*", CALLS_FILTER);
    // Shadow provider only supports "/calls".
    sURIMatcher.addURI(CallLog.SHADOW_AUTHORITY, "calls", CALLS);
}- The completely path would be: scheme (content://) + table_name (authorities) + path (defined uriMatcher)
private final static Uri callLogsDB = Uri.parse("content://call_log/calls");- Fetch call logs
You are able to query call logs, register observers to listen to fetch events like incoming calls, outgoing calls, etc.
Check all fields you can query: CallLogProvider, CallLog
Code: CursorLoaderActivity
code: AlbumsProvider, AndroidManifest
Query examples:
- Query all of Taylor Swift's albums and return
titleandurl
val ALBUM_URI = Uri.parse("content://com.catherine.materialdesignapp.providers.AlbumsProvider/albums")
var cursor: Cursor? = null
try {
    cursor = contentResolver.query(
            ALBUM_URI,
            arrayOf("title, url"),
            "artist = ?",
            arrayOf("Taylor Swift"),
            null)
    Log.d(TAG, "cursor items:" + cursor?.count)
    if (cursor != null)
        while (cursor.moveToNext()) {
            for (i in 0 until cursor.columnCount) {
                Log.d(TAG, "${cursor.getColumnName(i)}: ${cursor.getString(i)}")
            }
        }
} catch (e: Exception) {
    e.printStackTrace()
} finally {
    cursor?.close()
}- Query the
title = Fearlessitem
val ALBUM_URI = Uri.parse("content://com.catherine.materialdesignapp.providers.AlbumsProvider/albums/Fearless")
var cursor: Cursor? = null
try {
    cursor = contentResolver.query(
            ALBUM_URI,
            null,
            null,
            null,
            null)
    Log.d(TAG, "cursor items:" + cursor?.count)
    if (cursor != null)
        while (cursor.moveToNext()) {
            for (i in 0 until cursor.columnCount) {
                Log.d(TAG, "${cursor.getColumnName(i)}: ${cursor.getString(i)}")
            }
        }
} catch (e: Exception) {
    e.printStackTrace()
} finally {
    cursor?.close()
}- Insert a new item
val values = ContentValues()
values.put("title", "Reputation")
values.put("url", "https://www.amazon.com/reputation-Taylor-Swift/dp/B0754BBDF1/ref=ntt_mus_dp_dpt_1")
values.put("image", "https://images-na.ssl-images-amazon.com/images/I/81Ii6u2neLL._SX522_.jpg")
values.put("thumbnail_image", "https://images-na.ssl-images-amazon.com/images/I/71PcXiIap4L.jpg")
values.put("artist", "Taylor Swift")
val songList = arrayListOf(
    "...Ready for It?",
    "End Game",
    "I Did Something Bad",
    "Don't Blame Me",
    "Delicate",
    "Look What You Made Me Do"
)
values.put(
    "songs", fromStringList(songList)
)
try {
    contentResolver.insert(
        ALBUM_URI,
        values
    )
} catch (e: Exception){
    e.printStackTrace()
}
private fun fromStringList(value: List<String>?): String {
if (value == null || value.isEmpty()) {
return JSONArray().toString()
}
val ja = JSONArray()
for (i in value.indices) {
ja.put(value[i])
}
return ja.toString()
}- Update "Speak Now"
var values = ContentValues()
var songList = arrayListOf("Mine", "Innocent", "Speak Now")
values.put("songs", "'" + fromStringList(songList) + "'")
try {
    contentResolver.update(
        ALBUM_URI,
        values,
        "title = ?",
        arrayOf(
            "Speak Now"
        )
    )
} catch (e: Exception){
    e.printStackTrace()
}- Delete the
title = Fearlessitem
val ALBUM_TITLE_URI = Uri.parse("content://com.catherine.materialdesignapp.providers.AlbumsProvider/albums/Fearless")
try {
    contentResolver.delete(ALBUM_TITLE_URI, null, null)
} catch (e: Exception){
    e.printStackTrace()
}- Delete Taylor Swift's Reputation album
try {
    contentResolver.delete(ALBUM_URI, "artist = ? AND title = ?", arrayOf("Taylor Swift", "Reputation"))
} catch (e: Exception) {
    e.printStackTrace()
}Tasks on a background thread using AsyncTask (for short or interruptable tasks) or AsyncTaskLoader (for tasks that are high-priority, or tasks that need to report back to the user or UI).
- Help get work on/off the UI thread.
- Basically, all AsyncTasks are created in a same thread. That means them will execute in a serial fashion from a single message queue.
- run on UI thread:
onPreExecute,onProgressUpdateandonPostExecute - update progress to UI via
publishProgress, handle data inonProgressUpdate WeakReference- There is a way to force AsyncTask works in thread-pooled way:
executeOnExecutor
Code: BackgroundActivity, SleepTask
Don't hold references to any type of UI specific objects in any
threading scenarios.
Don't declare your task as an inner class of an activity.
Looper class keeps the thread alive, holds a message queue and pop works off a queue and execute on.
Handler class helps put work at the head, the tail or even set a time-based delay.
When you want the data to be available even if the device configuration changes, use loaders
This getLoaderManager() or getSupportLoaderManager() is deprecated since Android P. Instead, we use ViewModels and LiveData
- Call
getLoaderManager()orgetSupportLoaderManager()depends on whether you useSupport Library initLoaderis supposed to be called inonCreate()- Call
restartLoaderis equivalent toinitLoader, butinitLoaderonly works at the first time. onLoadFinishedis run on background thread, this may cause memory leak if updating UI here - use at your own risk.
Code: BackgroundActivity, SleepTaskLoader
- Dedicate thread for API callbacks.
- HandlerThread is a nifty solution for the work that not deal with UI updates.
- Don't forget to assign the priority because CPU can only execute a few parallel threads.
- Run a lot of parallel small works.
- There are a couple of ThreadPools: FixedThreadPool, CachedThreadPool and ScheduledThreadPool.
-
FixedThreadPool
- A thread pool with fixed number of threads.
- Instead of building a fixed thread pool with random number of threads, you should check how many processors your device have to avoid out of memory or high latency. E.g.
val coreCount = Runtime.getRuntime().availableProcessors() // in my case, it's six..
-
CachedThreadPool
- A thread pool that creates new threads as needed, but will reuse previously constructed threads when they are available.
- Notice, CachedThreadPool may cause out of memory or high latency.
-
ScheduledThreadPool
- A thread pool that can schedule commands to run after a given delay, or to execute periodically.
- It's ideal for background tasks. It also helps get intents off UI thread.
- It's the easiest way to update UI by running on AsyncTask, and HandlerThread is also a excellent solution for the work that not deal with UI updates.
Three style of notifications:
- Standard notification
- Notification with actions (one or two buttons)
- Replying notification
Long click app icons on Android O+ devices, notification badge will pop up.
Classify notifications by channels in the Settings app on Android O+ devices.
Code: [NotificationActivity]read more
- Set ContentDescription
- Make the views focusable
- Define your own style in styles.xml, notice your style must extend whatever styles contain ".DayNight" keyword.
<style name="AppTheme.NoActionBar" parent="Theme.MaterialComponents.DayNight.NoActionBar">
    <item name="windowActionBar">false</item>
    <item name="windowNoTitle">true</item>
    <item name="colorPrimary">@color/colorPrimary</item>
    <item name="colorPrimaryDark">@color/colorPrimaryDark</item>
    <item name="colorAccent">@color/colorAccent</item>
</style>
or
<style name="AppTheme" parent="AppTheme.DayNight">
    <item name="colorPrimary">@color/colorPrimary</item>
    <item name="colorPrimaryDark">@color/colorPrimaryDark</item>
    <item name="colorAccent">@color/colorAccent</item>
</style>
In Manifest, update the theme
android:theme="@style/AppTheme.NoActionBar"- Initialise night mode programmatically if you want
public class MainActivity {
    @Override
    protected void onCreate(Bundle savedInstanceState) {
        initNightMode();
        super.onCreate(savedInstanceState);
        setContentView(R.layout.activity_main);
    }

    // We set the theme, immediately in the Activity’s onCreate()
    private void initNightMode() {
        Storage storage = new Storage(this);
        int nightMode = storage.retrieveInt(Storage.NIGHT_MODE);
        if (nightMode == AppCompatDelegate.MODE_NIGHT_YES) {
            AppCompatDelegate.setDefaultNightMode(AppCompatDelegate.MODE_NIGHT_YES);
        } else {
            AppCompatDelegate.setDefaultNightMode(AppCompatDelegate.MODE_NIGHT_NO);
        }
    }
}- Switch day/night mode programmatically if you want
SharedPreferences sharedPreferences = getSharedPreferences("main", Context.MODE_PRIVATE);
button.setOnClickListener(
    v -> {
        int nightMode = AppCompatDelegate.getDefaultNightMode();
        if (nightMode == AppCompatDelegate.MODE_NIGHT_YES) {
            AppCompatDelegate.setDefaultNightMode(AppCompatDelegate.MODE_NIGHT_NO);
            button.setTitle(getString(R.string.action_night_mode));
            sharedPreferences.edit().putInt("night_mode", AppCompatDelegate.MODE_NIGHT_NO).apply();
        } else {
            AppCompatDelegate.setDefaultNightMode(AppCompatDelegate.MODE_NIGHT_YES);
            item.setTitle(getString(R.string.action_day_mode));
            sharedPreferences.edit().putInt("night_mode", AppCompatDelegate.MODE_NIGHT_YES).apply();
        }
        // Recreate the activity for the theme change to take effect.
        recreate();
    }
);- Notice, in step 4, the
recreate()will recreate the Activity only, which means, other activities won't update simultaneously. They are still Day Mode. To update the whole app to Night Mode, there are two points:- Create your own Night Mode resources if needed. E.g.
layout-night - Manage options menu by your base activity
- Create your own Night Mode resources if needed. E.g.
Code: [BaseActivity]read more
To inherit styles from Android support library by using parent
<style name="GreenText" parent="TextAppearance.AppCompat">
    <item name="android:textColor">#00FF00</item>
</style>
And to inherit user-defined styles, you could use a dot notation
<style name="GreenText.Large">
    <item name="android:textSize">22dp</item>
</style>
Code: styles
A robust SQLite object mapping library.
WorkManager providers APIs for deferrable, one-off and recurring background tasks that need guaranteed execution
ViewModel is constructed when app configuration changes such as screen rotation
LiveData is an observable data holder for the data is meant to be shown on screens.
Paging library integrates directly with endless data
Navigation library simplifies implementation of complex but common navigation requirements.
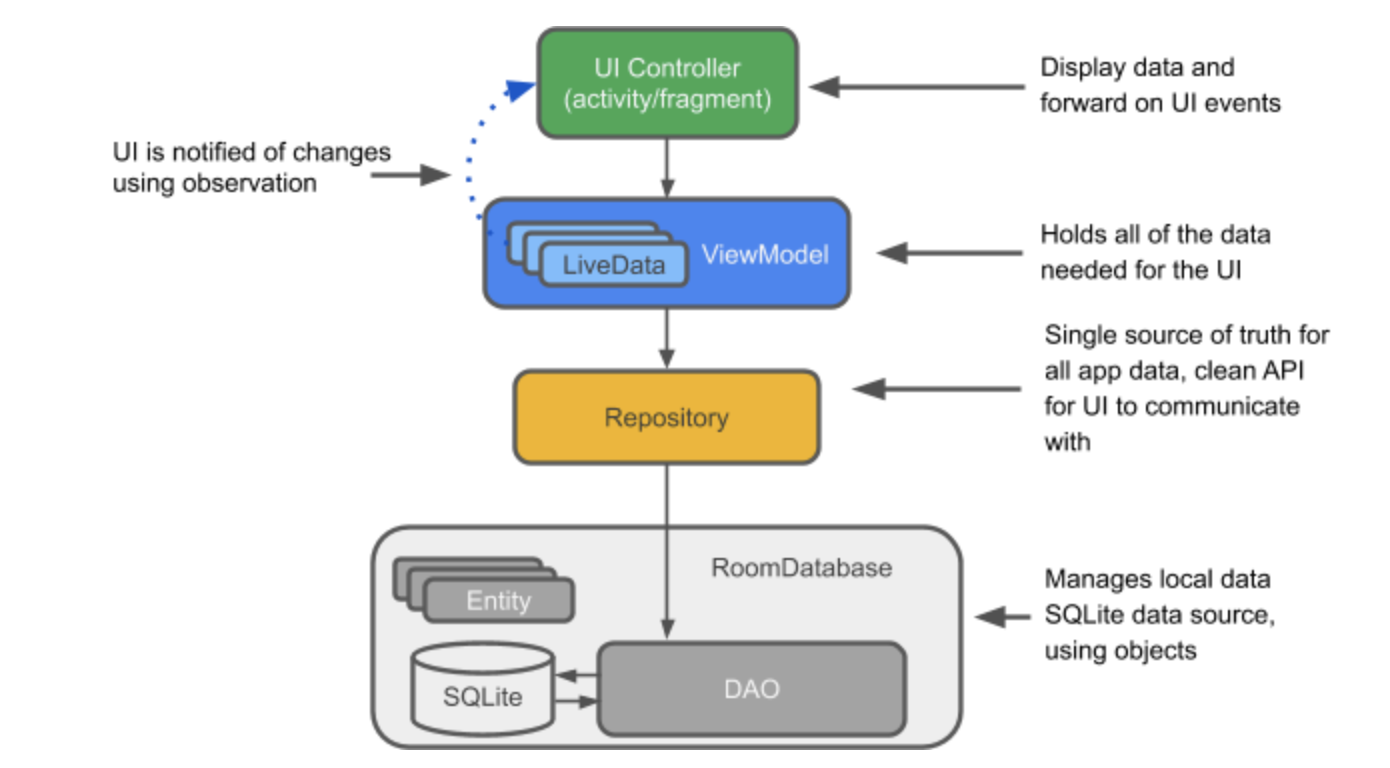
Go to google tutorial to see how Room + ViewModel + LiveData works.
Code(Room + ViewModel + LiveData): PlaylistFragment, AlbumsFragment, ArtistsFragment and jetpack
- To activate AndroidX, add two flags in gradle.properties
android.useAndroidX=true
android.enableJetifier=true
-
Remove android support libraries
com.android.support...andandroid.arch..., all the changes must be implemented to both classes and layouts. -
Update test options in build.gradle
android {
  defaultConfig {
          testInstrumentationRunner "androidx.test.runner.AndroidJUnitRunner"
      }
  testOptions {
          execution 'ANDROIDX_TEST_ORCHESTRATOR'
      }
}

dependencies {
    androidTestImplementation 'androidx.test:runner:1.1.1'
    androidTestUtil 'androidx.test:orchestrator:1.1.1'
}Follow the instruction and create your first MVVM app
- Annotated with
@Database - Extend
RoomDatabase - Annotated with entities associated with the database. E.g.
@Database(entities = {xxx.class}, version = 1, exportSchema = false) - Include an abstract method without any arguments and return
Dao. E.gpublic abstract MyDao myDao();
@Database(entities = {School.class}, version = SchoolDatabase.SCHOOL_DB_VERSION, exportSchema = false)
@TypeConverters({Converters.class})
public abstract class SchoolDatabase extends RoomDatabase {
    public final static int SCHOOL_DB_VERSION = 1;
    public final static String SCHOOL_DB = "school_database";

    public abstract StudentDao studentDao();
    private static volatile SchoolDatabase sInstance = null;

    @NonNull
    public static synchronized SchoolDatabase getInstance(final Context context) {
        if (sInstance == null) {
            synchronized (SchoolDatabase.class) {
                if (sInstance == null) {
                    // persist data in local storage
                    sInstance = Room.databaseBuilder(context.getApplicationContext(),
                            SchoolDatabase.class, SCHOOL_DB)
                            // Wipes and rebuilds instead of migrating
                            // if no Migration object.
                            // Migration is not part of this practical.
                            .fallbackToDestructiveMigration()
                            .build();

                    // Notice, if you do not want to persist data in local storage, still, you can implement this jetpack architecture. By using inMemoryDatabaseBuilder, data stored in an in memory database disappear when the process is stopped.
                    sInstance = Room.inMemoryDatabaseBuilder(),
                         SchoolDatabase.class).build();
                }
            }
        }
        return sInstance;
    }
}
You need a Converters class to covert json array data to List and vice versa.
class Converters {
    @TypeConverter
    public String listToJson(List<Student> value) {
        return Gson().toJson(value);
    }

    @TypeConverter
    public List<Album> jsonToList(String value) {
        Album[] objects = Gson().fromJson(value, Album[].class);
        return objects.toList();
    }
}Tables within the database.
// Database naming schema
public final class DataStudentName {
    public static final String TABLE_NAME = "student";
    public static final String COL_STUDENT_ID = "student_id";
    public static final String COL_NAME = "name";
    public static final String COL_CLASS = "class";
}@Entity(tableName = DataStudentName.TABLE_NAME)
public class Student implements Comparable<Student> {
@NonNull
@PrimaryKey
@ColumnInfo(name = DataStudentName.COL_STUDENT_ID)
private String mStudentId;
@ColumnInfo(name = DataStudentName.COL_NAME)
private String mName;
@ColumnInfo(name = DataStudentName.COL_CLASS)
private String mClass;
public Student(@NonNull String mStudentId, String mName, String mClass) {
this.mStudentId = mStudentId;
this.mName = mName;
this.mClass = mClass;
}
@NonNull
public String getStudentId() {
return mStudentId;
}
public String getName() {
return mName;
}
public String getClass() {
return mClass;
}
@Override
public String toString() {
return "Student{" +
"mStudentId='" + mStudentId + '\'' +
", mName='" + mName + '\'' +
", mClass='" + mClass + '\'' +
'}';
}
@Override
public int compareTo(@NonNull Student o) {
return this.mStudentId.compareTo(o.mStudentId);
}
}Data Access Object, which includes a bunch of SQL commands to help user access data.
@Dao
public interface StudentDao {

    @Query("SELECT * FROM student ORDER BY name ASC")
    LiveData<List<Student>> getAll();

    @Query("SELECT * FROM student ORDER BY name ASC")
    DataSource.Factory<Integer, Student> getStudentDataSource();

    @Query("SELECT * FROM student ORDER BY name ASC")
    List<Student> getRawList();

    @Insert(onConflict = OnConflictStrategy.REPLACE)
    void insertAll(List<Student> students);

    @Insert(onConflict = OnConflictStrategy.REPLACE)
    void insert(Student student);

    @Transaction
    void updateAll(List<Student> students) {
        deleteAll();
        insertAll(students);
    }

    @Transaction
    void update(Student oldStudent, Student newStudent) {
        insert(newStudent);
        deleteByRawQuery(oldStudent.getStudentId());
    }

    @RawQuery
    int updateByRawQuery(SupportSQLiteQuery query);

    @Query("DELETE FROM student WHERE student_id = :student_id")
    int deleteByRawQuery(String student_id);

    @Query("DELETE FROM student")
    void deleteAll();
}Handle data sources and makes sure to execute on the correct thread.
public class DataRepository {
    private final static String TAG = DataRepository.class.getSimpleName();
    private final StudentDao mDao;
    private final ExecutorService mIoExecutor;
    private static volatile DataRepository sInstance = null;

    public static DataRepository getInstance(Application application) {
        if (sInstance == null) {
            synchronized (DataRepository.class) {
                if (sInstance == null) {
                    StudentDatabase database = StudentDatabase.getInstance(application);
                    sInstance = new DataRepository(database.studentDao(),
                            Executors.newSingleThreadExecutor());

                    // load default data source from raw directory or do a network request
                    // After retrieving data, do not forget to call insert() or insertAll() to update data
                }
            }
        }
        return sInstance;
    }

    public DataRepository(StudentDao dao, ExecutorService executor) {
        mIoExecutor = executor;
        mDao = dao;
    }

    public void insert(Student student) {
        mIoExecutor.submit(() -> mDao.insert(student));
    }


    public void insertAll(List<Student> students) {
        mIoExecutor.submit(() -> mDao.insertAll(students));
    }

    // ...
    // more operations, it depends on what data you are going to show on the UI Controller.
}- Store and manage data for UI
- Extend
ViewModel
// ViewModel for AddStudentActivity
public class AddStudentViewModel extends ViewModel {

    private DataRepository mRepository;

    public AddStudentViewModel(DataRepository repository) {
        mRepository = repository;
    }

    public void save(Student student) {
        mRepository.insert(student);
    }

    public void save(String name, String classStr) {
        Student student = new Student(
            System.currentTimeMillis() + "",
            name,
            classStr
        );
        save(student);
    }
}- Factory for creating a AddStudentViewModel.
- Implement
ViewModelProvider.Factory
public class AddStudentViewModelFactory implements ViewModelProvider.Factory {
    private final DataRepository mRepository;

    public static AddStudentViewModelFactory createFactory(Activity activity) {
        Application application = activity.getApplication();
        if (application == null) {
            throw new IllegalStateException("Not yet attached to Application");
        }
        return new AddStudentViewModelFactory(DataRepository.getInstance(application));
    }

    private AddStudentViewModelFactory(DataRepository repository) {
        mRepository = repository;
    }

    @NonNull
    @Override
    public <T extends ViewModel> T create(@NonNull Class<T> modelClass) {
        try {
            return modelClass.getConstructor(DataRepository.class).newInstance(mRepository);
        } catch (InstantiationException | IllegalAccessException |
                NoSuchMethodException | InvocationTargetException e) {
            throw new RuntimeException("Cannot create an instance of " + modelClass, e);
        }
    }
}- Initialise ViewModel via ViewModelFactory
- Manipulate data via ViewModel
public class MainActivity extends AppCompatActivity {
    private final static String TAG = MainActivity.class.getSimpleName();
    private AddStudentViewModel mViewModel;
    private EditText mName, mClass;

    @Override
    protected void onCreate(Bundle savedInstanceState) {
        super.onCreate(savedInstanceState);
        AddStudentViewModelFactory viewModelFactory = AddStudentViewModelFactory.createFactory(this);
        mViewModel = ViewModelProviders.of(this, viewModelFactory)
                .get(AddStudentViewModel.class);

        setContentView(R.layout.activity_main);

        mName = findViewById(R.id.et_name);
        mClass = findViewById(R.id.et_class);

        Button mSave = findViewById(R.id.bt_save);
        mSave.setOnClickListener(this::saveOnClick);
    }

    public void saveOnClick(View view) {
        String name = TextUtils.isEmpty(mName.getText()) ? "" : mName.getText().toString();
        String classStr = TextUtils.isEmpty(mClass.getText()) ? "" : mClass.getText().toString();

        if (name.length() == 0 || classStr.length() == 0) {
            Log.e(TAG, "Missing input");
            return;
        }
        mViewModel.save(name, classStr);
        finish();
    }
}dependencies {
def android_test_version = "1.0.2"
def espresso_version = "3.0.1"
androidTestImplementation "com.android.support.test:runner:$android_test_version"
androidTestImplementation "com.android.support.test:rules:$android_test_version"
androidTestImplementation "com.android.support.test.espresso:espresso-core:$espresso_version"
androidTestImplementation "com.android.support.test.espresso:espresso-contrib:$espresso_version"
}@RunWith(AndroidJUnit4.class)
public class AddEntityReadWriteTest {
private StudentDao studentDao;
private StudentDatabase database;
@Before
public void createDb() {
Context context = InstrumentationRegistry.getInstrumentation().getTargetContext();
database = Room.inMemoryDatabaseBuilder(context, StudentDatabase.class).build();
studentDao = database.studentDao();
}
@After
public void closeDb() {
database.close();
}
@Test
public void writeStudentAndReadList() {
Student student = new Student(
System.currentTimeMillis() + "",
"Tom",
"A1"
);
studentDao.insert(student);
List<Student> students = studentDao.getRawList();
Assert.assertEquals(student.compareTo(students.get(0)), 0);
}
@Test
public void updateStudentAndReadList() {
// insert a student
Student student = new Student(
System.currentTimeMillis() + "",
"Thomas",
"A001"
);
studentDao.insert(student);
List<Student> students = studentDao.getRawList();
Assert.assertEquals(student.compareTo(students.get(0)), 0);
// update the student
String studentId = student.getStudentId();
String newClass = "C002";
String mSelection = String.format("UPDATE %1$s SET %2$s = '%3$s' WHERE %4$s = '%5$s'",
DataStudentName.TABLE_NAME,
DataStudentName.COL_CLASS,
newClass,
DataStudentName.COL_STUDENT_ID,
studentId
);
SimpleSQLiteQuery simpleSQLiteQuery = new SimpleSQLiteQuery(mSelection, null);
studentDao.updateByRawQuery(simpleSQLiteQuery);
students = studentDao.getRawList();
Assert.assertEquals(newName, students.get(0).getName());
}
}Code: AlbumsFragment, AlbumAdapter, AlbumViewModelFactory, AlbumViewModel, AlbumRepository, AlbumRoomDatabase, AlbumDao, Album
Doc: https://developer.android.com/training/data-storage/room
Practice: https://codelabs.developers.google.com/codelabs/android-room-with-a-view/index.html?index=..%2F..index#0
- Set the debuggable variable (Some 3rd party dependencies might use this variable as well)
android {
    buildTypes {
        debug {
            debuggable true
        }
        release {
            debuggable false
        }
    }
}-
Add breakpoints if needed (Click the Debug button instead of the Run button)
step over: go to next line of codestep into: go into the function
-
Add watchpoints for C/C++ code
First thing first, install LLDB or LLDB navigator won't appear on Android Studio.
Then debug C/C++ code as if debugging Java/Kotlin.
To create modules in apps and publish which as individual APKs, you need Android Bundle
Min SDK version: Android 5.0+ (API level 21)
Dynamic delivery: An android bundle, which contains features that you suppose the user won't use at install, is basically a bunch of code and resources. Users download bundles on demand.
APKs you will publish:
Base APKis where contains basic functionality and must-have resources at first download and install.Configuration APKsare modules for specific screen density, CPU architecture or language. Google Play automatically generates configuration APKs for you.- (Optional)
Dynamic feature APKsprovide modularize features as the user requests
- Install Android Studio Canary 14
- In AndroidManifest.xml
<application
    android:extractNativeLibs="false"
/>- In build.gradle
android {
    bundle {
        language {
            enableSplit = true
        }
        density {
            enableSplit = true
        }
        abi {
            enableSplit = true
        }
    }

        dependencies {
        // dynamic delivery
        implementation "com.google.android.play:core:${rootProject.ext.playcore}"
        // bundle's dependencies
        api "com.android.support:customtabs:${rootProject.ext.material}"
        api "com.google.android.gms:play-services-maps:${rootProject.ext.googleMap}"
    }

    // dynamic delivery
    dynamicFeatures = [":bbc_news", ":tour_guide", ":assets", ":open_weather"]
}- Create new Dynamic Feature Module (Edit -> New Module -> Dynamic Feature Module) and Fill in bbc_news as module name
- Create NewsPageActivity in bbc_news module
public class NewsPageActivity extends AppCompatActivity {
    private final static String TAG = NewsPageActivity.class.getSimpleName();
    private final static String BBC_NEWS_URL = "https://www.bbc.com/news";
    private final static int CUSTOM_TABS_REQUEST_CODE = 100;

    @Override
    protected void onCreate(Bundle savedInstanceState) {
        super.onCreate(savedInstanceState);
        setContentView(R.layout.activity_news_page);

        CustomTabsIntent customTabsIntent = new CustomTabsIntent.Builder()
                .setToolbarColor(getResources().getColor(R.color.colorPrimary))
                .build();
        customTabsIntent.intent.setData(Uri.parse(BBC_NEWS_URL));
        startActivityForResult(customTabsIntent.intent, CUSTOM_TABS_REQUEST_CODE);
    }

    @Override
    protected void onActivityResult(int requestCode, int resultCode, Intent data) {
        super.onActivityResult(requestCode, resultCode, data);
        if (requestCode == CUSTOM_TABS_REQUEST_CODE) {
            finish();
        }
    }
}- Update AndroidManifest.xml in bbc_news module
<manifest xmlns:android="http://schemas.android.com/apk/res/android"
    xmlns:dist="http://schemas.android.com/apk/distribution"
    package="com.catherine.materialdesignapp.bbc_news">

    <dist:module
        dist:instant="false"
        dist:title="@string/title_bbc_news">
        <dist:delivery>
            <dist:on-demand />
        </dist:delivery>
        <dist:fusing dist:include="true" />
    </dist:module>

    <application>
        <activity android:name=".NewsPageActivity">
            <intent-filter>
                <action android:name="android.intent.action.VIEW" />
            </intent-filter>
        </activity>
    </application>
</manifest>
- Install and launch this bbc_news module See DynamicDeliveryActivity, bbc_news module
Code: DynamicDeliveryActivity, bbc_news module, tour_guide module, assets module, [open_weather module]google sample code
Read More
- bundletool (Generate signed Android bundles)
Before you publish your Android bundles and APK to Google Play, you needbundletool, a command line tool, to test those bundles locally.
Download bundletool and move to AAD-Preparation/
- In Android Studio, go to Build -> Generate Signed Bundle/APK... -> generate a .aab file
- Generate a set of APKs
java -jar ../bundletool-all-0.9.0.jar build-apks --bundle=app/debug/app-debug.aab --output=app/debug/MaterialDesign.apks- Deploy APKs to a connected device
java -jar ../bundletool-all-0.9.0.jar install-apks --apks=app/debug/MaterialDesign.apks- Unzip and see all APKs if you like
mkdir app/debug/apks
unzip app/debug/MaterialDesign.apks -d app/debug/apks
Sign APKs: apksigner
Sign .jar files, .aar files or Android bundles: jarsigner
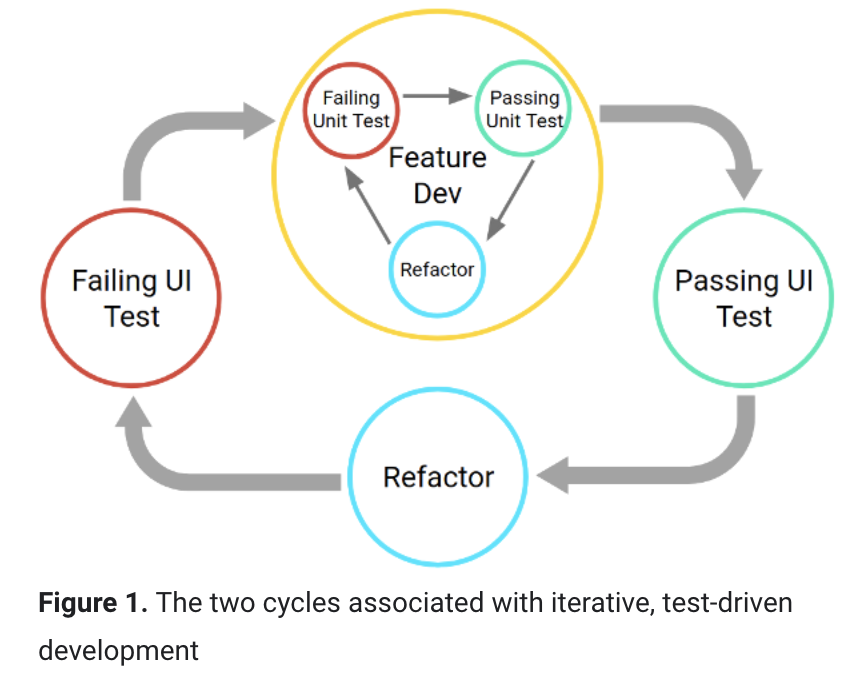
- Tests give you rapid feedback on failures, which are spotted earlier on development cycle are far easier to fix than once that have gone live.
- You are able to maintain a stable velocity throughout the lifetime of your project.
- Avoid the boom bust cycle of crunch feature time and the aggregation of technical debt.
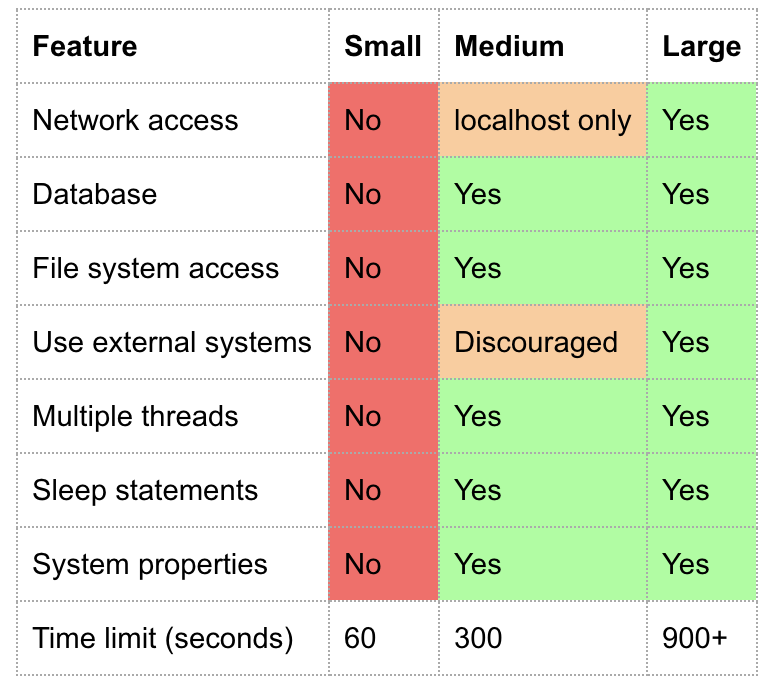
- (small tests) Unit test
- Validate the functionality and contracts of each class within your app
- Run on your own local machine
- fast and focus
- 70%
- (medium tests) Integration test
- Interaction between a view and view model and run on particular screens, DAOs and multi-fragment tests
- Run on real devices or emulators
- 20%
- (large tests) End-to-end test
- validate end-to-end workflows that guide users through multiple modules and features
- Run on real devices or emulators
- 10%
- Through: Test failure conditions, invalid inputs and boundary conditions.
- Repeatable: Return the same results every time.
- Focused: Focus one specific aspect of the code.
- Verifies behaviour: Avoid writting too many assumption in the actual implementation of your code.
- Fast
- Concise
You could run your unit tests on any of them:
- Real devices
- Emulator
- Simulator. E.g. Roboletric
Robolectric supports testing on JVM-powered development machines
Espresso
AndroidJUnit4
Google sample
Google testing blog
Google doc
E.g. https://openweathermap.org/api
- Show SSL certificates
openssl s_client -connect openweathermap.org:443 -showcerts- Create a .pem file and paste string from
-----BEGIN CERTIFICATE-----to-----END CERTIFICATE-----
echo -n | openssl s_client -connect openweathermap.org:443 | \ sed -ne '/-BEGIN CERTIFICATE-/,/-END CERTIFICATE-/p' > openweathermap.crtConvert .pem file to .crt
openssl x509 -outform der -in openweathermap.pem -out openweathermap.crt-
Check pem online
https://www.sslshopper.com/certificate-decoder.html -
Pin SSL online https://www.ssllabs.com/ssltest/index.html
-
Debug certificates
openssl s_client -debug -connect w openweathermap.org:443search Verify return code
- Pin certificates
openssl s_client -servername openweathermap.org -connect openweathermap.org:443 | openssl x509 -pubkey -noout | openssl pkey -pubin -outform der | openssl dgst -sha256 -binary | openssl enc -base64The exam is only available in Java at this time (4/1/2019)
Read more
- Basic Types
- Bitwise operators
- == vs ===
- Numbers
- Characters
- Strings
- Array
- Control Flow
whenifwhile
- Returns and Jumps
breakxxx@ fororxxx@ whilereturn
- Classes and Inheritance
- Class with multiple constructors
- Inheritance
interfaceoverrideinner classsuper@xxx.f()abstract class
- Properties and Fields
- getter and setter
lateinit::
- Visibility Modifiers
openpublicinternalprotectedprivate
- BaseClass, BaseClassExtensions
- Extension functions
- Extension properties
- Companion objects (which is similar to
static) - Call extension functions of the base class declared other class
- Call functions both declared in the base class and self class inside extension functions (check BaseClassExtensions)
- Data Class
- Sealed Class, Enum Classes
- enum vs sealed class
- [Generics]
- Declaration-site variance
- Type projections
- Nested and Inner Classes
- Nested Class
- Inner Class
- Anonymous Inner Class [NOT YET]
- Enum classes
- Basic usage of enum classes
- Another way to initialise the enum
- Enum constants can also declare their own anonymous classes
- Print all values of enum class
- Objects
- Object expressions - class
- Object expressions - class + interface
- Anonymous objects
- Object declarations (Singleton)
- Companion objects
- Type aliases
- Shorten types declaration
- Inline classes
- An inline class must have a single property initialised in the primary constructor
- Inline classes cannot have properties with backing fields, ie, your code would be:
val length: Int
  get() = s.length
- Representation: Inline classes could be as inline, generic, interface or nullable
- Inline classes vs type aliases
- Enable inline classes in Gradle:
compileKotlin {
    kotlinOptions.freeCompilerArgs += ["-XXLanguage:+InlineClasses"]
}
- Delegation
- Implementation by delegation
by
// The last "b" (from ": Base by b") is implemented by the "b" in "Derived(b: Base)"
class Derived(b: Base) : Base by b- Overriding functions and variables is optional
- Declare standard Delegates(
Lazy,Observableand storing properties in a Map) viaby - Implement properties including standard delegates once for all
- Local delegated properties
- Basic functions
- Functions with default arguments
- Override functions
- Lambda
- variable number of arguments (
vararg) - Unit-returning functions
infix fun
- Projections
- in-projections
- out-projections
- star-projections
- Higher-Order Functions is a function that takes functions as parameters, or returns a function.
- Compare callbacks in Java and Kotlin (SAM for Kotlin classes)
- Lambda functions
- Pass functions as arguments to another function (
this::func) - Passing a lambda to the last parameter
- Implement a function type as an interface (You can either override
invoke()or runinvoke()) invoke()::
- Inline Functions